Microsoft Access Data Import/Export
Introduction
Microsoft Access supports various scenarios of importing
and exporting data, to and from MS Access databases, to and from text files,
to and from spreadsheets, etc. Before importing, you should create a
database that will receive the records.
The primary way to import or export is through the External Data property page of the Ribbon. You can also right-click any object in the Navigation Pane, position the mouse on either Import or Export and click the desired option.
 Practical Learning: Introducing Data Import/Export
- Start Microsoft Access
- Click Blank Desktop Database
- Set the file name as FunDS2
- Click Create
- On the Ribbon, click File and click Options
- In the left list, click Current Database
- In the right list, click Overlapping Windows
- Click OK
- Read the message box and click OK
- On the default table, double-click ID to put into edit mode, press F2 and press Home, type SoldItem (to get SoldItemID) and press Enter
- In the Views section of the Ribbon, click View (or Design View)
- Set the name as SoldItems and click OK
- Complete the table with the following fields (change only the indicated
parts):
| Field Name |
Data Type |
Field Size |
Format |
Caption |
| SoldItemID |
|
|
|
Sold Item ID |
| ReceiptNumber |
Number |
|
|
Receipt # |
| ItemNumber |
Number |
|
|
Item # |
| Manufacturer |
|
40 |
|
|
| Category |
|
25 |
|
|
| SubCategory |
|
25 |
|
Sub-Category |
| ItemName |
|
100 |
|
Item Name |
| ItemSize |
|
20 |
|
Size |
| PurchasePrice |
Number |
Double |
Fixed |
Purchase Price |
- Close the table
- When asked whether you want to save, click Yes
- To create a new table, on the Ribbon, click Create and, in the Tables
section, click Table Design
- Type ReceiptNumber and press Tab
- Right-click ReceiptNumber and click Primary Key
- Create the fields as follows:
| Field Name |
Data Type |
Field Size |
Format |
Caption |
| ReceiptNumber |
Number |
Long Integer |
|
Receipt # |
| EmployeeNumber |
Number |
Long Integer |
|
Employee # |
| ShoppingDate |
Date/Time |
|
Long Date |
Shopping Date |
| ShoppingTime |
Date/Time |
|
Long Time |
Shopping Time |
| SalesTotal |
Number |
Double |
Fixed |
Sales Total |
| AmountTendered |
Number |
Double |
Fixed |
Amount Tendered |
- Close the table
- When asked whether you want to save, click Yes
- Set the name of the table as ShoppingSessions and click OK
- On the Ribbon, click File and click New
- Click Blank Desktop Database
- Set the file name as Computer Training Center
- Click Create
- On the Ribbon, click File and click Options
- In the left list, click Current Database
- In the right list, click Overlapping Windows
- Click OK
- Read the message box and click OK
Importing a Microsoft Access Database
The simplest type of data to import into a Microsoft Access database is another MS Access
database. To import a Microsoft Access database:
- If the Navigation Pane contains at least one table, right-click a table. Position the mouse on
Import, and click Access Database

- In the Import & Link section of the Ribbon, click the Access button

In the dialog box, if you know the path to the database including its name,
type it. If not, click the Browse button to select the source database. Once you have specified the database, click OK.
The Import Objects dialog box will display. The objects are organized by categories. Select the desired objects.
Besides the objects, you can import or ignore such aspects as the relationships and other Navigation Pane
options. To decide, click the Options button and select the desired options:
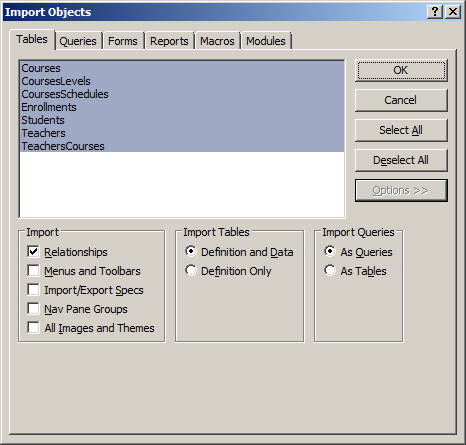
Once you are ready, click OK. If the objects in the database were valid (and they should be), you shouldn't have
any problem.
 Practical Learning: Importing a Microsoft Access Database
- On the Ribbon, click External Data
- In the Import & Link section of the Ribbon, click the Access button

- In the dialog box, click the Browse button
- From the resources that accompany these lessons, select CTC and click Open
- On the dialog box, click OK
- In the Tables property page, click Select All
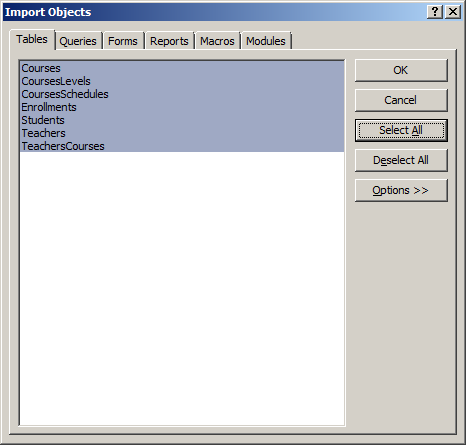
- Click the Forms tab and click Select All
- Click OK
- When the objects have been imported, on the dialog box, click Close
Exporting a Microsoft Access Database
There are various ways you can export the records of a
Microsoft Access database. One way is to formally export a table.
To export an object:
- In the Navigation Pane, right-click the table that contains the records,
position the mouse on export, and click Access
- In the Navigation Pane, click the table that contains the records to select it. In the Export section of the
Ribbon, click the Access button
In the first page of the wizard, if you know the path to the database including its name, type
it or click the Browse button to select the target database. Once you have specified the database, click OK. This
would display the Export dialog box. It allows you to specify the name of the object that will receive the records
or the object that would be created. You can also specify what would be exported: only the structure of the table or
both the structure and the records:

The above technique allows you to export one object, or one object at a time. If you want to
export the whole database, on the Ribbon, click File and click Save As:
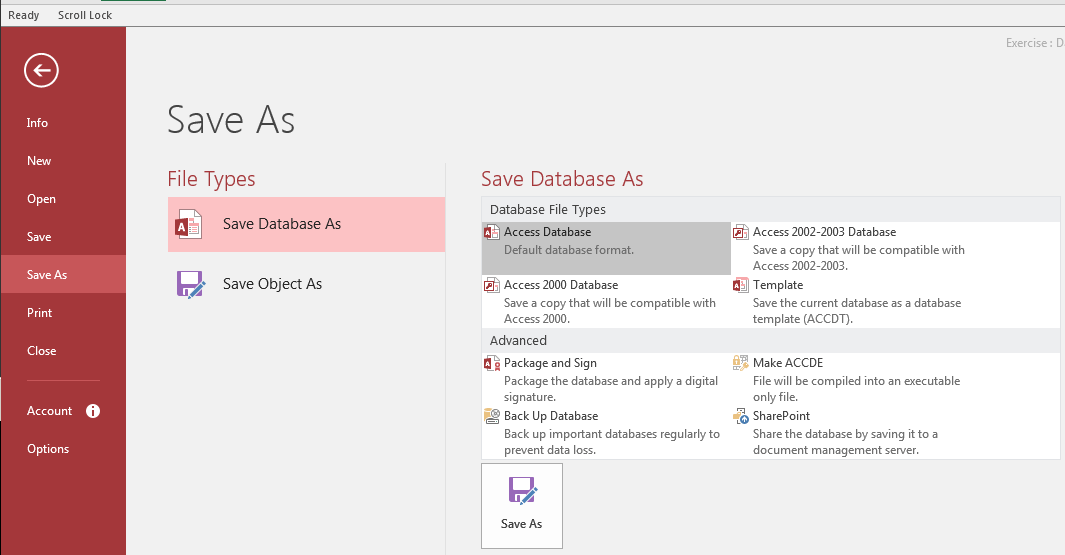
This window allows you to select the type of format the new
database should have. The window provides eight options you can use. To use an
option, either click it and click Save As or double-click it.
If you want to save the database in the current Access
2007-2016 format, select Access Database. This would open the Save As dialog
box. Specify the name and location of the new database, and click Save.
If you want to create a Microsoft Access 97-2000 database,
click Access 2000 Database. This would create a file with .mdb extension.
These are databases compatible with Microsoft Access 97 and Microsoft Office
Access 2000. There is nothing bad or wrong with those versions of databases and
they are still valuable today. They just don't support some features such expressions,
attachments, etc on a table:
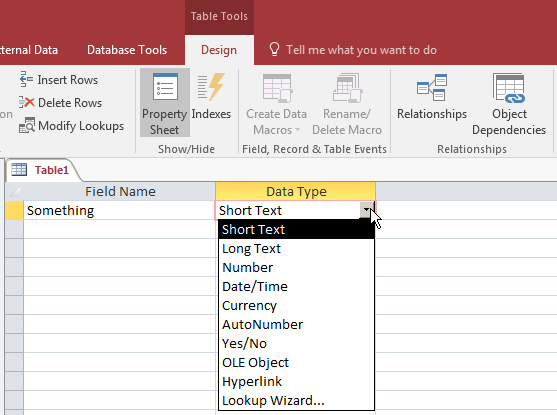
In the MDB database versions, expressions cannot be created
on tables but they can be created on other types of objects.
Microsoft Access and Spreadsheets
Importing a Worksheet
There are various ways you can import a spreadsheet into a Microsoft Access database. The
spreadsheet can come from any application, including Microsoft Excel, Google Sheets, CSV, etc.
If you are planning to import a Microsoft Excel worksheet or a Google Sheet, you should
first prepare it. One way is to make sure that the whole spreadsheet is organized as a single table. In this
case, the top side of the spreadsheet should contain the categories that can be used/considered as column
headers. No non-organized text (text that is not considered as belonging to the table) should display above the
headers. The values can then display under each header. Here is an example:
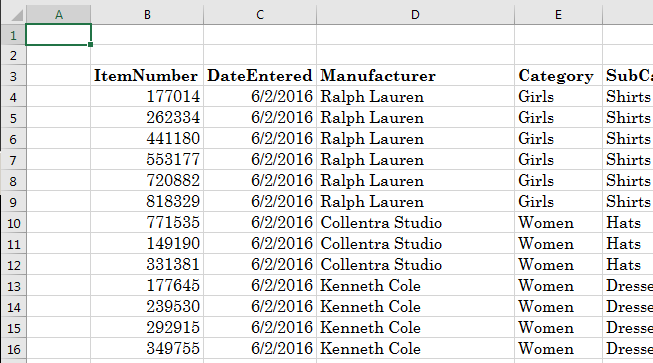
No non-organized text (text that is not considered as belonging to the table) should display
below the records).
Once the document is ready, to import it:
- If the Navigation Pane contains at least one table, right-click a table in the Navigation Pane, position the mouse on
Import, and click Excel
- In the Import & Link section of the Ribbon, click the Excel button

In the dialog box, specify the path and name of the spreadsheet and click OK. This would
start a wizard. In the first page, select the name of the spreadsheet that
contains the data.
 Practical Learning: Importing a Microsoft Excel Spreadsheet
- On the Ribbon, click File and click Open
- In the list of files, click FunDS2
- On the Ribbon, click External Data
- In the Import & Link section, click the Excel button

- Click the Browse button
- From the resources that accompany these lessons, select Fun Department Store
and click Open
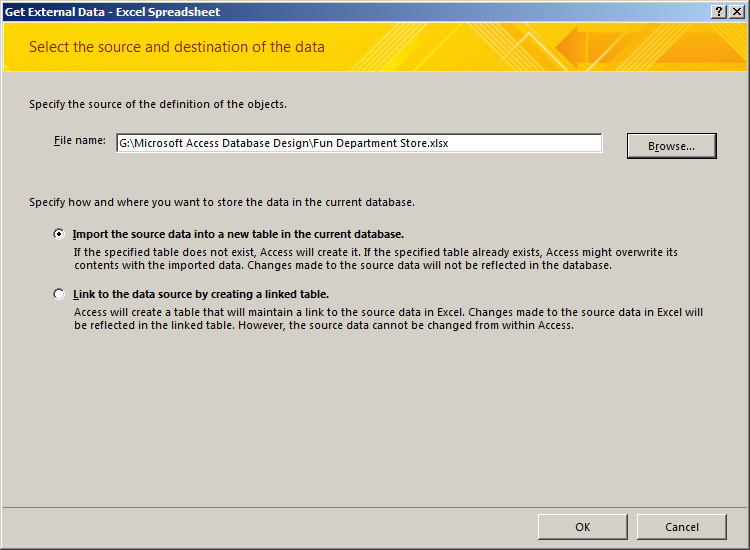
- Click OK
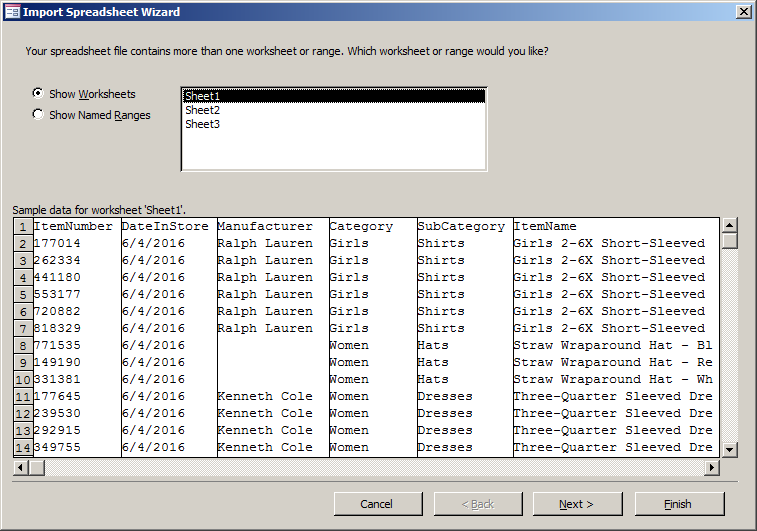
- In the first page of the wizard, make sure Sheet1 is selected and click
Next. A message box may display. Read it and click OK
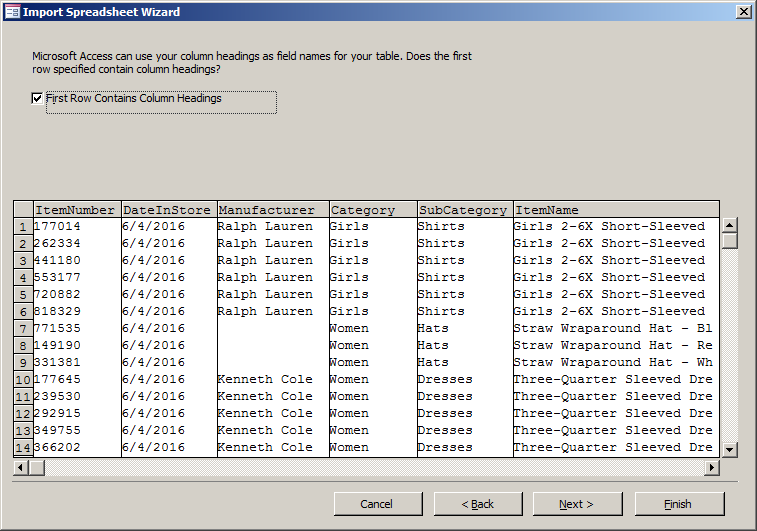
- In the second page of the wizard, make sure First Row Contains Column
Headings is checked and click Next
- In the third page of the wizard, as the ItemNumber column is selected,
click the arrow of the Data Type combo box and select Long Integer
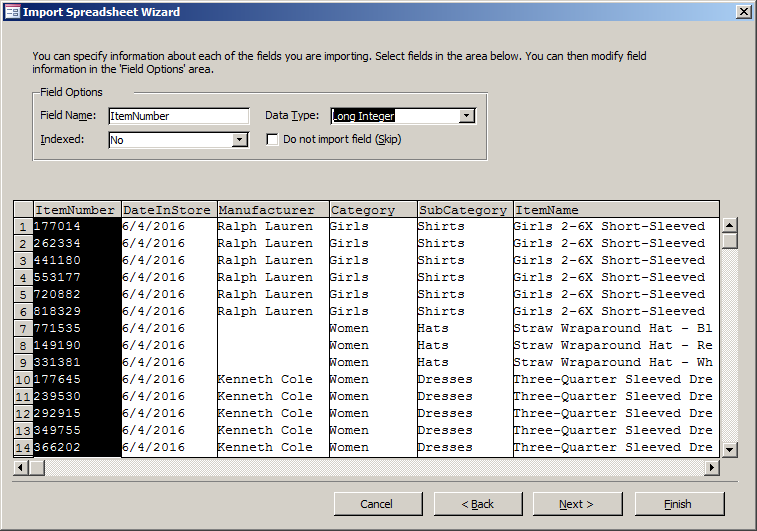
- Click DateInStore or any cell under it and make sure its Data Type is
Date With Time
- Click UnitPrice and make sure its Data Type is set to Double
- Click Next
- Click the arrow of the combo box and select ItemNumber
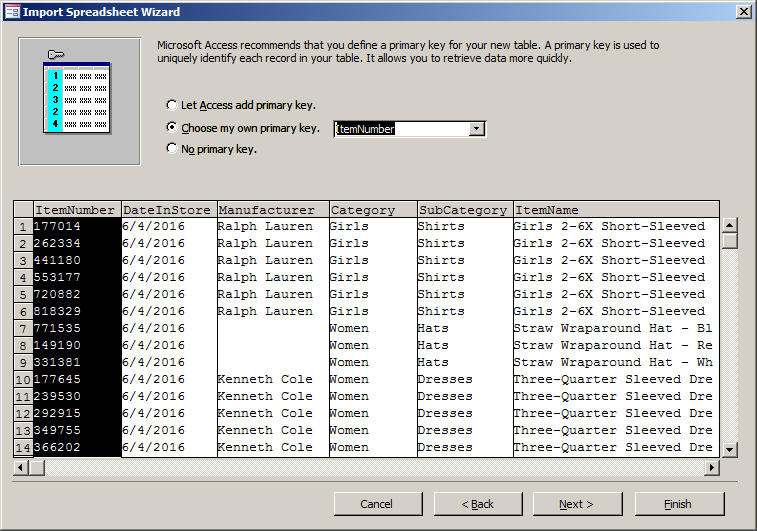
- Click Next
- Replace the Import to Table name to StoreItems
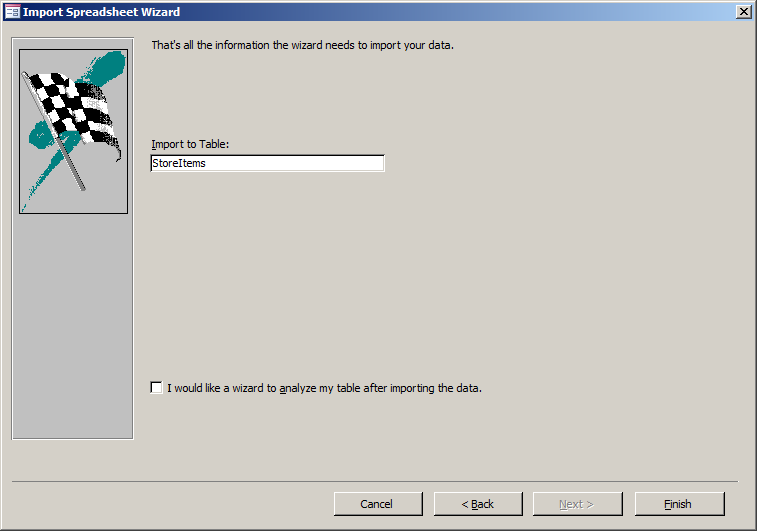
- Click Finish
- On the dialog box, click Close
- In the Navigation Pane, right-click the StoreItems table and click
Design View
- Change the following characteristics of the fields:
| Field Name |
Field Size |
Format |
Caption |
| ItemNumber |
|
|
Item # |
| DateInStore |
|
|
Date in Store |
| Manufacturer |
40 |
|
|
| Category |
25 |
|
|
| SubCategory |
25 |
|
Sub-Category |
| ItemName |
100 |
|
Item Name |
| ItemSize |
20 |
|
Size |
| UnitPrice |
Double |
Fixed |
Unit Price |
- Close the table
- When asked whether you want to save, click Yes
- You will also receive a message box indicating that some data may be lost. Read it
and click Yes
Importing a Named Spreadsheet
If the spreadsheet contains a mix of organized and non-organized sections or groups, you
should create names for the necessary groups of records.
 Practical Learning: Importing a Microsoft Excel Spreadsheet
- Start Microsoft Excel
- From the resources that accompany these lessons, open the Fun Department
Store workbook
- In the bottom side, click Sheet2
- Click Employee # and type EmpolyeeNumber
- Replace First Name with FirstName
- Replace First Name with LastName
- Select the cells from EmployeeNumber to the last Sales Associates
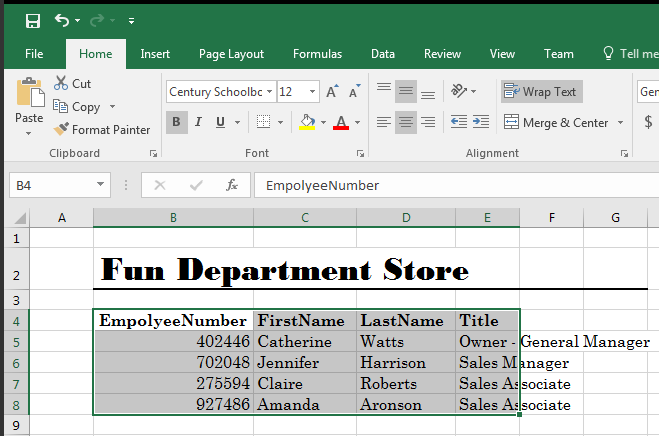
- On the Ribbon, click Formulas
- In the Defined Names section, click Define Name
- Replace the suggested Name with Employees
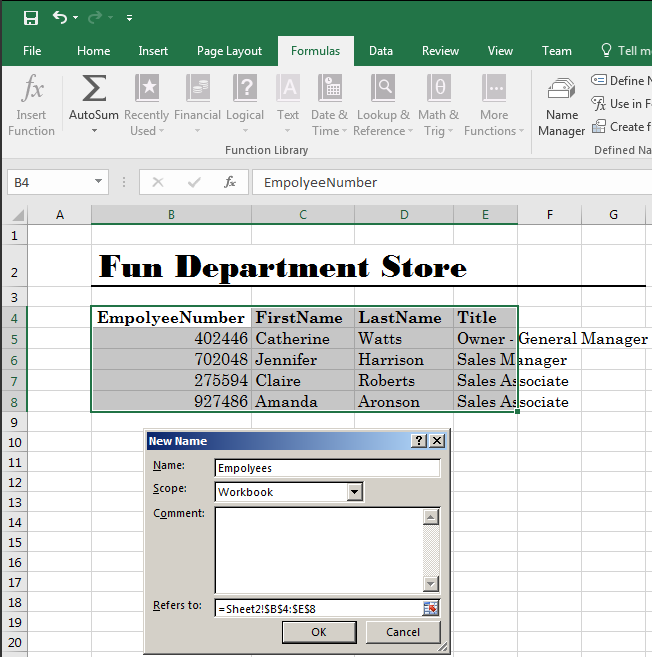
- Click OK
- Close Microsoft Excel
- When asked whether you want to save, click Save and return to Microsoft Access
- On the Ribbon, click External Data if necessary.
In the Import & Link section, click the Excel button

- Click the Browse button
- Select the Fun Department Store
spreadsheet you changed above and click Open
- On the Get External Data dialog box, click OK
- In the first page of the wizard, click the Show Named Ranges radio
button
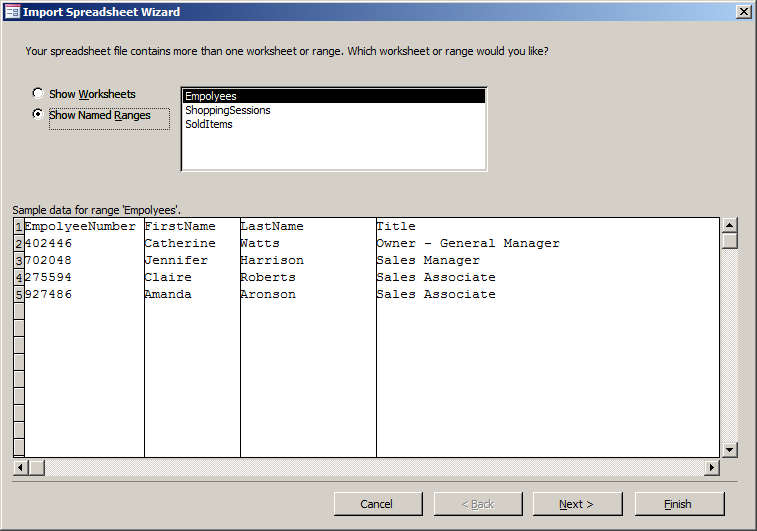
- Make sure Employees is selected and click Next
- On the second page of the wizard, click First Row Contains Column
Headings and click Next
- In the third page of the wizard, as the EmployeeNumber column is selected,
click the arrow of the Data Type combo box and select Long Integer
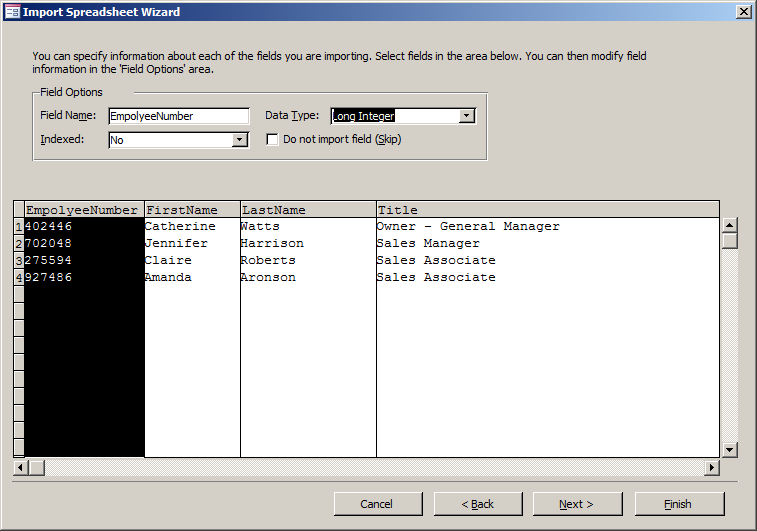
- Click Next
- Click the arrow of the combo box and select EmployeeNumber
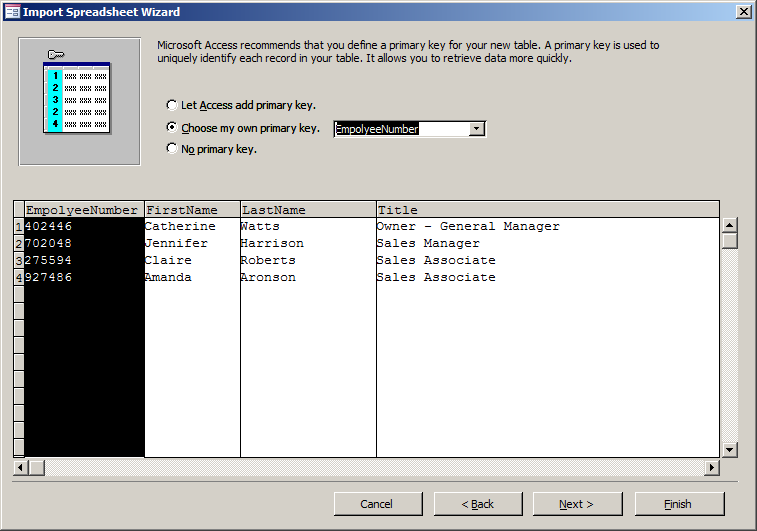
- Click Next
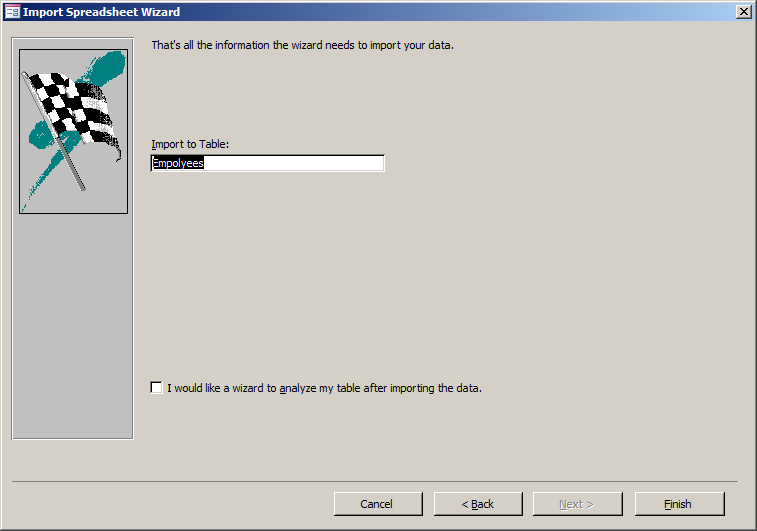
- Accept the name of the table as Employees and click Finish
- On the dialog box, click Close
- In the Navigation Pane, right-click the Employees table and click
Design View
- Change the following characteristics of the fields:
| Field Name |
Data Type |
Field Size |
Expression |
Caption |
| EmployeeNumber |
Number |
|
|
Employee # |
| FirstName |
|
20 |
|
First Name |
| LastName |
|
20 |
|
Last Name |
| EmployeeName |
|
|
[FirstName] & " " & [LastName] |
Employee Name |
| Title |
|
100 |
|
|
- Close the table
- When asked whether you want to save, click Yes
- You will also receive a message box that some data may be lost. Read it
and click Yes
Copying From a Spreadsheet
Instead of manually importing a spreadsheet, you can
select the values in a spreadsheet, copy them, and paste them in a table
in Microsoft Access.
 Practical
Learning: Copying From a Spreadsheet
- Start Microsoft Excel and, in the list of files, click Fun Department
Store
- Click Sheet3
- Click cell B5
- Press and hold Shift
- Click Cell G64
- Release Shift
- On the Ribbon of Microsoft Excel, click Home
- In the Clipboard section, click Copy
- In Microsoft Access, in the Navigation Pane, double-click the
ShoppingSessions table
- Right-click the button at the intersection of the column headers and the
row headers
- Click Paste
- Read the Microsoft Access message box and click Yes
- Return to Microsoft Excel in Sheet3
- Click cell I5
- Press and hold Shift
- Click cell P165
- Release Shift
- On the Ribbon, click Home and click Copy
- Return to Microsoft Access and double-click the SoldItems table in the
Navigation Pane
- On the table, click Receipt #
- Press and hold Shift
- Click Unit Price
- Release Shift
- Press Ctrl + V to paste
- Read the message box and click Yes
- Close both tables
- In the Navigation Pane, right-click any of the tables, position the mouse on Import, and click Access Database
- Click Browse
- Locate and select the FunDS1 database from the previous lessons
(otherwise, from the resources that accompany these lessons, select FunDS2) and click Open
- On the dialog box, click OK
- On the Import Objects dialog box, click Forms
- Click Select All
- Click OK
- When the forms have been imported, on the dialog box, click Close
Exporting to a Microsoft Excel Spreadsheet
to transfer data from Microsoft Access to a spreadsheet involves copying and pasting.
To start, in Microsoft Access, you can open a table in Datasheet View then select one, some, or all
records. After selecting the record(s), you can copy them, open Microsoft Excel, click the cell that
would host the top-left value, and paste.
Another technique consists of exporting, and you can do it
without first opening the table:
- Before exporting a table, in the Navigation Pane, click the table. Then, on the Ribbon, click
External Data. In the Export section, click the Excel button

- In the Navigation Pane, right-click the desired table, position the mouse
on Export, and click Excel
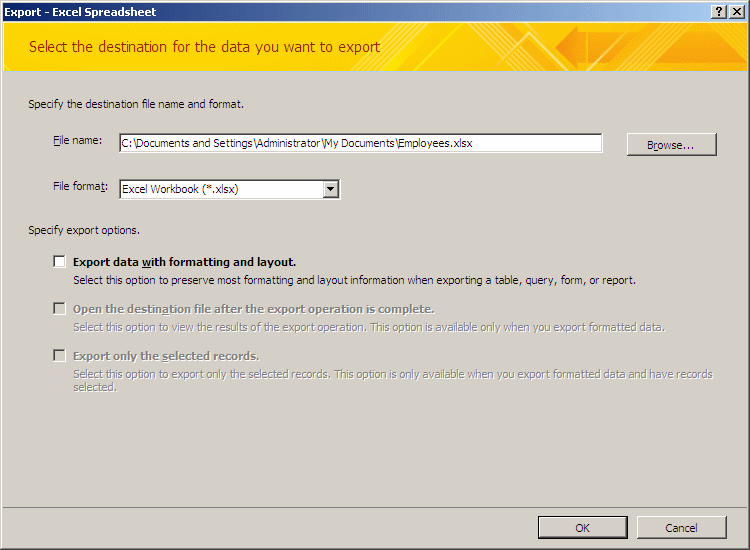
This would open the Export - Excel Spreadsheet dialog box with the path where
the file will be saved. The default folder is the My Documents:
 Practical Learning:
Exporting Data as a Spreadsheet
- On the Ribbon, click File and click Open
- In the list of files, click Computer Training Center
- In the Navigation Pane, right-click the CourseSchedules table, position the mouse on Export, and click Excel
- Click the Browse button and select the (My) Documents folder
- Click OK
- On the dialog box, click Close
Microsoft Access and Text Files
Importing a Text File
You can create a table using data from a text file.
If you are creating the (text) file in Notepad, the delimitation of a field is
usually done by pressing Tab after creating the fields' content. To import a text file in Microsoft Access:
- In the Import section of the Ribbon, click the Text File button
- If you had previously created a table that would receive the values, in
the Navigation Pane, right-click that table, position the mouse on Import,
and click Short Text File
 Practical Learning: Importing a Text Document
- To start a new database, on the Ribbon, click File and click New
- Click Blank Desktop Database
- Set the name to Monson University1
- Click Create
- On the Ribbon, click File and click Options
- In the left list, click Current Database
- In the right list, click Overlapping Windows
- Click OK
- On the Ribbon, click External Data and, in the Import & Link section,
click Text File

- In the Get External Data - Text File dialog box, click the Browse
button
- Locate the resources that accompany these lessons and select the
Departments.txt
file
- Click Open
- On the dialog box, click OK
- On the first page of the Import Text Wizard, accept that the text be Delimited and click Next
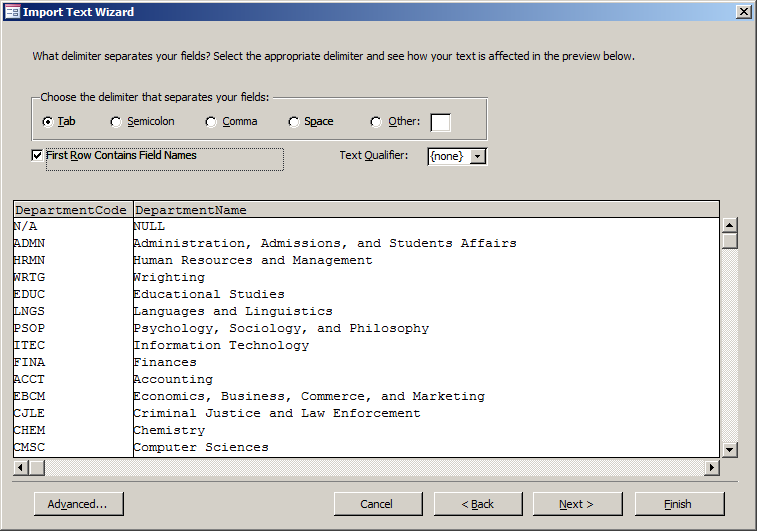
- In the second page, accept that the delimiter be set to Tab.
Click the First Row Contains Field Names check box
- Click Next
- In the third page of the wizard, click Next
- Click the arrow of the combo box and select DepartmentCode
- Click Next
- Accept the name of the table as Departments and click Finish
- When the records have been imported, click Close
- In the Navigation Pane, right-click the Departments table and click Design
View
- Change the following characteristics of the fields:
| Field Name |
Field Size |
| DepartmentCode |
5 |
| DepartmentName |
100 |
- Close the table
- When asked whether you want to save, click Yes
- You will also receive a message box that some data may be lost. Read it
and click Yes
- On the Ribbon, click External Data and, in the Import & Link section,
click Text File

- In the Get External Data - Text File dialog box, click the Browse
button
- From the resources that accompany these lessons, select the
Employees.txt
file, and click Open
- On the dialog box, click OK
- On the first page of the Import Text Wizard, accept that the text be Delimited and click Next
- In the second page, accept that the delimiter be set to Tab and click First Row Contains Field Names

- Click Next
- In the third page of the wizard, as EmployeeNumber is selected, click
the arrow of the Data Type combo box and select Short Text
- Click Next
- Click the arrow of the combo box and select EmployeeNumber
- Click Next
- Accept the name of the table as Employees and click Finish
- When the records have been imported, click Close
- In the Navigation Pane, right-click the Employees table and click Design
View
- Change the following characteristics of the fields:
| Field Name |
Field Size |
Caption |
| EmployeeNumber |
10 |
|
| FirstName |
25 |
First Name |
| MiddleName |
25 |
|
| LastName |
25 |
Last Name |
| DepartmentCode |
5 |
|
| Title |
100 |
|
- Close the table
- When asked whether you want to save, click Yes
- You will also receive a message box that some data may be lost. Read it
and click Yes
- On the Ribbon, click External Data and, in the Import & Link section,
click Text File

- In the Get External Data - Text File dialog box, click the Browse
button
- From the resources that accompany these lessons, select the
Majors.txt
file, and click Open
- On the dialog box, click OK
- On the first page of the Import Text Wizard, accept that the text be Delimited and click Next
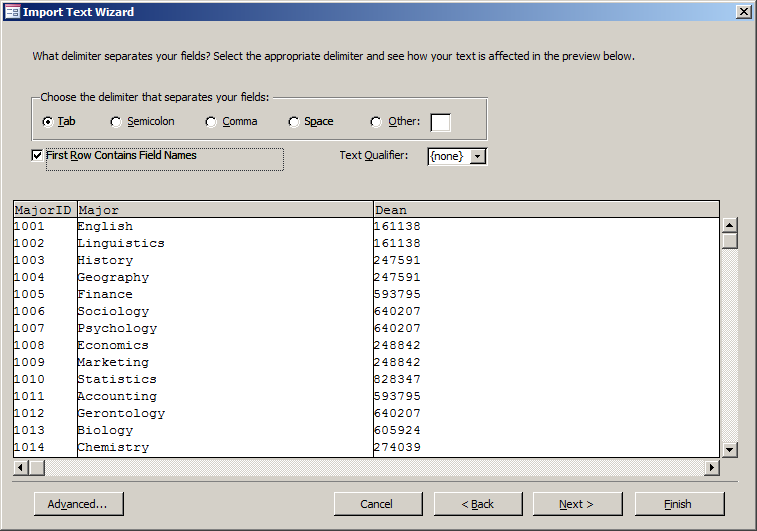
- In the second page, accept that the delimiter be set to Tab and click First Row Contains Field Names
- Click Next
- In the third page of the wizard, click Dean
- Click
the arrow of the Data Type combo box and select Short Text
- Click Next
- Click the arrow of the combo box and select MajorID
- Click Next
- Accept the name of the table as Majors and click Finish
- When the records have been imported, click Close
- In the Navigation Pane, right-click the Employees table and click Design
View
- Change the following characteristics of the fields:
| Field Name |
Field Size |
| MajorID |
|
| Major |
100 |
| Dean |
10 |
- Close the table
- When asked whether you want to save, click Yes
- You will also receive a message box that some data may be lost. Read it
and click Yes
- On the Ribbon, click External Data and, in the Import & Link section,
click Text File

- In the Get External Data - Text File dialog box, click the Browse
button
- From the resources that accompany these lessons, select the
Minors.txt
file, and click Open
- On the dialog box, click OK
- On the first page of the Import Text Wizard, accept that the text be Delimited and click Next
- In the second page, accept that the delimiter be set to Tab and click First Row Contains Field Names
- Click Next
- In the third page of the wizard, click Next
- Click the arrow of the combo box and select MinorID
- Click Next
- Accept the name of the table as Minors and click Finish
- When the records have been imported, click Close
- In the Navigation Pane, right-click the Employees table and click Design
View
- Change the following characteristics of the fields:
| Field Name |
Field Size |
| MinrID |
|
| Minor |
100 |
- Close the table
- When asked whether you want to save, click Yes
- You will also receive a message box that some data may be lost. Read it
and click Yes
- In the Navigation Pane, right-click Table1, position the mouse on Import,
and click Text File

- In the Get External Data - Text File dialog box, click the Browse
button
- Locate the resources that accompany these lessons and select the Students.txt
file
- Click Open
- On the dialog box, click OK
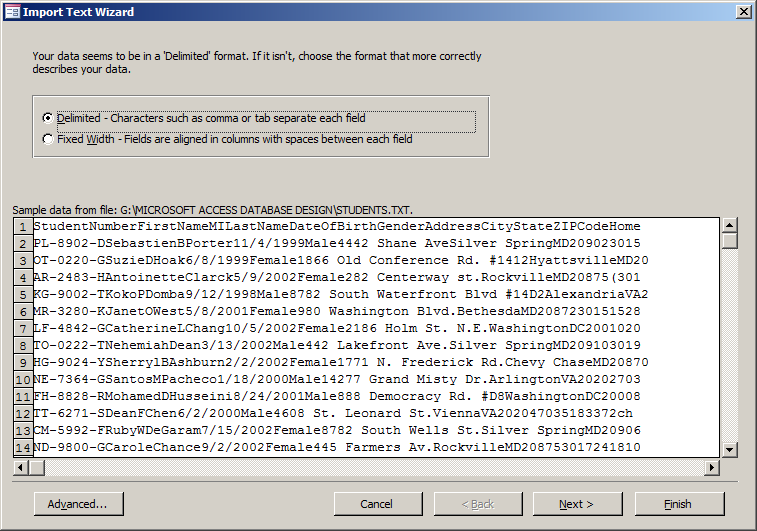
- On the first page of the Import Text Wizard, accept that the text be Delimited and click Next
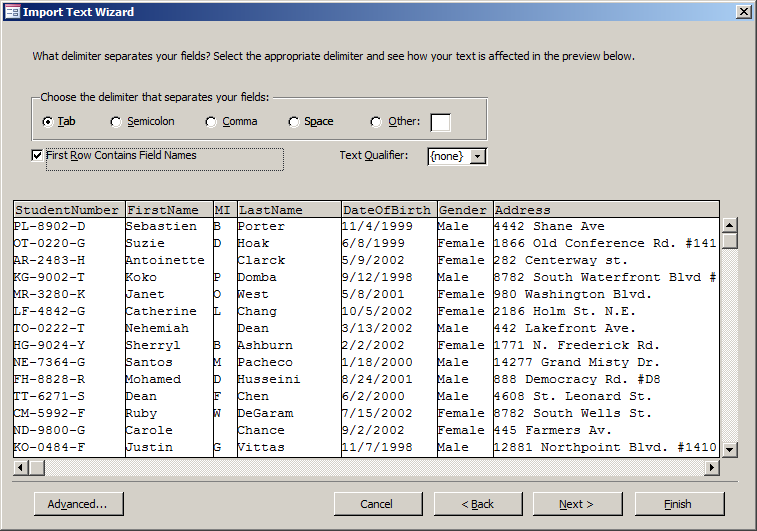
- In the second page, accept that the delimiter be set to Comma or Tab and click
Next
- In the second page of the wizard, click First Row Contains Field Names
- Click Next
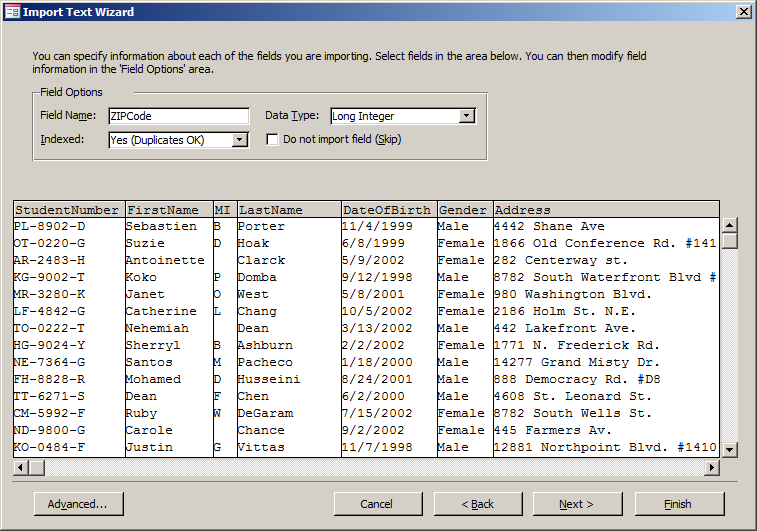
- As StudentNumber is selected, click the arrow of the Data Type combo box
and select Short Text
- Click Next
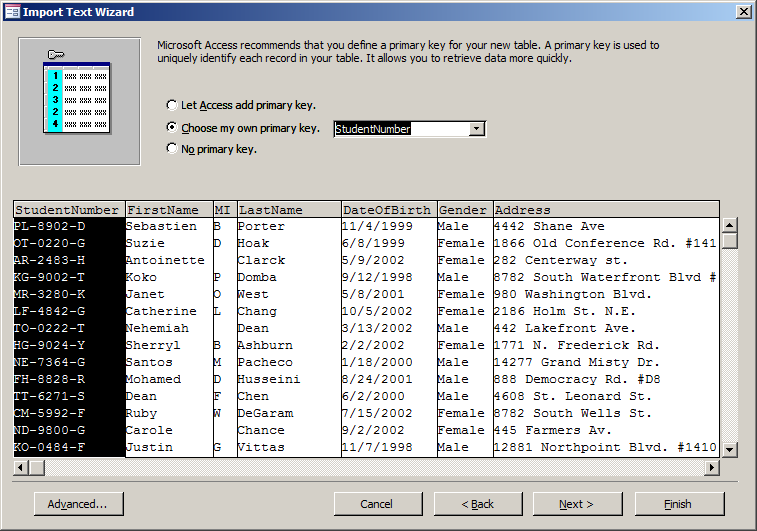
- Click the arrow of the combo box and select StudentNumber
- Click Next
- Accept the name of the table as Students and click Finish
- When the records have been imported, click Close
- In the Navigation Pane, right-click the Students table and click Design
View
- Change the following characteristics of the fields:
| Field Name |
Field Size |
Caption |
| StudentNumber |
12 |
Student # |
| FirstName |
25 |
First Name |
| MiddleName |
25 |
|
| LastName |
25 |
Last Name |
| DateOfBirth |
|
|
| Gender |
20 |
|
| Address |
120 |
|
| City |
40 |
|
| State |
50 |
|
| ZIPCode |
20 |
ZIP Code |
- Close the table
- When asked whether you want to save, click Yes
- You will also receive a message box that some data may be lost. Read it
and click Yes
Exporting a Text File
To save a table as text:
- In the Navigation Pane, click the table you want to export. In the Export
section of the Ribbon, click the Text File
button
- In the Navigation Pane, right-click the table that holds the data,
position the mouse on Export, and click Short Text File
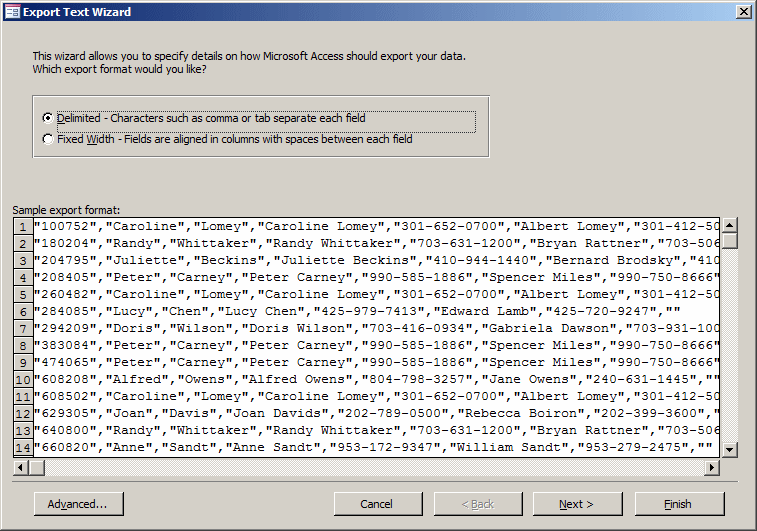
This would open the Export - Text File dialog box with the
name of the file using the .txt extension. Simply follow the wizard:
Microsoft Access and XML
Importing an XML File
An XML file is essentially a document made of at least one
table. A typical XML file starts with a root node:
<?xml version="1.0" standalone="yes"?>
Under it, the global parent node starts and closes itself:
<?xml version="1.0" standalone="yes"?>
<FunFurniture>
</FunFurniture>
This global parent node is not the table. Inside that node,
you should have a node that would represent a table and it can repeat itself as
many times as necessary. Here is an example:
<?xml version="1.0" standalone="yes"?>
<FunFurniture>
  <Employees>
  </Employees>
  <Employees>
  </Employees>
</FunFurniture>
Inside each table, you should have the name of each column followed by its value:
<?xml version="1.0" standalone="yes"?>
<FunFurniture>
  <Employees>
    <EmployeeNumber>924795</EmployeeNumber>
    <FirstName>Donald</FirstName>
    <LastName>Tripleton</LastName>
    <Title>Sales Manager</Title>
  </Employees>
  <Employees>
    <EmployeeNumber>274957</EmployeeNumber>
    <FirstName>Jeanne</FirstName>
    <LastName>Wooley</LastName>
    <Title>Sales Associate</Title>
  </Employees>
  <Employees>
    <EmployeeNumber>684078</EmployeeNumber>
    <FirstName>Irene</FirstName>
    <LastName>Polsen</LastName>
    <Title>Sales Associate</Title>
  </Employees>
  <Employees>
    <EmployeeNumber>297149</EmployeeNumber>
    <FirstName>Monica</FirstName>
    <LastName>Jackson</LastName>
    <Title>Sales Associate</Title>
  </Employees>
</FunFurniture>
After
creating and saving an XML file, to import it in Microsoft Access, in the External Data tab of the Ribbon and in the Import section, click
the XML File button  and follow the wizard.
 Practical Learning: Importing an
XML Document
- To start a new database, on the Ribbon, click File and click New
- Click Blank Desktop Database
- Set the name to StatesStatistics2
- Click Create
- Close the default table without saving it
- On the Ribbon, click External Data
- In the Import & Link section, click the XML File button

- In the Get External Data - XML File dialog box, click the Browse
button
- Locate the resources that accompany these lessons and select the StatesStatistics.xml
file
- Click Open
- On the Get External Data - XML File dialog box, click OK
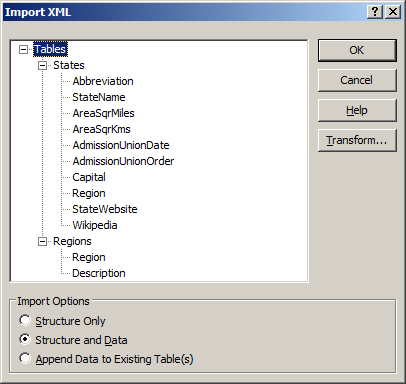
- In the Import XML dialog box, accept the selections and click OK
- In the Get External Data - XML File dialog box, click the Close
button
- In the Navigation Pane, right-click the Regions table and click Design
View
- In the top side of the window, make sure Region is selected.
In the bottom side, set the Field Size to
25
- Close the table
- When asked whether you want to save, click Yes
- You will also receive a message box that some data may be lost. Read it
and click Yes
- In the Navigation Pane, double-click the States table

- After viewing the records, right-click the States tab and click Design
View
- Change the following characteristics of the fields:
| Field Name |
Data Type |
Field Size |
Format |
Decimal Places |
Caption |
| Abbreviation |
|
2 |
|
|
State |
| StateName |
|
40 |
|
|
Name |
| AreaSqrMiles |
Number |
|
Standard |
0 |
Sqr Miles |
| AreaSqrKm |
Number |
|
Standard |
0 |
Sqr Kms |
| AdmissionUnionDate |
Date/Time |
|
|
|
Date of Admission to Union |
| AdmissionUnionOrder |
Number |
Byte |
|
|
Order of Admission to Union |
| Capital |
|
40 |
|
|
|
| Region |
|
25 |
|
|
|
| StateWebsite |
Hyperlink |
|
|
|
State's Website |
| Wikipedia |
Hyperlink |
|
|
|
|
- Close the table
- When asked whether you want to save, click Yes
- You will also receive a message box that some data may be lost. Read it
and click Yes
Exporting to XML
To export a table to XML format, in the Navigation Pane:
- Right-click the table that holds the data,
position the mouse on Export, and click XML File
- Click the table you want to export. On the Ribbon, click External Data and, in the Export section, click More -> XML
File
The Export - XML File dialog box that comes up allows you to
verify the name of the file that will be created and the path where it will go.
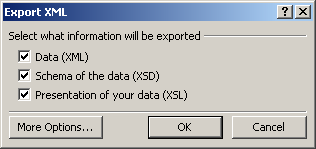
Once you are ready, you can click OK. A dialog box would come up asking which
one(s) of the three files you want to have created:
If you want to create a more elaborate XML application with
advanced options, you can click the More Options button. This would close the
previous dialog box and open another one:
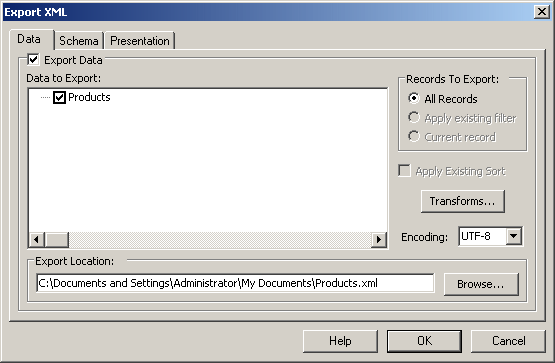
This dialog box allows you to specify more details on how
the table should be exported. After making your selections, click OK.
Microsoft Access and the Web
Importing an HTML File
To import an HTML file in Microsoft Access:
- In the Import section of the Ribbon, click the More button and click
HTML Document
- If the Navigation Pane contains at least one table, right-click a table,
position the mouse on Import, and click HTML Document
The primary steps to follow are the same for a text document. In the third
page of the wizard, to consider and/or apply more options, click the Advanced
button:
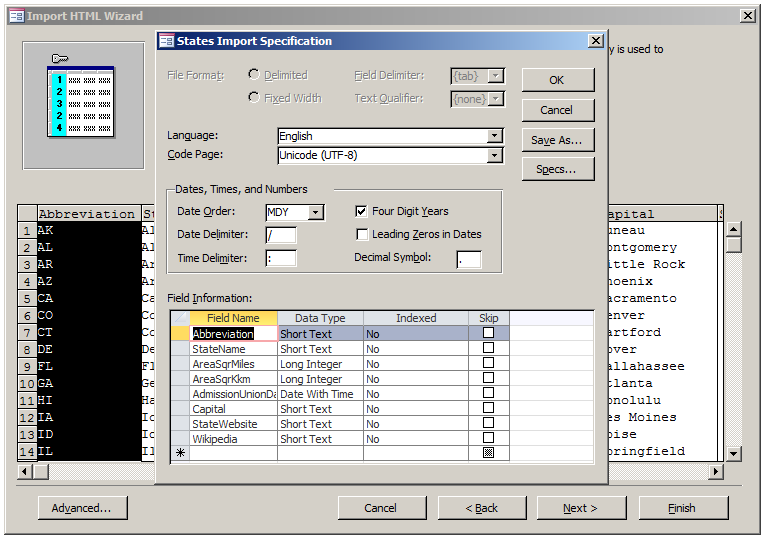
After making the necessary adjustments, click OK.
 Practical Learning: Importing a Text Document
- On the Ribbon, click File and click New
- Click Blank Desktop Database
- Set the name to States Statistics
- Click Create
- In the Navigation Pane, right-click Table1, position the mouse on Import, and click HTML Document
- In the Get External Data - HTML Document dialog box, click the Browse
button
- Locate the resources that accompany these lessons
- Select the states.htm document and click Open
- Click OK
- In the first page of the Import HTML Wizard, click First Row Contains
Column Headings
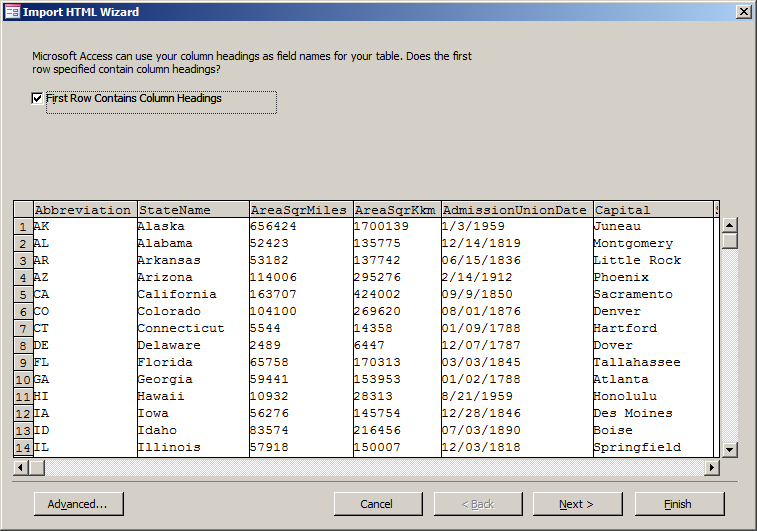
- Click Next
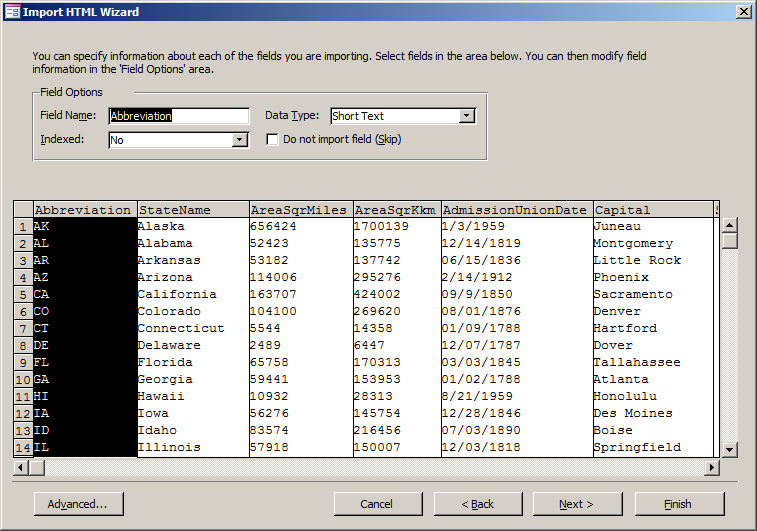
- Accept the defaults of the second page of the wizard and click
Next
- In the third page of the wizard, click the arrow of the combo box and
select Abbreviation
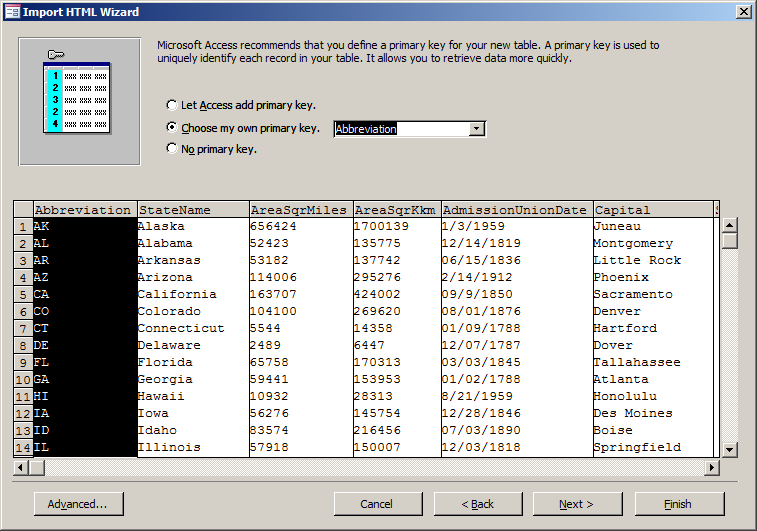
- Click Next
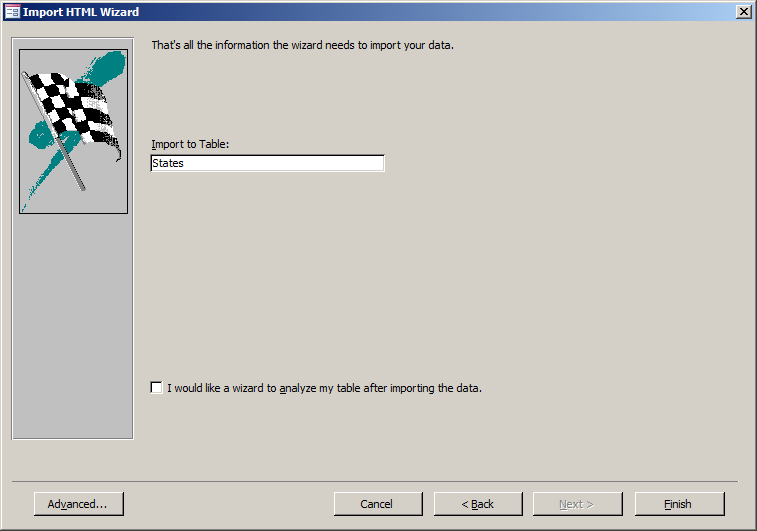
- Set the name of the table as States
- Click Finish
- You receive a confirmation message.
Click Close
- In the Navigation Pane, right-click the States table and click Design
View
- Change the following characteristics of the fields:
| Field Name |
Data Type |
Field Size |
Format |
Caption |
| Abbreviation |
|
5 |
|
Abbrv |
| StateName |
|
40 |
|
State Name |
| AreaSqrMiles |
Number |
Double |
Standard |
Area in Square Miles |
| AreaSqrKkm |
Number |
Double |
Standard |
Area in Square Kilometers |
| AdmissionUnionDate |
|
|
|
Date of Admission to Union |
| Capital |
|
40 |
|
|
| StateWebsite |
Hyperlink |
|
|
State's Website |
| Wikipedia |
Hyperlink |
|
|
|
- Close the table
- When asked whether you want to save, click Yes
- You will also receive a message box that some data may be lost. Read it
and click Yes
- Close Microsoft Access
A Microsoft Access Table on a Web Page
You can copy and paste Data from a webpage into a table. To do this:
- If you want to copy all columns and all records, in the Navigation Pane of
Microsoft Access, right-click the table and click Copy
- If you want to copy all columns and all records, open the table in
Microsoft Access, press Ctrl + A to select everything. Press Ctrl + C to
copy. In the web page of the application, click the section you want on the web page and
press Ctrl + V to paste
- If you want to copy only some columns and/or some records, open the table
in Microsoft Access. Make the selection. Right-click the selection and click
Copy. In the web application, right-click the section you want on the web
page and click Paste or click the section and press Ctrl + V
Some other applications do not support copy and paste. An
alternative is to export the table to HTML. To save a table as HTML, in the Navigation
Pane:
- Right-click the table that holds the data,
position the mouse on Export, and click HTML Document
- Click the table you want to export. On the Ribbon, click External Data and, in the Export section, click More ->
HTML Document
This would open the Export - HTML Document dialog box.
Microsoft Access and Microsoft Word
Introduction
There are various ways you can use Microsoft Word with a
Microsoft Access database. As opposed to copying from a database table and
pasting to a table, you may want the reverse. That is, you can copy a table from
a Microsoft Word document. To do this, in Microsoft Word, select the table in a
document and copy it. Start a table in Microsoft Access and paste the records.
Mail Merge
Mail merging allows you to use data on your database
to create letters, labels, envelopes, and other documents that require
external data originating from another document. To start a mail merge, in the Navigation Pane:
- Click the table that holds the information you
want to use. In the Export section of the Ribbon,
click Word Merge
- Right-click the table, position the mouse on
Export and click Word Merge
This would open the Microsoft Word Mail Merge Wizard:
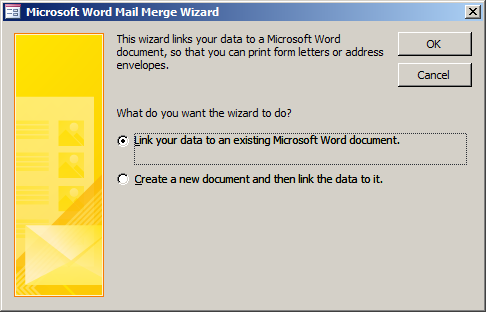
And click OK. This would open the Select Microsoft Word
Document dialog box. It allows you to select the letter/document you plan to
use. If you don't have that document, click Cancel, open Microsoft Word, create
the document and proceed from there. If you have a letter, select it. This would
open the letter in Microsoft Word. ail Merge
window, if you want to create a letter to be sent out, accept the Letters radio
button and click Next. In the second page of the wizard, you will have the
choice of creating a new Microsoft Word document or using an existing document.
If you want to create a new document, click or accept Use the Current Document.
If you click Start From Existing Document, you will be asked to specify the
document, in which case you should click Open, select the document, and click
Open:
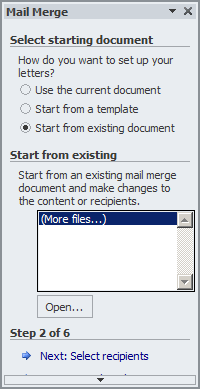
After this, the Mail Merge window would come back to
the Use Current Document option. Click Next: Select Recipients.
To insert other types of items, in the Mail Merge window,
you can click the Address Block link, the Insert Address Block dialog box would
come up. The Insert Address Block dialog box is made of various sections.
It allows you to specify a type of greeting and other pieces of information to
be inserted in the document. After making the selection(s), you can click OK.
After creating the document and adding the necessary fields to it, you can
preview and review it. To do this, in the Mail Merge window, click the Next:
Preview Your Letters link. When you do this, the letter appears with the value(s)
of the first record. To review the document with the other values, in the Mail
Merge window, you can click the previous  or the next
  buttons.
After reviewing the document, in the Mail Merge window, you
can click the Next: Complete The Merge link. You can then save, print, and
manage the document. In the same way, you can create labels or envelopes.
 Practical Learning:
Creating a Mail Merge
- Start Microsoft Word
- From the resources that accompany these lessons, open
Promotion.docx
- Press Ctrl + A to select everything
- Press Ctrl + C to copy
- Close Microsoft Word and return to Microsoft Access
- From the resources that accompany these lessons, open the Bethesda
Car Rental1 database
- In the Navigation Pane, in the Tables section, click Customers
- To start a mail merge, on the Ribbon, click External Data
- In the Export section,
click Word Merge
- Click the second radio button:
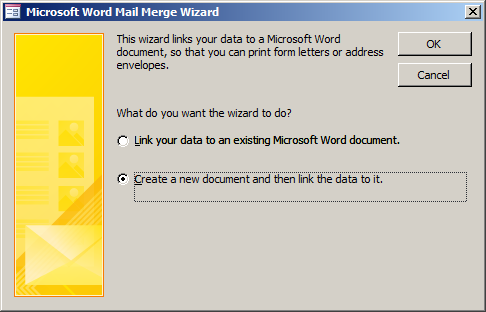
- Click OK.
Microsoft Word starts.
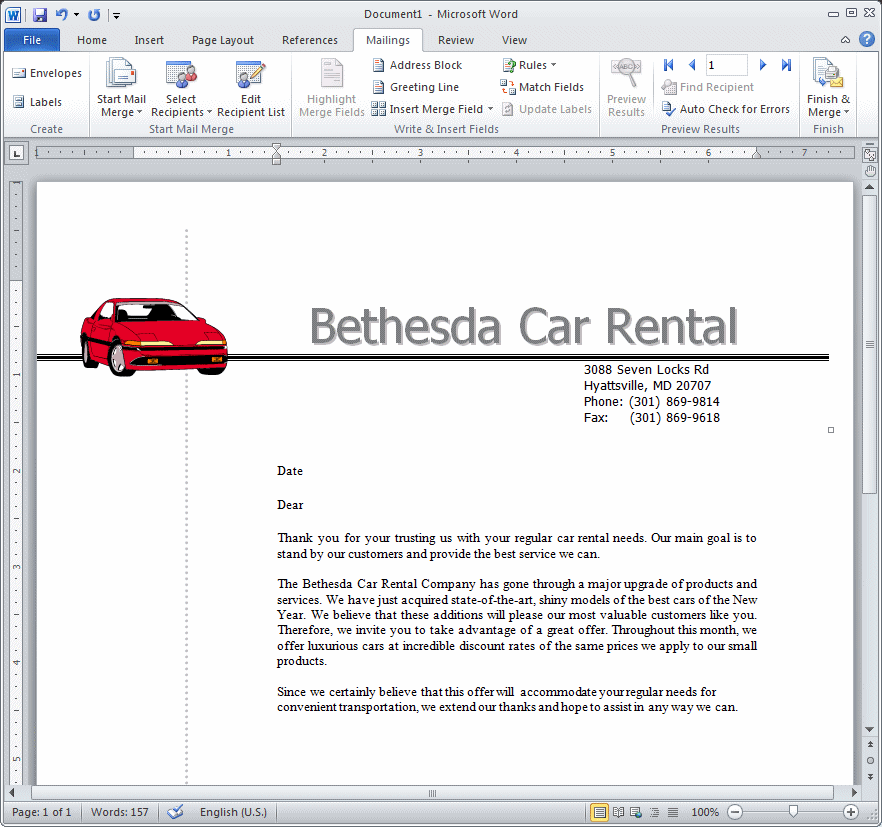
- In Microsoft Word, press Ctrl + V to paste the Promotion.docx document
(this would be the equivalent of creating or designing the document)
- In the Mail Merge
window, to create a letter to be sent out, accept the Letters radio
button
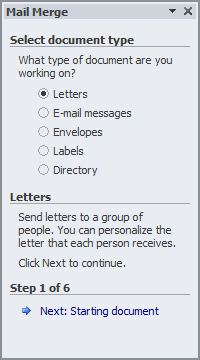
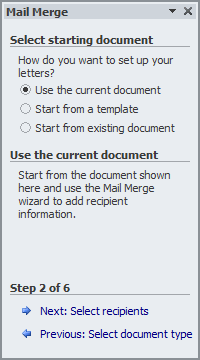
Click Next: Starting Document
- In the Select Starting Document section, make sure Use the Current
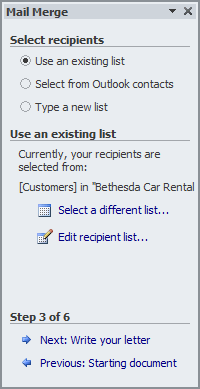
Document is selected Click Next: Select Recipients
- Click Next: Write Your Letter
- In the Microsoft Word document, double-click Date and press Delete
- On the Ribbon of Microsoft Word, click Insert
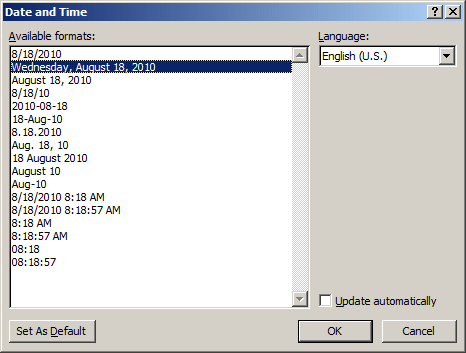
- In the Text section, click Date & Time
- In the Available Formats list box of the Date & Time dialog box,
click the second option (day, month, and year)
- Click OK
- Press Enter
- Click the right side of Dear
- In the Mail Merge window, click More Items
- In the Fields list, click FirstName
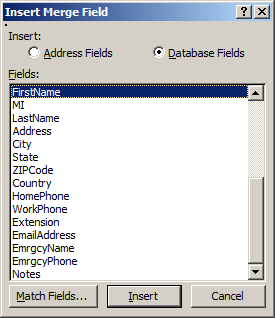
- Click Insert
- Click Close
- Press the Space bar
- In the Mail Merge window, click More Items...
- In the Fields name, double-click LastName
- Click Close
- In the Mail Merge window, click Next: Preview Your Letters
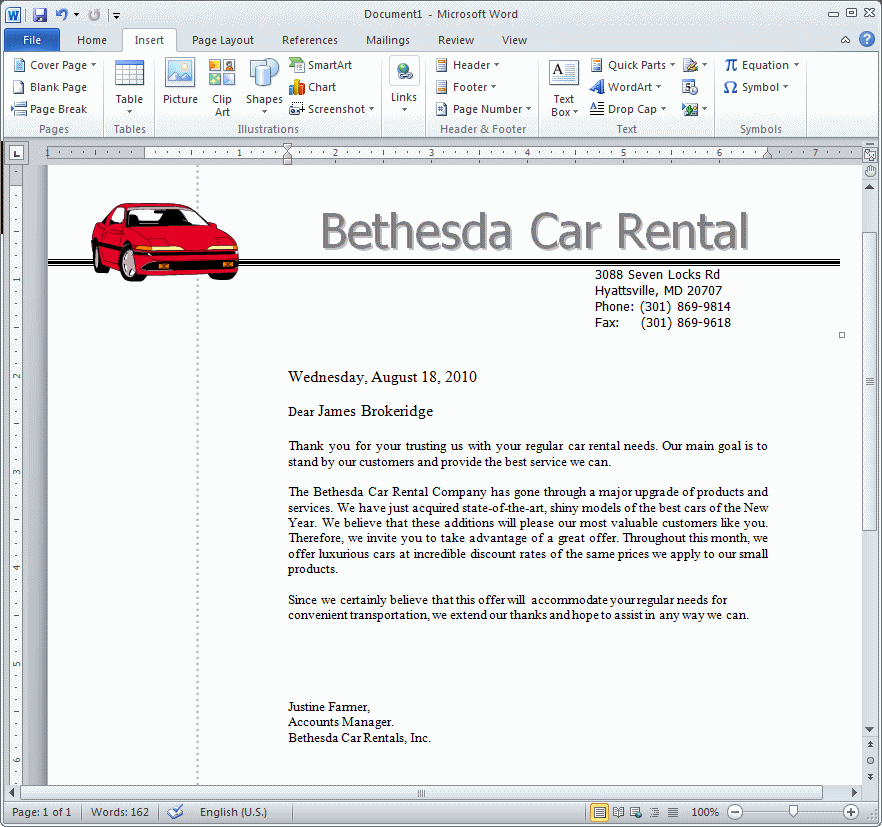
- In the Mail Merge window, click the next recipient button
 and observe the name in the document
- Click the next recipient button 4 times and observe the names in
the document
- Click the previous recipient button 2 times and observe the names
in the document
- In the Mail Merge window, click Next: Complete the Merge
- Close Microsoft Word
- When asked whether you want to save, click Save
- Set the file name as Bethesda Car Rental Promotional
Campaign1
- Click Save
- Close Microsoft Access
Sharing a Microsoft Access Database
Distributing the Database
Distributing a database consists of making it available to
more than one computer. Both Microsoft Windows and Microsoft Access provide various solutions,
One solution is to install Microsoft Access
on each computer that will use your database. This may be the most expensive solution but it is
the easiest. Most companies use that solution because it is easy
either to purchase many copies or get many licenses of Microsoft
Office Professional that includes Microsoft Access.
After creating a database, in the server or the computer
of your choice (normally, the database can be located on any computer that is a
member of your network) where you want the database to be located, create a
folder. Copy the database file into that folder
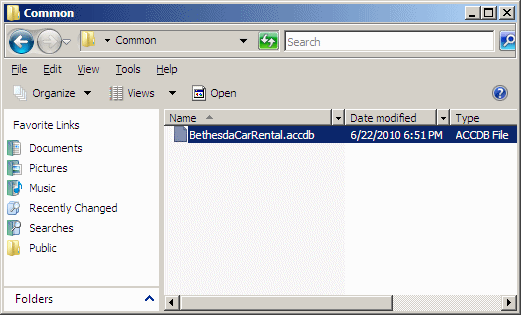
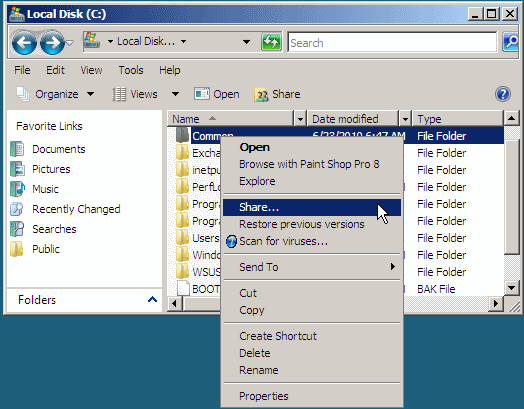
Access the drive that holds that folder. To share it,
right-click it and click Share:
Click the arrow of the combo box in the File Sharing window
and select Everyone:

After selecting Everyone, click Add. Click the down-pointing arrow on the right side of Everyone:
- If you are sharing from Microsoft Windows Server 2008,
select Contributor
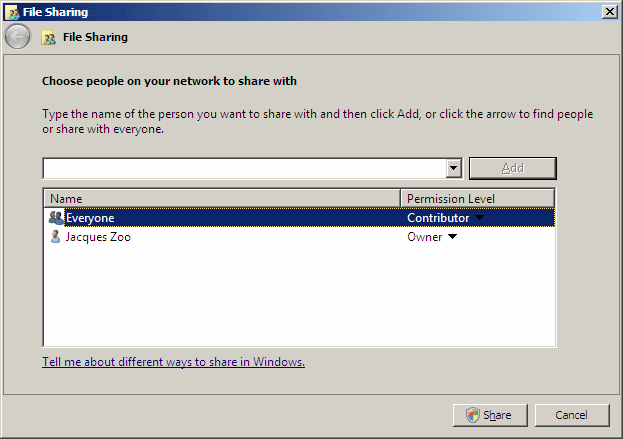
- If you are sharing from Microsoft Windows 7+, select
Read/Write
Click Share. If you receive a message box, click Continue.
You should receive a message box telling
you that the sharing was
successful
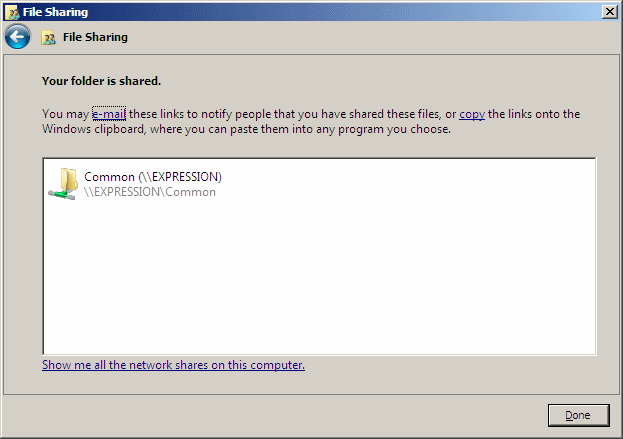
Click Close.
In another computer where you want to access the database,
open a file utility such as Windows Explorer. Click Network. Click the name of
the computer to show its shared folders. Open the folder that contains the database. Right-click the name of the database, position the mouse on
Send To, and click Desktop (Create Shortcut)
As an alternative, you could right-click the database and
click Create Shortcut, then copy that shortcut where you want
the database to be accessible. To open the database from that computer, double-click the
shortcut.
Importing or Splitting a Database
Introduction
Importing data allows you to get information from an external source and insert it in your database. Microsoft Access can accept data from various applications. To import
a file or objects, on the Ribbon, click the External Data tab:

In the Import section of the
Ribbon, click the button that corresponds to the type of object you want to get.
What happens depends on the type of file you are trying to import.
Importing Microsoft Access Objects
To import objects from another Microsoft Access database, on the Ribbon, click External Data. In the Import section of the Ribbon, click the Access button
 .
This would open the Get External Data - Access Database wizard. You should first
locate the folder that contains the database, and then select the database.
Splitting a Database
You can divide your database in two parts. One part would be
installed on one computer that can be a server or just another computer. This is
referred to as back-end. The other part would be installed in each user's
computer. The users computers can then connect to the back-end database that
stores the actual database. The users computer have only the graphical interface
that allows them to work. To implement this
scenario, you split your database.
To split a database, on the Ribbon, click Database
Tools:

In the Move Data section, click the Access Database button  . This would open the Database Splitter dialog box with four paragraphs and
two buttons:
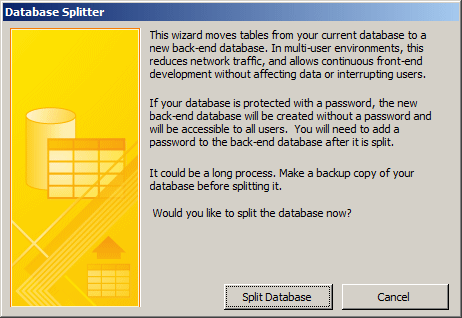
After reading them, click Split Database and follow the
wizard.
 Practical Learning: Splitting a Database
- From the resources that accompany these lessons, open the Computer
Training Center database.
Notice the objects in the Navigation Pane
- On the Ribbon, click Database Tools
- In the Move Data section, click Access Database


- You receive a Database Splitter dialog box. Read the paragraphs and click
Split Database
- In the Create Back-End Database dialog box, change the name of the file to
ComputerTrainingCenterBackEnd
- Click Split.
When the splitting is over, a dialog box appears
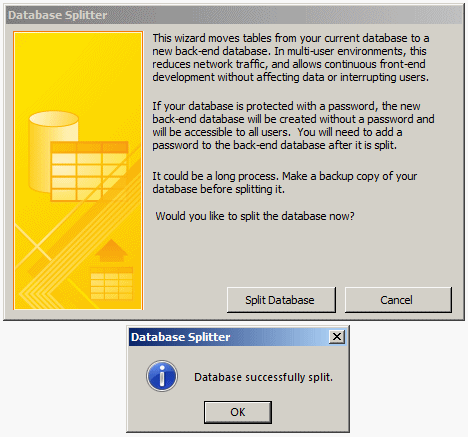
- Read it and click OK
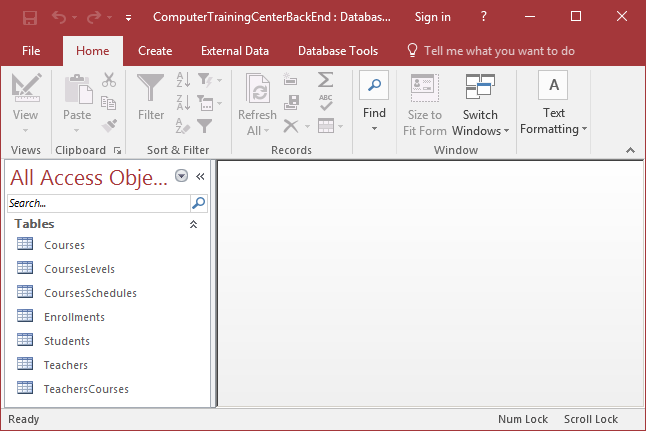
- Open the ComputerTrainingCenterBackEnd database. Notice the icons of the tables in the Navigation
Pane
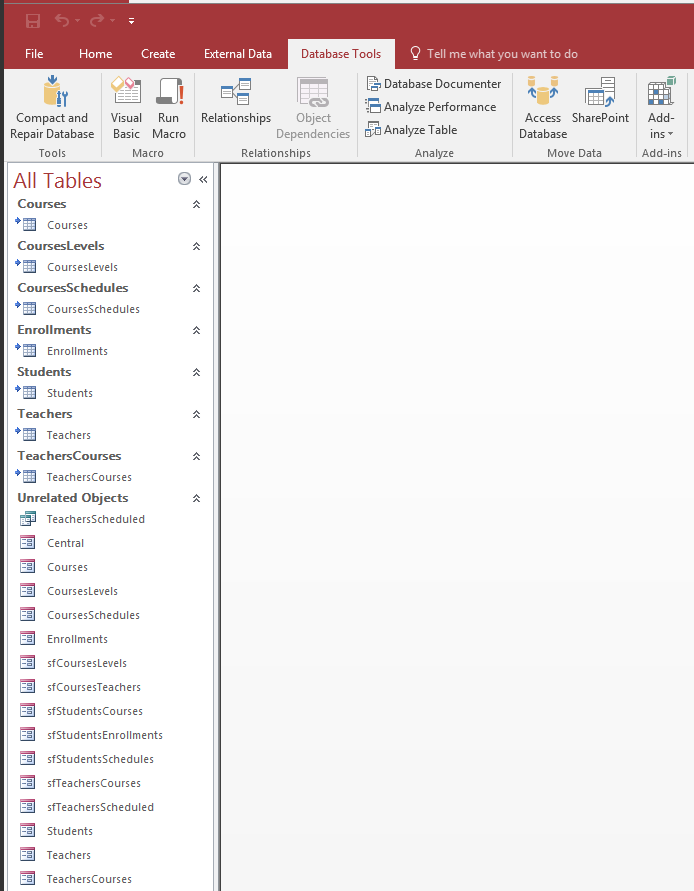
- Re-open the Bethesda Car Rental5 database and notice the new icons of the
tables in the Navigation Pane
- Close Microsoft Access
![]() Practical Learning: Introducing Data Import/Export
Practical Learning: Introducing Data Import/Export

![]() Practical Learning: Importing a Microsoft Access Database
Practical Learning: Importing a Microsoft Access Database


![]() Practical Learning: Importing a Microsoft Excel Spreadsheet
Practical Learning: Importing a Microsoft Excel Spreadsheet


![]() Practical Learning: Importing a Microsoft Excel Spreadsheet
Practical Learning: Importing a Microsoft Excel Spreadsheet


![]() Practical
Learning: Copying From a Spreadsheet
Practical
Learning: Copying From a Spreadsheet
![]() Practical Learning:
Exporting Data as a Spreadsheet
Practical Learning:
Exporting Data as a Spreadsheet![]() Practical Learning: Importing a Text Document
Practical Learning: Importing a Text Document


![]() and follow the wizard.
and follow the wizard.![]() Practical Learning: Importing an
XML Document
Practical Learning: Importing an
XML Document


![]() Practical Learning: Importing a Text Document
Practical Learning: Importing a Text Document


![]() or the next
or the next ![]() buttons.
buttons.![]() Practical Learning:
Creating a Mail Merge
Practical Learning:
Creating a Mail Merge


![]() .
This would open the Get External Data - Access Database wizard. You should first
locate the folder that contains the database, and then select the database.
.
This would open the Get External Data - Access Database wizard. You should first
locate the folder that contains the database, and then select the database.
 . This would open the Database Splitter dialog box with four paragraphs and
two buttons:
![]() Practical Learning: Splitting a Database
Practical Learning: Splitting a Database


