Special Windows for Data Selection and Record Filtering
Filtering By Value
In a typical table, each column has one or more values.
As mentioned in our introduction to sorting, a column may have the same
value(s) occurring over and over again while another column may have a
different value for each record. To assist you in selecting a value that
repeats in a field, Microsoft Access provides a convenient window with the
list of values where each is unique. To display that list:
- Click a column header or any cell under a column for a table or query, or click a control or its accompanying label
on a form. Then, in the Sort & Filter section of the Ribbon, click the Filter button

- On a table or query, click the down-pointing button on the right side of the caption of the column
In both cases, a window would display, containing the values of the column on which the action was
performed. Each value has a check box:
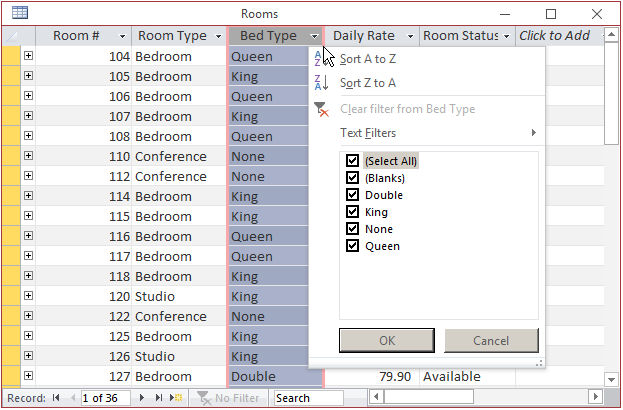
In the window that comes up, besides the values of the column, there are the (Select All) and the
(Blanks) items (the values of the columns in the checked list box are arranged in alphabetical order; Select All and
Blanks are in parentheses because they are not considered for the alphabetical arrangement). To dismiss the
window, press Esc or click Cancel.
When the window comes up, to select only the one value whose record(s) must be displayed, clear the
check box of (Select All):
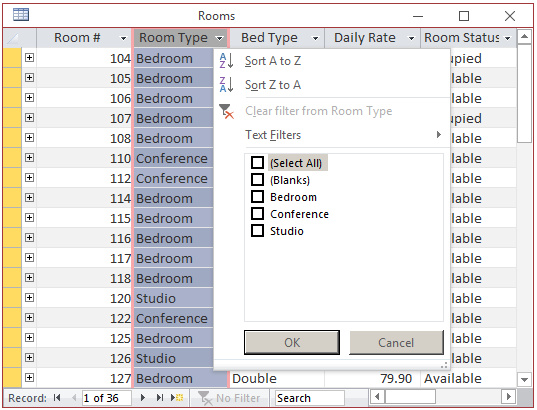
Then click the check box on the one item you want. Here is an example:
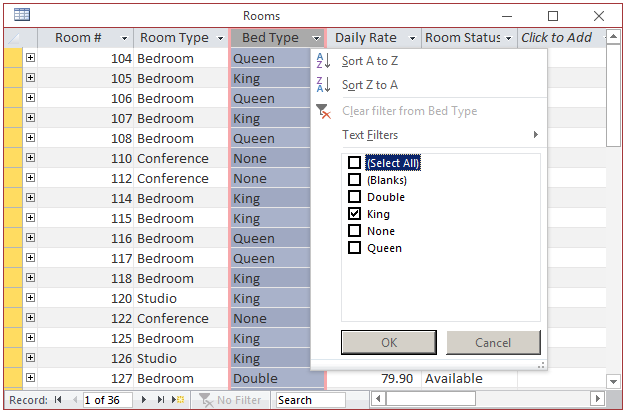
Then click OK. This would display only the records that share the value that had the check box:
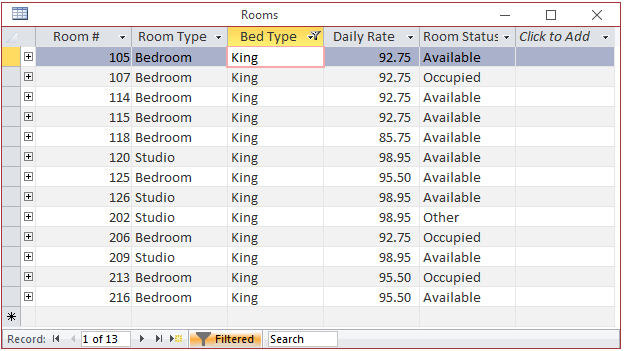
In the same way, you can show only empty fields by selecting the (Blanks) option.
To remove the filter, we saw that you could click the Toggle Filter button
 on the Ribbon. An alternative is to
click the Filtered button
  in the bottom
side of a table, a query, or a form. As an alternative, display the window again, click the (Select All) option and click OK.
 Practical Learning: Filtering for a Value
- Start Microsoft Access and open the Altair Realtors2 database from the previous lesson
- In the Navigation Pane, double-click the Properties form to open it
- On the form, click Condition
- If necessary, on the Ribbon, click Home.
In the Sort & Filter section of the Ribbon, click Filter

- In the list that appears, click (Select All) to clear all check boxes
- Click the Excellent check box
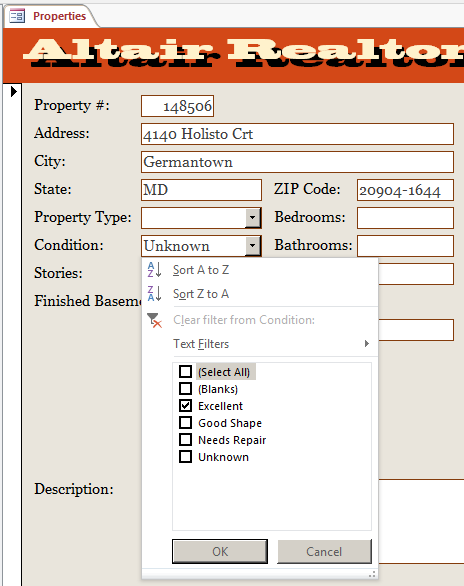
- Click OK
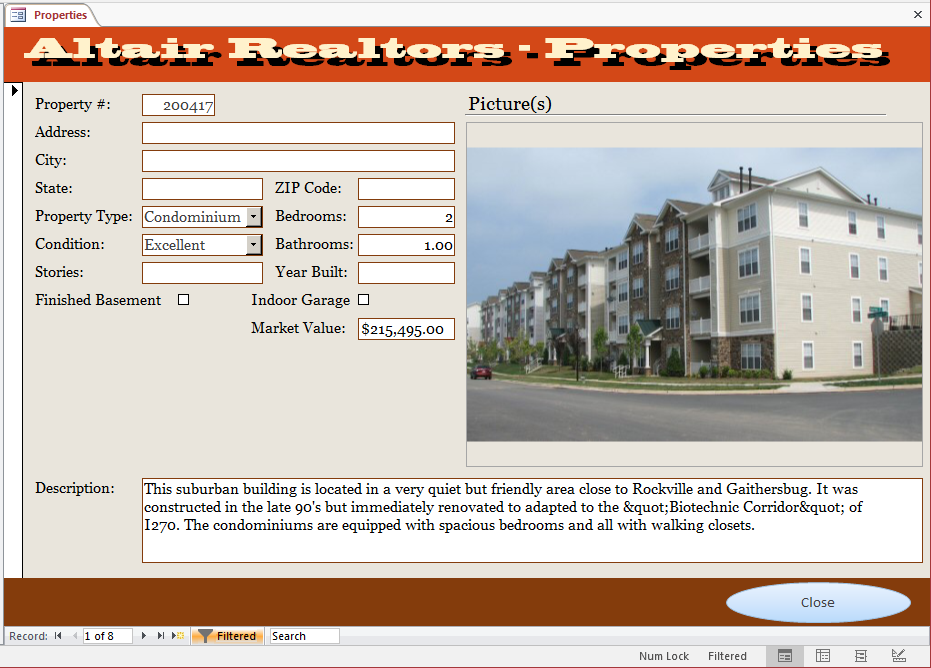
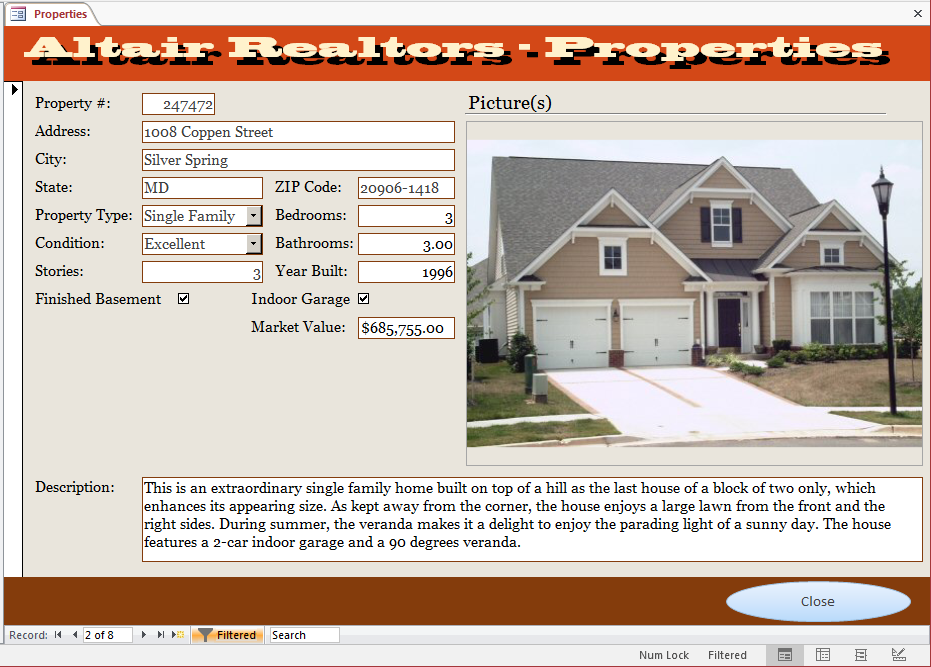
- Navigate to various properties and notice that only those in excellent
condition display
- On the Ribbon, click Toggle Filter

Filtering By Form
Besides the techniques and windows we have used so far for data analysis, Microsoft Access provides another feature referred to as
filtering by form. To start it, open a table or query in Datasheet View, or a form in Form View or in Layout View. On the Ribbon, click Home. In the
Sort & Filter section of the Ribbon, click Advanced and click Filter By Form. The table, query, or form would become empty and all records would get hidden:

To select a value, click the cell under the column header. A combo box would come up. Click the arrow
of that combo box to display its values:

The combo box includes each distinct value of the column. If some records are empty, there would be a
first empty blank field in the list. To filter the records, select the blank or the desired value from the list. As an
alternative, the combo box is an editable text box. This means that, instead of selecting a value from the list, you can
type a Boolean expression.
After making a selection or typing the expression, to apply the filter:
- Right-click the column header on the table or query, or the control
(or its accompanying label) on the form, and click Apply Filter/Sort
- In the Sort & Filter section of the Ribbon, click the Toggle Filter button
- In the Sort & Filter section of the Ribbon, click Advanced and click Apply
Filter/Sort
This action would cause the table, query, or form to display the results.
After filtering, the value (criterion) is stored in memory
and you can filter again as many times as you want. Otherwise, you can remove the filter. To do this:
- Right-click a cell of the column on which the filtering was performed on a table or query, or right-click the
control (or its accompanying label) on the form, and click Clear Filter From ... (this is followed by the name of the
field or control)
- In the Sort & Filter section of the Ribbon, click the
Toggle Filter button

- Click any cell in the table or query, or click any control on the form. In the Sort & Filter section of the
Ribbon, click Advanced and click Clear All Filters
 Practical Learning: Filtering By Form
- If necessary, on the Ribbon, click Home.
On the Ribbon, click Advanced and click Filter By Form
- Right-click anywhere on the form and click Clear Grid
- Click Stories, then click the arrow of the appearing combo box and select 3
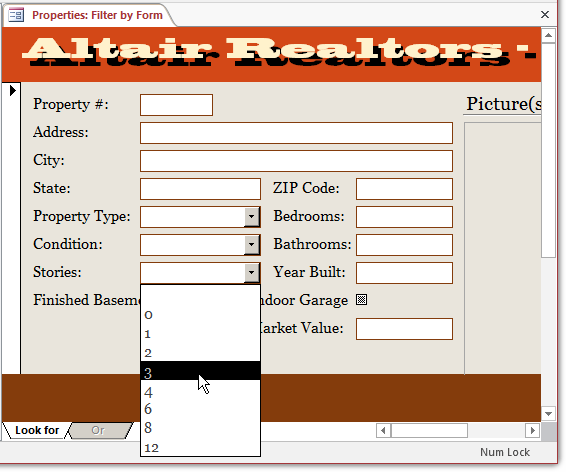
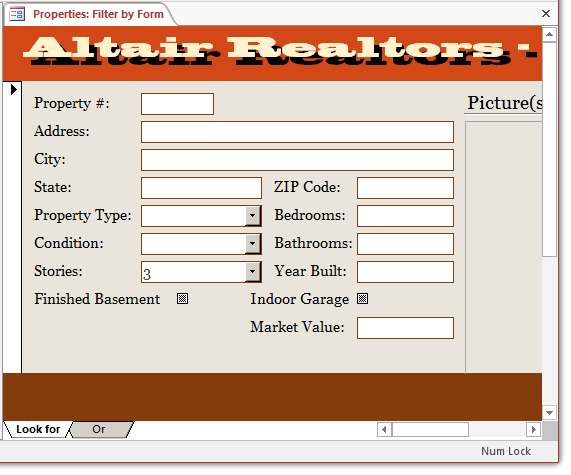
- Right-click an unoccupied area of the form and click Apply Filter/Sort
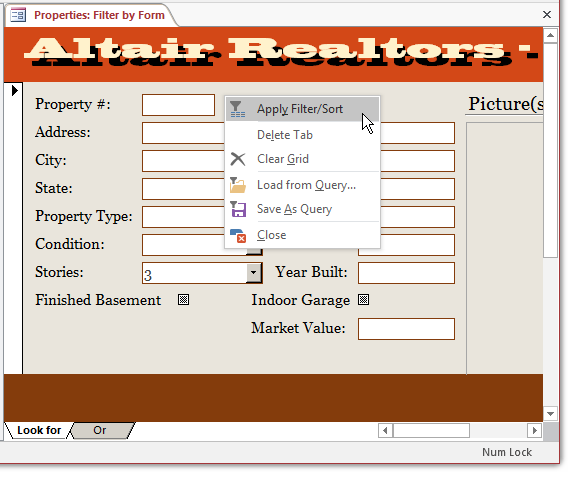
- Navigate to different records. Notice that only the properties that
have 3 levels are displayed
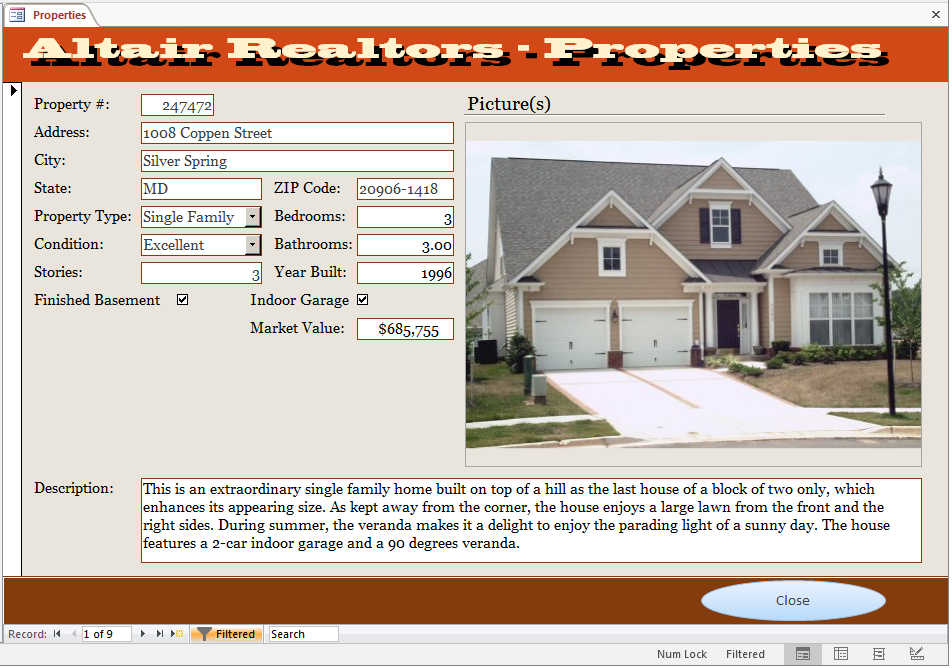
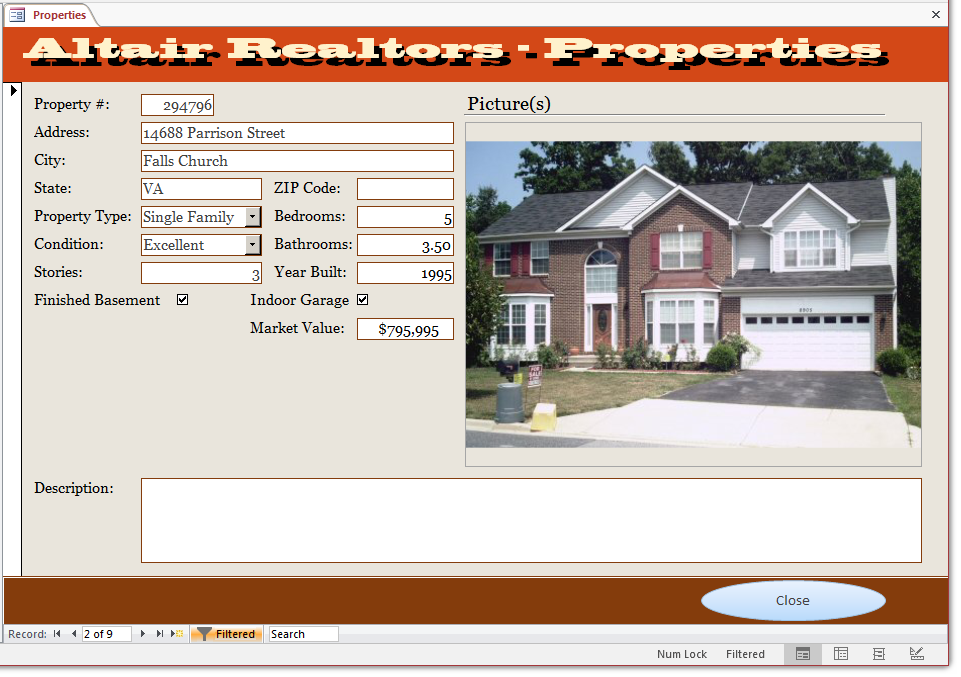
- Close the form
- Open the StatesStatistics3 database from the previous lesson
- On the Ribbon, click Create and click Query Design
- In the Show Table, click States, click Add, and click Close
- In the top list, double-click StateName, AreaSqrMiles, AdmissionUnionDate, Capital, and Region
- Preview the results in the Datasheet View
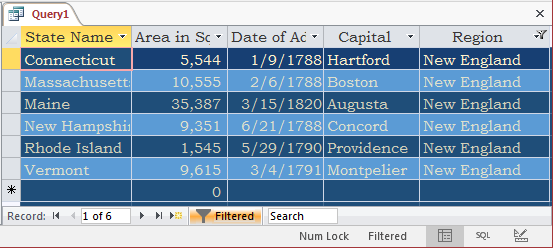
- On the Ribbon, click Advanced and click Filter By Form
- Click the cell below Region
- Click the arrow of its combo box and select New England
- To execute, on the Ribbon, click the Toggle Filter button

- In the Home tab of the Ribbon, change the following characteristics:
Change the following characteristics:
Font Name: Bookman Old Style (if you don't have that font, select Times New Roman)
Font Color: Gold, Accent 4, Lighter 80% (Theme Colors: 8th column, 2nd row)
Background Color: Blue, Accent 1, Darker 50% (Theme Colors: 5th column, 6th row)
Alternate Row Color: Blue, Accent 1 (Theme Colors: 5th column, 1st row)
- To change the filter, on the Ribbon, click the Toggle Filter button

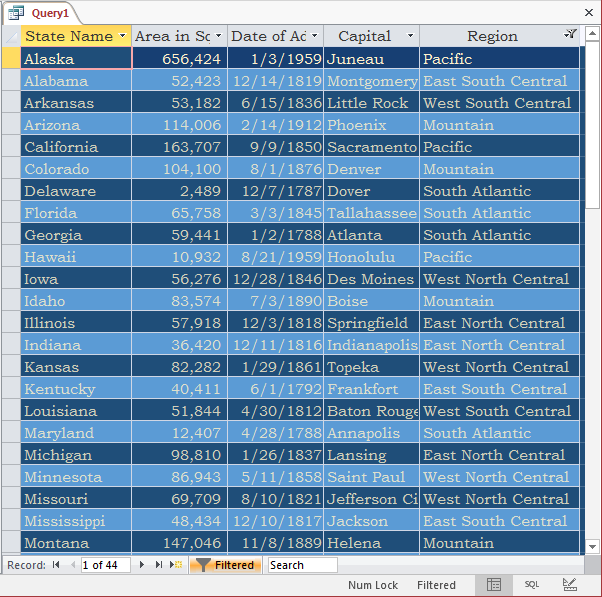
- On the Ribbon, click Advanced and click Filte By Form
- Click the cell below Region, press Home, and type <> (to get <>"New England")
- To execute, right-click anywhere in the window and click Apply Filter/Sort
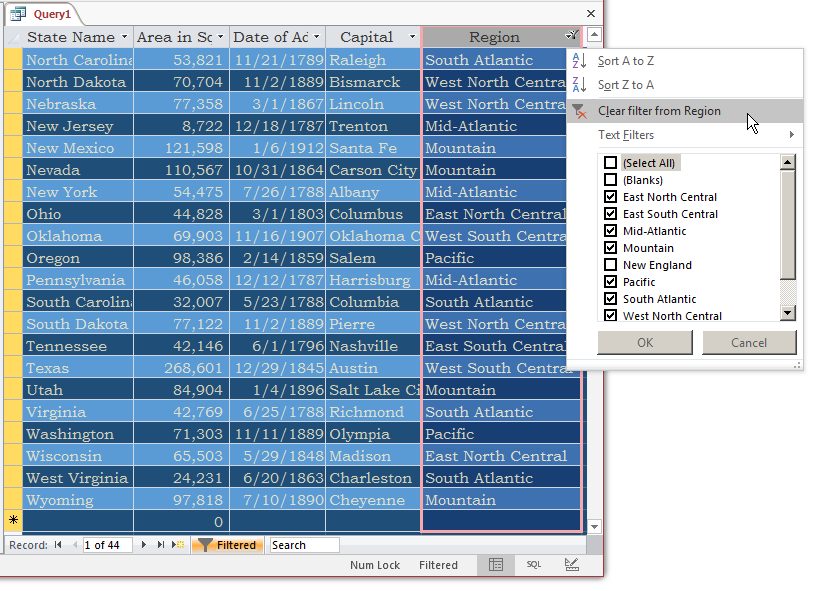
- To remove the filter, click the button on the right side of Region on the window and click Clear filter from Region
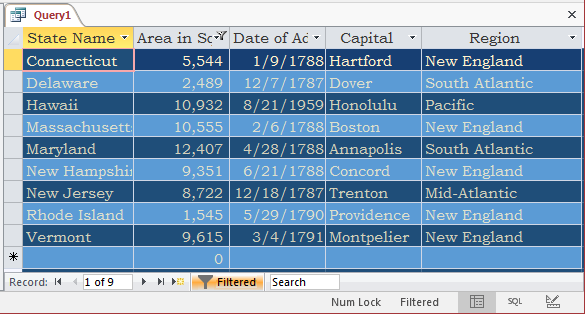
- On the Ribbon, click Advanced and click Filte By Form
- Delete <>"New England"
- Click the cell below Area in Sqr Miles and type <= 20000 and press Enter
- To apply, on the Ribbon, click Advanced and click Apply Filter/Sort
- On the Ribbon, click Advanced and click Filte By Form
- Delete the <= 20000 expression
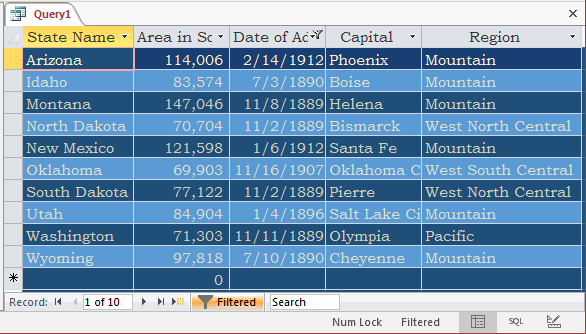
- Click the cell below Date of Admission to Union and type BETWEEN #1/1/1880# AND #12/31/1920# and press Enter
- Apply the filter using one of the techniques we used already
- On the Ribbon, click Advanced and click Filter By Form
- Delete the expression on the window
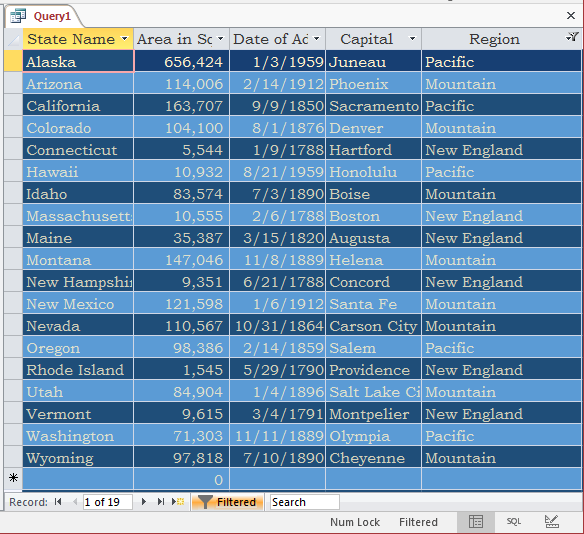
- Click the cell below Region and type IN("mountain", "pacific", "new england") and press Enter
- Apply the filter
- Close the query without saving it
The Object Filter Window
To assist you in setting a condition for data analysis, Microsoft
Access provides a window that resembles the Design View of a query. The window
allows you to select one or more fields and set a (some) condition(s) on it/them. The
name of that window is a combination of the name of the object from which you
opened it, the word Filter, and an incremental number (1, 2, 3, and so on).
To open the Object Filter window, display
the table, query, or form in Datasheet View, the form in Form View or in Layout
View, or the report in Report View or in Layout View. On the Ribbon, click Home. In
the Sort & Filter section of the Ribbon, click Advanced and click Advanced
Filter/Sort... A window like the Design View of a query would display.
To use the Object Filter, select (only) the column(s) on which
you want to apply a condition. After selecting a column, in the bottom section of the window, in the
Criteria box corresponding to the column, type a Boolean expression. After
selecting a column and setting a condition, to apply it:
- Right-click the window and click Apply Filter/Sort
- In the Sort & Filter section of the Ribbon, click Advanced, and click
Apply Filter/Sort
To remove the previous criterion, right-click the window
and click Clear Grid. After using the grid, you can close it and keep the table,
query, or form open.
 Practical
Learning: Filtering Using the Object Filter Window
- Open the Monson University1 database from
Lesson 24
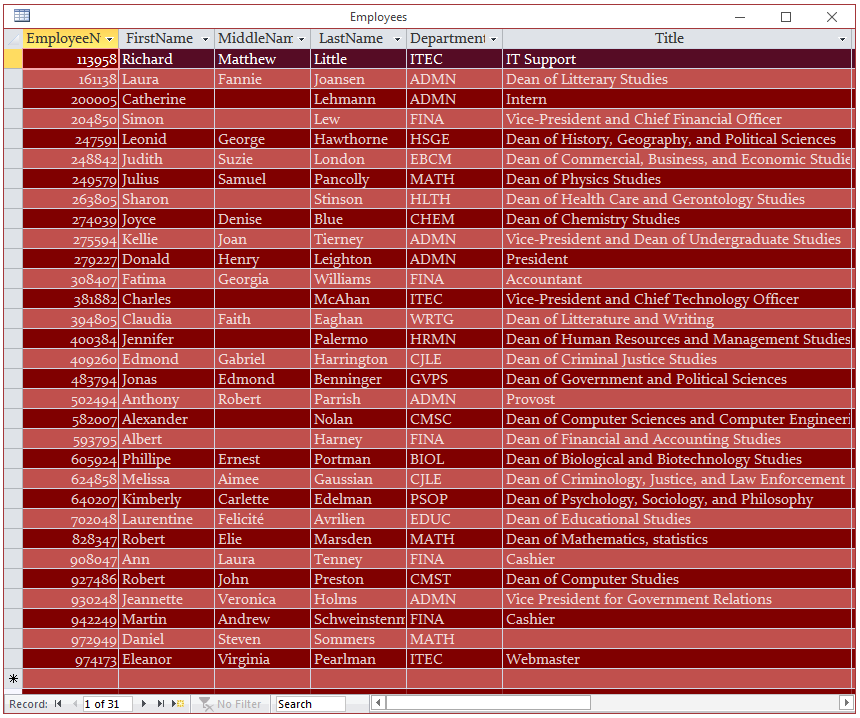
- In the Navigation Pane, double-click the Employees table
-
Change the following characteristics:
Font Name: Constantia (if you don't have that font, select Times New Roman)
Font Color: White
Background Color: More Colors: Red: 128, Green: 0, Blue: 0
Alternate Row Color:
Maroon (Standard Colors: 6th column, 1st row)
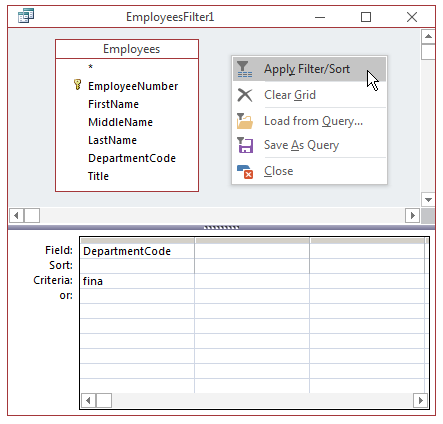
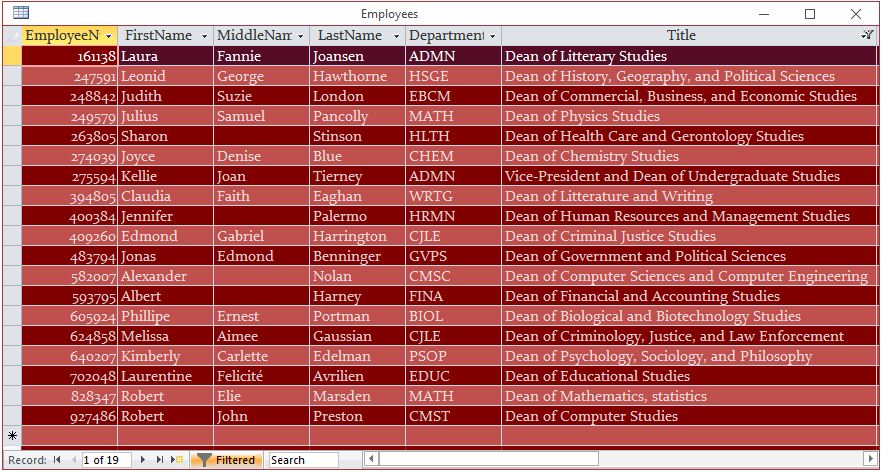
- On the Ribbon, click Advanced and click Advanced Filter/Sort...
- From the top section, double-click DepartmentCode
- In the bottom section, click the Criteria box for the DepartmentCode
column and type fina
- Right-click an unoccupied area of the window and click Apply
Filter/Sort

- On the Ribbon, click Advanced and click Advanced Filter/Sort...
- In the bottom side of the window, replace DepartmentCode with Title
- Replace fina with Like '*dean*' (meaning we want all records where the title insludes the word Dean)
- On the Ribbon, click Advanced and click Apply Filter/Sort...
- Close the table without saving it
The Query Builder
Most forms and reports use a table or an existing query as their Record Source. As an alternative, you can specify a SQL statement as the
Record Source of a form or report. If you know the statement you want to use, you can directly type it in the Record Source field of the Property Sheet of a
form or report in the Design View. As an alternative, you can click the ellipsis button
 of the Record Source. This would open a special window that resembles the Design View of a query. It is called the Query Builder.
When the Query Builder displays, the Ribbon has a Design tab:

As seen when designing a query, after selecting some fields and optionally setting a condition, if you want to preview the result,
click either the View button  or the Run
 button. When you have finished building the query, to return to the form or
report, click the Close button on the Ribbon. You may receive a message. Read it and click Yes.
After creating the form or report, if you delete it (the form or the report), the SQL statement would be lost also.
 Practical Learning: Using the Query Builder
- On the Ribbon, click Create and click Form Design
- In the Property Sheet, click the All tab, then click Record Source and
click its ellipsis button

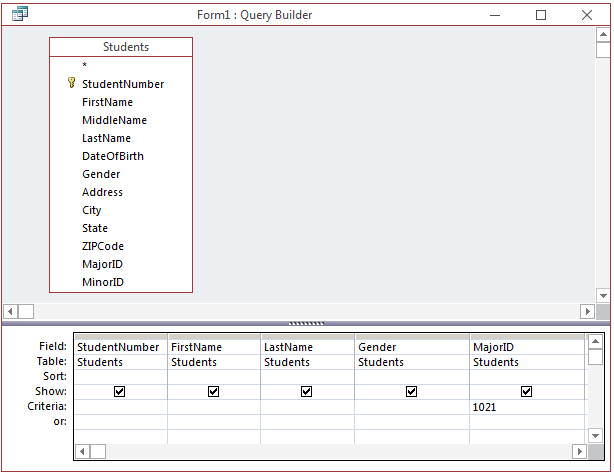
- In the Show Table dialog box, click Students, click Add, and click Close
- In the top list, double-click StudentNumber, FirstName, LastName,
Gender, and MajorID
- In the bottom side of the window, click the Criteria box for MajorID and
type 1021
- On the Ribbon, click the Close button

- When asked whether you want to save the changes, click Yes
- Save the form as Computer Science Students
- On the Ribbon, click Design and click Add Existing fields
- In the Field List, double-click StudentNumber, FirstName, LastName, and
Gender
- In the Controls section of the Ribbon, click the Combo box and
click the form
- In the first page of the wizard, make sure the first radio is selected
and click Next
- In the second page of the wizard, click Table: Majors and click Next
- In the 3rd page of the wizard, double-click Major and click Next
- In the 4th page of the wizard, click Next
- In the 5th page of the wizard, click Next
- In the 6th page of the wizard, click the arrow of the combo box and
select MajorID
- Click Next and click Finish
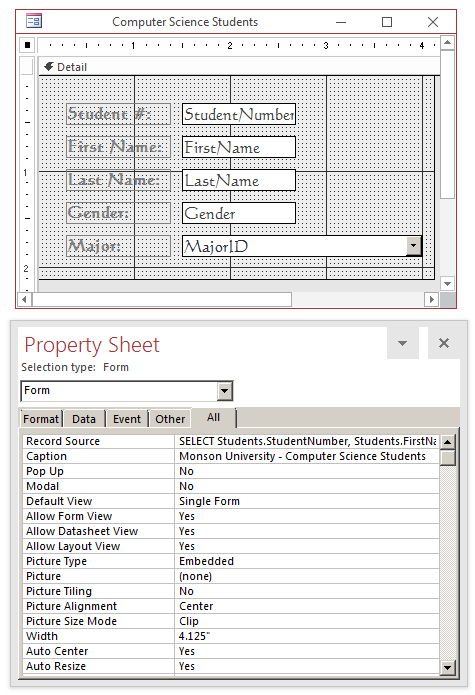
- Design the form as follows:
- Save a nd close the form
- Close Microsoft Access


![]() on the Ribbon. An alternative is to
click the Filtered button
on the Ribbon. An alternative is to
click the Filtered button ![]() in the bottom
side of a table, a query, or a form. As an alternative, display the window again, click the (Select All) option and click OK.
in the bottom
side of a table, a query, or a form. As an alternative, display the window again, click the (Select All) option and click OK.![]() Practical Learning: Filtering for a Value
Practical Learning: Filtering for a Value


![]() Practical Learning: Filtering By Form
Practical Learning: Filtering By Form


![]() Practical
Learning: Filtering Using the Object Filter Window
Practical
Learning: Filtering Using the Object Filter Window


![]() of the Record Source. This would open a special window that resembles the Design View of a query. It is called the Query Builder.
of the Record Source. This would open a special window that resembles the Design View of a query. It is called the Query Builder.
![]() or the Run
or the Run
![]() button. When you have finished building the query, to return to the form or
report, click the Close button on the Ribbon. You may receive a message. Read it and click Yes.
button. When you have finished building the query, to return to the form or
report, click the Close button on the Ribbon. You may receive a message. Read it and click Yes.![]() Practical Learning: Using the Query Builder
Practical Learning: Using the Query Builder
