Options on Data Joins
Data Joins and Record Nullity
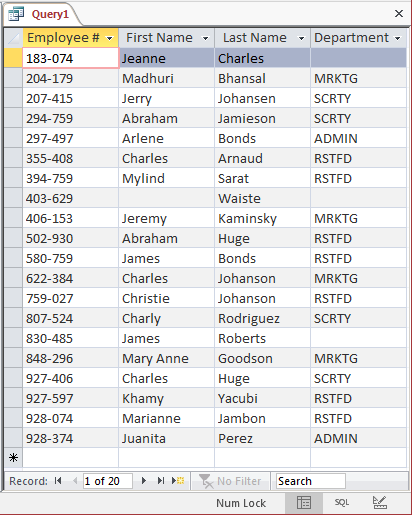
Sometimes you will have a table where a field is missing some records. Here is an example of a list of employees where some records don't specify the department to which the employee belongs:
SELECT Employees.EmployeeNumber AS [Employee #],
       Employees.FirstName,
       Employees.LastName,
       Employees.DepartmentCode AS Department
FROM Employees;
This would produce:
If you create an inner join query of two tables that have a relationship
and some records of the child table are missing some values in the foreign key
column, the query would produce only the records that have a value. Here is an
example:
SELECT Employees.EmployeeNumber AS [Employee #],
       Employees.FirstName,
       Employees.LastName,
       Departments.DepartmentName AS Department
FROM   Departments INNER JOIN Employees
       ON Departments.DepartmentCode = Employees.DepartmentCode;
This would produce:
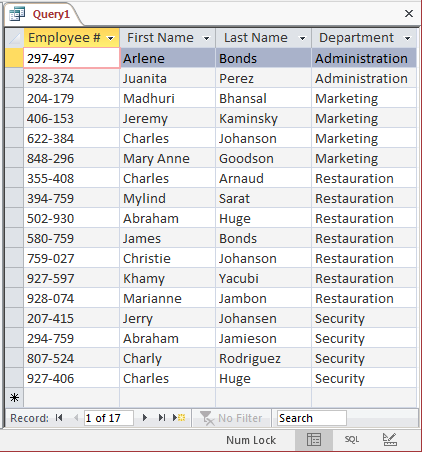
Notice that the query produces fewer records. As it happens,
database engines don't like null records especially on shared fields, fields
that are involved in relationships. To make sure that all records of a child
table are produced by a query, produce a default value for records whose values
are missing. If the relationship is using a simple integer, create a record with
the 0 value. If the relationship is using a string, you can create a record with
an 'N/A' value. If the records are processed by a computer, you can create a
record with a generic/random value such as 00000 or something like that.
 Practical
Learning: Dealing with Data Joins and Record Nullity
- Start Microsoft Access
- From the resources that accompany these lessons, open the Altair Realtors3 database
- On the Ribbon, click Create and click Query Design
- In the Show Table dialog box, double-click Properties and click Close
- In the Properties list, double-click PropertyNumber, City, and State
- Switch the query to Datasheet View:
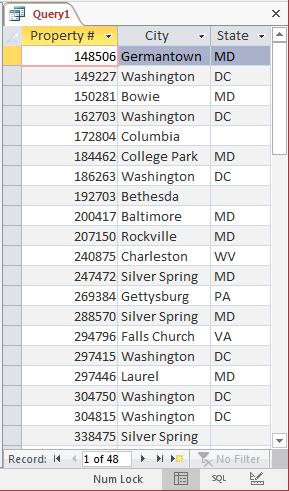
- Notice the number of records: 48.
Switch the query to Design View
- Right-click an empty area in the top side of the window and click Show
Table
- In the Show Table dialog box, double-click PropertyTypes and click Close
- In PropertyTypes list, double-click PropertyType
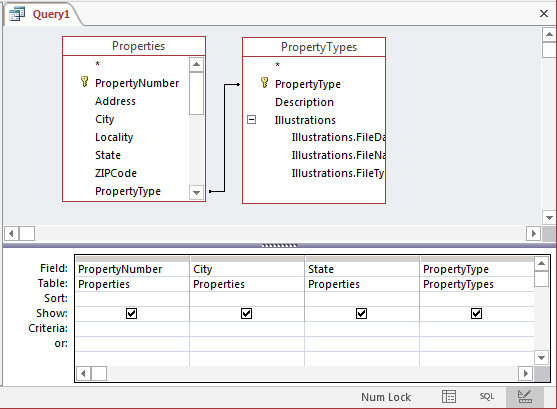
- Switch the query to Datasheet View
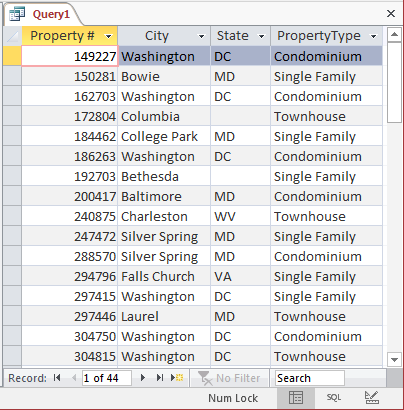
- Notice the number of records this time: 44.
Display
the SQL View of the query and change its code as follows:
SELECT Properties.PropertyNumber,
       Properties.City,
       Properties.State,
       Conditions.Condition
FROM   Properties INNER JOIN Conditions
       ON Properties.Condition = Conditions.Condition;
- Switch the query to Datasheet View
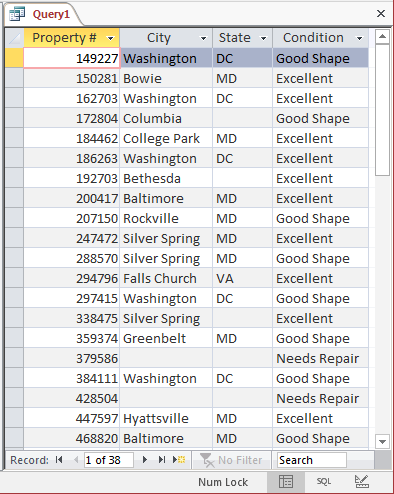
- Notice the number of records: 38.
Close the query without saving it
- In the Navigation Pane, double-click the PropertyTypes form
- Create a new record as
follows:
| PropertyType |
Description |
| Unknown |
The property type is not available or it is not clear. |
| Illustrations |
 |
- Close the PropertyTypes table
- In the Navigation Pane, double-click the Conditions form
- Create a new record as
follows:
| PropertyType |
Description |
| Unknown |
The current condition or appearance (interior and/or exterior)
of the property has not been checked, was not assessed, or is not
clearly known. |
- Close the Conditions table
- In the Navigation Pane, right-click the Properties table and click
Design View
- In the top side of the window, click PropertyType
- In the bottom side, click Default Value and type Unknown
- In the top side of the window, click Condition
- In the bottom side, click Default Value and type Unknown
- Save the table and switch it to the Datasheet View
- In the PropertyType column, for each empty cell, select Unknown
- In the Condition column, for each empty cell, select Unknown
- Notice that there is a default value for both the PropertyType and the
Condition columns
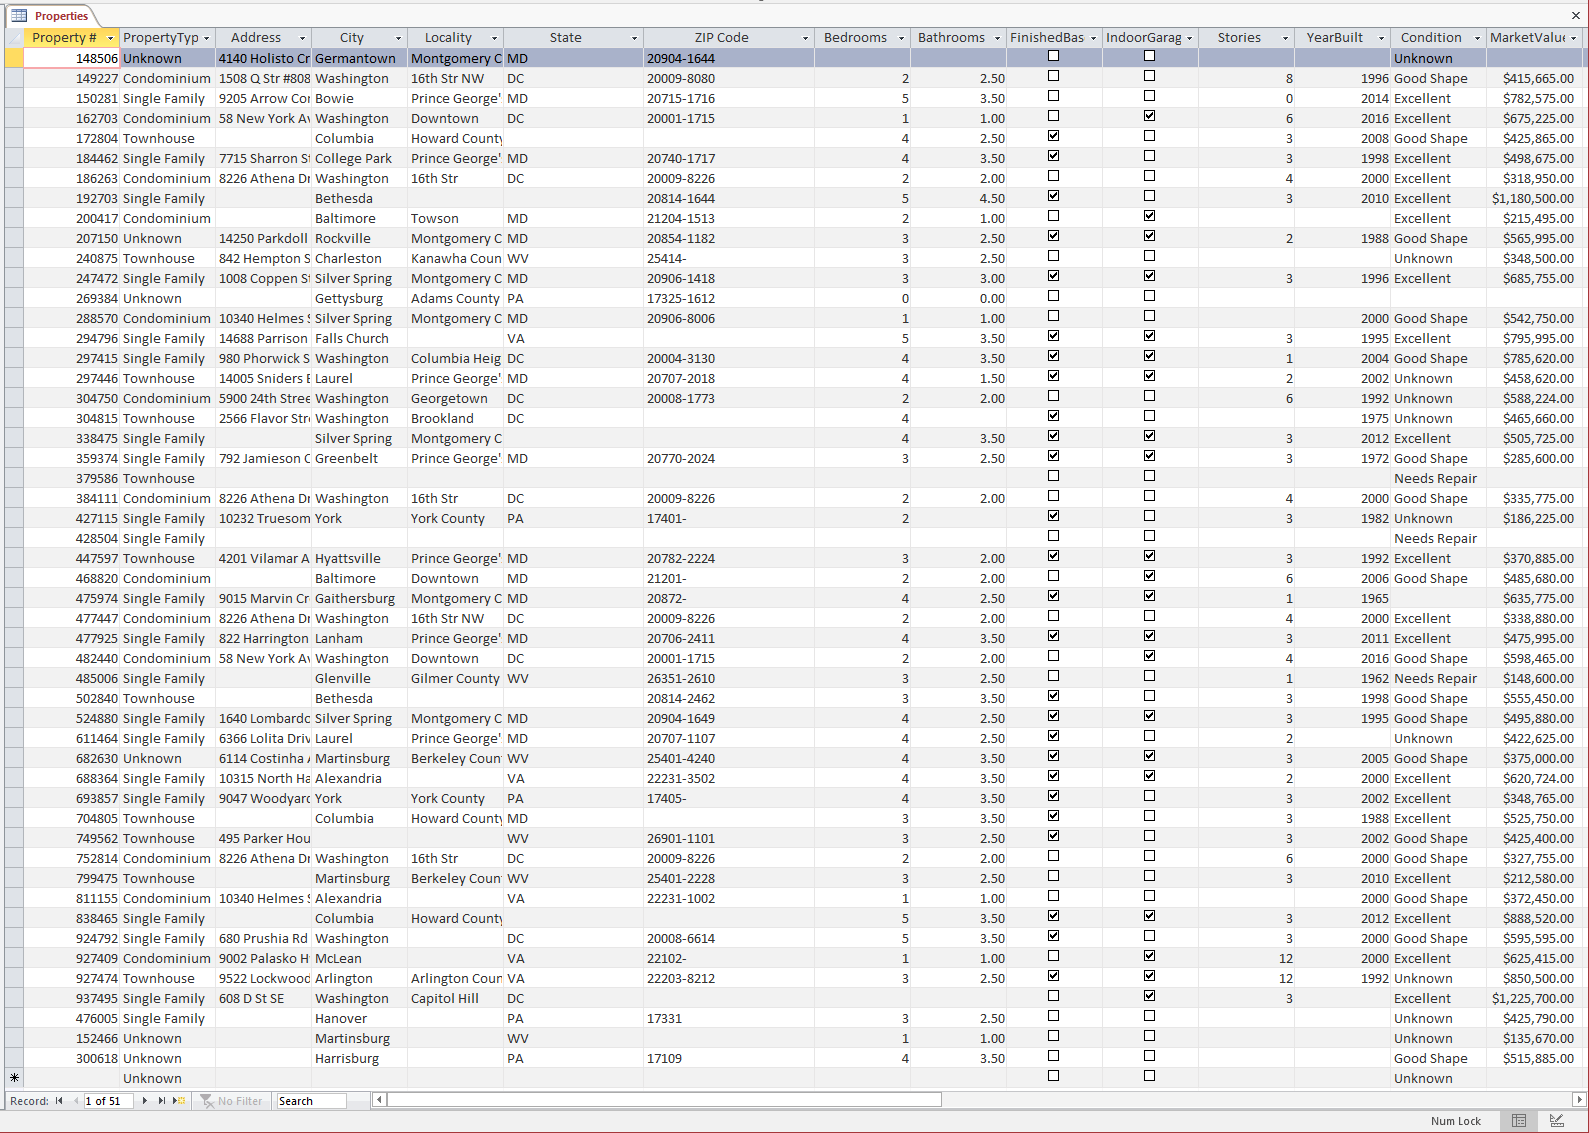
- By setting only the indicated values, create new records as
follows:
| Property # |
Property Type |
City |
State |
ZIP Code |
Bedrooms |
Bathrooms |
Finished Basement |
Indoor Garage |
Condition |
Market Value |
| 476005 |
Single Family |
Hanover |
PA |
17331 |
3 |
2.50 |
Checked |
|
|
425790 |
| 152466 |
|
Martinsburg |
WV |
|
1 |
1.00 |
|
|
|
135670 |
| 427048 |
Condominium |
Alexandria |
VA |
|
3 |
2.00 |
|
|
Needs Repair |
622845 |
| 297427 |
|
Matinsburg |
|
|
|
|
|
|
Excellent |
|
| 729336 |
|
Alexandria |
VA |
|
3 |
2.50 |
|
|
Needs Repair |
750000 |
| 300618 |
|
Harrisburg |
PA |
17109 |
5 |
3.50 |
Checked |
Checked |
Good Shape |
515885 |
- Close the table
- On the Ribbon, click Create and click Query Design
- In the Show Table dialog box, double-click Properties and click Close
- In the Properties list, double-click PropertyNumber, City, and State
- Switch the query to Datasheet View
- Notice the number of records: 51.
Switch the query to Design View
- Right-click an empty area in the top side of the window and click Show
Table
- In the Show Table dialog box, double-click PropertyTypes and click Close
- In the PropertyTypes list, drag PropertyType and drop it on City in the
bottom side
- In the Properties list, double-click Bedrooms and Bathrooms
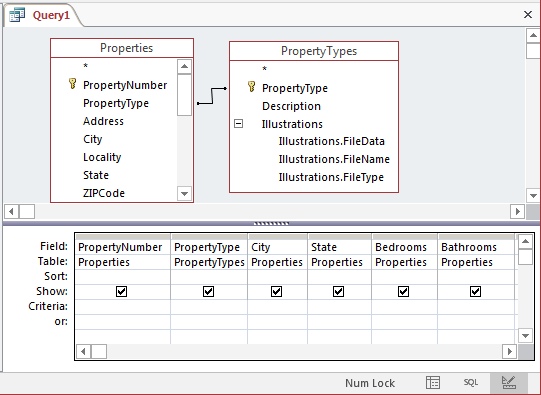
- Switch the query to Datasheet View
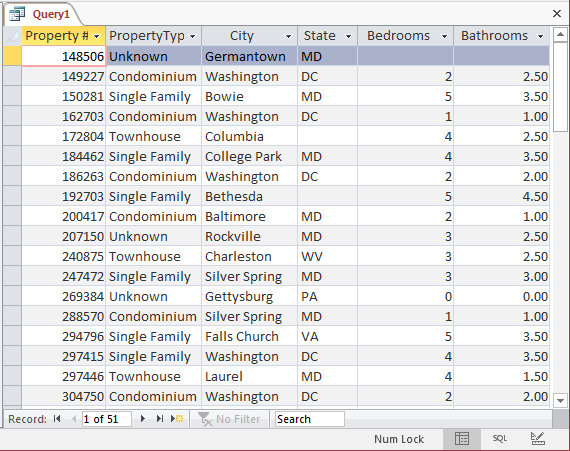
- Notice the number of records this time: 51.
Close the query without saving it
- Open the Lambda Square Apartments1 database created and used earlier
- On the Ribbon, click Create and click Query Design
- In the Show Table dialog box, double-click Payments and click Close
- In the Payments list, double-click ReceiptNumber, PaymentDate,
ProcessedBy, RegistrationNumber, and PaymentAmount
- Switch the query to Datasheet View
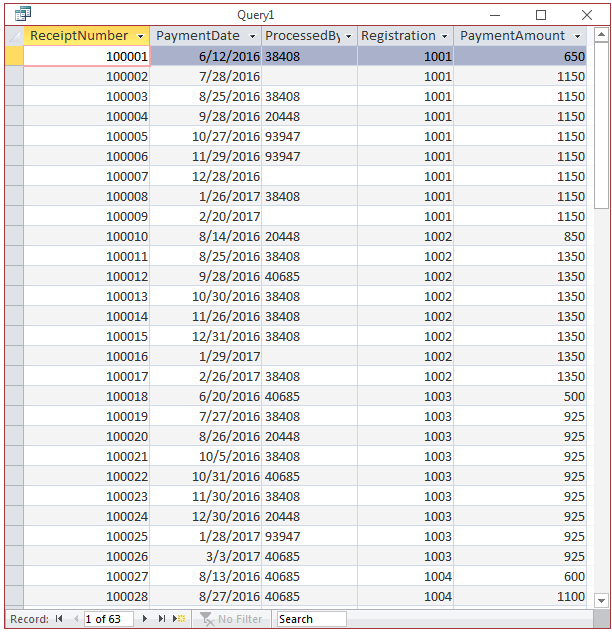
- Notice the number of records: 63.
Switch the query to Design View
- Right-click an empty area in the window and click Show Table...
- In the Show Table dialog box, double-click Employees and click Close
- Drag EmployeeNumber and drop it on ProcessedBy
- In the bottom side of the window, replace ProcessedBy with
Employee: [EmployeeNumber] & " - " & [EmployeeName] & " (" & [Title] & ")"
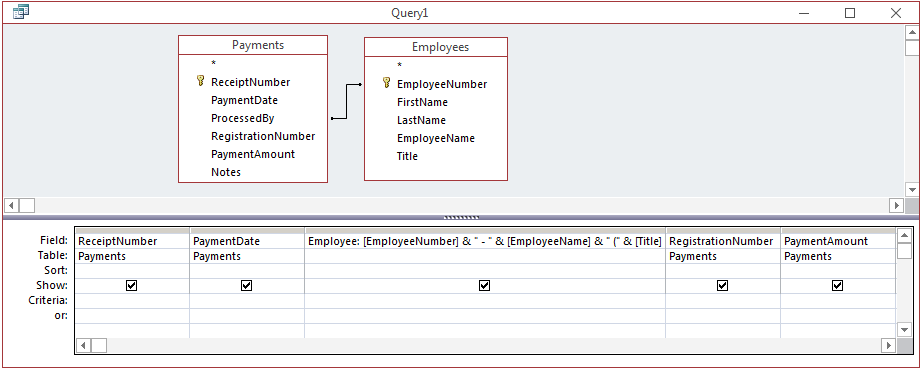
- Switch the query to Datasheet View
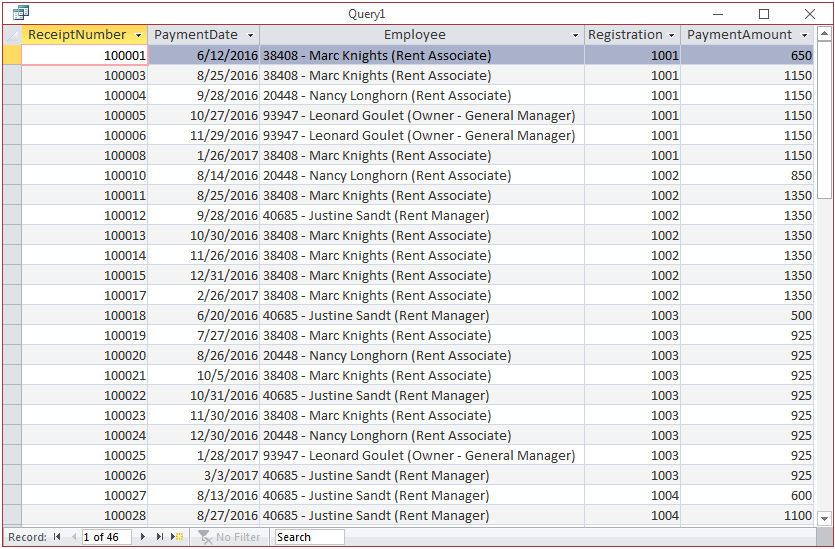
- Notice the number of records: 46.
Close the query without saving it
- In the Navigation Pane, double-click the Employeees table and create a
new record as follows (this is for transactions made at the bank such as a
tenant who deposits rent money directly at the bank):
| EmployeeNumber |
FirstName |
LastName |
Title |
| 00000 |
Automatic |
Processing |
Electronic Transaction |
- Close the Employees table
- In the Navigation Pane, right-click the Payments table and click Design
View
- In the top side of the window, click ProcessedBy
- In the bottom side, click Default Value and type "00000"
- Save and close the table
- Open the Payments table
- In the ProcessedBy column, in every empty cell, type 00000
- Close the Payments table
- On the Ribbon, click Create and click Query Design
- In the Show Table dialog box, double-click Payments and Employees
- Click Close
- Drag EmployeeNumber and drop it on ProcessedBy
- In the Payments list, double-click ReceiptNumber and PaymentDate
- Press Tab and type
Employee: [EmployeeNumber] & " - " & [EmployeeName] & " (" & [Title] & ")"
- In the Paynments list, double-click
RegistrationNumber and PaymentAmount
- Switch the query to Datasheet View
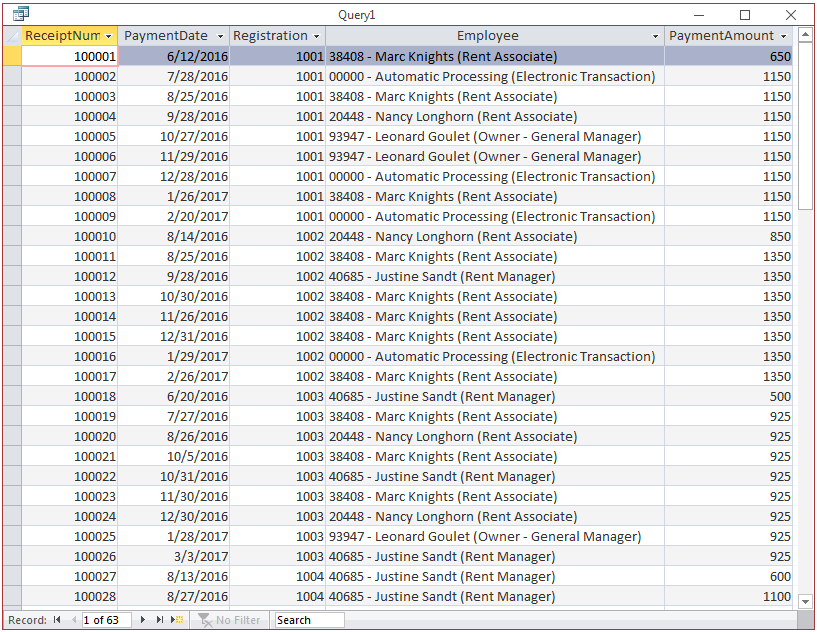
- Notice the number of records: 63.
Close the query without saving it
Joining More Than Two Tables
So far, our join statements involved only two tables.
Actually, you can use more tables than that. The basic formula to join three tables is:
SELECT field-name(s) FROM first-table
first-join-type second-table ON condition1
second-join-type third-table ON condition2
You start the expression by joining the first to the second
tables, which means that both tables should share a column in a primary
key-foreign key type of relationship. In the same way, you can create the second
join. Of course, the second and the third tables should have a common column. In
most cases, there should be a column that all three tables share. Most of the
time, the relationship starts with a primary key column from the parent table. That
column is then represented as a foreign key in the other two tables.
 Practical
Learning: Joining More Than Two Tables
- On the Ribbon, click Create and click Form Design
- In the Property Sheet, click the All tab.
Click
Record Source and click its ellipsis button
- In the Show Table, double-click Employees, Registrations, and Apartments
- Click Close
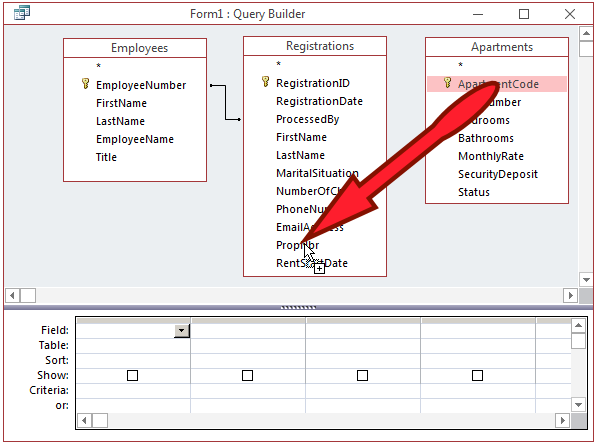
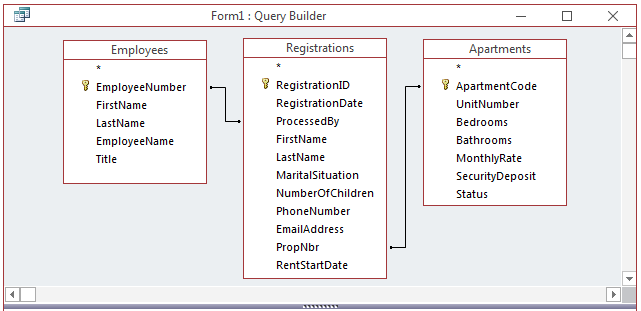
- Drag EmployeeNumber from the Employees list and drop it on ProcessedBy on
the Registrations list
- Drag ApartmentCode from the Apartments list and drop it on PropNbr on
the Registrations list
- In the Registrations list, double-click RegistrationID and RegistrationDate
- Press Tab and type
Employee: [EmployeeNumber] & " - " & [EmployeeName] & " (" & [Title] & ")"
- In the Registrations list, double-click FirstName, LastName,
MaritalStatus, and NumberOfChildren
- Press Tab and type:
Apartment: "Apart # " & [UnitNumber] & ", " & [Bedrooms] & " bedroom(s), " & [Bathrooms] & " bathroom(s), Rate: " & [MonthlyRate] & "/month"
- Display the SQL View of the query:
SELECT Registrations.RegistrationID AS [Regist #],
       Registrations.RegistrationDate AS [Regist Date],
       [EmployeeNumber] & " - " & [EmployeeName] & " (" & [Title] & ")" AS Employee,
       Registrations.FirstName,
       Registrations.LastName,
       Registrations.MaritalSituation AS Status,
       Registrations.NumberOfChildren AS Children,
       "Apart # " & [UnitNumber] & ", " & [Bedrooms] & " bedroom(s), " & [Bathrooms] & " bathroom(s), Rate: " & [MonthlyRate] & "/month" AS Apartment
FROM   Apartments INNER JOIN (Employees INNER JOIN Registrations
       ON Employees.EmployeeNumber = Registrations.ProcessedBy)
       ON Apartments.ApartmentCode = Registrations.PropNbr;
- Close the Query Builder
- When asked whether you want to save the changes, click Yes
- Save the form as Rent Allocations
- Double-click the button at the intersection of the rulers
- In the Property Sheet, change the following characteristics:
Caption: Lambda Square Apartments - Rent Allocation
Default Value: Continuous Form
Auto Center: Yes
Navigation Buttons: No
- On the Ribbon, click Design
- In the Tools section, click Add Existing Fields
- In the Field List, click Apartment, press and hold Shift, click Regist
#, and release Shift
- Drag the selection to the form
- On the Ribbon, click Arrange and click Tabular
- Drag the selection to the left
- Press Ctrl + A to select all controls
- On the Ribbon, click Remove Layout
- Complete the design of the form. Here is an example:

- Save and close the form
Data Joins and Records Analyses
Sorting Records
In the data joins we have created so far, we considered all
records and let the database engine list them using only the rules of joins
built-in the SQL. To make such a list more restrictive, you can apply some conditions
by which to isolate some records.
You can visually create the filters in the Design View of a query or in a
similar window. You can also create a filter in SQL. As done in previous lessons, to include a criterion in a SELECT
statement, you can create a WHERE clause.
 Practical
Learning: Introducing Joins and Data Analysis
- Open the Monson University1 database used earlier
- To start a query, on the Ribbon, click Create and click Query Design
- On the Show Table dialog box, click Close
- Right-click the top side of the window and click SQL View
- Change the statement as
follows:
SELECT EmployeeNumber AS [Employee #],
       FirstName      AS [First Name],
       LastName       AS [Last Name],
       Title,
       DepartmentName AS Department
FROM   Employees, Departments
WHERE  Employees.DepartmentCode = Departments.DepartmentCode
ORDER  BY LastName;
- Preview the results in the Datasheet View
- If necessary, on the Ribbon, click Home.
Change the following characteristics:
Font Name: Californian FB (if you don't have that font, select Times New Roman)
Font Color: Blue, Accent 1, Lighter 80% (Theme Colors:
5th column, 2nd row)
Background Color:
More Colors: Red: 195, Green: 95, Blue: 15
Gridlines: Horizontal
Alternate Row Color: More Colors: Red: 128, Green: 0, Blue: 0

- Close the query without saving it
- Close Microsoft Access


![]() Practical
Learning: Dealing with Data Joins and Record Nullity
Practical
Learning: Dealing with Data Joins and Record Nullity


![]() Practical
Learning: Joining More Than Two Tables
Practical
Learning: Joining More Than Two Tables

![]() Practical
Learning: Introducing Joins and Data Analysis
Practical
Learning: Introducing Joins and Data Analysis