Introduction to Classes

Introduction to Classes
Fundamentals of Classes
Introduction
Imagine you want to describe an object, such as a house. You can declare various variables that each holds one particular value such as the number of bedrooms, the number of doors, the market value of the house, etc. Here is an example:
@{
    string typeOfHouse;
    int numberOfBedrooms;
    decimal price;
}
|
 |
Instead of many variables, you group the whole description one unit named a class. A class is a technique of using one or a group of variables to describe an object.
![]() Practical Learning: Introducing Classes
Practical Learning: Introducing Classes
body {
    margin: 0;
    background-color: white;
}

.container {
    margin: auto;
    width: 375px;
}

.emphasis {
    font-weight: 600
}

.container h2 {
    text-align: center;
}

.left-col {
    width: 100px;
}<!DOCTYPE html>
<html>
<head>
<link rel="stylesheet" type="text/css" href="~/Content/Site.css" />
<title>Fun Department Store - Inventory</title>
</head>
<body>
<div class="container">
<h2>Fun Department Store - Inventory</h2>
@{
int itemNumber = 284075;
string itemName = "Petite Jersey Matte Dress";
string size = "Small";
decimal unitPrice = 124.75m;
}
<form name="fromDepartmentStore" method="post">
<table>
<tr>
<td class="left-col emphasis">Item #:</td>
<td><input type="text" name="txtItemNumber" value="@itemNumber" style="width: 60px" /></td>
</tr>
<tr>
<td class="emphasis">Item Name:</td>
<td><input type="text" name="txtItemName" value="@itemName" style="width: 200px" /></td>
</tr>
<tr>
<td class="emphasis">Size:</td>
<td><input type="text" name="txtItemSize" value=@size /></td>
</tr>
<tr>
<td class="emphasis">Unit Price:</td>
<td><input type="text" name="txtUnitPrice" value=@unitPrice /></td>
</tr>
</table>
</form>
</div>
</body>
</html>

body {
    margin: 0;
    background-color: #f6f5f1;
}

.container {
    margin: auto;
    width: 375px;
}

.emphasis     { font-weight: 600 }
.container h2 { text-align: center; }
.left-col     { width: 100px; }
Creating a Class
A class is created in a file. A file that contains (a) class(es) is a regular text-based file that has the extension .cs. A file can contain one or more classes. A class starts with a keyword named class.
You can also use skeleton code to start a class:
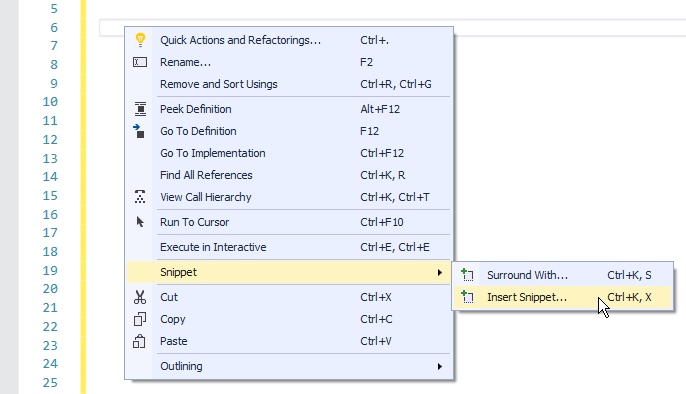

A class with the default name MyClass would be added. You can accept that name or change it.
Classes and Files
One way you can organize the classes of your application is to put them in different files. A file can contain as many classes as necessary.
Classes's Files and Folders
One way you can organize files is to put them in different folders. This also applies to files that contain classes.
The Body of a Class
To present its description, a class has members. The list of the members of a class is specified after the name of the class. The members are included between an opening curly bracket { and a closing curly bracket }. The section between the curcly brackets is referred to as the body of the class. It would appear as follows:
class House { . . . }
As mentioned above, the members of a class are included inside its curly brackets. Here is an example:
class House {
    string typeOfHouse;
    int numberOfBedrooms;
    decimal price; }
Although this code is legal, to make it easier to read, you can include each curcly bracket on its own line and each member on its own line, like this:
class House
{
    string typeOfHouse;
    int numberOfBedrooms;
    decimal price;
}
Or this:
class House
{
string typeOfHouse;
int numberOfBedrooms;
decimal price;
}
As mentioned earlier, the variables that are the same type can be declared together using their common type. Here are examples:
class State
{
    string capital;
    string abbrev, name, dateOfAdmissionToUnion;
    int orderOfAdmissionToUnion;
    decimal areaInSquareMiles, areaInKilometers;
}
![]() Practical Learning: Creating a Class
Practical Learning: Creating a Class
class StoreItem
{

}
Introduction to Using a Class
To use a class in your program, you must first declare a variable for it. Declaring a variable of a class is also referred to as creating an object or creating an instance of a class.
The way you declare a variable for a class depends on where you want to use the object. To declare the variable in the code delimiters in a webpage, type the name of the class followed by a name for the variable. Here is an example:
@{
    StoreItem dress;
}
The variable of a class can also be declared in the body of another class or in another code section. Here is an example:
class House
{
}

class State
{
    House property;
}
You can also declare variables of different classes in the body of, or outside a class. In C#, the order of appearance of the classes or their variables is not implortant.
If various variables are using the same type, you can declare them using their common class name. Separate the names of variables with commas. Here are examples:
class Region
{
    decimal area;
    State sc, wa;
}
Value Types and Reference Types
When you declare a variable of a regular type (string or number), such a value is referred to as a value type. In fact, when you access the value of the variable, you get the actual value itself.
After declaring a variable for a class, whenever you need its object, you must use the address of the memory where the object is stored. This means that you are actually accessing the object using its reference. For this reason, an object created from a class is stored in a type of memory called the heap.
When declaring a variable for a class, to indicate that its value must be stored in the heap, you must initialize it using an operator called new. In the variable is being declared in a code delimiter, the new operator is followed by the name of the project, a period, and the name of the class. If the object is being created in another code section, use just the name of the class. In both cases, the name of the class is followed by empty parentheses. Here is an example:
<!DOCTYPE html>
<html>
<head>
<title>Department Store</title>
</head>
<body>
@{
    StoreItem si = new StoreItem();
}

</body>
</html>
Instead of the name of the class, on the left of the = operator, you can use the var keyword. With this keyword, you must initialize the variable immediately, normally on the same line. Here is an example:
<!DOCTYPE html>
<html>
<head>
<title>Department Store</title>
</head>
<body>
@{
    var si = new StoreItem();
}

</body>
</html>
To access the variable outside the code delimiter, use the @ symbol followed by the name of the variable.
Introduction to the Fields of a Class
Consider a class named House:
class House
{
}
As mentioned previously, the section between the curly brackets, { and }, of a class is referred to as its body. In the body of a class, you can create a list of the types that describe an object. These types are referred to as members of the class. At a minimum, these members are created like variables, and therefore are considered member variables. In C#, a variable declared in the body of a class is called a field. Each field is declared as a normal variable with a name and a data type. The name of a variable follows the same rules we reviewed for names of variables. Here is an example of a class with a few fields:
class House
{
    int brightness;
    string security;
}
Each field can be any type you want.
New Convention:From now on, in our lessons, to refer to a field that belongs to a class, we may write class-name.field-name This means that we are referring to the field field-name that is a member of the class class-name. |
![]() Application: Adding Fields to a Class
Application: Adding Fields to a Class
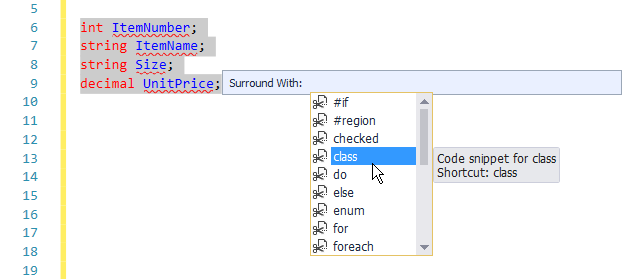
class StoreItem
{
    int ItemNumber;;
    string ItemName;
    string Size;
    decimal UnitPrice;
}
Access Modifiers and Classes
The Private Members of a Class
The parts of an object fall into two main categories: those you can touch and those you don't have access to. The parts you cannot access or cannot see are referred to as private. When creating a class, to specify that a member must be hidden to outside objects, precede its declaration with the private keyword. Here are examples:
class House
{
    string Location;

    // A private field
    private string FloorPlan;
    // A private field
    private int basement;
}
When a member is marked private, other members of the same class can access it. Objects outside the class and members of other classes cannot access a private member.
The Public Members of a Class
The parts of an object to which you have access are referred to as public. To indicate that a member of a class must be accessible outside the class, precede its declaration with the public keyword. Here are examples:
class House
{
    // A public field
    public string BuildingPermit;
    // A public field
    public decimal MarketValue;
}
The public and private keywords are referred to as access levels.
By default, if you create a member (field, etc) in a class but don't specify its access level, the member is considered private and cannot be accessed from outside, that is by a non-member, of that class. Therefore, to make a member accessible by other classes, you must mark it as public.
You can use a mix of public and private members in a class and there is no rule on which access level should be listed first or last. To reduce confusion as to what member is public or private, you should always specify the access level of each member.
![]() Practical Learning: Specifying the Access Modifiers of Fields
Practical Learning: Specifying the Access Modifiers of Fields
class StoreItem
{
    public int ItemNumber;
    public string ItemName;
    public string Size;
    public decimal UnitPrice;
}
The Internal Members of a Class
The public keyword is used to let objects of the same project and objects of other projects access the public members. The private keyword is used to let only members of a class access the (private) members of the class. If you want to create a member of a class so that only objects of the same project can access that member, you can mark it with the internal keyword.
If many variables use the same type and must use the same access level, you can apply their common access level. Here are examples:
class Drama
{
    public string category, enactment;
    private int length, reception, stage;
}
Sometimes you want your code to be shared among various languages such as C++/CLI, Visual Basic, F#, etc. To make this possible, a C# class can be created as a public object.
If you want your class to be accessible to code written in other languages, precede the class keyword with the public keyword when creating it.
![]() Practical Learning: Specifying the Access Modifiers of Fields
Practical Learning: Specifying the Access Modifiers of Fields
public class StoreItem
{
    public int ItemNumber;
    public string ItemName;
    public string Size;
    public decimal UnitPrice;
}
Initializing an Object
The Period Operator
After creating a member of a class, to access it from another class, first declare a variable from its class as we know already. To actually access the member, use the period operator ".".
After declaring an instance of a class, you can access each of its members and assign it the desired value.
![]() Practical Learning: Using a Class' Fields
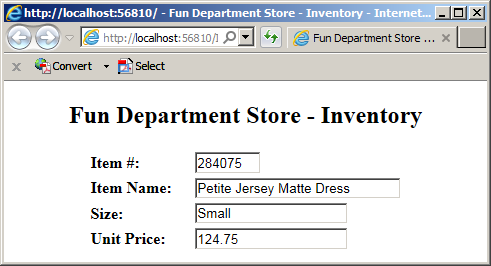
Practical Learning: Using a Class' Fields
<!DOCTYPE html>
<html>
<head>
<link rel="stylesheet" type="text/css" href="~/Content/Site.css" />
<title>Fun Department Store - Inventory</title>
</head>
<body>
<div class="container">
    <h2>Fun Department Store - Inventory</h2>

    @{
        StoreItem si = new StoreItem();

        si.ItemNumber = 938074;
        si.ItemName = "Twist Sheath Dress";
        si.Size = "2";
        si.UnitPrice = 138.45m;
    }

    <form name="fromDepartmentStore" method="post">
        <table>
            <tr>
                <td class="left-col emphasis">Item #:</td>
                <td><input type="text" name="txtItemNumber" value="@si.ItemNumber" style="width: 60px" /></td>
                <td rowspan="4"><img src="~/Images/dress1.png" alt="Twist Sheath Dress" width="281" height="600" /></td>
            </tr>
            <tr>
                <td class="emphasis">Item Name:</td>
                <td><input type="text" name="txtItemName" value="@si.ItemName" style="width: 200px" /></td>
            </tr>
            <tr>
                <td class="emphasis">Size:</td>
                <td><input type="text" name="txtItemSize" value=@si.Size /></td>
            </tr>
            <tr>
                <td class="emphasis">Unit Price:</td>
                <td><input type="text" name="txtUnitPrice" value=@si.UnitPrice /></td>
            </tr>
        </table>
    </form>
</div>
</body>
</html>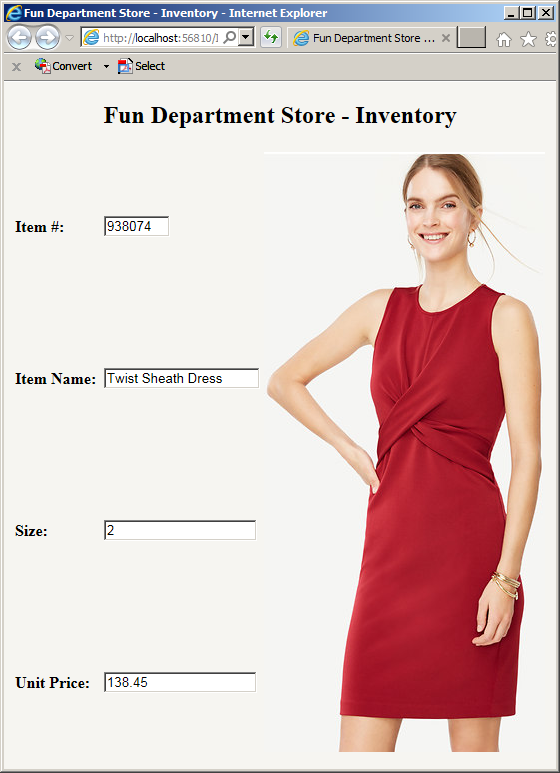
Using an Anonymous Type
We saw that, to use a class, you could first declare a variable for it and initialize it. Fortunately, you don't have to use a class to initialize an object. You can declare a variable that resembles an instance of a class and initialize it as you see fit. This is referred to as an anonymous type. To use it, declare the variable using the var keyword and use the new operator to allocate memory for it. Instead of using the name of a class, type an opening and a closing curly brackets after the new operator. In the curly brackets, state a name for each member as if it were the member of the class and initialize each member variable with the desired value. After the closing curly bracket, end the declaration with a semi-colon. Here is an example:
<!DOCTYPE html>
<html>
<head>
<title>Book Collection</title>
</head>
<body>

@{
    var BookInformation = new
    {
        Title = "Calculus 6e Edition",
        Pages = 1074,
        Cover = "Hard Back"
    };
}
</body>
</html>
After initializing the anonymous type, you can access each one of its members using the name of the variable followed by the period operator, and followed by the member variable. Here is an example:
<!DOCTYPE html>
<html>
<head>
<title>Department Store</title>
</head>
<body>
@{
    var BookInformation = new
    {
        Title = "Calculus 6e Edition",
        Pages = 1074,
        Cover = "Hard Back"
    };
}

<h3>=//= Book Collection =//=</h3>
<p>Title: @BookInformation.Title<br>
Number of Pages:  @BookInformation.Pages<br>
Type of Cover: @BookInformation.Cover</p>
</body>
</html>
This would produce:
=//= BookInformation =//=
Title:         Calculus 6e Edition
Nbr of Pages:  1074
Type of Cover: Hard Back
Press any key to continue . . .
Remember that spreading the declaration on many lines only makes it easy to read. Otherwise, you can as well include everything on the same line. Here is an example:
<!DOCTYPE html>
<html>
<head>
<title>Book Collection</title>
</head>
<body>

@{
    var BookInformation = new { Title = "Calculus 6e Edition", Pages = 1074, Cover = "Hard Back" };
}

<h3>=//= Book Collection =//=</h3>
<p>Title: @BookInformation.Title<br>
Number of Pages:  @BookInformation.Pages<br>
Type of Cover: @BookInformation.Cover</p>
</body>
</html>
Introduction to the Nullity of an Object
The Nullity of a Variable
When you need to use the values and behaviors that a class offers, you know that you must declare a variable for it. You also know that you should provide the values for the members (fields) of the class before using it. This allows the compiler to fill the memory reserved for that variable with the desired value(s). Sometimes, when declaring a variable, you may not be ready to provide the necessary values for the object.
An object is null when it doesn't have a valid value. This means that a variable that has been declared for a class but that has not yet received values for its members is referred to as a null object. To support this, the C# language provides the null keyword.
Imagine you have some classes as follows:
public class Square
{
    public decimal Side;
}

public class Employee
{

}

public class House
{
    public string Bedrooms;
}

public class Description
{

}
To create a null object, when declaring the variable, use the name of the class, followed by a name for the variable, and assign the null keyword to it. Here are examples:
<!DOCTYPE html>
<html>
<head>
<title>Exercise</title>
</head>
<body>
<h3>Exercise</h3>

@{
    House habitat = null;
    Square plate = null;
    Employee staff = null;
}

</body>
</html>
A Null Field
If you want to indicate that a field of a primitive type can hold a null value, add a question mark to it. Here are examples:
public class House
{
    int? bedrooms;
    decimal? value;
}
![]() Practical Learning: Ending the Lesson
Practical Learning: Ending the Lesson
|
|
||
| Previous | Copyright © 2001-2019, FunctionX | Next |
|
|
||