Introduction to Interfaces

Introduction to Interfaces
Introduction
An interface is a structural layout that resembles a class but has the following characteristics:
![]() Practical Learning: Introducing Interfaces
Practical Learning: Introducing Interfaces
body {
    background-color: white
}

table              { width:      100%;   }
.container         { margin:     auto;
                     width:      710px;  }
.central-alignment { text-align: center; }
.caption           { width:      200px;  }
Creating an Interface
The basic formula to create an interface is:
[ access-modifier(s) ] interface name
{
    members
}
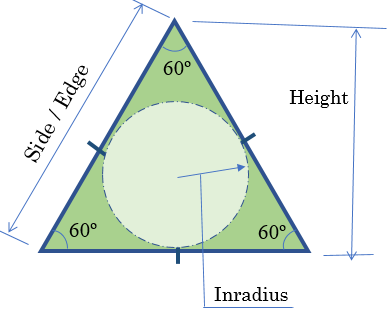
The access modifiers can be any of those we have seen in previous lessons (public, protected, internal, private, or protected internal). If you omit the access modifier, it is assumed to be public. By tradition, the name of an interface starts with I. The section between the curly brackets is the body of the interface.
To create an interface, you can use a text editor such as Notepad, include your code, and save the file with the .cs extension. If you are using Microsoft Visual Studio, to created an interface, on the main menu, click Project -> Add New Item... In the Add New Item dialog box, select Interface, give it a name and click Add.
![]() Practical Learning: Creating an Interface
Practical Learning: Creating an Interface
namespace Geometry18
{
    public interface IPolygon
    {
    }
}
Implementing an Interface
After creating an interface, to implement it, as mentioned in our introduction, create a class or a structure that derives from the interface. Here is an example:
interface IPolygon
{
}

public class Triangle : IPolygon
{
}
Once you have the class, you can create objects from it and instantiate it using the new operator.
![]() Practical Learning: Implementing an Interface
Practical Learning: Implementing an Interface
namespace Geometry18.App_Code
{
    public class EquilateralTriangle : IPolygon
    {
    }
}
Interfaces and Objects
Creating an Object from an Interface-Derived Class
After implementing an interface, you can create an object of a class that implements it. Here is an example from the above class:
private void btnCreate_Click(object sender, EventArgs e)
{
    EquilateralTriangle et = new EquilateralTriangle();
}
By using the name of the class to declare a variable, you can access any non-private member of the class.
Declaring a Variable of Interface Type
As seen for an abstract class, you cannot declare a variable of an interface and use it directly as you would a regular class. Instead, you can declare a variable by using the name of the interface but not allocate memory for the variable. Here is an example:
private void btnCreate_Click(object sender, EventArgs e)
{
    IPolygon figure;
}
When allocating memory for the object, use the new operator. You must use a class that implements that interface. Here is an example:
private void btnCreate_Click(object sender, EventArgs e)
{
    IPolygon figure;

    figure = new EquilateralTriangle();
}
You can also declare the variable and allocate its memory on the same line. Here is an example:
private void btnCreate_Click(object sender, EventArgs e)
{
    IPolygon figure = new EquilateralTriangle();
}
After that, you can use the object.
Introduction to the Members of an Interface
As mentioned earlier, the purpose of an interface is to create a skeleton for classes and/or structures. When creating an interface, in its body, create the necessary members. Unlike classes and structures, the following keywords are not allowed on the members of an interface: private, public, protected, internal, static, abstract, virtual, or overrides.
In the class or a structure that is based on the interface, you must implement all the members of the interface. This means that you must create a definition for each member of the interface.
Interfaces and Properties
A Property in an Interface
An interface can contain one or more properties. If the property is intended to be read-only, create it using the formula we saw for automatic read-only properties, that is, without a body. Here is an example:
interface IPolygon
{
    double Area { get; }
}
When implementing the property, if it is a simple property that doesn't need to validate any value, you can simply apply the desired access level. Here is an example:
interface IPolygon
{
    double Area { get; }
}

public class Triangle : IPolygon
{
    public double Area { get; }
}
Otherwise, you can create a body for the property.
In the same way, if the property is intended to be write-only, in the body of the interface, create it and then implement it in a deriving class.
If a property is intended to be read-write, create it without its body in the interface. When implementing the property in a class, if it is a simple property, create it as an automatic property. If the property must validate its value, you can first create a private field and use it in the clauses of the property.
![]() Practical Learning: Adding a Property to an Interface
Practical Learning: Adding a Property to an Interface
namespace Geometry18.App_Code
{
    public interface IPolygon
    {
        int    Edges         { get;      }
        double Side          { get; set; }
        int    InternalAngle { get;      }
        double Perimeter     { get;      }
        double Area          { get;      }
    }
}namespace Geometry18.App_Code
{
public class EquilateralTriangle : IPolygon
{
public int Edges
{
get
{
return 3;
}
}
public double Side { get; set; }
public int InternalAngle
{
get
{
return 60;
}
}
public double Perimeter
{
get
{
return Side * Edges;
}
}
public double Area
{
get
{
return Side * Side * Math.Sqrt(3.00) / 4.00;
}
}
}
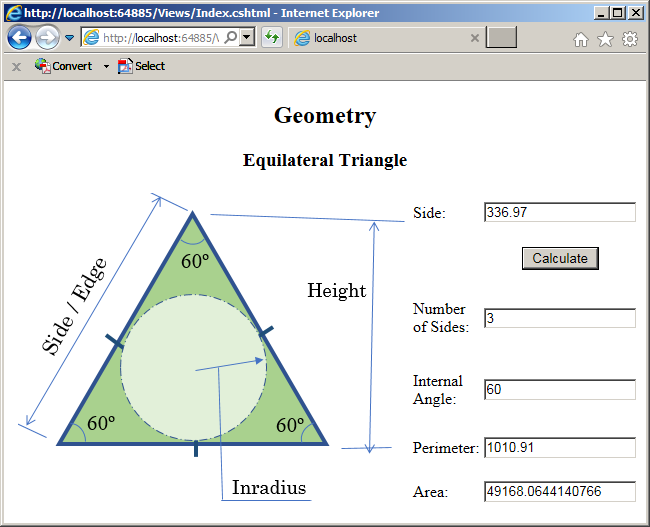
}<!DOCTYPE html>
<html>
<head>
<title></title>
<link rel="stylesheet" type="text/css" href="~/Content/Geometry.css" />
</head>
<body>
<div class="container">
<h2 class="central-alignment">Geometry</h2>
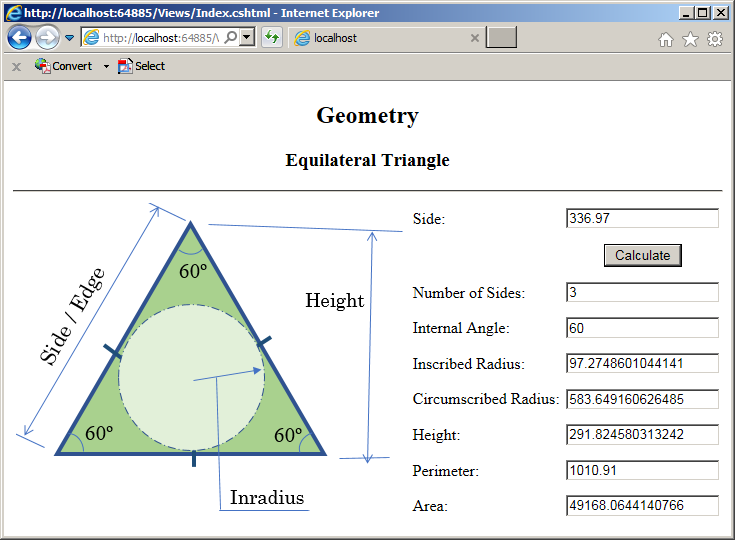
<h3 class="central-alignment">Equilateral Triangle</h3>
<hr />
@{
double side = 0.00;
Geometry18.App_Code.EquilateralTriangle et = new Geometry18.App_Code.EquilateralTriangle();
if (IsPost)
{
side = Convert.ToDouble(Request["txtSide"]);
et.Side = side;
}
}
<form name="frmGeometry" method="post">
<table>
<tr>
<td style="width: 395px" rowspan="9">
<img src="~/Images/triangle2.png" width="391" height="315" alt="Geometry - Equilateral Triangle">
</td>
<td>Side:</td>
<td><input type="text" name="txtSide" value="@side" /></td>
</tr>
<tr>
<td> </td>
<td style="text-align: center"><input type="submit" name="btnSubmit" value="Calculate" /></td>
</tr>
<tr>
<td>Number of Sides:</td>
<td><input type="text" name="txtSides" value="@et.Edges" /></td>
</tr>
<tr>
<td>Internal Angle:</td>
<td><input type="text" name="txtInternalAngle" value="@et.InternalAngle" /></td>
</tr>
<tr>
<td>Perimeter:</td>
<td><input type="text" name="txtPerimeter" value="@et.Perimeter" /></td>
</tr>
<tr>
<td>Area:</td>
<td><input type="text" name="txtArea" value="@et.Area" /></td>
</tr>
</table>
</form>
</div>
</body>
</html>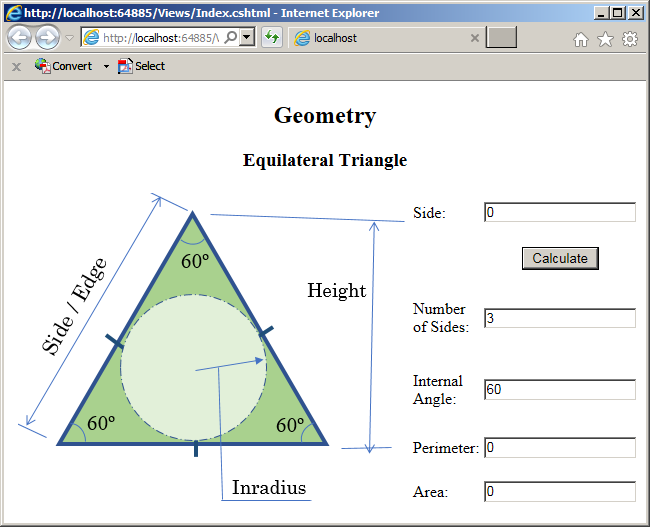

A Property of an Interface Type
Imagine you create an interface as we did above. Here is an example:
using System.Drawing;

public interface IVehicle
{
    int   NumberOfTires { get; set; }
    int   NumberOfDoors { get; set; }
    Color MainColor     { get; set; }
}
You can create one or more classes that implement such an interface. Here are examples:
using System.Drawing;

public class Sedan : IVehicle
{
    public int    NumberOfTires { get; set; }
    public int    NumberOfDoors { get; set; }
    public Color  MainColor     { get; set; }

    public string Make          { get; set; }
    public string Model         { get; set; }
    public int    Year          { get; set; }
    public int    NumberOfSeats { get; set; }
}
A property of a class can be of the type of an interface. You primarily create the property like one that is based on a class. Here is an example:
using System;

public class RentalOrder
{
    // Rental Order #
    public int InvoiceNumber { get; set; }
    // The employee/clerk who processes/processed the rental order
    public string EmployeeeNumber { get; set; }
    // The vehicle that was rented

    public IVehicle Car { get; set; }

    public DateTime RentStartDate { get; set; }
    public DateTime RentEndDate { get; set; }
}
When it comes time to use an interface-type property, you may have to indicate where the values of the property come from. In fact, at one time, you may have to initialize the property. To do this, you should/can (must) use a class that implements the interface. Here is an example:
private void btnOrderProcessing_Click(object sender, EventArgs e)
{
    RentalOrder ro = new RentalOrder();

    ro.InvoiceNumber   = 100001;
    ro.EmployeeeNumber = "309-247";
    ro.RentStartDate   = new DateTime(2018, 8, 12);
    ro.RentEndDate     = new DateTime(2018, 8, 17);

    ro.Car = new Sedan();
}
From the interface-based property, you can access only the members of the interface. As a result, the following code would produce an error because you are trying to access a member of the class but that member is not part of the interface:
private void btnOrderProcessing_Click(object sender, EventArgs e)
{
    RentalOrder ro = new RentalOrder();

    ro.InvoiceNumber   = 100001;
    ro.EmployeeeNumber = "309-247";
    ro.RentStartDate   = new DateTime(2018, 8, 12);
    ro.RentEndDate     = new DateTime(2018, 8, 17);

    ro.Car = new Sedan();

    ro.Car.Make = "Ford";
}
Therefore, as mentioned already, remember that you can access only the members of the interface. Here are examples:
private void btnOrderProcessing_Click(object sender, EventArgs e)
{
    RentalOrder ro = new RentalOrder();

    ro.InvoiceNumber   = 100001;
    ro.EmployeeeNumber = "309-247";
    ro.RentStartDate   = new DateTime(2018, 8, 12);
    ro.RentEndDate     = new DateTime(2018, 8, 17);

    ro.Car.NumberOfTires = 4;
    ro.Car.NumberOfDoors = 4;
    ro.Car.NumberOfSeats = 5;
    ro.Car.MainColor     = Color.Silver;
}
Interfaces and Methods/Functions
A Method in an Interface
An interface can contain one or more methods. A method is created like an abstract method of an abstract class. That is, a method without a body. The formula to follow is:
return-type method-name();
Here is an example:
interface IPolygon
{
    double CalculatePerimeter();
}
In the same way, you can add as many methods as you want. In every class or structure that implements the interface, you must define each of the interface's methods.
![]() Practical Learning: Adding a Method to an Interface
Practical Learning: Adding a Method to an Interface
namespace Geometry18
{
    interface IPolygon
    {
        int    Edges         { get;      }
        double Side          { get; set; }
        int    InternalAngle { get;      }
        double Perimeter     { get;      }
        double Area          { get;      }

        double CalculateInscribedRadius();
        double CalculateCircumscribedRradius();
    }
}namespace Geometry18.App_Code
{
public class EquilateralTriangle : IPolygon
{
public int Edges => 3;
public double Side { get; set; }
public int InternalAngle => 60;
public double Perimeter => Side * Edges;
public double Area => Side * Side * Math.Sqrt(3.00) / 4.00;
public double CalculateInscribedRadius()
{
return Side * Math.Sqrt(3.00) / 6.00;
}
public double CalculateCircumscribedRradius()
{
return Side * Math.Sqrt(3.00);
}
}
}An interface cannot contain a constructor. Instead, you can create one or more constructors in a class that implements the interface. Using sush a constructor, you can initialize the variable. Here is an example:
private void btnCalculate_Click(object sender, EventArgs e)
{
    double measure = Convert.ToDouble(txtSide.Text);
    IPolygon et = new Triangle(measure);
}
![]() Practical Learning: Using a Class that Implements an Interface
Practical Learning: Using a Class that Implements an Interface
using System;
using System.Collections.Generic;
using System.Linq;
using System.Web;

namespace Geometry18.App_Code
{
    public class EquilateralTriangle : IPolygon
    {
        public EquilateralTriangle(double edge)
        {
            Side = edge;
        }

        public int Edges => 3;

        public double Side { get; set; }

        public int InternalAngle => 60;
        public double Perimeter => Side * Edges;
        public double Area => Side * Side * Math.Sqrt(3.00) / 4.00;

        public double Height
        {
            get
            {
                return Side * Math.Sqrt(3.00) / 2.00;
            }
        }

        public double CalculateInscribedRadius()
        {
            return Side * Math.Sqrt(3.00) / 6.00;
        }

        public double CalculateCircumscribedRradius()
        {
            return Side * Math.Sqrt(3.00);
        }
    }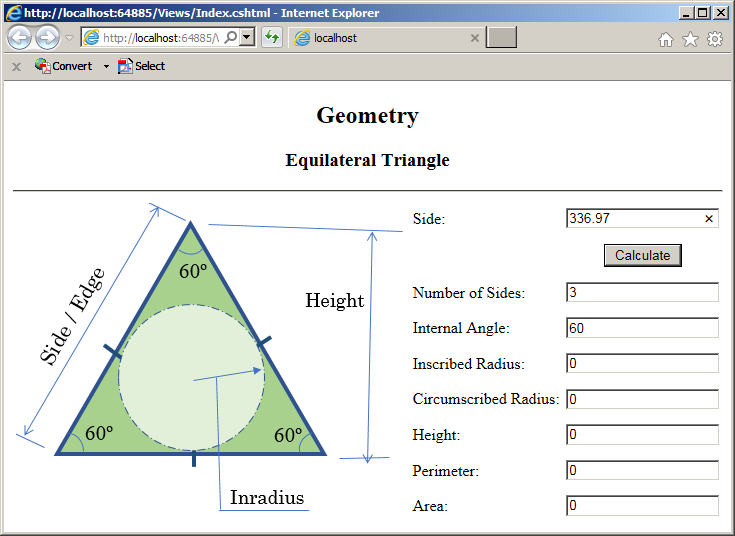
}<!DOCTYPE html>
<html>
<head>
<title></title>
<link rel="stylesheet" type="text/css" href="~/Content/Geometry.css" />
</head>
<body>
<div class="container">
<h2 class="central-alignment">Geometry</h2>
<h3 class="central-alignment">Equilateral Triangle</h3>
<hr />
@{
double side = 0.00;
Geometry18.App_Code.EquilateralTriangle et = new Geometry18.App_Code.EquilateralTriangle(0.00);
if (IsPost)
{
side = Convert.ToDouble(Request["txtSide"]);
et = new Geometry18.App_Code.EquilateralTriangle(side);
}
}
<form name="frmGeometry" method="post">
<table>
<tr>
<td style="width: 395px" rowspan="9">
<img src="~/Images/triangle2.png" width="391" height="315" alt="Geometry - Equilateral Triangle">
</td>
<td class="caption">Side:</td>
<td><input type="text" name="txtSide" value="@side" /></td>
</tr>
<tr>
<td> </td>
<td style="text-align: center"><input type="submit" name="btnSubmit" value="Calculate" /></td>
</tr>
<tr>
<td>Number of Sides:</td>
<td><input type="text" name="txtSides" value="@et.Edges" /></td>
</tr>
<tr>
<td>Internal Angle:</td>
<td><input type="text" name="txtInternalAngle" value="@et.InternalAngle" /></td>
</tr>
<tr>
<td>Inscribed Radius:</td>
<td><input type="text" name="txtInscribedRadius" value="@et.CalculateInscribedRadius()" /></td>
</tr>
<tr>
<td>Circumscribed Radius:</td>
<td><input type="text" name="txtCircumscribedRadius" value="@et.CalculateCircumscribedRradius()" /></td>
</tr>
<tr>
<td>Height:</td>
<td><input type="text" name="txtInternalAngle" value="@et.Height" /></td>
</tr>
<tr>
<td>Perimeter:</td>
<td><input type="text" name="txtPerimeter" value="@et.Perimeter" /></td>
</tr>
<tr>
<td>Area:</td>
<td><input type="text" name="txtArea" value="@et.Area" /></td>
</tr>
</table>
</form>
</div>
</body>
</html>
body {
    background-color: white
}

table        { width:      100%;   }
.centered    { text-align: center; }
.small       { width:      40px;   }
.medium      { width:      120px;  }
.large       { width:      150px;  }
.contents    { margin:     auto;
width: 780px; }namespace Geometry19.App_Code
{
public interface IPolygon
{
int Edges { get; }
double Side { get; set; }
int InternalAngle { get; }
double Perimeter { get; }
double Area { get; }
double CalculateInscribedRadius();
double CalculateCircumscribedRradius();
}
}namespace Geometry19.App_Code
{
public class Pentagon : IPolygon
{
public Pentagon(double edge)
{
Side = edge;
}
public int Edges
{
get
{
return 5;
}
}
public double Side { get; set; }
public int InternalAngle
{
get
{
return 108;
}
}
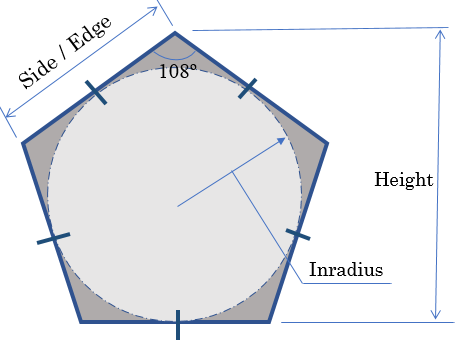
// http://mathworld.wolfram.com/Pentagon.html
public double Height => Side * Math.Sqrt(5.00 + (2.00 * Math.Sqrt(5.00))) / 2.00;
public double Perimeter => Side * Edges;
public double Area => Side * Side * Math.Sqrt(5.00 * (5.00 + (2.00 * Math.Sqrt(5.00)))) / 4.00;
public double CalculateInscribedRadius()
{
// http://mathworld.wolfram.com/Pentagon.html
return Side * Math.Sqrt(25.00 + (10.00 * Math.Sqrt(5.00))) / 10.00;
// https://en.wikipedia.org/wiki/Pentagon
// return Side / (2.00 * Math.Sqrt(5.00 - Math.Sqrt(20.00)));
}
public double CalculateCircumscribedRradius()
{
// http://mathworld.wolfram.com/Pentagon.html
return Side * Math.Sqrt(50.00 + (10.00 * Math.Sqrt(5.00))) / 10.00;
}
}
}<!DOCTYPE html>
<html>
<head>
<title>Geometry - Pentagon</title>
<link rel="stylesheet" type="text/css" href="~/Content/Geometry.css" />
</head>
<body>
<header>
<h1 class="centered">Geometry</h1>
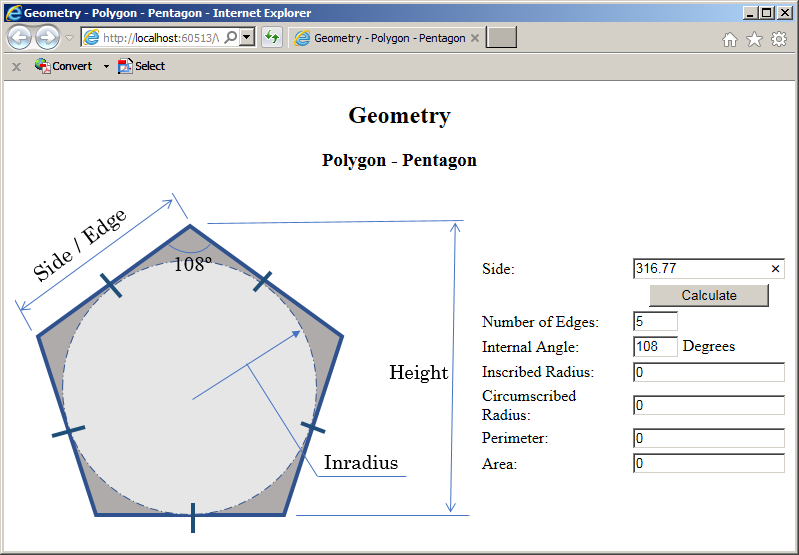
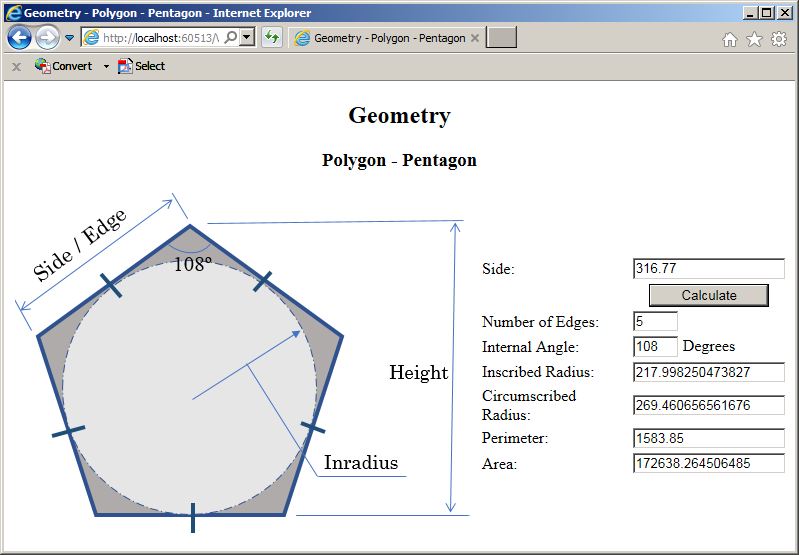
<h2 class="centered">Pentagon</h2>
</header>
@{
double side = 0.00;
Geometry19.App_Code.IPolygon pent = new Geometry19.App_Code.Pentagon(0.00);
if (IsPost)
{
side = Convert.ToDouble(Request["txtSide"]);
pent = new Geometry19.App_Code.Pentagon(side);
}
}
<div class="contents">
<form name="Pentagon" method="POST">
<table>
<tr>
<td><img src="~/Images/pentagon.png" alt="Geometry - Polygon - Pentagon" width="460" height="343" /></td>
<td>
<table>
<tr>
<td class="large">Side:</td>
<td><input type="text" name="txtSide" value=@side /></td>
</tr>
<tr>
<td> </td>
<td style="text-align: center"><input class="medium" type="submit" name="btnCalculate" value="Calculate" /></td>
</tr>
<tr>
<td>Number of Edges:</td>
<td><input type="text" name="Edges" class="small" value=@pent.Edges /></td>
</tr>
<tr>
<td>Internal Angle:</td>
<td><input type="text" name="InternalAngle" class="small" value=@pent.InternalAngle /> Degrees</td>
</tr>
<tr>
<td>Inscribed Radius:</td>
<td><input type="text" name="InscribedRadius" value=@pent.CalculateInscribedRadius() /></td>
</tr>
<tr>
<td>Circumscribed Radius:</td>
<td><input type="text" name="CircumscribedRadius" value=@pent.CalculateCircumscribedRradius() /></td>
</tr>
<tr>
<td>Perimeter:</td>
<td><input type="text" name="Perimeter" value=@pent.Perimeter /></td>
</tr>
<tr>
<td>Area:</td>
<td><input type="text" name="Area" value=@pent.Area /></td>
</tr>
</table>
</td>
</tr>
</table>
</form>
</div>
</body>
</html>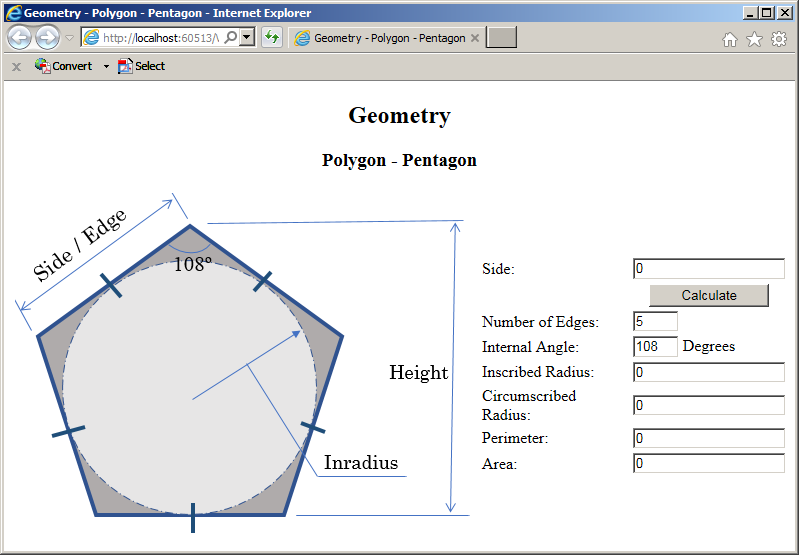
Passing an Interface As Argument
A parameter of a method can be an interface type. In the body of such a method, you can access (only) the members of the interface. Here is an example:
@helper Display(IPolygon poly)
{
    <table>
        <tr>
            <td>Number of Sides:</td>
            <td>@poly.Edges</td>
        </tr>
        <tr>
            <td>Internal Angle:</td>
            <td>@poly.InternalAngle</td>
        </tr>
        <tr>
            <td>Inscribed Radius:</td>
            <td>@poly.CalculateInscribedRadius()</td>
        </tr>
        <tr>
            <td>Circumscribed Radius:</td>
            <td>@poly.CalculateCircumscribedRradius()</td>
        </tr>
        <tr>
            <td>Perimeter:</td>
            <td>@poly.Perimeter</td>
        </tr>
        <tr>
            <td>Area:</td>
            <td>@poly.Area</td>
        </tr>
    </table>
}
When calling the method, pass an object of the interface but that object should have been initialized with a class that implements the interface. Here is an example:
<!DOCTYPE html>
<html>
<head>
<title>Geometry - Polygon - Pentagon</title>
</head>
<body>
@helper Display(Geometry19.App_Code.IPolygon poly)
{
    <table>
        <tr>
            <td>Number of Sides:</td>
            <td>@poly.Edges</td>
        </tr>
        <tr>
            <td>Internal Angle:</td>
            <td>@poly.InternalAngle</td>
        </tr>
        <tr>
            <td>Inscribed Radius:</td>
            <td>@poly.CalculateInscribedRadius()</td>
        </tr>
        <tr>
            <td>Circumscribed Radius:</td>
            <td>@poly.CalculateCircumscribedRradius()</td>
        </tr>
        <tr>
            <td>Perimeter:</td>
            <td>@poly.Perimeter</td>
        </tr>
        <tr>
            <td>Area:</td>
            <td>@poly.Area</td>
        </tr>
    </table>
}

<h3>Geometry - Polygon - Pentagon</h3>
@{
    double measure = 316.77;
    IPolygon shape = new Pentagon(measure);

    @Display(shape);
}
</body>
</html>
Returning an Interface
A method can return an object of an interface type. When creating the method, specify its return type as the desired interface. In the body of the method, remember that you cannot simply instantiate an interface and directly use it as you would an object of a class. As a result, you cannot directly return an object of an interface type. Instead, you can declare a variable of the desired interface, initialize it with a class that implements the interface and then return that variable. Here is an example:
File: Polygon.cs
using System;
using System.Collections.Generic;
using System.Linq;
using System.Text;
using System.Threading.Tasks;

namespace Geometry18.App_Code
{
    public interface IPolygon
    {
        int Edges { get; }
        double Side { get; set; }
        int InternalAngle { get; }
        double Perimeter { get; }
        double Area { get; }

        double CalculateInscribedRadius();
        double CalculateCircumscribedRradius();
    }

    public class Geometry
    {
        public IPolygon Create()
        {
            double measure = 316.77;

            IPolygon geo = new Pentagon(measure);

            return geo;
        }
    }
}
File: Index.cshtml
<!DOCTYPE html>
<html>
<head>
<title>Geometry - Polygon - Pentagon</title>
</head>
<body>
@helper Display(Geometry18.App_Code.IPolygon poly)
{
    <table>
        <tr>
            <td>Number of Sides:</td>
            <td>@poly.Edges</td>
        </tr>
        <tr>
            <td>Internal Angle:</td>
            <td>@poly.InternalAngle</td>
        </tr>
        <tr>
            <td>Inscribed Radius:</td>
            <td>@poly.CalculateInscribedRadius()</td>
        </tr>
        <tr>
            <td>Circumscribed Radius:</td>
            <td>@poly.CalculateCircumscribedRradius()</td>
        </tr>
        <tr>
            <td>Perimeter:</td>
            <td>@poly.Perimeter</td>
        </tr>
        <tr>
            <td>Area:</td>
            <td>@poly.Area</td>
        </tr>
    </table>
}

<h3>Geometry - Polygon - Pentagon</h3>
@{
    Geometry18.App_Code.Geometry calculations = new Geometry18.App_Code.Geometry();

    Geometry18.App_Code.IPolygon shape = calculations.Create();

    @Display(shape);
}
</body>
</html>
Interfaces and Inheritance
Inheriting an Interface
An interface can be derived from another interface (but an interface cannot derive from a class). Obviously the derived interface is supposed to add some behavior using methods and/or properties. Here is an example:
interface IPolygon
{
    double Side { get; set; }
    double Area { get; set; }
}

interface IPolyhedron : IPolygon
{
    double Volume { get; set; }
}
As you should know already that nothing is implemented in an interface, a member of the parent interface cannot be defined in a derived interface. Also, any class that needs the behavior(s) of the derived interface must implement all members of the derived interface and those of the parent interface(s). Here is an example:
interface IPolygon
{
    double Side { get; set; }
    double Area { get; set; }
}

interface IPolyhedron : IPolygon
{
    double Volume { get; set; }
}

public class Tetrahedron : IPolyhedron
{
    public double Side { get; set; }
    public double Area { get; set; }
    public double Volume { get; set; }
}
In the same way, an interface can inherit from an interface that itself inherits from another interface, and from another, and so on.
Implementing Many Interfaces
You cannot create a class that inherits from many classes at the same time (C#, unlike some languages, doesn't support multiple inheritance, which is the ability for a class to have direct inheritance from many parent classes). Instead, you can create a class that implements more than one interface. To create a class based on more than one interface, after the colon applied to the class, enter the name of each interface and separate them with commas. Here is an example:
interface IPolygon
{
    int    Edges     { get;      }
    double Side      { get; set; }
    double Perimeter { get;      }
    double Area      { get;      }
}

interface IColorizer
{
    Color BorderColor { get; set; }
    Color BackgroundColor { get; set; }
}

public class Triangle : IPolygon, IColorizer
{
    public int Edges { get; }
    public double Side { get; set; }
    public double Perimeter { get; }
    public double Area { get; }

    public Color BorderColor { get; set; }
    public Color BackgroundColor { get; set; }
}
In the above example, we created a class that implements only two interfaces. You can create a class that implements as many interfaces as you want. Also, the same interface can be implemented differently in different classes.
![]() Practical Learning: Ending the Lesson
Practical Learning: Ending the Lesson
|
|
||
| Previous | Copyright © 2003-2019, FunctionX | Next |
|
|
||