Techniques on Using Inheritance

Techniques on Using Inheritance
Introduction to Class Abstraction
Overview
So far, we have been able to create classes and inherit from them. Here is an example of a simple class we created in the previous lesson:
| Header File: Rectangle.h | |
#pragma once

using namespace System;

public ref class CRectangle
{
private:
    double len;
    double hgt;

public:
    property double Length
    {
	double get() { return len; }

	void set(double L)
	{
		if( L <= 0 )
			len = 0;
		else
			len = L;
	}
    }

    property double Height
    {
	double get() { return hgt; }

	void set(double h)
	{
		if( h <= 0 )
			hgt = 0;
		else
			hgt = h;
	}
    }

    property double Perimeter
    {
	double get() { return 2 * (Length + Height); }
    }

    property double Area
    {
	double get() { return Length * Height; }
    }

public:
	CRectangle();
	CRectangle(double length, double height);
	void CRectangle::ShowCharacteristics();
};
|
|
| Source File: Rectangle.cpp | |
#include "Rectangle.h"

CRectangle::CRectangle()
    : len(0.00), hgt(0.00)
{
}

CRectangle::CRectangle(double length, double height)
    : len(length), hgt(height)
{
}

void CRectangle::ShowCharacteristics()
{
    Console::WriteLine(L"Rectangle Characteristics");
    Console::WriteLine(L"Length:    {0}", this->Length);
    Console::WriteLine(L"Height:    {0}", this->Height);
    Console::WriteLine(L"Perimeter: {0}", this->Perimeter);
    Console::WriteLine(L"Area:      {0}", this->Area);
}
|
|
| Source File: Exercise.cpp | |
#include "Rectangle.h"

using namespace System;

int main()
{
    CRectangle ^ rect = gcnew CRectangle(18.64, 28.42);

    rect->ShowCharacteristics();

    Console::WriteLine();
    return 0;
}
|
|
This would produce:
Rectangle Characteristics
Length:    18.64
Height:    28.42
Perimeter: 94.12
Area:      529.7488

Press any key to continue . . .
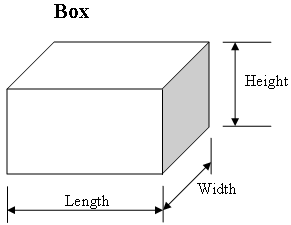
Imagine you want to create a rectangular parallelepiped. Using the above CRectangle class, you certainly would not have to start from scratch. You can derive from this class and create a new one. When inheriting from a class, a base class such as the above CRectangle can be configured to provide its children with the basic foundation they would need. Although a child class can implement a new behavior not available on the parent class, sometimes the derived class will need a customized implementation of a behavior that has already been configured in its parent. For example, if you derive a box from a rectangle, since a box has 6 faces, when creating the area of the box, you certainly would not expect the have the same value as that of the parent.
Consider this:
|
|
#pragma once
using namespace System;

public enum class ItemsCategories
{
    Unknown,
    CablesAndConnectors,
    CellPhonesAndAccessories,
    Headphones,
    DigitalCameras,
    PDAsAndAccessories,
    TelephonesAndAccessories,
    TVsAndVideos,
    SurgeProtectors,
    Instructional
};

namespace ElectronicsStore
{
    public ref class CStoreItem
    {
    public:
        // An item whose characteristics are not (yet) defined
        CStoreItem(void);
        // An item that is known by its make, model, and unit price
        CStoreItem(long itmNbr, String ^ make,
		   String ^ model, double unitPrice);
        // An item that is known by its name and unit price
        CStoreItem(long itmNbr, String ^ name, double unitPrice);
        // An item completely defined
        CStoreItem(long itmNbr, ItemsCategories category,
	           String ^ make, String ^ model, double unitPrice);
        ~CStoreItem();

    private:
        long            nbr;
        ItemsCategories cat;
        String        ^ mk;
        String        ^ mdl;
        String        ^ nm;
        double          price;

    public:
        property long ItemNumber
        {
            long get() { return nbr; }
            void set(long n) { this->nbr = n; }
        }

        property ItemsCategories Category
        {
            ItemsCategories get() { return cat; }
	        void set(ItemsCategories c) { this->cat = c; }
        }

        property String ^ Make
        {
	    String ^ get() { return mk; }
	    void set(String ^ m) { this->mk = m; }
        }

        property String ^ Model
        {
	    String ^ get() { return mdl; }
	    void set(String ^ m) { this->mdl = m; }
        }

        property String ^ Name
        {
            String ^ get() { return nm; }
	    void set(String ^ n) { this->nm = n; }
        }

        property double UnitPrice
        {
	    double get() { return price; }
	    void set(double p) { this->price = p; }
        }
    };
}
#include "StoreItem.h"

namespace ElectronicsStore
{
    CStoreItem::CStoreItem(void)
    {
        nbr      = 0;
		cat      = ItemsCategories::Unknown;
        mk       = L"Unknown";
        mdl      = L"Unspecified";
        nm       = L"N/A";
        price    = 0.00;
    }

    CStoreItem::CStoreItem(long itmNbr, String ^ make,
			   String ^ model, double unitPrice)
    {
        nbr      = itmNbr;
        cat      = ItemsCategories::Unknown;
        mk       = make;
        mdl      = model;
        nm       = L"N/A";
        price    = unitPrice;
    }

    CStoreItem::CStoreItem(long itmNbr, String ^ name,
			   double unitPrice)
    {
        nbr      = itmNbr;
        cat      = ItemsCategories::Unknown;
        mk       = L"Unknown";
        mdl      = L"Unspecified";
        nm       = name;
        price    = unitPrice;
    }

    CStoreItem::CStoreItem(long itmNbr, ItemsCategories category,
			   String ^ make, String ^ model,
			   double unitPrice)
    {
        nbr      = itmNbr;
        cat      = category;
        mk       = make;
        mdl      = model;
        price    = unitPrice;
    }

    CStoreItem::~CStoreItem()
    {
    }
}
Set the Name to Exercise and click Add #include "StoreItem.h"
using namespace System;
int main()
{
String ^ strTitle = L"=-= Nearson Electonics =-=\n"
L"******* Store Items ******";
Console::WriteLine();
return 0;
}
When studying inheritance, we learned that there is a special bond between an inherited class and its parent. Not only does the child object have access to the public members of a class but also the child, based on this relationship, has direct access to the members of the protected section(s) of the parent. If there is such a good relationship between a class and its children, it should be possible to access a members of a derived class using an instance of the parent. Consider this:
This would produce: Rectangle Characteristics Length: 18.64 Height: 28.42 Perimeter: 94.12 Area: 529.7488 Box Characteristics Length: 18.64 Height: 28.42 Area: 4831.8272 Volume: 21232.331904 Press any key to continue . . . Notice that, although the rect handle is assigned an instance of its child, this parent object can access the properties of a child variable and is able to show only the characteristics that belongs to it, namely Length and Height. The Width, that is part of the parent class CRectangle is ignored. Also notice that the box is able to appropriately show its characteristics. Notice that both the parent class CRectangle and the child class CBox have each a property named Area and a method named ShowCharacteristics. After creating a handle of a child class and assigning it a handle of a parent, when we access a property they share or when accessing a method that each has, what version of the property or of the method are we accessing? A virtual property or method is a member that a parent has and that a child implements also. When creating a parent class, you should put a flag on a property or method that a child of that class would also have. To create a virtual method (or property), precede its return type (or the property keyword) with the virtual keyword. Here is an example:
If you define a virtual method outside of the class, don't precede its return type with the virtual keyword. When inheriting a class from one that has a virtual method or property, you can indicate that the member is already present on the parent by preceding it with the virtual keyword. Here is an example:
If you flag a property or a method in a parent class with the virtual keyword, when deriving a class from it, you can ignore the method or property and not implement it. But if you decide to implement the property or method, you must indicate that you are providing a new version of the property or method. Providing a new version of a property or a method is referred to as overriding it. When overriding a property or a method, you must indicate this by writing the override keyword to its right. Here are examples:
There is an alternative to the above technique of overriding a member of a class. In a derived class, if you are implementing a new version of a property or method in a child class and you don't want any confusion with the version in the parent class, you can indicate that the implementation of the member in the derived class is new. To do this, type the new keyword on the right side of the name of the method or in the closing parentheses of the get() or set() methods of the property in the derived class. Here are examples: using namespace System;
public ref class CCircle
{
private:
double rad;
public:
property double Radius
{
double get() { return rad; }
void set(double r)
{
if( r <= 0 )
rad = 0;
else
rad = r;
}
}
virtual property double Circumference
{
double get() { return Radius * 2 * Math::PI; }
}
virtual double CalculateArea();
virtual void Show();
};
double CCircle::CalculateArea()
{
return Radius * Radius * 3.14159;
}
void CCircle::Show()
{
Console::WriteLine(L"Circle Characteristics");
Console::WriteLine(L"Radius: {0}", Radius);
Console::WriteLine(L"Circumference: {0}", Circumference);
Console::WriteLine(L"Area: {0}", CalculateArea());
}
public ref class CEllipse : public CCircle
{
private:
double large;
public:
property double LongRadius
{
double get() { return large; }
void set(double L)
{
if( L <= 0 )
large = L;
else
large = L;
}
}
virtual property double Circumference
{
double get() new { return Radius * LongRadius * Math::PI; }
}
virtual double CalculateArea() new;
virtual void Show() override;
};
double CEllipse::CalculateArea()
{
return Radius * LongRadius * Math::PI;
}
void CEllipse::Show()
{
Console::WriteLine(L"Ellipse Characteristics");
Console::WriteLine(L"Small Radius: {0}", Radius);
Console::WriteLine(L"Long Radius: {0}", LongRadius);
Console::WriteLine(L"Circumference: {0}", Circumference);
Console::WriteLine(L"Area: {0}", CalculateArea());
}
int main()
{
CCircle ^ circ = gcnew CCircle;
circ->Radius = 24.75;
circ->Show();
Console::WriteLine();
CEllipse ^ elps = gcnew CEllipse;
elps->Radius = 15.75;
elps->LongRadius = 25.25;
elps->Show();
Console::WriteLine();
return 0;
}
This would produce: Circle Characteristics Radius: 24.75 Circumference: 155.508836352695 Area: 1924.420224375 Ellipse Characteristics Small Radius: 15.75 Long Radius: 25.25 Circumference: 1249.37212842449 Area: 1249.37212842449 Press any key to continue . . .
Consider a case where you have created a class that is derived from another class. When you dynamically call the inherited class using an instance of the base class (as done in the last example), during the closing of the program, the destructor of the child class is called first, followed by the destructor of the base class. If you dynamically declare an instance of the base class and then invoke the children of the class, you need to make sure that each destructor and the right destructor of the classes that were used is called to destroy the class. This is a safe measure to avoid memory leak. This aspect of C++ programming is taken care of by declaring the destructor of the base class as virtual. Whenever the destructor of the parent class is declared virtual, the destructor of an inherited class is also virtual. This ensures that, when the program closes, all of the destructors of the base class and its children that were used are called, providing a safe claim of the memory that was used. To declare a destructor as virtual, type the virtual keyword on its left, in the body of the class. Here is an example: public ref class CCircle
{
private:
double rad;
public:
property double Radius
{
double get() { return rad; }
void set(double r)
{
if( r <= 0 )
rad = 0;
else
rad = r;
}
}
virtual property double Circumference
{
double get() { return Radius * 2 * Math::PI; }
}
virtual double CalculateArea();
virtual void Show();
virtual ~CCircle();
};
double CCircle::CalculateArea()
{
return Radius * Radius * 3.14159;
}
void CCircle::Show()
{
Console::WriteLine(L"Circle Characteristics");
Console::WriteLine(L"Radius: {0}", Radius);
Console::WriteLine(L"Circumference: {0}", Circumference);
Console::WriteLine(L"Area: {0}", CalculateArea());
}
CCircle::~CCircle()
{
}
After deriving a class from another one, we have seen how you can "re-write" a property or method of the parent in the child class. When using a property or method in a child class, by default, if you call a property or method that is available in both the child and the parent class, the compiler would directly access the version in the child class. Consider the following example: using namespace System;
public ref class CSquare
{
public:
virtual String ^ Description();
virtual void Display();
};
String ^ CSquare::Description()
{
return L"A Square is a geometric shape with 4 equal sides";
}
void CSquare::Display()
{
Console::WriteLine(L"Geomtric Shapes");
Console::WriteLine(L"Name: Square");
Console::WriteLine(L"Description {0}", Description());
}
public ref class CCube : public CSquare
{
public:
virtual String ^ Description() override;
virtual void Display() override;
};
String ^ CCube::Description()
{
return L"A cube is 3-dimensional box with 6 squares";
}
void CCube::Display()
{
Console::WriteLine(L"Geomtric Shapes");
Console::WriteLine(L"Name: Cube");
Console::WriteLine(L"Description {0}", Description());
}
int main()
{
CCube ^ cube = gcnew CCube;
cube->Display();
Console::WriteLine();
return 0;
}
This would produce: Geomtric Shapes Name: Cube Description: A cube is 3-dimensional box with 6 squares Press any key to continue . . . In the result of this program, the application defines a cube and includes the word square without defining what a square is. Based on the rules of overridden members that we have seen so far, you cannot directly access the Description() method of the CSquare class from a method of the CCube class. The solution is to "qualify" the parent method when calling it. This qualification is performed using the scope resolution operator :: by accessing the method in the parent class as if it were a static method. This can be done as follows: void CCube::Display()
{
Console::WriteLine(L"Geometric Shapes");
Console::WriteLine(L"Name: Cube");
Console::WriteLine(L"Description {0}", CSquare::Description());
Console::WriteLine(L" {0}", Description());
}
int main()
{
CCube ^ cube = gcnew CCube;
cube->Display();
Console::WriteLine();
return 0;
}
This would produce: Geomtric Shapes
Name: Cube
Description A Square is a geometric shape with 4 equal sides
A cube is 3-dimensional box with 6 squares
Press any key to continue . . .
In the same way, from the child class, you can access the members of the parent class by qualifying them but calling them as you would a static member.
Consider the following virtual class:
This class can be tested as follows:
This would produce: Geometric Shapes Name: Cube Description A square is a geometric shape with 4 equal sides Side: 24.85 Perimeter: 99.4 Area: 617.5225 Press any key to continue . . . Notice that, in the main() function, we called the Display() method of the CSquare class as we have been doing so far and we had to qualify the name of the method to clearly show what class it belongs to. In the same way, if you derive one class from another, when in the body of the derived class, if you want to access a member of the parent class, we saw that you could qualify the method. In a derived class, if you want to re-implement a method of the parent class, instead of formally overriding it, you can overload it. The difference is, and you should be aware of it, that when overriding, you are redefining a method with the exact same signature (same name and same argument(s), if any). When overloading a method, remember that they different versions must have the same name but different argument(s). Based on this, if you overload a method in a child class, give it the same name but change something about the argument(s), either a different type of argument or a different number of arguments. Here is an example:
Notice that, the Description() method that is also available in the parent class without an argument, this time takes a constant integer. Also remember that you don't even have to use the argument; it is only used to distinguish it from the other one. When implementing the new version, you can do whatever you want with it and call it as you see fit. Consider the following class:
This program would not work because, in the CCube::Display() method, the compiler cannot locate the Description() method. When calling an overloaded method of a parent class from a derived class, in the derived class, as opposed to qualifying the name of the method as we learned in the previous section, you can create a synonym of of the method. To do this, in the body of the derived class, type the using keyword, followed by the name of the parent class, followed by the ::operator, followed by the name of the method that you had overridden. Here are two examples:
This time, when calling the overridden method(s), the compiler would know which one you are referring to. The program would produce: Geomtric Shapes
Name: Cube
Description A cube is 3-dimensional box with 6 squares
A Square is a geometric shape with 4 equal sides
Side: 24.85
Side Area: 617.523
Total Area: 149.1
Press any key to continue . . .
By default, any class you create can be used as a base class for another class. That is, another class can be derived from any other class you create. If you want to prevent a class from serving as a base for another class, you can flag that class as sealed. To mark a class as sealed, type the sealed keyword after its name. Here is an example: using namespace System;
public enum class FlowerColor
{
Red = 1,
White,
Pink,
Yellow,
Blue,
Orange,
Lavender,
Multiple,
Other
};
public enum class FlowerArrangement
{
Basket = L'A',
Bouquet = L'U',
Vase = L'V',
Bundle = L'D',
Any
};
public ref class CFlower sealed
{
public:
String ^ Type;
FlowerColor Color;
FlowerArrangement Arrangement;
double UnitPrice;
CFlower(String ^ type, FlowerColor clr,
FlowerArrangement arng, double price);
};
CFlower::CFlower(String ^ type, FlowerColor clr,
FlowerArrangement arng, double price)
: Type(type),
Color(clr),
Arrangement(arng),
UnitPrice(price)
{
}
void ShowFlower(const CFlower ^ one)
{
Console::WriteLine("== Flower Order ==");
Console::WriteLine(L"Flower Type: {0}", one->Type);
Console::Write(L"Flower Color: ");
Console::WriteLine(one->Color);
Console::Write(L"Arrangement: ");
Console::WriteLine(one->Arrangement);
Console::WriteLine(L"Price: {0:C}", one->UnitPrice);
}
int main()
{
CFlower ^ inspiration = gcnew CFlower(L"Roses", FlowerColor::Pink,
FlowerArrangement::Bouquet, 32.25);
ShowFlower(inspiration);
Console::WriteLine();
return 0;
}
After creating a sealed class, remember that you cannot derive any class from it. If you do, you would receive an error.
Instead of sealing a whole class, you may want only one or some of its members to be sealed. Such a class should allow derivation. That is, the class should not be marked as sealed. When creating the class, you can define what property or method must not be overridden by derived classes. This means that you can prevent derived classes from providing new versions of designated properties and methods. To mark a member as sealed, it must first be flagged with virtual. Then, after the closing parentheses of the method, the get() or set() methods of a property, type the sealed keyword. Here is an example: public ref class CCircle
{
private:
double rad;
public:
property double Radius
{
virtual double get() sealed { return rad; }
virtual void set(double r) sealed
{
if( r <= 0 )
rad = 0;
else
rad = r;
}
}
virtual property double Circumference
{
double get() { return Radius * 2 * Math::PI; }
}
virtual double CalculateArea();
virtual void Show();
virtual ~CCircle();
};
double CCircle::CalculateArea()
{
return Radius * Radius * 3.14159;
}
void CCircle::Show()
{
Console::WriteLine(L"Circle Characteristics");
Console::WriteLine(L"Radius: {0}", Radius);
Console::WriteLine(L"Circumference: {0}", Circumference);
Console::WriteLine(L"Area: {0}", CalculateArea());
}
When a property or method of a class has been marked as sealed, you cannot override it in a derived class. If you do, you would receive an error.
An abstract class is one whose role is only meant to lay a foundation for other classes that would need a common behavior or similar characteristics. Therefore, an abstract class is used only as a base class for inheritance. A class is made abstract by declaring its methods as "pure" virtual methods. Only a virtual method can be made "pure". The syntax of declaring a pure virtual method is: virtual ReturnType MethodName() = 0; The virtual keyword is required to make sure that a (any) child of this class can implement this method as it judges it necessary. The ReturnType is the data type that the method will return. The MethodName is an appropriate name for the method. The = 0 expression is required to let the compiler know that this method is pure virtual. When creating an abstract class, you can declare all of its methods as pure. Here is an example: public ref class CQuadrilateral
{
public:
virtual double Perimeter() = 0;
virtual double Area() = 0;
};
To indicate that the class is abstract, type the abstract keyword after its name. Here is an example: public ref class CQuadrilateral abstract
{
public:
virtual double Perimeter() = 0;
virtual double Area() = 0;
};
In C++/CLI, if you omit the abstract keyword, you would receive a warning. Not all methods of an abstract class have to be pure virtual. This means that regular virtual methods can also be members of an abstract class. Here is an example: public ref class CQuadrilateral abstract
{
public:
virtual String ^ Description();
virtual double Perimeter() = 0;
virtual double Area() = 0;
virtual void Display() = 0;
};
A property can also be a member of an abstract class. If you declare a property in an abstract class, don't use the = 0 expression on the property. Here is an example: public ref class CQuadrilateral abstract
{
public:
virtual property double Base;
virtual String ^ Description();
virtual double Perimeter() = 0;
virtual double Area() = 0;
virtual void Display() = 0;
};
You can also add regular member variables in an abstract class. You can even make some private, some public, and some protected. Here are examples: public ref class CQuadrilateral abstract
{
private:
double bs;
protected:
String ^ Name;
public:
virtual property double Base;
virtual String ^ Description();
virtual double Perimeter() = 0;
virtual double Area() = 0;
virtual void Display() = 0;
};
An abstract class can also have one or more constructors: public ref class CQuadrilateral abstract
{
private:
double bs;
protected:
String ^ Name;
public:
virtual property double Base;
virtual String ^ Description();
virtual double Perimeter() = 0;
virtual double Area() = 0;
virtual void Display() = 0;
CQuadrilateral();
};
When a class is defined as abstract, you can implement any of its properties if you want. If a method is not made pure virtual, you can also define it. Here are examples: public ref class CQuadrilateral abstract
{
private:
double bs;
public:
String ^ Name;
virtual property double Base
{
double get() { return bs; }
void set(double b)
{
if( b <= 0 )
bs = 0.00;
else
bs = b;
}
}
String ^ Description();
virtual double Perimeter() = 0;
virtual double Area() = 0;
CQuadrilateral();
};
CQuadrilateral::CQuadrilateral()
{
Name = L"Quadrilateral";
}
String ^ CQuadrilateral::Description()
{
return L"A quadrilateral is a geometric figure with four sides";
}
After creating an abstract class, even if you implement (some of) its properties and methods, you cannot use the class. That is, you cannot declare a variable or handle of the class. This is because the class is not complete. Remember that it has at least one method that is not defined. Because an abstract class is not complete, you cannot (yet) use it. If you want to use it, you must derive a class from it. If you decide to derive a class from an abstract one, you must implement every one of its pure virtual methods in the new class. If you omit or forget defining a pure virtual method, you would receive an error. When declaring the pure virtual methods in the new class, replace the = 0 expression with the override method. For the regular virtual properties or methods, you must flag them with either the override or the new keyword. Here is an example of a class that derives from an abstract class: public ref class CSquare : public CQuadrilateral
{
public:
CSquare();
virtual String ^ Description() new;
virtual double Perimeter() override;
virtual double Area() override;
virtual void Display() override;
};
Based on this, in the new class, define the pure virtual method(s) as you want. After defining the new class, you can then instantiate it and use it as necessary. Here is an example: using namespace System;
public ref class CQuadrilateral abstract
{
private:
double bs;
protected:
String ^ Name;
public:
virtual property double Base
{
double get() { return bs; }
void set(double b)
{
if( b <= 0 )
bs = 0.00;
else
bs = b;
}
}
virtual String ^ Description();
virtual double Perimeter() = 0;
virtual double Area() = 0;
virtual void Display() = 0;
CQuadrilateral();
};
CQuadrilateral::CQuadrilateral()
{
Name = L"Quadrilateral";
}
String ^ CQuadrilateral::Description()
{
return L"A quadrilateral is a geometric figure with four sides";
}
public ref class CSquare : public CQuadrilateral
{
public:
	CSquare();

	virtual String ^ Description() new;
	virtual double Perimeter() override;
	virtual double Area() override;
	virtual void   Display() override;
};
CSquare::CSquare()
{
Name = L"Square";
}
String ^ CSquare::Description()
{
return L"A square is a quadrilateral with four equal sides";
}
double CSquare::Perimeter()
{
return 4 * Base;
}
double CSquare::Area()
{
return Base * Base;
}
void CSquare::Display()
{
Console::WriteLine(L" === Shape Properties ===");
Console::WriteLine(L"Name: {0}", Name);
Console::WriteLine(L"Description: {0}", CQuadrilateral::Description());
Console::WriteLine(L" {0}", Description());
Console::WriteLine(L"Side: {0}", Base);
Console::WriteLine(L"Perimeter: {0}", Perimeter());
Console::WriteLine(L"Area: {0}", Area());
}
int main()
{
CSquare ^ sqr = gcnew CSquare;
sqr->Base = 22.46;
sqr->Display();
Console::WriteLine();
return 0;
}
This would produce: === Shape Properties === Name: Square Description: A square is a quadrilateral with four equal sides Side: 22.46 Perimeter: 89.84 Area: 504.4516 Press any key to continue . . .
In Lesson 6, we were introduced to inheritance as a way of laying a foundation that other classes could be based on. An example of such a class is: public ref class CProperty
{
};
This type of class is vague. It's hardly usable to declare a variable or create a handle. Still, as we saw with abstract classes, you can create a class that serves only as a foundation for other classes. Like an abstract class, an interface is a class that is used only to create a skeleton class. The class cannot actually be instantiated but it can contain as much behavior as necessary. An interface is primarily created like a class but it adds the interface keyword on the left side of the class keyword. By tradition, the name of an interface starts with I. Here is an example: interface class IGeometry
{
};
You can also include an assembly access level: Here is an example: public interface class IGeometry
{
};
Like an abstract class, you cannot declare a variable of an interface. Still, when creating it, in its body, you can list the members that the child classes will inherit. The members can be properties or methods as we have used them in classes so far. Unlike an abstract class, you cannot define any method in the interface: you can only declare it. Also, unlike an abstract class, if the interface contains a property, you cannot define that property in the interface. You can only declare it. Here are examples of a property and a method in an interface: public interface class IGeometry
{
property String ^ Name;
void Display();
};
After creating an interface, you can inherit a class from it. Besides, like an abstract class, you cannot use an interface without creating a new class from it that you would eventually use to declare a variable. You primarily inherit from an interface the same way you would create a child class. Here is an example: public interface class IGeometry
{
property String ^ Name;
void Display();
};
public ref class CRound : public IGeometry
{
};
One of the fundamental differences between an abstract class and an interface is that the former can contain member variables and defined methods. The later cannot contain member variables but properties and declared methods. Another difference between both is that you cannot define a property or a method in an interface class, which you can do in an abstract class. Because of the definition of an interface, after basing a class on it, since none of its members would have been defined, you must define each one (all) of them in a class derived from an interface. Here is an example: using namespace System;
public interface class IGeometry
{
	property String ^ Name;
	void Display();
};
public ref class CRound : public IGeometry
{
private:
String ^ _name;
public:
CRound();
CRound(String ^ name);
property String ^ Name
{
virtual String ^ get() { return _name; }
virtual void set(String ^ value) { _name = value; }
}
virtual void Display();
};
CRound::CRound()
{
_name = L"Unknown";
}
CRound::CRound(String ^ name)
{
_name = name;
}
void CRound::Display()
{
Console::WriteLine(L"Name: {0}", Name);
}
As mentioned earlier, after deriving a class from an interface, you can then declare a variable from it. Here is an example: int main()
{
CRound ^ rnd = gcnew CRound;
rnd->Display();
Console::WriteLine();
rnd->Name = L"General Round Shape";
rnd->Display();
Console::WriteLine();
return 0;
}
This would produce: Name: Unknown Name: General Round Shape Press any key to continue . . . As seen in previous lessons, after creating a non-sealed class, you can inherit a class from it. This is one of the best features of C++ and C++/CLI. For example, you can derive a class from another class that itself was derived from an interface. When deriving this new class, you can add new members that were not declared in the interface. You can also override the interface's member(s) or new them. Here is an example: using namespace System;
public interface class IGeometry
{
property String ^ Name;
void Display();
};
public ref class CRound : public IGeometry
{
private:
String ^ _name;
public:
CRound();
CRound(String ^ name);
property String ^ Name
{
virtual String ^ get() { return _name; }
virtual void set(String ^ value) { _name = value; }
}
virtual void Display();
};
CRound::CRound()
{
_name = L"Unknown";
}
CRound::CRound(String ^ name)
{
_name = name;
}
void CRound::Display()
{
Console::WriteLine(L"Name: {0}", Name);
}
public ref class CCircle : public CRound
{
private:
double rad;
public:
property double Radius
{
double get() { return rad; }
void set(double value)
{
rad = (value <= 0) ? 0.00 : value;
}
}
virtual double Area();
virtual void Display() new;
};
double CCircle::Area()
{
return Radius * Radius * 3.14159;
}
void CCircle::Display()
{
Console::WriteLine(L"Figure: {0}", Name);
Console::WriteLine(L"Radius: {0}", Radius);
Console::WriteLine(L"Area: {0}", Area());
}
int main()
{
CCircle ^ circ = gcnew CCircle;
circ->Name = L"Circle";
circ->Radius = 36.82;
circ->Display();
Console::WriteLine();
return 0;
}
This would produce: Figure: Circle Radius: 36.82 Area: 4259.092518716 Press any key to continue . . .
As we have seen so far, in C++, you can inherit from: Multiple inheritance consists of inheriting a class from more than two other classes. This is possible in C++ because the language allows it. In C++/CLI, you cannot inherit from more than two classes. Instead, you can inherit from:
| ||||||||||||||||||||||||||||||||||||||||||||||||||||||||||||||||||||||||||||||||