In our lessons, we will learn Java as a computer language not as a development environment. This means that we will primarily build applications that show how this language functions, not how to create graphical applications. The types of programs we will create on this site are called console applications. By default, a console application displays its result(s) in a black window. To make it a little easier, we will use an environment that displays a window but with a different background color.
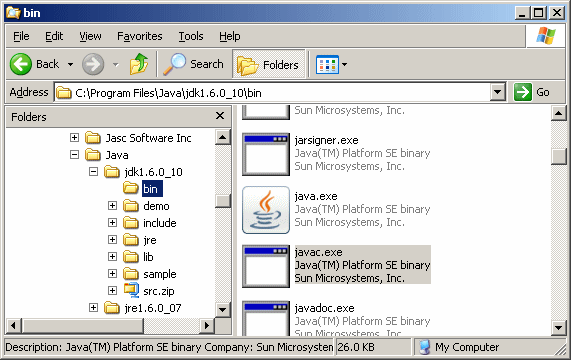
As you may be aware, the computer doesn't speak or understand human languages. Still, to communicate your instructions to the computer, you can write them in a human language, using characters, letters, symbols, and words you are familiar with. When doing this, you prepare text that would be communicated to the computer. For the computer to understand these instructions, they must be "translated" into the computer's own language, also called the machine language. This intermediary "translator" is also called a compiler. There are various compilers on the market. One of them, or a few of them, are provided by Sun and they are free. Although we will create only console applications, we will use NetBeans IDE. To start, connect to the Sun Microsystems web site, click the Downloads link or do a search on the word "Java". Download the latest Java 2 Platform, Standard Edition or J2SE development kit. At the time of this writing, it is J2SE 5.0. You may be prompted to download the NetBeans IDE + JDK 5.0 Update 2. This is fine.
Imagine you want to create a list of books of your personal library. To characterize each book, you can create a list of words that describe it. This list would be made of general characteristics of each book. Here is an example:
In the computer world, the work Book in the above example is referred to as a class: A class is a list of criteria used to describe something. Each word or group of words, in bold in the above example, is called a property of the class. In our example, Book Title is a property of the Book class. In the same way, Author is another property of the of the Book class. In Java, there is never space between two words that represent the same entity. This means that the above list is better represented as follows:
One class can also be a property of another class (unfortunately, we need to mention these issues in our introduction but don't make too much effort to understand them: everything will be clearer in future lessons). For example, imagine you create another class that can be used to describe each author of a book. The list of properties can be created as follows:
You can then use this class to define a criterion in the Book class, exactly as done above: only the Author word is necessary in the Book class, its Name and Nationality criteria are directly represented. Every property that is created in the class is referred to as its member. For example, in the above lists, Nationality is a member of the Author class while Publisher is a member of the Book class.
To describe a particular book of your collection, you can provide information for each characteristic of the class used to describe it. Here is an example:
In the same way, you can describe each author of the collection by filling out its characteristics using the above criteria. When describing an object as done in this example, you must first give a name to the object (this is not always necessary as we will see in future lessons). In the above example, Modjang is the name of the object. Author is (still) the name of the class. This name is necessary because you would need it in a class where Author must be used as a member. Based on this, you can use the name of the above class when describing a Book object. Here is an example:
It is important to understand the difference between a class and an object. An object is the result of describing something using the preset criteria of a (known) class. In the strict sense, you must first create a class by specifying each criterion you want to use to eventually describe some objects. On the other hand, you can create an object only that is based on an existing class. Everything statement in Java must end with a semi-colon. This results in the following:
In many cases, only characteristics are necessary to have a class on which complete objects can be described. Still, an object may be expected to perform one or more assignments or actions. An assignment that an object can perform is called a method. Imagine you have books that that can open or close themselves when asked to do so (Sci-Fi anyone?). The action used to open may be called Open. To differentiate an assignment, or method, from a property, the name of a method must be followed with parentheses. Here are two examples:
Although this list shows the methods last, this is not a rule, the methods can be the first, the last, or included between, as long as they belong to the class. In the same way, a class that is made a property (member) of a class can also have its own methods. Every item that is created in a class is referred to as its member.
A computer language is developed from scratch. Then other languages can be developed using its existing rules. This is also a rule that people who developed Java followed. One of the assignments they performed was to create many classes that you can directly use in your program to lay a solid foundation and work on top of that. The classes that already exist with Java are referred to as built-in classes. To make it easy to "catalog" the various built-in classes, they were created in libraries called packages and there are various of them. One of the classes that ship with Java is called System. One of the jobs of the System class is to display something on the screen. To perform this job, the System class is equipped with a property called out. Actually, out itself is a class as we mentioned earlier that one class can be used as a property of another class. To actually display something on the screen, the out class is equipped with a method called println (read Print Line). To display something, you can write it between the parentheses of this method. If the item to display is a word, you must include it between double-quotes. We will see that another job it can handle is to get a value from the user.
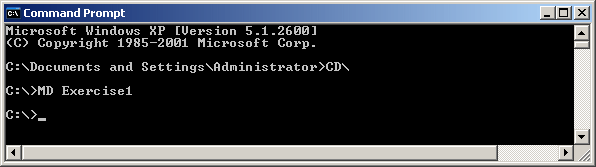
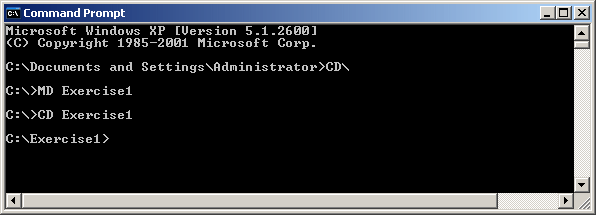
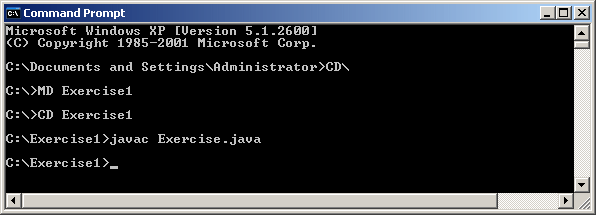
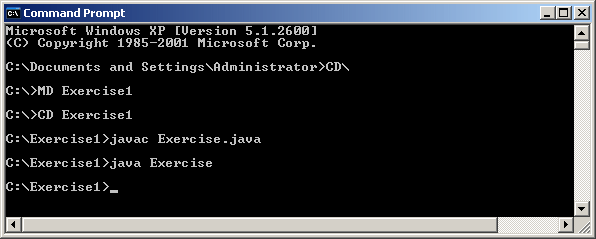
A Java application is primarily created from a file located in a folder. As we will see in the next section, this file contains a class (we will learn more about classes starting in Lesson 4). You must use a folder in which you will save the file:
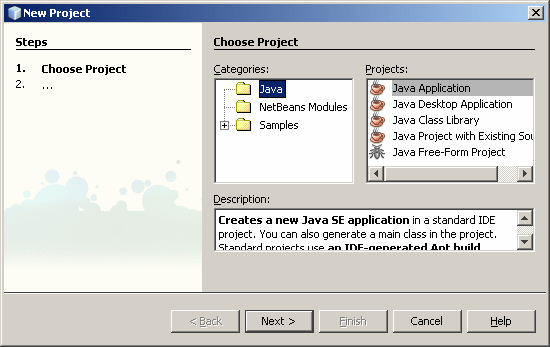
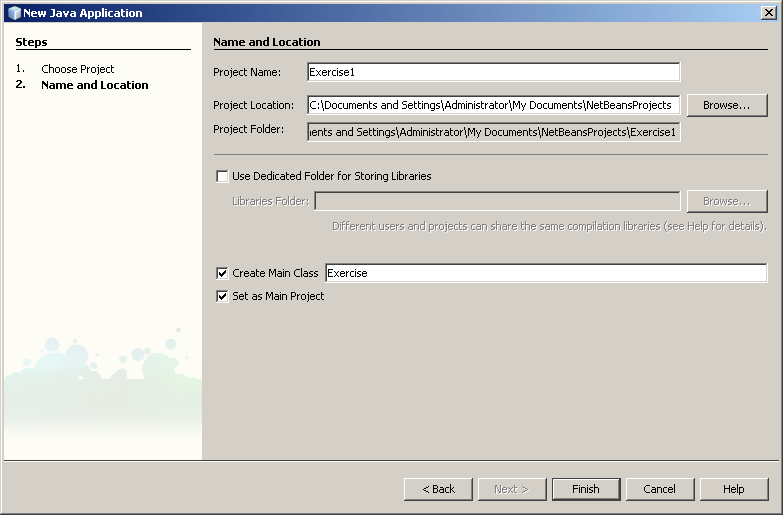
Instead of working manually, you can use NetBeans.
Java code consists of instructions written in plain English. The simplest document of a Java code contains a class and something called main. The formula we will use and accept at this time is: public class Exercise {
public static void main(String[] args) {
}
}
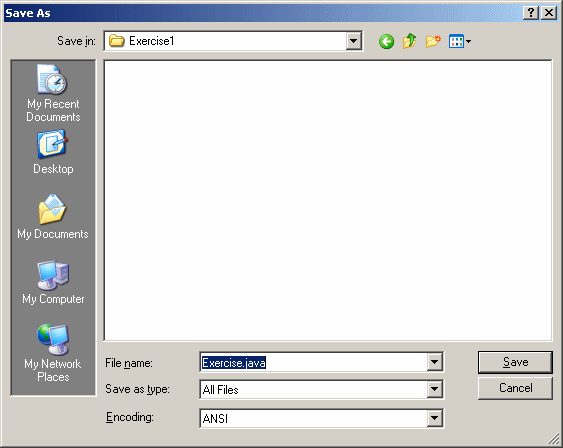
Every single word or symbol on the above code will be explained in later lessons. For now, accept it "as is". After typing the code, save it in the desired folder. Here is an example:
|
|
|||||||||||||||||||||||||||||||||||||||||||||||||||||||||||||||||||||||||||||||
|
|
||||||||||||||||||||||||||||||||||||||||||||||||||||||||||||||||||||||||||||||||
|
|
||||||||||||||||||||||||||||||||||||||||||||||||||||||||||||||||||||||||||||||||