|
File Processing |
|
Creating a File |
|
Introduction |
|
In Microsoft Excel, instead of a worksheet, you could create a form-based application that your users would use. If (since) you have already used Windows-based applications, you are surely familiar with data entry on a form, in which case you use Windows controls. File processing is the ability to store the values of a document in the computer so you can retrieve such values another time. |
File processing is the ability to save values from an application and be able to get those values back when needed. The VBA language supports file processing.
|
|
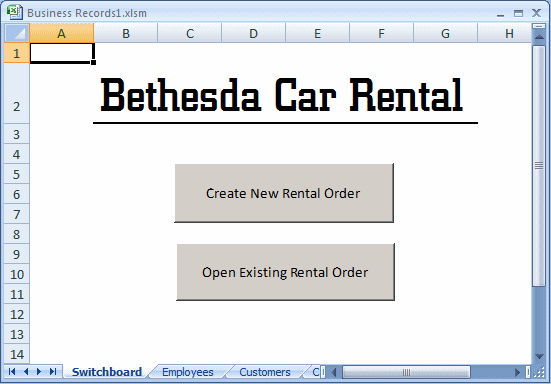
- Start Microsoft Excel
- Double-click Sheet1, type Switchboard
- Double-click Sheet2 and type Employees
- Double-click Sheet3 and type Customers
- Click the next sheet tab (the Insert Worksheet)
- Double-click the new sheet tab and type Cars
- Click the next sheet tab (the Insert Worksheet)
- Double-click the new sheet tab and type Rental Rates
- Click the Switchboard tab
- Press and hold Shift
- Click the Rental Rates tab
- Release Shift

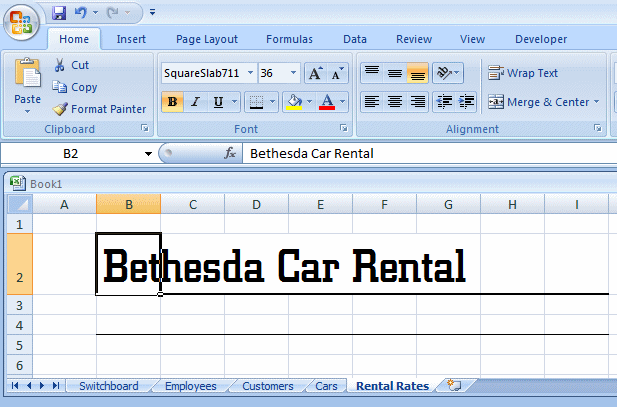
- Click Cell B2 and type Bethesda Car Rental
- Click the Enter button

- Format it as you see fit:
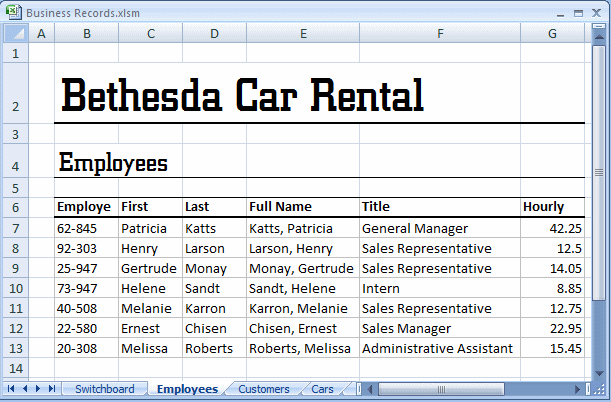
- Click the Employees sheet tab
- To save the workbook, press Ctrl + S
- In the top combo box, select the C drive (or any drive you want)
- Click the Create New Folder (Windows XP) or New Folder (Windows Vista) button
- Type Bethesda Car Rental as the name of the new folder and press Enter
- Make sure the new folder is selected.
Change the file name to Business Records - In the Save As Type combo box, select Excel Macro-Enabled Workbook
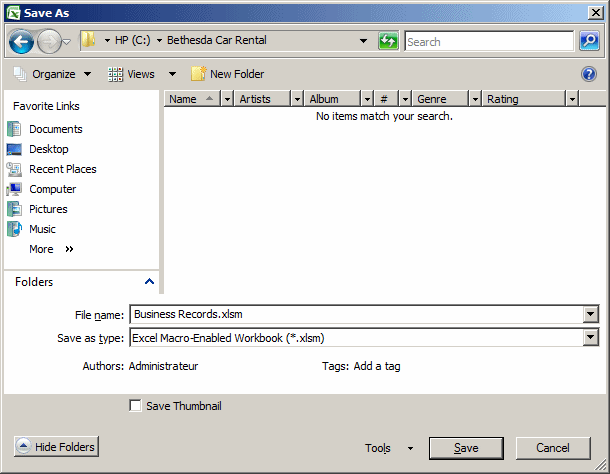
- Click Save
- In the Employees sheet tab, click Cell B6 and type Employee #
- Create a list of employees
- Click Cell E7, type =D7 & ", " & C7 and click the
Enter button
- Drag its AutoFill down to Cell E13
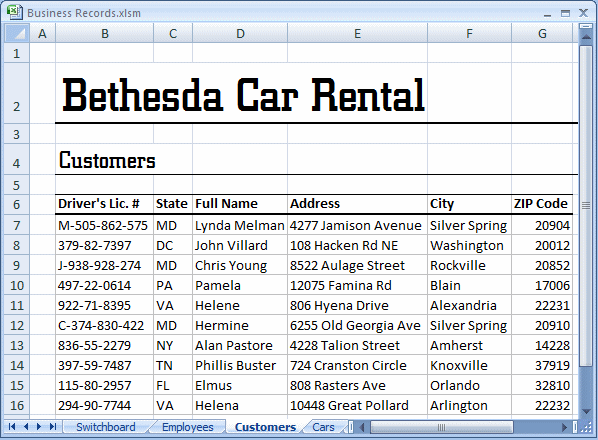
- Click the Customers sheet tab
- Click Cell B6 and type Driver's Lic. #
- Create a list of customers
- Click the Cars sheet tab
- Click Cell B6 and type Tag Number
- Create a list of cars
- Click the Rental Rates sheet tab
- Click Cell B6 and type Category
- Complete the table with the following values:
Category Daily Weekly Monthly Weekend Economy 35.95 32.75 28.95 24.95 Compact 39.95 35.75 32.95 28.95 Standard 45.95 39.75 35.95 32.95 Full Size 49.95 42.75 38.95 35.95 Mini Van 55.95 50.75 45.95 42.95 SUV 55.95 50.75 45.95 42.95 Truck 42.75 38.75 35.95 32.95 Van 69.95 62.75 55.95 52.95 - To save the workbook, press Ctrl + S
- On the Ribbon, click Developer
- In the Code section of the Ribbon, click Visual Basic

- On the main menu of Microsoft Visual Basic, click Insert -> UserForm
- If the Properties window is not available, right-click the form
and click Properties.
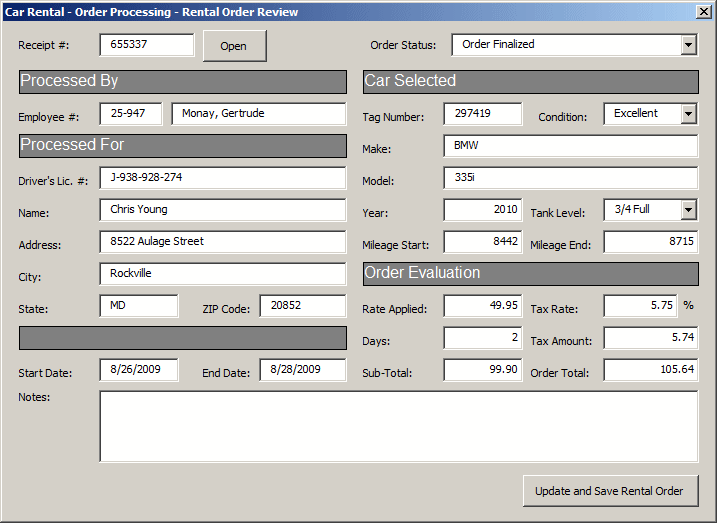
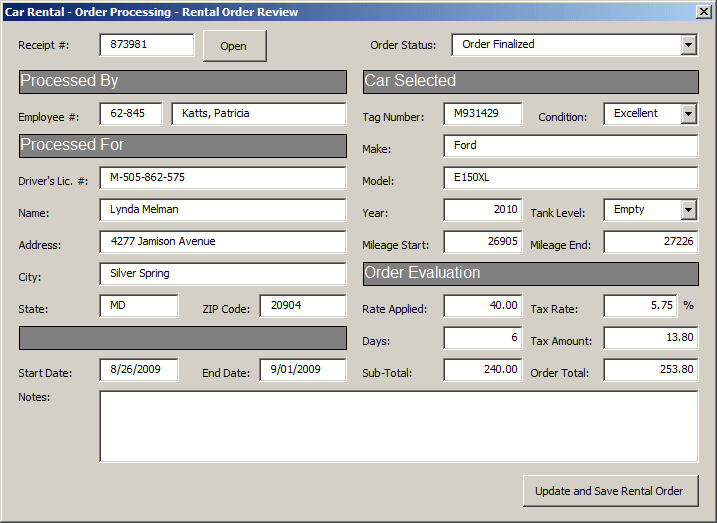
In the Properties window, click (Name) and type frmNewRentalOrder - Click Caption and type Bethesda Car Rental - Order Processing - New Rental Order
- Design the form as follows:
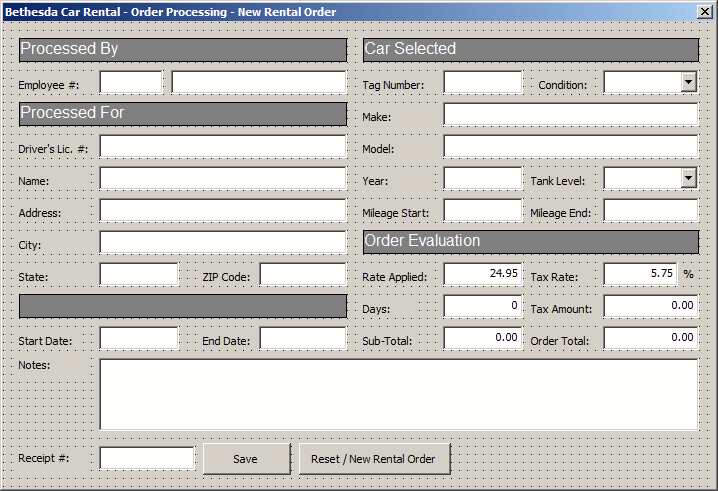
Control (Name) Caption/Text Other Properties Label Processed By BackColor: &H00808080&
BorderColor: &H00000000&
ForeColor: &H00FFFFFF&Label Car Selected BackColor: &H00808080&
BorderColor: &H00000000&
ForeColor: &H00FFFFFF&Label Employee #: Text Box txtEmployeeNumber Text Box txtEmployeeName Label Tag Number: Text Box txtTagNumber Label Condition: Combo Box cbxCarConditions Label Processed For BackColor: &H00808080&
BorderColor: &H00000000&
ForeColor: &H00FFFFFF&Label Make: Text Box txtMake Label Driver's Lic. #: Text Box txtDrvLicenseNbr Label Model: Text Box txtModel Label Name: Text Box txtCustomerName Label Year: Text Box txtCarYear TextAlign: 3 - fmTextAlignRight Label Tank Level: Combo Box cbxTankLevels Label Address: Text Box txtAddress Label Mileage Start: Text Box txtMileageStart TextAlign: 3 - fmTextAlignRight Label Mileage End: Text Box txtMileageEnd TextAlign: 3 - fmTextAlignRight Label City: Text Box txtCity Label Order Evaluation BackColor: &H00808080&
BorderColor: &H00000000&
ForeColor: &H00FFFFFF&Label State: Text Box txtState Label ZIP Code: Text Box txtZIPCode Label Rate Applied: Text Box txtRateApplied 24.95 TextAlign: 3 - fmTextAlignRight Label Tax Rate: Text Box txtTaxRate 5.75 TextAlign: 3 - fmTextAlignRight Label BackColor: &H00808080&
BorderColor: &H00000000&
ForeColor: &H00FFFFFF&Label Days: Text Box txtDays 0 TextAlign: 3 - fmTextAlignRight Label Tax Amount: Text Box txtTaxAmount 0.00 TextAlign: 3 - fmTextAlignRight Label Start Date: Text Box txtStartDate Label End Date: Text Box txtEndDate Label Sub-Total: Text Box txtSubTotal 0.00 TextAlign: 3 - fmTextAlignRight Label Order Total: Text Box txtOrderTotal 0.00 TextAlign: 3 - fmTextAlignRight Label Receipt #: Text Box txtReceiptNumber Command Button cmdSave Save Command Button cmdReset Reset / New Rental Order - Right-click the Employee Number text box and click View Code
- In the Procedure combo box, select Enter
- Implement the event as follows:
Private Sub txtEmployeeNumber_Enter() REM When the Employee # has focus, activate the Employees worksheet Worksheets(2).Activate End Sub - In the Procedure combo box, select Exit
- Implement the event as follows:
Private Sub txtEmployeeNumber_Exit(ByVal Cancel As MSForms.ReturnBoolean) On Error GoTo txtEmployeeNumber_Error ' Check if the user left the Employee Number empty If txtEmployeeNumber.Text = "" Then ' If so, put leave the Employee Name empty txtEmployeeName.Text = "" Else ' If the user entered a valid employee #, use the Microsoft Excel's ' VLOOKUP() function to get the corresponding employee name ' We are using the range of cells from B7 to E13 but you can use a ' range of your choice as long as it contains the employees records txtEmployeeName.Text = _ Application.WorksheetFunction.VLookup(txtEmployeeNumber.Text, _ Worksheets(2).Range("B7:E13"), 4, False) End If Exit Sub txtEmployeeNumber_Error: ' If the user entered an invalid employee #, put Unknown in the name If Err.Number = 1004 Then txtEmployeeNumber.Text = "" txtEmployeeName.Text = "Unknown clerk" End If End Sub - In the Object combo box, select txtTagNumber
- In the Procedure combo box, select Enter
- Implement the event as follows:
Private Sub txtTagNumber_Enter() Worksheets(4).Activate End Sub - In the Procedure combo box, select Exit
- Implement the event as follows:
Private Sub txtTagNumber_Exit(ByVal Cancel As MSForms.ReturnBoolean) On Error GoTo txtTagNumber_Error ' Check if the user left the Tag Number text box empty If txtTagNumber.Text = "" Then ' If so, leave the car information empty txtTagNumber.Text = "" txtMake.Text = "" txtModel.Text = "" txtCarYear.Text = "" Else ' If the user entered a valid Tag Number, use the Microsoft Excel's ' VLOOKUP() function to get the corresponding car information txtMake.Text = _ Application.WorksheetFunction.VLookup(txtTagNumber.Text, _ Worksheets(4).Range("B6:I26"), 2, False) txtModel.Text = _ Application.WorksheetFunction.VLookup(txtTagNumber.Text, _ Worksheets(4).Range("B6:I26"), 3, False) txtCarYear.Text = _ Application.WorksheetFunction.VLookup(txtTagNumber.Text, _ Worksheets(4).Range("B6:I26"), 4, False) End If Exit Sub txtTagNumber_Error: ' If the user entered an invalid tag #, leave the Tag Number empty If Err.Number = 1004 Then txtTagNumber.Text = "" txtMake.Text = "" txtModel.Text = "" txtCarYear.Text = "" End If End Sub - In the Object combo box, select txtDrvLicenseNbr
- In the Procedure combo box, select Enter
- Implement the event as follows:
Private Sub txtDrvLicenseNbr_Enter() Worksheets(3).Activate End Sub - In the Procedure combo box, select Exit
- Implement the event as follows:
Private Sub txtDrvLicenseNbr_Exit(ByVal Cancel As MSForms.ReturnBoolean) On Error GoTo txtDrvLicenseNbr_Error If txtDrvLicenseNbr.Text = "" Then txtCustomerName.Text = "" txtAddress.Text = "" txtCity.Text = "" txtState.Text = "" txtZIPCode.Text = "" Else txtCustomerName.Text = _ Application.WorksheetFunction.VLookup(txtDrvLicenseNbr.Text, _ Worksheets(3).Range("B6:I26"), 2, False) txtAddress.Text = _ Application.WorksheetFunction.VLookup(txtDrvLicenseNbr.Text, _ Worksheets(3).Range("B6:I26"), 3, False) txtCity.Text = _ Application.WorksheetFunction.VLookup(txtDrvLicenseNbr.Text, _ Worksheets(3).Range("B6:I26"), 4, False) txtState.Text = _ Application.WorksheetFunction.VLookup(txtDrvLicenseNbr.Text, _ Worksheets(3).Range("B6:I26"), 5, False) txtZIPCode.Text = _ Application.WorksheetFunction.VLookup(txtDrvLicenseNbr.Text, _ Worksheets(3).Range("B6:I26"), 6, False) End If Exit Sub txtDrvLicenseNbr_Error: If Err.Number = 1004 Then txtDrvLicenseNbr.Text = "" txtCustomerName.Text = "" txtAddress.Text = "" txtCity.Text = "" txtState.Text = "" txtZIPCode.Text = "" End If End Sub - In the Object combo box, select txtRateApplied
- In the Procedure combo box, select Enter
- Implement the event as follows:
Private Sub txtRateApplied_Enter() Worksheets(5).Activate End Sub - In the Object combo box, select UserForm
- In the Procedure combo box, select Activate
- Implement the event as follows:
Private Sub ResetRentalOrder() Dim strRandomNumber As String ' Fill the Conditions combo box cbxCarConditions.AddItem "Needs Repair" cbxCarConditions.AddItem "Drivable" cbxCarConditions.AddItem "Excellent" ' Fill the Tank Level combo box cbxTankLevels.AddItem "Empty" cbxTankLevels.AddItem "1/4 Empty" cbxTankLevels.AddItem "1/2 Full" cbxTankLevels.AddItem "3/4 Full" cbxTankLevels.AddItem "Full" ' For a receipt number, we will create a random number strRandomNumber = CStr(CInt(Rnd * 9)) strRandomNumber = strRandomNumber & CStr(CInt(Rnd * 9)) strRandomNumber = strRandomNumber & CStr(CInt(Rnd * 9)) strRandomNumber = strRandomNumber & CStr(CInt(Rnd * 9)) strRandomNumber = strRandomNumber & CStr(CInt(Rnd * 9)) strRandomNumber = strRandomNumber & CStr(CInt(Rnd * 9)) txtReceiptNumber = strRandomNumber ' In the real world, you would check the list of files ' in the Bethesda Car Rental folder. You would then get the ' name of the last file, or the highest receipt number. You ' would then increase this number by 1, and use that as the ' new receipt number txtEmployeeNumber.Text = "" txtEmployeeName.Text = "" txtDrvLicenseNbr.Text = "" txtCustomerName.Text = "" txtAddress.Text = "" txtCity.Text = "" txtState.Text = "" txtZIPCode.Text = "" txtStartDate.Text = "" txtEndDate.Text = "" txtTagNumber.Text = "" cbxCarConditions.Text = "Excellent" txtMake.Text = "" txtModel.Text = "" txtCarYear.Text = "" cbxTankLevels.Text = "" txtMileageStart.Text = "0" txtMileageEnd.Text = "0" txtRateApplied.Text = "24.95" txtTaxRate.Text = "5.75" txtDays.Text = "0" txtTaxAmount.Text = "0.00" txtSubTotal.Text = "0.00" txtOrderTotal.Text = "0.00" txtNotes.Text = "" ' Display today's date in the date text boxes txtStartDate = Date txtEndDate = Date End Sub Private Sub UserForm_Activate() Call ResetRentalOrder End Sub - In the Object combo box, select cmdReset
- Implement the Click event as follows:
Private Sub cmdReset_Click() Call ResetRentalOrder End Sub - On the Standard toolbar, click the Save button
- Return to Microsoft Excel and click the Switchboard tab sheet
- In the Developer tab of the Ribbon, in the Controls section, click Insert
- In the ActiveX Controls section, click Command Button
- Click the worksheet
- Right-click the new button and click Properties
- In the properties window, change the following characteristics
(Name): cmdCreateRentalOrder
Caption: Create New Rental Order - Right-click the button and click View Code
- Implement the event as follows:
Private Sub cmdCreateRentalOrder_Click() frmNewRentalOrder.Show End Sub - Press Ctrl + S to save
|
File Creation |
Before performing file processing, the first action you must perform consists of creating a file. To support file creation, the VBA provides a procedure named Open. Its syntax is:
Open pathname For Output [Access access] [lock] As [#]filenumber [Len=reclength]
The Open statement takes many factors, some are required and others are not. The Open (the name of the procedure) word, the For Output expression, and the As # expression are required.
The first argument, pathname, is required. This is a string that can be the name of the file. The file can have an extension or not. Here is an example:
Open "example.dat"
If you specify only the name of the file, it would be considered in the same folder where the current workbook is (the workbook that was opened when you called this statement). If you want, you can provide a complete path for the file. This would include the drive, the (optional) folder(s), up to the name of the file, with or without extension.
Besides the name of the file or its path, the mode factor is required. This factor specifies the actual action you want to perform, such as creating a new file or only opening an existing one. This factor can be one of the following keywords:
- Output: The file will be created and ready to receive (normal) values
- Binary: The file will be created and ready to receive values in binary format (as combinations of 1s and 0s)
- Append: If the file exists already, it will be opened and new values can be added to the end
Here is an example of creating a file:
Private Sub cmdSave_Click()
    Open "example.dat" For Output As #1

End Sub
The access factor is optional. It specifies what types of actions will be performed in the file, such as writing values to it or only reading existing values. This factor can have one of the following values:
- Write: After a new file has been created, new values will be written to it
- Read Write: When a new file has been created or an existing file has been opened, values can be read from it or written to it
If you decide to specify the access factor, precede its value with the Access keyword.
The lock factor is optional. It indicates how the processor should behave while the file is being used. Its possible values are:
- Shared: Other applications (actually called processes) can access this file while the current application is accessing it
- Lock Write: Do not allow other applications (processes) to access this file while the current application (process) is writing to it
- Lock Read Write: Do not allow other applications (processes) to access this file while the current application (process) is using it
On the right side of #, type a number, for the filenumber factor, between 1 and 511. If you are working on one file, use the number 1. If you are working on many files, you should use an incremental number. If you have not been keeping track of the number or you get confused at one time, to know the next number you can use, call the FreeFile() function, which returns the next available number in the sequence.
The reclength factor is optional. If the file was opened, this factor specifies the length of the record that was read.
|
Closing a File |
When you create a file and start using it, or after opening a file and while you are using it, it uses memory and consumes (or can be consuming) memory (which could be significant). When you have finished using the file, you should free the memory it was using and release the resources it was consuming. To assist you with this, the VBA provides a procedure named Close. Its syntax is:
Close [filenumberlist]
The filenumberlist factor is the filenumber you would have previously used to create or open the file.
Here is an example of closing a file:
Private Sub cmdSave_Click()
    Open "example.dat" For Output As #1

    Close #1
End Sub
|
Printing to a File |
After creating a file, you may want to write values to it. To support this, the VBA provides two procedures. One of them is called Print and its syntax is:
Print #filenumber, [outputlist]
The Print statement takes two factors but only the first is required.
The filenumber factor is the filenumber you would have used to create the file. The filenumber is followed by a comma.
The outputlist factor can be made of 0, 1 or more parts. Because it is optional, if you do not want to write a value to the file, leave this part empty. If you want to write a value, type a comma after the filenumber factor and follow these rules:
- If you want to start the value with empty spaces, use the Spc()
function and pass an integer (in the parentheses) that represents the number
of empty spaces. For example Spc(4) would include 4 empty spaces.
This factor is optional, which means you can omit it - Instead of a specific number of empty spaces, you can let the operating
system specify a built-in number of empty spaces. To do this, call the Tab()
function as part of your outputlist factor. The Tab() function
specifies the number of columns to include before the value. The Tab()
function can be more useful if you are concerned with the alignment of the
value(s) you will write in the file.
This factor is optional, which means you can omit it - To write a string, include it in double-quotes
- To write a number, whether an integer, a float, or a double, simply include the number normally
- To write a Boolean value, type it as True or False
- To write a date or time value, type it between # and # and follow the rules of dates or times of your language such as US English
- To write a null value, type Null
Here is an example of writing some values:
Private Sub cmdSave_Click()
    Open "Employee.txt" For Output As #1

    Print #1, "James"
    Print #1, "Larenz"
    Print #1, True
    Print #1, #12/08/2008#

    Close #1
End Sub
Instead of writing one value per line, you can write more than one value with one statement. To do this, separate them with either a semi-colon or an empty space. Here is an example:
Private Sub cmdSave_Click()
    Open "Employee.txt" For Output As #1

    REM The values are separated by a semi-colon
    Print #1, "James"; "Larenz"
    REM The values are separated by an empty space
    Print #1, True #12/08/2008#

    Close #1
End Sub
|
Writing to a File |
Besides the Print procedure, the VBA also provides a procedure named Write that can be used to write one or more values to a file. The syntax of the Write statement is the same as that of Print:
Write #filenumber, [outputlist]
The filenumber factor is required. It must be the filenumber specified when creating the file.
The outputlist factor is optional. If you want to skip it, type a comma after the filenumber and end the Write statement. In this case, an empty line would be written to the file. To write the values to the file, follow these rules:
- To start the value with empty spaces, call the Spc() function and
pass a number that represents the number of empty spaces.
This factor is optional, which means you can omit it - To start the value with a specific number of columns, call the Tab()
function and pass the number of columns as argument.
This factor is optional, which means you can omit it - To write a string, include it in double-quotes
- To write a number, include it normally
- To write a Boolean value, type it as #TRUE# or #FALSE#
- To write a null value, type #NULL#
- To write a date or time value, type it between # and #
Here is an example of writing some values:
Private Sub cmdSave_Click()
    Open "Employee.txt" For Output As #1

    Write #1, "James"
    Write #1, "M"
    Write #1, "Larenz"
    Write #1, #12/08/2008#
    Write #1, 24.50
    Write #1, True

    Close #1
End Sub
You can also write values on the same line. To do this, separate them with an empty space, a comma, or a semi-colon. Here is an example:
Private Sub cmdSave_Click()
    Open "Employee.txt" For Output As #1

    REM The values are separated by a semi-colon
    Write #1, "James"; "M"; "Larenz"
    REM The values are separated by a comma
    Write #1, #12/08/2008#, 24.50
    Write #1, True

    Close #1
End Sub
|
|
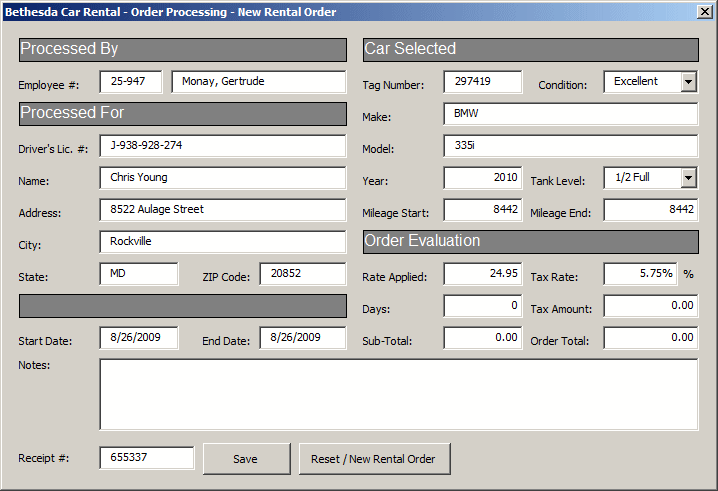
- Display the form
- Double-click the Save button
- Implement its Click event as follows:
Private Sub cmdSave_Click() On Error GoTo cmdSave_Error Rem Make sure the user enters a valid employee number If txtEmployeeNumber.Text = "" Then MsgBox "You must enter a valid employee number." Exit Sub End If Rem Make sure the user enters a valid car tag number If txtTagNumber.Text = "" Then MsgBox "You must enter a valid tag number." Exit Sub End If Rem Make sure the user enters a valid customer If txtDrvLicenseNbr.Text = "" Then MsgBox "You must specify a valid car." Exit Sub End If Open "C:\Bethesda Car Rental\" & txtReceiptNumber.Text & _ ".bcr" For Output As #1 Write #1, txtEmployeeNumber.Text Rem Some people would not include the Employee Name in Rem the file because it is already stored in the workbook. Rem But we will include it in our file Write #1, txtEmployeeName.Text Write #1, txtDrvLicenseNbr.Text Rem Some people would not include the customer name, address, Rem city, state, and ZIP code in the file because they are Rem already part of a workbook. Rem But we will include them in our file Write #1, txtCustomerName.Text Write #1, txtAddress.Text Write #1, txtCity.Text Write #1, txtState.Text Write #1, txtZIPCode.Text Write #1, txtStartDate.Text Write #1, txtEndDate.Text Write #1, txtTagNumber.Text Write #1, cbxCarConditions.Text Rem Some people would not include the car make, model, Rem and year in the file because they are Rem already stored in a workbook. Rem But we will include them here Write #1, txtMake.Text Write #1, txtModel.Text Write #1, txtCarYear.Text Write #1, cbxTankLevels.Text Write #1, txtMileageStart.Text Write #1, txtMileageEnd.Text Write #1, txtRateApplied.Text Write #1, txtTaxRate.Text Write #1, txtDays.Text Write #1, txtTaxAmount.Text Write #1, txtSubTotal.Text Write #1, txtOrderTotal.Text Write #1, "Car Rented" Write #1, txtNotes.Text Close #1 Exit Sub cmdSave_Error: MsgBox "There is a problem with the form. It cannot be saved." Resume Next End Sub - On the Standard toolbar, click the Save button
- Return to Microsoft Excel and click the Switchboard tab sheet if necessary
- In the Developer tab of the Ribbon, in the Controls section, click Insert
- In the ActiveX Controls section, click Command Button
- Click the worksheet
- Right-click the new button and click Properties
- In the properties window, change the following characteristics
(Name): cmdCreateRentalOrder
Caption: Create New Rental Order - Right-click the button and click View Code
- Implement the event as follows:
Private Sub cmdCreateRentalOrder_Click() frmNewRentalOder.Show End Sub - Press Ctrl + S to save
- Return to Microsoft Excel
- In the Controls section of the Ribbon, click the Design Mode button to uncheck it
- Click the button to display the form
- Enter some values for a rental order
- Write down the receipt number on a piece of paper
- Click the Save button
- Click the Reset button
- Enter some values for another rental order
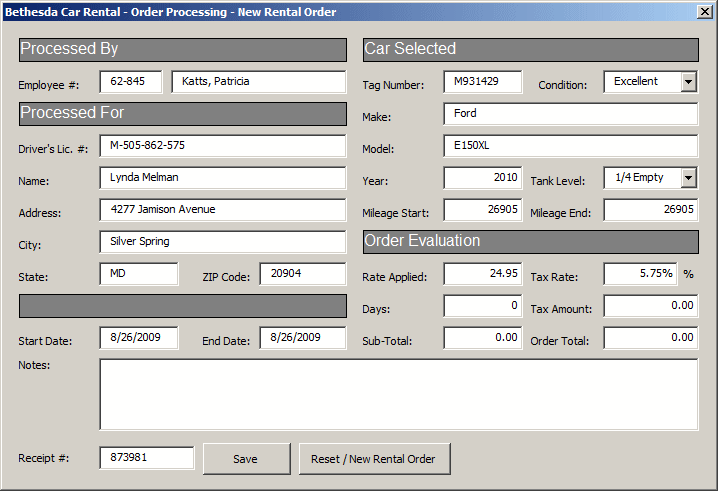
- Click the Save button
- Close the form and return to Microsoft Visual Basic