Connection to a Microsoft SQL Server Database System
|
|
Connection to a Microsoft SQL Server Database System |
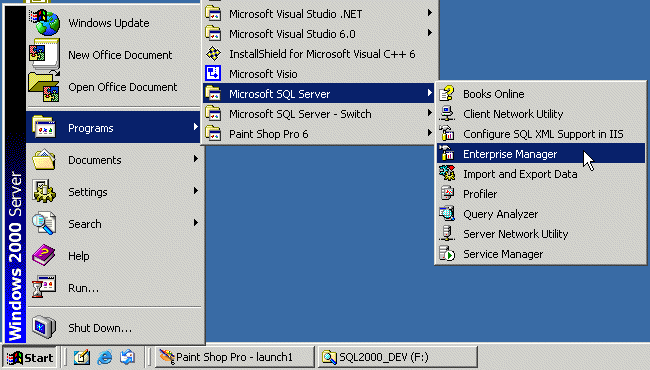
To be as flexible as possible, ADO.NET allows you to work with various types of databases. This also means that when you create an application, you must certainly first specify the type of database system you would be using. Before performing any database operation, you must first connect to the database server. One way you can do this, on the taskbar, you can click Start -> (All) Programs, and position the mouse on Microsoft SQL Server. You can then click either Query Analyzer or Enterprise Manager:
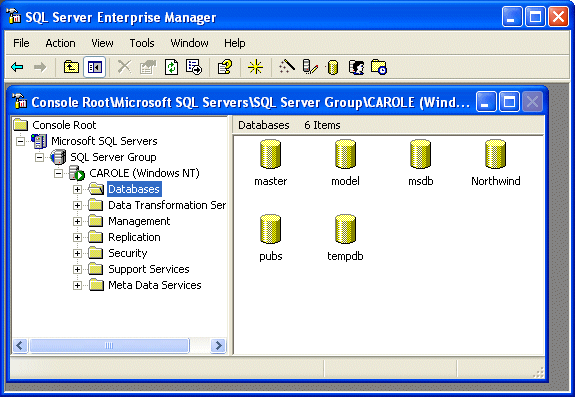
This would open the SQL Server Enterprise Manager:
You can also establish the connection through the SQL Query Analyzer. To do this, from the task bar, you can click Start -> (All) Programs -> Microsoft SQL Server -> Query Analyzer. This action would open the Connect to SQL Server dialog box:
If you are working in Microsoft Visual Studio .NET and need to connect to a server, you have various options. One way is to first display the Server Explorer window. To create a new connection, you can right-click the Data Connections node and click Add Connection...
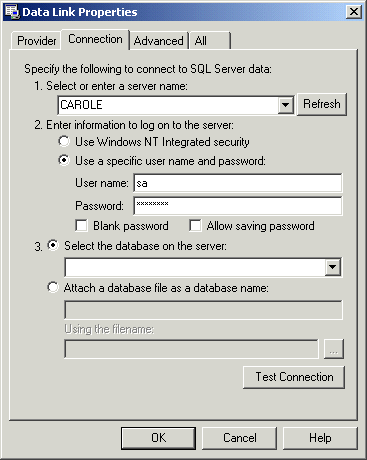
After clicking Add Connection..., the Data Link Properties would display. The Connection property page should be selected. Otherwise, you can click the Connection tab:
If you are creating a Windows Application (using Microsoft Visual Basic .NET), to support a connection to a database server, the .NET Framework provides the SqlConnection class that is defined in the System.Data.SqlClient namespace. Before using this class, you can first include this namespace in your file: Imports System.Data.SqlClient To connect to a database, you can first declare a variable of type SqlConnection using one of its two constructors. The default constructor allows you to declare the variable without specifying how the connection would be carried. The second constructor takes as argument a String value. Its syntax is: Public Sub New(ByVal connectionString As String) If you want, you can first create the string that would be used to handle the connection, then pass that string to the second construction. This would be done as follows: |
Private Sub btnConnect_Click(ByVal sender As System.Object, ByVal e As System.EventArgs) Handles btnConnect.Click
        Dim strConnection As String = ""
        Dim conSQL As SqlConnection = New SqlConnection(strConnection)
End Sub
|
You can also directly create the necessary (but appropriate) string in the second constructor when declaring the variable: |
Private Sub btnConnect_Click(ByVal sender As System.Object, ByVal e As System.EventArgs) Handles btnConnect.Click
        dim conSQL  as SqlConnection = new SqlConnection("")
End Sub
|
If you prefer to use the default constructor, you can first define a String value. To pass it to the default constructor, the SqlConnection class is equipped with a property called ConnectionString that is a pointer to String. You would use it as follows: |
Private Sub btnConnect_Click(ByVal sender As System.Object, ByVal e As System.EventArgs) Handles btnConnect.Click
        Dim strConnection As String = ""
        Dim conServer As SqlConnection = New SqlConnection

        conServer.ConnectionString = strConnection
End Sub
|
To use a SqlConnection object, you must provide various pieces of information, packaged as one and made available to the variable. These pieces are joined into a string but are separated from each other with a semi-colon ";". Each piece appears as a Key=Value format. In our lesson, we will refer to each of these pieces (Key=Value) as an attribute of the connection string. When joined, these attributes appear as follows: Key1=Value1;Key2=Value2;Key_n=Value_n Anything that part of this string is not case-sensitive (even though you are working on a C++ application). Remember that this whole ensemble is either passed as a string to the second constructor: dim conServer as SqlConnection = new SqlConnection("Key1=Value1;Key2=Value2;Key_n=Value_n")
or assigned as a string to the SqlConnection.ConnectionString property: Dim conServer As SqlConnection = New SqlConnection Dim strConnection As String = "Key1=Value1;Key2=Value2;Key_n=Value_n" conServer.ConnectionString = strConnection How you create these attributes depends on the type of computer you are connecting to, whether you are connecting to a database, what level the security you would use (or need), etc. There are various of these attributes, some of them are always required, some of them are usually optional, and some others depend on the circumstances. Instead of manually declaring a SqlConnection
variable, in the Data section of the Toolbox, you can click the SqlConnection
button
If you select New Connection..., you would be presented with the Data Link Properties dialog box. |
|
The Source of Data |
|
To establish a connection, you must specify the computer you are connecting to, that has Microsoft SQL Server installed. If you are working from the SQL Server Enterprise Manager, first expand the Microsoft SQL Servers node, followed by the SQL Server Group. If you don't see any name of a server, you may not have registered it (this is the case with some installations of MSDE):
Therefore, to specify the computer you want connecting to, if you are working from the SQL Server Enterprise Manager, you can click either (local) or the name of the server you want to connect to. Here is an example:
If you are connecting to the server using the SQL Query Analyzer, we saw that you would be presented with the Connect to SQL Server dialog box. Normally, the name of the computer would selected already. If not, you can select either (local) or the name of the computer in the SQL Server combo box:
If the SQL Server Enterprise Manager is already opened and you want to open SQL Query Analyzer, in the left frame, you can click the server or any node under the server to select it. Then, on the toolbar of the MMC, click Tools -> SQL Query Analyzer. In this case, the Query Analyzer would open directly. If you are already working in Microsoft Visual Studio .NET, we saw that you could right-click Data Connection and click Add Connection. When the Data Link Properties displays, in the 1. Select Or Enter A Server Name combo box, if you know the name of the computer, you can type it. Otherwise, you can click the arrow of the combo box and select the name of the server:
If you are programmatically connecting to a computer using the SqlConnection class, the connection string includes an attribute named Server, or Data Source, or Address, or Addr, or Network Address. For the rest of our lessons, this attribute will be referred to as the computer attribute. If you are creating an application used to connect to a computer on which the application resides, the computer can be identified as (local). Here is an example: Dim conDatabase As SqlConnection = new SqlConnection("Server=(local) ")
If you know the name of the computer, you can assign it to the computer attribute. In the same way, if you are connecting to a specific computer, you must provide its name. Here is an example: Dim conDatabase As SqlConnection = new SqlConnection("Data Source=EntranceStation; ")
Remember that the computer attribute is a requirement regardless of the (type of) application, even if it is local. |
|
Security |
|
An important aspect of establishing a connection to a computer is security. Even if you are developing an application that would be used on a standalone computer, you must take care of this issue. The security referred to in this attribute has to do with the connection, not how to protect your database. If you are using SQL Server Enterprise Manager, you can simply connect to the computer using the steps we have reviewed so far. If you are accessing SQL Query Analyzer from the taskbar by clicking Start -> (All) Programs -> Microsoft SQL Server -> Query Analyzer, after selecting the computer in the SQL Server combo box, you can specify the type of authentication you want. If security is not an issue in this instance, you can click the Windows Authentication radio button:
If you are working in the Data Link Properties, you can click the Use Windows NT Integrated Security radio button:
To support security, if you are programmatically establishing the connection, the connection string of the SqlConnection class includes an attribute called Trusted_Connection or Integrated Security that can have a value of true, false, yes, no, or SSPI with the SSPI having the same indication as true. If you are establishing a trusted or simple connection that doesn't need to be verified, you can assign a value of true or SSPI. Here is an example: |
Dim conDatabase As SqlConnection = new SqlConnection("Addr=(local)Data Source='';Trusted_Connection=sspi")
|
When you use the true or SSPI values, the user name (if any) and the password (if any) of the person opening your application would be applied. For example, if the application is being opened on Windows XP Home Edition (that, by default, doesn't require authentication), Windows 2000 Professional that has a default user name and password, or Windows XP Professional that has a default user name and password, the application would be opened fine without checking security. If you want security to apply, if you are connecting to SQL Query Analyzer using the Connect To SQL Server dialog box, you must click the SQL Server Authentication radio button:
If you are using the Data Link Properties and you want the connection to be authenticated, then you must click (or accept as default selected) the Use A Specific User Name And Password radio button. If you are programmatically establishing the connection, to apply authentication, you can assign false or no to the security attribute you selected. If you do this, then you must (this becomes a requirement) specify the user name and the password. For example, the following code will produce an error if you execute it: |
Dim conDatabase As SqlConnection = new SqlConnection("Server=(local)Database='';Integrated Security=no")
|
 |
|
So, if you set the security attribute to false or no, then you must provide login credentials. Notice that in some cases, you can provide empty credentials or a blank password.
If you are connecting to SQL Query Analyzer using the Connect To SQL Server dialog box and you want to apply authentication, after selecting the second radio button, this would prompt you for a username. If you are using the Data Link Properties after clicking the Use A Specific User Name And Password radio button, you can enter a username in the indicated text box. If you are programmatically creating the connection, to specify the user name, after assigning false or no to the security attribute, you must use the User ID attribute and assign it a valid username. Here is an example: |
Dim conDatabase As SqlConnection = new SqlConnection("Server=(local)Integrated Security=no;User ID=MammaMia")
|
The Password |
|
If you are "physically" connecting to the server through SQL Query Analyzer, besides the username, you can (must) also provide a password to complete the authentication:
After providing credentials and once you click OK, the SQL Query Analyzer would display. If you are using the Data Link Properties and you have selected the Use A Specific User Name And Password radio button, after typing a username, you can also enter a password in the indicated text box:
If you are programmatically establishing the connection, besides the username, to create a secured connection, you must also provide a password. To specify the password, you can user either the PASSWORD or the PWD (remember that the attributes are not case-sensitive) attribute and assign it the exact password associated with the User ID attribute of the same connection string. Here is an example: |
Dim conDatabase As SqlConnection = new SqlConnection("Server=(local)Integrated Security=no; User ID=sa;PWD=$outh~@kotA")
|
In some circumstances, you can use an empty password in which case you would assign an empty string to the password attribute.
Microsoft SQL Server (including MSDE) ships with various ready-made databases you can work with. In SQL Server Enterprise Manager, the available databases and those you will create are listed in a node called Databases. To display the list of databases, you can click the Databases node:
If you are not trying to connect to a database, you don't need to locate and click any. If you are attempting to connect to a specific database, in SQL Server Enterprise Manager, you can simply click the desired database. Here is an example:
If you are working in SQL Query Analyzer but you are not trying to connect to a specific database, you can accept the default master selected in the combo box of the toolbar. If you are trying to work on a specific database, to select it, on the toolbar, you can click the arrow of the combo box and select a database from the list:
If you are working from the Data Link Properties and in its Connection property page, if you don't want to open a specific database, there is nothing more to do (the master database would be selected as the default). If you want to establish a connection to a specific database, in the 3. Select The Database On The Server combo box, select the desired database. If you are working programmatically, to let you specify the database, the connection string includes an attribute named Database. The Database attribute allows you to specify the name of the database you are connecting to, if any. The Database keyword can also be substituted for the Initial Catalog. If you are connecting to an existing database, assign its name to this attribute. If you are not connecting to a database, you can omit this attribute. Alternatively, you can assign nothing to this attribute. Here is an example: Dim conDatabase As SqlConnection = new SqlConnection("Address=(local)Database=; ")
Another alternative is to assign an empty, single-quoted, string to this attribute. Here is an example: Dim conDatabase As SqlConnection = new SqlConnection("Network Address=(local)Initial Catalog=''; ")
As mentioned above, the Database attribute is optional, especially if you are only connecting to the computer and not to a specific database.
There are various other attributes used in the connection string. They include Network Library (also called Net), Application Name, Workstation ID, Encrypt, Connection Timeout, Data Source, Packet Size, AttachDBFilename, Current Language, Persist Security Info. After creating the connection string, when the application executes, the compiler would "scan" the string to validate each key=value section. If it finds an unknown Key, an unknown value, or an invalid combination of key=value, it would throw an ArgumentException exception and the connection cannot be established. |
|
|
||
| Previous | Copyright © 2005-2016, FunctionX | Next |
|
|
||