Windows Controls: The Tree View
|
|
Windows Controls: The Tree View |
Tree View Fundamentals
Description
A tree view is a control that resembles an upside down tree and displays a hierarchical list of items. Like a normal tree, a tree view starts in the top section with an object referred to as the root. Under the root, a real tree is made of branches and leaves. In an application, a tree view is only made of branches and each branch is called a node. In real world, a leaf cannot have a branch as its child, only a branch can have another branch as its child and a branch can have a leaf as a child. In an application, a node (any node) can have a node as a child.
Like a real world tree, the branches or nodes of a tree view use a type of relationship so that they are not completely independent. For example, a tree view can be based on a list that has a parent item and other child items that depend on that parent. In real world, if you cut a branch, the branches and leaves attached to it also disappear. This scenario is also valid for a tree view.
Most of the time, a tree has only one root but a tree in an application can have more than one root.
Tree View Creation
In a Windows application a tree view is primarily a control like any other. To use it in your application, you can click the TreeView button in the Toolbox and click a form or other control in your application. This is equivalent to programmatically declaring a variable of type TreeView, using the new operator to instantiate it and adding it to its container's list of controls through a call to the Controls.Add() method. Here is an example:
using System;
using System.Drawing;
using System.Windows.Forms;

public class Exercise : System.Windows.Forms.Form
{
    TreeView tvwCountries;

    public Exercise()
    {
        InitializeComponent();
    }

    private void InitializeComponent()
    {
        Text = "Countries Statistics";
        Size = new Size(242, 280);

        tvwCountries = new TreeView();

        tvwCountries.Location = new Point(12, 12);
        tvwCountries.Width = 210;
        tvwCountries.Height = 230;

        Controls.Add(tvwCountries);
    }
}

public class Program
{
    static int Main()
    {
        System.Windows.Forms.Application.Run(new Exercise());
        return 0;
    }
}
This would produce:

Using a TreeView variable only adds a rectangular empty control to your application. The next action you probably take is to add one or more branches to the tree.
![]() Practical Learning: Introducing the Tree View Control
Practical Learning: Introducing the Tree View Control
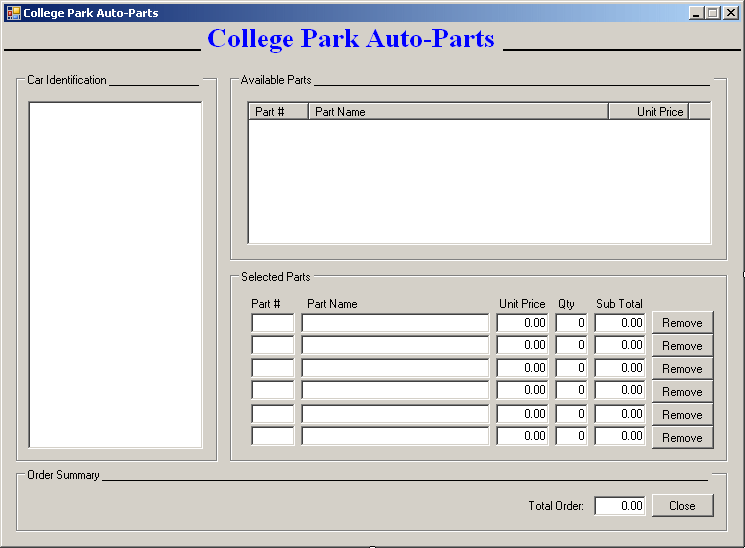
| Control | Text | Name | Other Properties | ||
| Label | College Park Auto-Parts | Font: Times New Roman, 20.25pt, style=Bold | |||
| Panel |
|
Height: 2 | |||
| TreeView |
|
tvwAutoParts | |||
| GroupBox |
|
||||
| ListView |
|
lvwAutoParts | View: Details | ||
| Columns | (Name) | Text | TextAlign | Width | |
| colPartNumber | Part # | ||||
| colPartName | Part Name | 300 | |||
| colUnitPrice | Unit Price | Right | 80 | ||
| GroupBox |
|
Selected Parts | |||
| Label | Part # | ||||
| Label | Part Name | ||||
| Label | Unit Price | ||||
| Label | Qty | ||||
| Label | Sub Total | ||||
| TextBox | txtPartNumber1 | ||||
| TextBox | txtPartName1 | ||||
| TextBox | 0.00 | txtUnitPrice1 | TextAlign: Right | ||
| TextBox | 0 | txtQuantity1 | TextAlign: Right | ||
| TextBox | 0.00 | txtSubTotal1 | TextAlign: Right | ||
| Button | Remove | btnRemove1 | |||
| TextBox | txtPartNumber2 | ||||
| TextBox | txtPartName2 | ||||
| TextBox | 0.00 | txtUnitPrice2 | TextAlign: Right | ||
| TextBox | 0 | txtQuantity2 | TextAlign: Right | ||
| TextBox | 0.00 | txtSubTotal2 | TextAlign: Right | ||
| Button | Remove | btnRemove2 | |||
| TextBox | txtPartNumber3 | ||||
| TextBox | txtPartName3 | ||||
| TextBox | 0.00 | txtUnitPrice3 | TextAlign: Right | ||
| TextBox | 0 | txtQuantity3 | TextAlign: Right | ||
| TextBox | 0.00 | txtSubTotal3 | TextAlign: Right | ||
| Button | Remove | btnRemove3 | |||
| TextBox | txtPartNumber4 | ||||
| TextBox | txtPartName4 | ||||
| TextBox | 0.00 | txtUnitPrice4 | TextAlign: Right | ||
| TextBox | 0 | txtQuantity4 | TextAlign: Right | ||
| TextBox | 0.00 | txtSubTotal4 | TextAlign: Right | ||
| Button | Remove | btnRemove4 | |||
| TextBox | txtPartNumber5 | ||||
| TextBox | txtPartName5 | ||||
| TextBox | 0.00 | txtUnitPrice5 | TextAlign: Right | ||
| TextBox | 0 | txtQuantity5 | TextAlign: Right | ||
| TextBox | 0.00 | txtSubTotal5 | TextAlign: Right | ||
| Button | Remove | btnRemove5 | |||
| TextBox | txtPartNumber6 | ||||
| TextBox | txtPartName6 | ||||
| TextBox | 0.00 | txtUnitPrice6 | TextAlign: Right | ||
| TextBox | 0 | txtQuantity6 | TextAlign: Right | ||
| TextBox | 0.00 | txtSubTotal6 | TextAlign: Right | ||
| Button | Remove | btnRemove6 | |||
| GroupBox |
|
Order Summary | |||
| Button | New Auto-Part... | btnNewAutoPart | |||
| Label | Total Order: | ||||
| TextBox | 0.00 | txtTotalOrder | |||
| Button | Close | btnClose | |||
Introduction to Creating Tree View Nodes
Visually Creating Nodes
To create the nodes of a tree view, Microsoft Visual Studio provides a convenient dialog box you can use at design time. To display it, after adding a tree view control to a form:
This would open the TreeNode Editor:
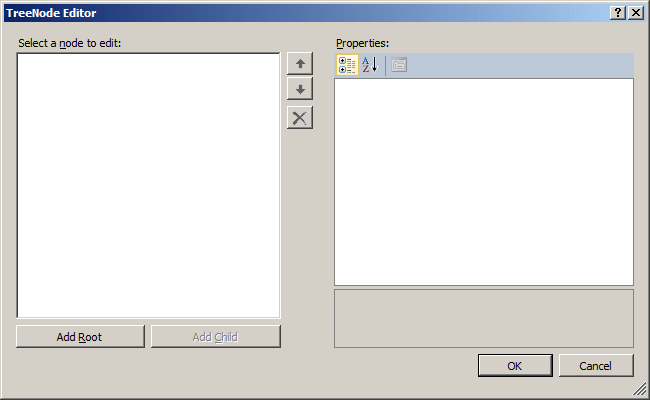
The primary characteristic of a node is the text it displays. At design time and in the TreeNode Editor, to create a node, you can click the Add Root button. When you do this, a node with a default but incremental name is created. To edit a node's name, first select it in the Select Node To Edit list, then, on the right side, click Name and enter the string you wish.
Programmatically Creating Nodes
The branches of a tree view are stored in a property called Nodes. The Nodes property is an object based on the TreeNodeCollection class. The TreeNodeCollection class implements the IList, the ICollection, and the IEnumerable interfaces.
As its name indicates, the Nodes property carries all of the branches of a tree view. This means that the Nodes property in fact represents a collection. Each member of this collection is called a node and it is an object based on the TreeNode class.
At run time, to create a new node, call the TreeNodeCollection.Add() method which is overloaded with two versions. One of the versions of this method uses the following syntax:
public virtual TreeNode Add(string text);
This method takes as argument the string that the branch will display. This method is also the prime candidate to create a root node. Here is an example of calling it:
private void InitializeComponent()
{
        Text = "Countries Statistics";
        Size = new Size(242, 280);

        tvwCountries = new TreeView();
        tvwCountries.Location = new Point(12, 12);
        tvwCountries.Width = 210;
        tvwCountries.Height = 230;

        tvwCountries.Nodes.Add("World");

        Controls.Add(tvwCountries);
}
This would produce:

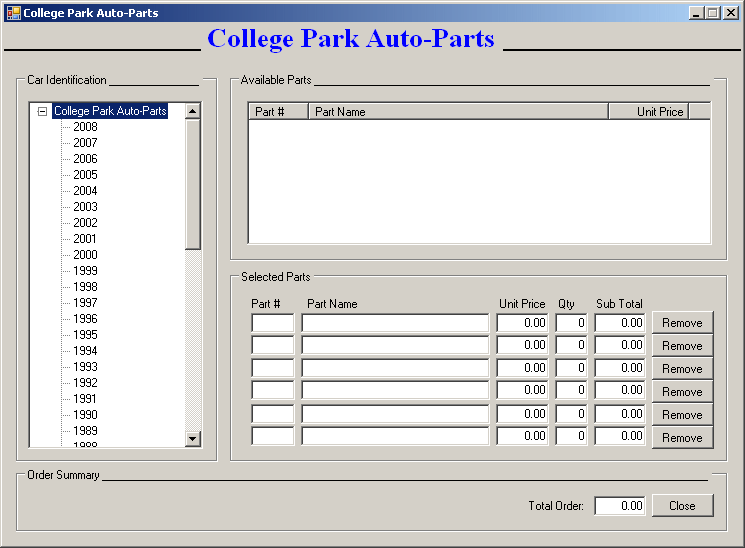
![]() Practical Learning:
Creating the Root Node
Practical Learning:
Creating the Root Node
private void Central_Load(object sender, EventArgs e)
{
            TreeNode nodRoot = tvwAutoParts.Nodes.Add("College Park Auto-Parts");

            for (int i = DateTime.Today.Year + 1; i > 1960; i--)
                nodRoot.Nodes.Add(i.ToString());
}
using System;
using System.Collections.Generic;
using System.ComponentModel;
using System.Data;
using System.Drawing;
using System.Linq;
using System.Text;
using System.Windows.Forms;

namespace CollegeParkAutoParts2
{
    public class PartDescription
    {
        // These members will be used to define a car part
        private long ID;
        private int yr;
        private string mk;
        private string mdl;
        private string cat;
        private string name;
        private decimal price;

        public PartDescription(long code = 0, int year = 1960,
        		       string make = "",
                               string model = "", string type = "Unknown",
                               string desc = "Unknown",
                               decimal UPrice = 0.00M)
        {
            this.ID = code;
            this.yr = year;
            this.mk = make;
            this.mdl = model;
            this.cat = type;
            this.name = desc;
            this.price = UPrice;
        }

        public long PartNumber
        {
            get { return ID; }
            set { ID = value; }
        }

        public int CarYear
        {
            get { return yr; }
            set { yr = value; }
        }

        public string Make
        {
            get { return mk; }
            set { mk = value; }
        }

        public string Model
        {
            get { return mdl; }
            set { mdl = value; }
        }

        public string Category
        {
            get { return cat; }
            set { cat = value; }
        }

        public string PartName
        {
            get { return name; }
            set { name = value; }
        }

        public decimal UnitPrice
        {
            get { return (price < 0) ? 0.00M : price; }
            set { price = value; }
        }

        public override string ToString()
        {
            return this.PartNumber + " " +
                   this.CarYear.ToString() + " " +
                   this.Make + " " +
                   this.Model + " " +
                   this.Category + " " +
                   this.PartName + " " +
                   this.UnitPrice;
        }
    }
}
A Node and its Children
Introduction
The other version of the TreeNodeCollection.Add() method uses the following syntax:
public virtual int Add(TreeNode node);
This method takes as argument a TreeNode object. In other words, it expects a complete or semi-complete branch already defined somehow.
The TreeNode class is equipped with various constructors you can use to instantiate it. Its default constructor allows you to create a node without primarily giving its details. Another TreeNode constructor has the following syntax:
public TreeNode(string text);
This constructor takes as argument the string that the node will display. Here is an example of using it and adding its newly create node to the tree view:
private void InitializeComponent()
{
        Text = "Countries Statistics";
        Size = new Size(242, 280);

        tvwCountries = new TreeView();
        tvwCountries.Location = new Point(12, 12);
        tvwCountries.Width = 210;
        tvwCountries.Height = 230;

        TreeNode nodElement = new TreeNode("World");
        tvwCountries.Nodes.Add(nodElement);

        Controls.Add(tvwCountries);
}
We mentioned that the primary characteristic of a node is the text it displays. The text of a node is stored in a property of the TreeNode class and is called Text. This allows you either to specify the string of a node or to retrieve it when needed. Here is an example of setting it:
private void InitializeComponent()
{
        Text = "Countries Statistics";
        Size = new Size(242, 280);

        tvwCountries = new TreeView();
        tvwCountries.Location = new Point(12, 12);
        tvwCountries.Width = 210;
        tvwCountries.Height = 230;

        TreeNode nodElement = new TreeNode();
        nodElement.Text = "World";
        tvwCountries.Nodes.Add(nodElement);

        Controls.Add(tvwCountries);
}
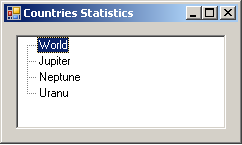
Just as we called the TreeNodeCollection.Add() method to create a branch, you can call it as many times as necessary to create additional branches. Here is an example:
private void InitializeComponent()
{
        Text = "Countries Statistics";
        Size = new Size(242, 280);

        tvwCountries = new TreeView();
        tvwCountries.Location = new Point(12, 12);
        tvwCountries.Width = 210;
        tvwCountries.Height = 230;

        tvwCountries.Nodes.Add("World");
        tvwCountries.Nodes.Add("Jupiter");
        tvwCountries.Nodes.Add("Neptune");
        tvwCountries.Nodes.Add("Uranu");

        Controls.Add(tvwCountries);
}
This would produce:
Alternatively, if you have many branches to add to the tree, you can first create them as an array of TreeNode values, then called the TreeNodeCollection.AddRange() method. The syntax of this method is:
public virtual void AddRange(TreeNode[] nodes);
This method takes as argument an array of TreeNode objects. Here is an example:
private void InitializeComponent()
{
        Text = "Countries Statistics";
        Size = new Size(242, 280);

        tvwCountries = new TreeView();
        tvwCountries.Location = new Point(12, 12);
        tvwCountries.Width = 210;
        tvwCountries.Height = 230;

        TreeNode[] nodPlanets =
        {
            	 new TreeNode("World"),
	 new TreeNode("Jupiter"),
            	 new TreeNode("Neptune"),
	 new TreeNode("Uranu")
        };
        tvwCountries.Nodes.AddRange(nodPlanets);

        Controls.Add(tvwCountries);
}
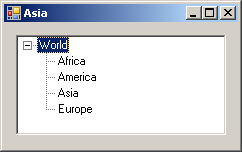
Creating Child Nodes
At design time and in the TreeNode Editor, to create a child node for an existing item, first select it in the Select Node To Edit list, then click the Add Child button. This causes a child node to be created for the selected item. To edit its name, first click it and change the string in the Label text box.
At run time, to create a child node, first get a reference to the node that will be used as its parent. One way you can get this reference is to obtain the returned value of the first version of the TreeNodeCollection.Add() method. As its syntax indicates, this method returns a TreeNode object.
We have used the default constructor of the TreeNode class and the constructor that takes as argument a string. The TreeNode class provides another constructor whose syntax is:
public TreeNode(string text, TreeNode[] children);
The first argument of this method is the string that the new node this constructor creates will display. The second argument is a collection of the child nodes of this branch. The collection is passed as an array. Based on this, you use this constructor to create a new node including its children. After creating the new node, you can pass it to the TreeNodeCollection.Add() method as we did earlier. Here is an example:
private void InitializeComponent()
{
Text = "Countries Statistics";
Size = new Size(242, 280);
tvwCountries = new TreeView();
tvwCountries.Location = new Point(12, 12);
tvwCountries.Width = 210;
tvwCountries.Height = 100;
TreeNode[] nodContinents =
{
new TreeNode("Africa"),
new TreeNode("America"),
new TreeNode("Asia"),
new TreeNode("Europe")
};
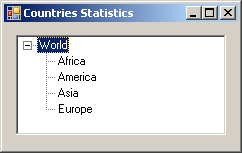
TreeNode nodWorld = new TreeNode("World", nodContinents);
tvwCountries.Nodes.Add(nodWorld);
Controls.Add(tvwCountries);
}
This would produce
Using the same approach, you can create as many branches and their child nodes as you wish. Here is an example:
private void InitializeComponent()
{
Text = "Countries Statistics";
Size = new Size(242, 320);
tvwCountries = new TreeView();
tvwCountries.Location = new Point(12, 12);
tvwCountries.Width = 210;
tvwCountries.Height = 270;
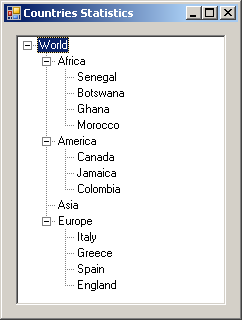
// Create a list of some African countries and
// store them in an array named nodAfricans
TreeNode[] nodAfricans = { new TreeNode("Senegal"),
new TreeNode("Botswana"),
new TreeNode("Ghana"),
new TreeNode("Morocco") };
// Create a list of some American countries and
// store them in an array named nodAmericans
TreeNode[] nodAmericans = { new TreeNode("Canada"),
new TreeNode("Jamaica"),
new TreeNode("Colombia")};
// Create a list of some European countries and
// store them in an array named nodEuropeans
TreeNode[] nodEuropeans = { new TreeNode("Italy"),
new TreeNode("Greece"),
new TreeNode("Spain"),
new TreeNode("England") };
// Create a list of continents, independently
TreeNode nodAfrica = new TreeNode("Africa", nodAfricans);
TreeNode nodAmerica = new TreeNode("America", nodAmericans);
TreeNode nodAsica = new TreeNode("Asia");
TreeNode nodEurope = new TreeNode("Europe", nodEuropeans);
// Store the list of continents in an array named nodContinents
TreeNode[] nodContinents = { nodAfrica, nodAmerica, nodAsica, nodEurope };
// Create a branch named nodWorld and store the list of
// continents as its child
TreeNode nodWorld = new TreeNode("World", nodContinents);
// Finally, add the nodWorld branch to the tree view
tvwCountries.Nodes.Add(nodWorld);
Controls.Add(tvwCountries);
}
This would produce:
![]() Practical Learning:
Creating Child Nodes
Practical Learning:
Creating Child Nodes
using System;
using System.Collections.Generic;
using System.ComponentModel;
using System.Data;
using System.Drawing;
using System.Linq;
using System.Text;
using System.Windows.Forms;
using System.Collections;

namespace CollegeParkAutoParts2
{
    public partial class Central : Form
    {
        PartDescription[] parts = new PartDescription[100];

        public Central()
        {
            InitializeComponent();
        }

        private void Central_Load(object sender, EventArgs e)
        {
            TreeNode nodRoot = tvwAutoParts.Nodes.Add("College Park Auto-Parts");

            // This is simply used to initialize the whole array with empty parts
            // This is just to make sure that each member of the array is defined
            for (int n = 0; n < 100; n++)
                parts[n] = new PartDescription(0, 1960, "", "", "", "", 0.00M);

            parts[0] = new PartDescription(447093, 2002, "Ford",
                "Escort SE L4 2.0", "Engine Electrical",
                "Alternator 75amp  Remanufactured; w/ 75 Amp",
                205.05M);
            parts[1] = new PartDescription(203815, 2006, "Dodge",
                "Caravan SE L4 2.4", "Cooling System",
                "Radiator Cap", 6.65M);
            parts[2] = new PartDescription(293047, 2000, "Toyota",
                "RAV4 2WD/4-DOOR", "Cooling System",
                "Thermostat Gasket", 4.95M);
            parts[3] = new PartDescription(990468, 2002, "Honda",
                "Civic 1.7 EX 4DR", "Exhaust",
                "Bolt & Spring Kit (Manifold outlet, Muffler Inlet)",
                85.75M);
            parts[4] = new PartDescription(304158, 1996, "Buick",
                "Regal Custom V6 3.8", "Fuel Injection",
                "Fuel Injector", 82.75M);
            parts[5] = new PartDescription(807245, 2004, "Acura",
                "MDX 3.5 4WD", "Driveshaft & Axle",
                "CV Boot Clamp 7 x 750mm; 1 Large + 1 Small Clamp",
                1.60M);
            parts[6] = new PartDescription(203485, 2001, "Ford",
                "Taurus LX V6 3.0", "Fuel Injection",
                "Oxygen Sensor OE Style 4Wire; Front; 2 Required",
                52.65M);
            parts[7] = new PartDescription(248759, 1999, "Jeep",
                "Wrangler Sahara", "Air Intake",
                "Air Filter AirSoft Panel", 7.95M);
            parts[8] = new PartDescription(202848, 1998, "Honda",
                "Accord 2.3 LX 4DR", "Air Intake",
                "Air Filter", 12.55M);
            parts[10] = new PartDescription(932759, 2006, "Kia",
                "Rio 1.6DOHC16V 4-DR", "Cooling System",
                "Thermostat", 14.45M);
            parts[11] = new PartDescription(304975, 2000, "Honda",
                "Civic 1.6 EX 4DR", "Suspension",
                "Ball Joint; Front Lower; 2 per car", 40.55M);
            parts[12] = new PartDescription(208450, 2003, "Chevrolet",
                "Monte Carlo LS V6 3.4", "Fuel Injection",
                "Oxygen Sensor OE connector; Rear", 65.55M);
            parts[13] = new PartDescription(209480, 2002, "Ford",
                "Focus SE DOHC L4 2.0", "Steering",
                "Steering Rack Remanufactured", 170.85M);
            parts[9] = new PartDescription(203495, 2004, "Honda",
                "Civic 1.7 EX 4DR", "Climate Control",
                "A/C Clutch; OE compressor = Sanden", 184.95M);
            parts[14] = new PartDescription(203480, 2007, "Toyota",
                "Corolla", "Air Intake",
                "Air Filter", 12.65M);
            parts[15] = new PartDescription(109379, 2005, "Volvo",
                "S40 2.5L T5 AWD", "Fuel Delivery",
                "Fuel Filter; Early Design; Outer Diameter = 55mm",
                30.95M);
            parts[16] = new PartDescription(935794, 2002, "Ford",
                "Escape XLS 4WD", "Brake",
                "Brake Caliper Remanufactured; Front Right",
                65.55M);
            parts[17] = new PartDescription(203485, 2006, "BMW",
                "325i", "Climate Control",
                "AC High Pressure Side Switch",
                49.95M);
            parts[18] = new PartDescription(204875, 1996, "Chevrolet",
                "Monte Carlo Z34 V6 3.4", "Fuel Delivery",
                "Fuel Filter", 8.05M);
            parts[19] = new PartDescription(937485, 2007, "Toyota",
                "Camry V6", "Air Intake", "Air Filter", 12.95M);
            parts[20] = new PartDescription(294759, 2001, "Ford",
                "Escape XLT 4WD", "Air Intake",
                "Air Filter Panel", 7.25M);
            parts[21] = new PartDescription(297495, 2003, "Honda",
                "Civic 1.7 EX 4DR", "Brake",
                "Brake Caliper Reman; w/ ProAct Pads; Front Right",
                82.55M);
            parts[22] = new PartDescription(794735, 2006, "BMW",
                "325i", "Climate Control",
                "Cabin Air/Pollen Filter; With Activated Carbon",
                28.05M);
            parts[23] = new PartDescription(937485, 2007, "Toyota",
                "Corolla", "Body Electrical",
                "Halogen  SilverStar; 12V 65W; inner-high beam",
                22.85M);
            parts[24] = new PartDescription(492745, 2005, "Ford",
                "Focus ZX3 L4 2.0", "Air Intake",
                "Fuel Injection Perf Kit", 342.95M);
            parts[25] = new PartDescription(937005, 2004, "Acura",
                "MDX 3.5 4WD", "Driveshaft & Axle",
                "CV Boot Clamp 7 x 750mm; For Large End of Boot; inner boot",
                1.60M);
            parts[26] = new PartDescription(293749, 2004, "Acura",
                "MDX 3.5 4WD", "Driveshaft & Axle",
                "Axle Nut 24mm x 1;5; rear ",
                2.35M);
            parts[27] = new PartDescription(920495, 2006, "BMW",
                "325i", "Climate Control",
                "Adjustable Telescoping Mirror", 7.95M);
            parts[28] = new PartDescription(204075, 2004, "Acura",
                "MDX 3.5 4WD", "Driveshaft & Axle",
                "Wheel Bearing; Rear; 1 per wheel",
                70.15M);
            parts[29] = new PartDescription(979304, 2000, "Toyota",
                "RAV4 2WD/4-DOOR", "Cooling System",
                "Thermostat Housing", 20.95M);
            parts[30] = new PartDescription(300456, 2004, "Acura",
                "MDX 3.5 4WD", "Driveshaft & Axle",
                "Wheel Bearing; Front; 1 per wheel",
                66.65M);
            parts[31] = new PartDescription(404860, 2001, "Ford",
                "Taurus LX V6 3.0", "Suspension",
                "Shock Absorber GR2; Rear; Wagon only",
                39.40M);
            parts[32] = new PartDescription(585688, 2007, "Buick",
                "Lacrosse CXS V6 3.6", "Brake",
                "Climate Control", 10.65M);
            parts[33] = new PartDescription(739759, 2001, "Ford",
                "Taurus LX V6 3.0", "Suspension",
                "Shock Absorber GasaJust; Rear; Wagon only",
                30.95M);
            parts[34] = new PartDescription(927495, 2005, "Volvo",
                "S40 2.5L T5 AWD", "Engine Mechanical",
                "Timing Belt Idler Pulley Original Equipment INA",
                65.55M);
            parts[40] = new PartDescription(979374, 2000, "Toyota",
                "RAV4 2WD/4-DOOR", "Cooling System",
                "Thermostat Gasket", 4.95M);
            parts[35] = new PartDescription(542347, 2007, "Buick",
                "Lacrosse CXS V6 3.6", "Brake",
                "Brake Pad Set ProACT Ceramic w/Shims; Front", 80.05M);
            parts[36] = new PartDescription(683064, 2000, "Toyota",
                "RAV4 2WD/4-DOOR", "Cooling System",
                "Radiator Hose; Upper", 103.75M);
            parts[37] = new PartDescription(248759, 1999, "Jeep",
                "Wrangler Sahara", "Air Intake",
                "Air Filter", 50.95M);
            parts[38] = new PartDescription(973974, 2007, "Toyota",
                "Corolla", "Air Intake",
                "Air Mass Meter; W/o Housing; Meter/sensor only",
                134.95M);
            parts[39] = new PartDescription(285800, 2001, "Ford",
                "Escape XLT 4WD", "Transmission",
                "AT Filter", 34.95M);
            parts[41] = new PartDescription(207495, 2007, "Toyota",
                "Corolla", "Body Electrical",
                "Headlight Bulb; 12V 65W; inner-high beam", 9.35M);
            parts[42] = new PartDescription(566676, 2000, "Toyota",
                "RAV4 2WD/4-DOOR", "Cooling System",
                "Auxiliary Fan Switch", 42.95M);
            parts[43] = new PartDescription(304950, 2007, "Toyota",
                "Corolla", "Body Electrical",
                "Headlight Bulb; 12V 51W; outer", 7.85M);
            parts[44] = new PartDescription(797394, 2000, "Toyota",
                "RAV4 2WD/4-DOOR", "Cooling System",
                "Water Flange Gasket", 0.85M);
            parts[45] = new PartDescription(910203, 2007, "Buick",
                "Lacrosse CXS V6 3.6", "Suspension",
                "Strut Mount Inc; Sleeve; Rear Right", 80.85M);
            parts[46] = new PartDescription(790794, 2000, "Toyota",
                "RAV4 2WD/4-DOOR", "Cooling System",
                "Radiator Hose; Lower", 9.45M);
            parts[47] = new PartDescription(970394, 2007, "Buick",
                "Lacrosse CXS V6 3.6", "Suspension",
                "Coil Spring Insulator; Front Lower",
                14.55M);
            parts[48] = new PartDescription(290840, 2005, "Volvo",
                "S40 2.5L T5 AWD", "Engine Mechanical",
                "Rod Bearing Set 1 per Rod; Standard; Reqs. 5-per Engine",
                26.95M);
            parts[49] = new PartDescription(209704, 2007, "Toyota",
                "Corolla", "Body Electrical",
                "Wiper Blade Excel+; Front Right", 7.25M);
            parts[50] = new PartDescription(200368, 2000, "Toyota",
                "RAV4 2WD/4-DOOR", "Cooling System",
                "Radiator Drain Plug incl; gasket", 3.15M);
            parts[51] = new PartDescription(200970, 2005, "Volvo",
                "S40 2.5L T5 AWD", "Engine Mechanical",
                "Reference Sensor; Flywheel Engine Speed",
                62.05M);
            parts[52] = new PartDescription(542347, 2007, "Buick",
                "Lacrosse CXS V6 3.6", "Air Intake",
                "Air Filter", 50.25M);
            parts[53] = new PartDescription(927045, 2001, "Ford",
                "Escape XLT 4WD", "Air Intake",
                "Air Filter", 62.95M);
            parts[54] = new PartDescription(990659, 2000, "Toyota",
                "RAV4 2WD/4-DOOR", "Cooling System",
                "Radiator OE Plastic tank", 136.85M);
            parts[55] = new PartDescription(440574, 2007, "Buick",
                "Lacrosse CXS V6 3.6", "Suspension",
                "Strut Mount Inc; Sleeve; Rear Left",
                80.80M);

            // Showing the years nodes
            for (int years = DateTime.Today.Year + 1; years > 1960; years--)
                nodRoot.Nodes.Add(years.ToString());

            // Showing the makes nodes
            foreach (TreeNode nodYear in nodRoot.Nodes)
            {
                ArrayList lstMakes = new ArrayList();

                foreach (PartDescription part in parts)
                {
                    if (nodYear.Text == part.CarYear.ToString())
                    {
                        if (!lstMakes.Contains(part.Make))
                            lstMakes.Add(part.Make);
                    }
                }

                foreach (string strMake in lstMakes)
                    nodYear.Nodes.Add(strMake);
            }

            // Showing the models nodes
            foreach (TreeNode nodYear in nodRoot.Nodes)
            {
                foreach (TreeNode nodMake in nodYear.Nodes)
                {
                    ArrayList lstModels = new ArrayList();

                    foreach (PartDescription part in parts)
                    {

                        if ((nodYear.Text == part.CarYear.ToString()) &&
                            (nodMake.Text == part.Make))
                        {
                            if (!lstModels.Contains(part.Model))
                                lstModels.Add(part.Model);

                        }
                    }

                    foreach (string strModel in lstModels)
                        nodMake.Nodes.Add(strModel);
                }
            }

            // Showing the categories nodes
            foreach (TreeNode nodYear in nodRoot.Nodes)
            {
                foreach (TreeNode nodMake in nodYear.Nodes)
                {
                    foreach (TreeNode nodModel in nodMake.Nodes)
                    {
                        ArrayList lstCategories = new ArrayList();

                        foreach (PartDescription part in parts)
                        {

                            if ((nodYear.Text == part.CarYear.ToString()) &&
                                (nodMake.Text == part.Make) &&
                                (nodModel.Text == part.Model))
                            {
                                if (!lstCategories.Contains(part.Category))
                                    lstCategories.Add(part.Category);
                            }
                        }

                        foreach (string strCategory in lstCategories)
                            nodModel.Nodes.Add(strCategory);
                    }
                }
            }
        }
    }
}
The Number of Child Nodes
The number of nodes in the TreeNode objects is stored in the TreeNodeCollection.Count property. To get the current number of nodes in the tree view, you can call the TreeView.GetNodeCount() method. Its syntax is:
public int GetNodeCount(bool includeSubTrees);
Here is an example:
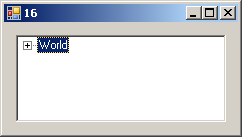
private void InitializeComponent()
{
        Text = "Countries Statistics";
        Size = new Size(242, 320);

        tvwCountries = new TreeView();
        tvwCountries.Location = new Point(12, 12);
        tvwCountries.Width = 210;
        tvwCountries.Height = 270;

        // Create a list of some African countries and
        // store them in an array named nodAfricans
        TreeNode[] nodAfricans = { new TreeNode("Senegal"),
		                               new TreeNode("Botswana"),
			               new TreeNode("Ghana"),
			               new TreeNode("Morocco") };

        . . . No Change

        Controls.Add(tvwCountries);

        int count = tvwCountries.GetNodeCount(true);
        Text = count.ToString();
    }
This would produce:
If you create a node and add it to a branch that already contains another node, the new node is referred to as a sibling to the existing child node.
The Nodes of a Node
In our introduction, we saw that a node, any node, could have as many nodes as you judge necessary. To support this, the TreeNode class is equipped with a property called Nodes, which, like that of the TreeView class, is based on the TreeNodeCollection class. This allows you to refer to the list of children of the node that this Nodes property belongs to. With this information, you can further create or manipulate child nodes of any node as you wish.
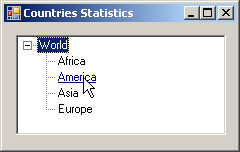
Node Selection
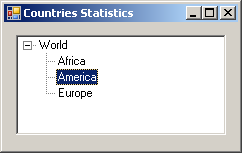
Besides looking at a node, probably the primary action a user performs on a tree is to select an item. To select a node in the tree, the user can click it. To programmatically select a node, assign its reference to the TreeView.SelectedNode property. Here is an example:
private void InitializeComponent()
{
        Text = "Countries Statistics";
        Size = new Size(242, 320);

        tvwCountries = new TreeView();
        tvwCountries.Location = new Point(12, 12);
        tvwCountries.Width = 210;
        tvwCountries.Height = 100;

        TreeNode nodAfrica = new TreeNode("Africa");
        TreeNode nodAmerica = new TreeNode("America");
        TreeNode nodEurope = new TreeNode("Europe");
        TreeNode[] nodContinents = { nodAfrica, nodAmerica, nodEurope };

        TreeNode nodWorld = new TreeNode("World", nodContinents);
        tvwCountries.Nodes.Add(nodWorld);

        tvwCountries.SelectedNode = nodAmerica;

        Controls.Add(tvwCountries);
}
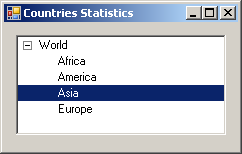
After selecting a node, the tree view indicates the item selected by highlighting it. In the following picture, the America node is selected:
To programmatically find out what item is selected in the tree, get the value of the TreeView.SelectedNode Boolean property. If no node is selected, this property produces null. Alternatively, you can check the value of a node's TreeNode.IsSelected Boolean property to find out if it is currently selected.
Node Edition
After locating a node, the user may want to change its text. To change the string of a node, it must be put to edit mode. To do this, you can call the TreeNode.BeginEdit() method. Its syntax is:
public void BeginEdit();
When a node is in edit mode, the caret blinks in its edit box section. The user can then type a new string or edit the existing string. After setting the (new) string, the user can press Enter or may click somewhere. At this time, you need to indicate that the user has finished this operation. To do this, you can call the TreeNode.EndEdit() method. Its syntax is:
public void EndEdit(bool cancel);
Just before this method, you can check the content of the string that was added or edited. This allows you to accept or reject the change. The argument to the EndEdit() method allows you to validate or cancel the editing action.
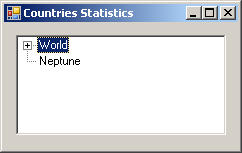
Node Location
As mentioned already, the nodes of a tree view are stored in a collection of type TreeNodeCollection. Every time you create a new node, it occupies a position inside the tree. Each node is represented by the Item indexed property of this collection. The first node of the tree has an index of 0.
When you call the TreeNodeCollection.Add() method to create a node, the new branch is added at the end of the list of its siblings. If you want, you can add a new child somewhere in the tree. To do this, you would call the TreeNodeCollection.Insert() method. Its syntax is:
public virtual void Insert(int index, TreeNode node);
The first argument to this method is the index that the new node will occupy when created. The second argument is a reference to the new node to be created. Here is an example of using it:
private void InitializeComponent()
{
        Text = "Countries Statistics";
        Size = new Size(242, 320);

        tvwCountries = new TreeView();
        tvwCountries.Location = new Point(12, 12);
        tvwCountries.Width = 210;
        tvwCountries.Height = 100;

        TreeNode[] nodContinents =
        {
            new TreeNode("Africa"),
            new TreeNode("America"),
            new TreeNode("Asia"),
            new TreeNode("Europe")
        };

        TreeNode nodWorld = new TreeNode("World", nodContinents);
        tvwCountries.Nodes.Add(nodWorld);

        tvwCountries.Nodes.Insert(1, new TreeNode("Neptune"));

        Controls.Add(tvwCountries);
}
This would produce:
Another technique you can use to locate a node consists of using some coordinates. To do this, you can call the TreeView.GetNodeAt() method that is overloaded with two versions whose syntaxes are:
public TreeNode GetNodeAt(Point pt);
public TreeNode GetNodeAt(int x, int y);
To use this method, you must know either the Point location or the x and y coordinates of the node. If you provide valid arguments to this method, it returns a reference to the TreeNode located at the argument. Here is an example:
private void InitializeComponent()
{
        Text = "Countries Statistics";
        Size = new Size(242, 320);

        tvwCountries = new TreeView();
        tvwCountries.Location = new Point(12, 12);
        tvwCountries.Width = 210;
        tvwCountries.Height = 100;

        TreeNode[] nodContinents =
        {
            new TreeNode("Africa"),
            new TreeNode("America"),
            new TreeNode("Asia"),
            new TreeNode("Europe")
        };

        TreeNode nodWorld = new TreeNode("World", nodContinents);
        tvwCountries.Nodes.Add(nodWorld);

        tvwCountries.ExpandAll();
        TreeNode nodBranch = tvwCountries.GetNodeAt(22, 48);

        Controls.Add(tvwCountries);
        Text = nodBranch.Text;
}
This would produce:
After creating a tree, to get a reference to the first child node, you can retrieve the TreeNode.FirstNode property. You would use code as follows:
private void InitializeComponent()
{
        Text = "Countries Statistics";
        Size = new Size(242, 320);

        tvwCountries = new TreeView();
        tvwCountries.Location = new Point(12, 12);
        tvwCountries.Width = 210;
        tvwCountries.Height = 100;

        TreeNode[] nodContinents = { new TreeNode("Africa"),
				   new TreeNode("America"),
				   new TreeNode("Asia"),
				   new TreeNode("Europe") };

        TreeNode nodWorld = new TreeNode("World", nodContinents);
        tvwCountries.Nodes.Add(nodWorld);

        TreeNode nodFirst = tvwCountries.Nodes[0].FirstNode;
        Controls.Add(tvwCountries);

        Text = nodFirst.Text;
}
To get a reference to the last child node, retrieve the TreeNode.LastNode property. You would use code as follows:
TreeNode nodLast = tvwCountries.Nodes[0].LastNode;
Text = nodLast.Text;
To get a reference to the sibling above a node, if any, you can retrieve its TreeNode.PrevNode property. To get a reference to the sibling below a node, if any, you can retrieve its TreeNode.NextNode property.
To find whether a tree view contains a certain node, you can call the TreeNodeCollection.Contains() method. Its syntax is:
public bool Contains(TreeNode node);
This method expects as argument a reference to the node to look for. If the tree contains that node, the method returns true. If the node is not found, this method returns false.
![]() Practical Learning:
Using the Selected Node
Practical Learning:
Using the Selected Node
private void tvwAutoParts_NodeMouseClick(object sender,
            TreeNodeMouseClickEventArgs e)
{
        TreeNode nodClicked = e.Node;

        if( nodClicked.Level == 4 )
                lvwAutoParts.Items.Clear();

        try
        {
                try
                {
                    foreach (PartDescription part in parts)
                    {
                        if ((part.Category == nodClicked.Text) &&
                            (part.Model == nodClicked.Parent.Text) &&
                            (part.Make == nodClicked.Parent.Parent.Text) &&
                            (part.CarYear.ToString() == nodClicked.Parent.Parent.Parent.Text))
                        {
                            ListViewItem lviAutoPart = new ListViewItem(part.PartNumber.ToString());

                            lviAutoPart.SubItems.Add(part.PartName);
                            lviAutoPart.SubItems.Add(part.UnitPrice.ToString());
                            lvwAutoParts.Items.Add(lviAutoPart);
                        }
                    }
                }
                catch (NullReferenceException)
                {
                }
        }
        catch (NullReferenceException)
        {
        }
}
internal void CalculateOrder()
{
            // Calculate the current total order and update the order
            decimal subTotal1 = 0.00M, subTotal2 = 0.00M, subTotal3 = 0.00M,
                        subTotal4 = 0.00M, subTotal5 = 0.00M, subTotal6 = 0.00M;
            decimal orderTotal = 0.00M;

            // Retrieve the value of each sub total
            try
            {
                subTotal1 = decimal.Parse(this.txtSubTotal1.Text);
            }
            catch (FormatException)
            {
                MessageBox.Show("Invalid Value");
            }

            try
            {
                subTotal2 = decimal.Parse(this.txtSubTotal2.Text);
            }
            catch (FormatException)
            {
                MessageBox.Show("Invalid Value");
            }

            try
            {
                subTotal3 = decimal.Parse(this.txtSubTotal3.Text);
            }
            catch (FormatException)
            {
                MessageBox.Show("Invalid Value");
            }

            try
            {
                subTotal4 = decimal.Parse(this.txtSubTotal4.Text);
            }
            catch (FormatException)
            {
                MessageBox.Show("Invalid Value");
            }

            try
            {
                subTotal5 = decimal.Parse(this.txtSubTotal5.Text);
            }
            catch (FormatException)
            {
                MessageBox.Show("Invalid Value");
            }

            try
            {
                subTotal6 = decimal.Parse(this.txtSubTotal6.Text);
            }
            catch (FormatException)
            {
                MessageBox.Show("Invalid Value");
            }

            // Calculate the total value of the sub totals
            orderTotal = subTotal1 + subTotal2 + subTotal3 +
                         subTotal4 + subTotal5 + subTotal6;

            // Display the total order in the appropriate text box
            this.txtTotalOrder.Text = orderTotal.ToString();
}

private void lvwAutoParts_DoubleClick(object sender, EventArgs e)
{
        ListViewItem lviAutoPart = lvwAutoParts.SelectedItems[0];

        if (lvwAutoParts.SelectedItems.Count == 0 ||
                    lvwAutoParts.SelectedItems.Count > 1)
                    return;

            if (txtPartNumber1.Text == "")
            {
                txtPartNumber1.Text = lviAutoPart.Text;
                txtPartName1.Text   = lviAutoPart.SubItems[1].Text;
                txtUnitPrice1.Text  = lviAutoPart.SubItems[2].Text;

                txtQuantity1.Text   = "1";
                txtSubTotal1.Text   = lviAutoPart.SubItems[2].Text;

                txtQuantity1.Focus();
            }// If the previous Part # text box is not empty, then use the next one
            else if (txtPartNumber2.Text == "")
            {
                txtPartNumber2.Text = lviAutoPart.Text;
                txtPartName2.Text   = lviAutoPart.SubItems[1].Text;
                txtUnitPrice2.Text  = lviAutoPart.SubItems[2].Text;

                txtQuantity2.Text = "1";
                txtSubTotal2.Text = txtUnitPrice2.Text;
                txtQuantity2.Focus();
            }
            else if (txtPartNumber3.Text == "")
            {
                txtPartNumber3.Text = lviAutoPart.Text;
                txtPartName3.Text   = lviAutoPart.SubItems[1].Text;
                txtUnitPrice3.Text  = lviAutoPart.SubItems[2].Text;

                txtQuantity3.Text = "1";
                txtSubTotal3.Text = txtUnitPrice3.Text;
                txtQuantity3.Focus();
            }
            else if (txtPartNumber4.Text == "")
            {
                txtPartNumber4.Text = lviAutoPart.Text;
                txtPartName4.Text   = lviAutoPart.SubItems[1].Text;
                txtUnitPrice4.Text  = lviAutoPart.SubItems[2].Text;

                txtQuantity4.Text = "1";
                txtSubTotal4.Text = txtUnitPrice4.Text;
                txtQuantity4.Focus();
            }
            else if (txtPartNumber5.Text == "")
            {
                txtPartNumber5.Text = lviAutoPart.Text;
                txtPartName5.Text   = lviAutoPart.SubItems[1].Text;
                txtUnitPrice5.Text  = lviAutoPart.SubItems[2].Text;

                txtQuantity5.Text = "1";
                txtSubTotal5.Text = txtUnitPrice5.Text;
                txtQuantity5.Focus();
            }
            else if (txtPartNumber6.Text == "")
            {
                txtPartNumber6.Text = lviAutoPart.Text;
                txtPartName6.Text   = lviAutoPart.SubItems[1].Text;
                txtUnitPrice6.Text  = lviAutoPart.SubItems[2].Text;

                txtQuantity6.Text = "1";
                txtSubTotal6.Text = txtUnitPrice6.Text;
                txtQuantity6.Focus();
            } // If all Part # text boxes are filled, don't do anything
            else
                return;

            CalculateOrder();
}
private void txtQuantity1_Leave(object sender, EventArgs e)
{
            int qty = 0;
            decimal unitPrice = 0.00M, subTotal = 0.00M;

            // Get the quantity of the current item
            try
            {
                qty = int.Parse(this.txtQuantity1.Text);
            }
            catch (FormatException)
            {
                MessageBox.Show("Invalid Value");
            }

            // Get the unit price of the current item
            try
            {
                unitPrice = decimal.Parse(this.txtUnitPrice1.Text);
            }
            catch (FormatException)
            {
                MessageBox.Show("Invalid Value");
            }

            // Calculate the current sub total
            subTotal = qty * unitPrice;

            // Display the new sub total in the corresponding text box
            this.txtSubTotal1.Text = subTotal.ToString();
            // Update the order
            CalculateOrder();
}
private void txtQuantity2_Leave(object sender, EventArgs e)
{
            int qty = 0;
            decimal unitPrice = 0.00M, subTotal = 0.00M;

            try
            {
                qty = int.Parse(this.txtQuantity2.Text);
            }
            catch (FormatException)
            {
                MessageBox.Show("Invalid Value");
            }

            try
            {
                unitPrice = decimal.Parse(this.txtUnitPrice2.Text);
            }
            catch (FormatException)
            {
                MessageBox.Show("Invalid Value");
            }

            subTotal = qty * unitPrice;
            this.txtSubTotal2.Text = subTotal.ToString();

            CalculateOrder();
}
private void txtQuantity3_Leave(object sender, EventArgs e)
{
            int qty = 0;
            decimal unitPrice = 0.00M, subTotal = 0.00M;

            try
            {
                qty = int.Parse(this.txtQuantity3.Text);
            }
            catch (FormatException)
            {
                MessageBox.Show("Invalid Value");
            }

            try
            {
                unitPrice = decimal.Parse(this.txtUnitPrice3.Text);
            }
            catch (FormatException)
            {
                MessageBox.Show("Invalid Value");
            }

            subTotal = qty * unitPrice;
            this.txtSubTotal3.Text = subTotal.ToString();

            CalculateOrder();
}
private void txtQuantity4_Leave(object sender, EventArgs e)
{
            int qty = 0;
            decimal unitPrice = 0.00M, subTotal = 0.00M;

            try
            {
                qty = int.Parse(this.txtQuantity4.Text);
            }
            catch (FormatException)
            {
                MessageBox.Show("Invalid Value");
            }

            try
            {
                unitPrice = decimal.Parse(this.txtUnitPrice4.Text);
            }
            catch (FormatException)
            {
                MessageBox.Show("Invalid Value");
            }

            subTotal = qty * unitPrice;
            this.txtSubTotal4.Text = subTotal.ToString();

            CalculateOrder();
}
private void txtQuantity5_Leave(object sender, EventArgs e)
{
            int qty = 0;
            decimal unitPrice = 0.00M, subTotal = 0.00M;

            try
            {
                qty = int.Parse(this.txtQuantity5.Text);
            }
            catch (FormatException)
            {
                MessageBox.Show("Invalid Value");
            }

            try
            {
                unitPrice = decimal.Parse(this.txtUnitPrice5.Text);
            }
            catch (FormatException)
            {
                MessageBox.Show("Invalid Value");
            }

            subTotal = qty * unitPrice;
            this.txtSubTotal5.Text = subTotal.ToString();

            CalculateOrder();
}
private void txtQuantity6_Leave(object sender, EventArgs e)
{
            int qty = 0;
            decimal unitPrice = 0.00M, subTotal = 0.00M;

            try
            {
                qty = int.Parse(this.txtQuantity6.Text);
            }
            catch (FormatException)
            {
                MessageBox.Show("Invalid Value");
            }

            try
            {
                unitPrice = decimal.Parse(this.txtUnitPrice6.Text);
            }
            catch (FormatException)
            {
                MessageBox.Show("Invalid Value");
            }

            subTotal = qty * unitPrice;
            this.txtSubTotal6.Text = subTotal.ToString();

            CalculateOrder();
}
|
private void btnRemove1_Click(object sender, EventArgs e)
{
        txtPartNumber1.Text = "";
        txtPartName1.Text = "";
        txtUnitPrice1.Text = "0.00";
        txtQuantity1.Text = "0";
        txtSubTotal1.Text = "0.00";

        CalculateOrder();
}
|
private void btnRemove2_Click(object sender, EventArgs e)
{
        txtPartNumber2.Text = "";
        txtPartName2.Text = "";
        txtUnitPrice2.Text = "0.00";
        txtQuantity2.Text = "0";
        txtSubTotal2.Text = "0.00";

        CalculateOrder();
}
|
private void btnRemove3_Click(object sender, EventArgs e)
{
        txtPartNumber3.Text = "";
        txtPartName3.Text = "";
        txtUnitPrice3.Text = "0.00";
        txtQuantity3.Text = "0";
        txtSubTotal3.Text = "0.00";

        CalculateOrder();
}
|
private void btnRemove4_Click(object sender, EventArgs e)
{
        txtPartNumber4.Text = "";
        txtPartName4.Text = "";
        txtUnitPrice4.Text = "0.00";
        txtQuantity4.Text = "0";
        txtSubTotal4.Text = "0.00";

        CalculateOrder();
}
private void btnRemove5_Click(object sender, EventArgs e)
{
        txtPartNumber5.Text = "";
        txtPartName5.Text = "";
        txtUnitPrice5.Text = "0.00";
        txtQuantity5.Text = "0";
        txtSubTotal5.Text = "0.00";

        CalculateOrder();
}
private void btnRemove6_Click(object sender, EventArgs e)
{
        txtPartNumber6.Text = "";
        txtPartName6.Text = "";
        txtUnitPrice6.Text = "0.00";
        txtQuantity6.Text = "0";
        txtSubTotal6.Text = "0.00";

        CalculateOrder();
}
private void btnClose_Click(object sender, EventArgs e)
{
        Close();
}
Deleting Nodes
When a tree contains a few nodes, the user may want to delete some of them, for any reason. To delete a node, you can call the TreeNodeCollection.Remove() method. Its syntax is:
public void Remove(TreeNode node);
This method expects a reference to the node you want to delete. Another solution you can use would consist of locating the node by its index. To do this, you would call the TreeNodeCollection.RemoveAt() method. Its syntax is:
public virtual void RemoveAt(int index);
When calling this method, pass the index of the node to be deleted. If you are already at that node and you want to remove it, you can call the TreeNode.Remove() method. Its syntax is:
public void Remove();
One of the characteristics of a tree in the real world is that, if you cut a branch, the branches attached to it and their leaves are cut too. In the same way, if you call any of these Remove() or RemoveAt() methods to delete a node, its children, if any, would be deleted too.
To remove all nodes of a tree view, you can call the TreeNodeCollection.Clear() method. Its syntax is:
public virtual void Clear();
This method is used to get rid of all nodes of a tree.
Characteristics of a Tree View
The Path to a Node
After a node has been added to a tree, it holds a position relative to its parent and its existence depends on that parent. To keep track of its "ancestry", each node has a path that can be used to identify its parent and its grand-parent(s), if any. To know the path of a node from itself to the root, you can access its TreeNode.FullPath property. This property produces a string made of sections separated by a specific character identified as the TreeView.PathSeparator property. By default, this character is the backslash, following the conventions of the operating system. If you want to use a different character or string, assign it to the PathSeparator property. To know what character or string a tree view is using as the separator, you can retrieve the value of its PathSeparator property.
Hot Tracking
In order to select an item, the user must click it or navigate to it using the keyboard. Alternatively, if you want the items to be underlined when the mouse passes over them, set to true the TreeView.HotTracking Boolean property. Its default value is false. Here is an example:
private void InitializeComponent()
{
        Text = "Countries Statistics";
        Size = new Size(242, 320);

        tvwCountries = new TreeView();
        tvwCountries.Location = new Point(12, 12);
        tvwCountries.Width = 210;
        tvwCountries.Height = 100;

        tvwCountries.HotTracking = true;

        Controls.Add(tvwCountries);

        TreeNode[] nodContinents = { new TreeNode("Africa"),
				   new TreeNode("America"),
				   new TreeNode("Asia"),
				   new TreeNode("Europe") };

        TreeNode nodWorld = new TreeNode("World", nodContinents);
        tvwCountries.Nodes.Add(nodWorld);
}
This would produce:
The Intermediary Lines of Related Nodes
As mentioned already, a tree view appears as a list of items arranged like a tree. This implies a relationship of parent-child among the items in the control. To indicate this relationship between two nodes, a line is drawn from one to another. Based on this, a line from a node on top of another node under it indicates that the one on top is the parent to the one under it.
The presence or absence of the lines among related nodes is controlled by the TreeView.ShowLines Boolean property. By default, this property is set to true (in the .NET Framework, some other libraries have it set by default to false). If this property is set to false, the lines between the nodes would not display. Here is an example:
private void InitializeComponent()
{
        Text = "Countries Statistics";
        Size = new Size(242, 320);

        tvwCountries = new TreeView();
        tvwCountries.Location = new Point(12, 12);
        tvwCountries.Width = 210;
        tvwCountries.Height = 100;

        tvwCountries.ShowLines = false;

        TreeNode[] nodContinents = { new TreeNode("Africa"),
				   new TreeNode("America"),
				   new TreeNode("Asia"),
				   new TreeNode("Europe") };

        TreeNode nodWorld = new TreeNode("World", nodContinents);
        tvwCountries.Nodes.Add(nodWorld);

        Controls.Add(tvwCountries);
}
This would produce:

The Root Lines
If you create a tree that has more than one root, a line is drawn among those root nodes. Here is an example:
The presence or absence of this type of line is controlled by the TreeView.ShowRootLines Boolean property.
Node Indentation
Indentation is the ability for a child node to be aligned to the right with regards to its parent. The general distance from the left border of the parent to the left border of the child is partially controlled by the TreeView.Indent property which is an integer. If the default distance doesn't suit you, you can change it by assigning a positive number to the control's Indent property.
Full Row Selection
When the user clicks an item, that node becomes highlighted for the length of its string. If you want, you can show the highlighting on the selected node but from the left to the right borders of the tree view. To do this, you can set the TreeView.FullRowSelect Boolean property to true. Its default value is false. For the TreeView.FullRowSelect property to work, the ShowLines property must be set to false. Here is an example:
private void InitializeComponent()
{
        Text = "Countries Statistics";
        Size = new Size(242, 320);

        tvwCountries = new TreeView();
        tvwCountries.Location = new Point(12, 12);
        tvwCountries.Width = 210;
        tvwCountries.Height = 100;

        tvwCountries.HotTracking = true;
        tvwCountries.ShowLines = false;
        tvwCountries.FullRowSelect = true;

        TreeNode[] nodContinents = { new TreeNode("Africa"),
				   new TreeNode("America"),
				   new TreeNode("Asia"),
				   new TreeNode("Europe") };

        TreeNode nodWorld = new TreeNode("World", nodContinents);
        tvwCountries.Nodes.Add(nodWorld);

        Controls.Add(tvwCountries);
}
This would produce:
Hiding Selection After Losing Focus
We saw that, to select an item, the user can click it. If the user clicks another control, the node that was selected in the tree view loses its highlighting because the control has lost focus. When the focus moves to another control, if you want the selected node of the tree view to preserve its highlighting, set to false the TreeView.HideSelection Boolean property. Its default value is true.
The + and - Buttons
At this time, we have seen that some nodes have children and some don't. When a node has at least one child, the node indicates this by displaying a + button. If the user clicks the + button, the node expands, displays a list of its children, and the button becomes -. The presence or absence of the + and - buttons is controlled by the TreeView.ShowPlusMinus Boolean property. By default, this property is set to true. If you don't want the parent nodes to display the + or - button, set this property to false.
Expanding and Collapsing Tree Nodes
When a node displays a + button and the user clicks that button, the node displays its child(ren). This action is referred to as expanding the node. To programmatically expand a node, call its TreeNode.Expand() method. Its syntax is:
public void Expand();
This method only expands the node that calls it but if its children have their own children, they are not expanded. To expand a node and its children that have nodes, you can call its TreeNode.ExpandAll() method. Its syntax is:
public void ExpandAll();
To find out if a node is expanded, check the value of its TreeNode.IsExpanded property.
To expand other nodes of the tree view, the user can continue clicking each node that has a + button as necessary. To programmatically expand all nodes of a tree view, call its TreeView.ExpandAll() method. Its syntax is:
public void ExpandAll();
If a node is displaying a - button, it indicates that it is showing the list of its children. To hide the list, the user can click the - button. This action is referred to as collapsing the node. To programmatically collapse a node, call its TreeNode.Collapse() method whose syntax is:
public void Collapse();
The user can do this for each node that is expanded. To programmatically collapse all nodes of a tree view, call its TreeView.CollapseAll() method. Its syntax is:
public void CollapseAll();
Tree Nodes and Check Boxes
Besides the strings (and some small pictures as we will see later), the nodes of a tree view can display a check box on their left side. The presence or absence of the check box is controlled by the CheckBoxes Boolean property whose default value is false. If you want to display the check boxes, set this property to true. Here is an example:
private void InitializeComponent()
{
        Text = "Countries Statistics";
        Size = new Size(242, 320);

        tvwCountries = new TreeView();
        tvwCountries.Location = new Point(12, 12);
        tvwCountries.Width = 210;
        tvwCountries.Height = 100;

        tvwCountries.CheckBoxes = true;

        TreeNode[] nodContinents = { new TreeNode("Africa"),
				   new TreeNode("America"),
				   new TreeNode("Asia"),
				   new TreeNode("Europe") };

        TreeNode nodWorld = new TreeNode("World", nodContinents);
        tvwCountries.Nodes.Add(nodWorld);

        Controls.Add(tvwCountries);
}
This would produce:
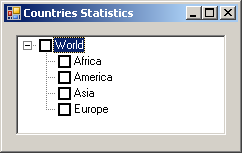
If you equip the nodes with check boxes, the user can click an item to select it independently of the check box. The user can also click the check box, which would place a check mark in the box. To programmatically check the box, you can assign a true value to the node's Checked property.
When a check mark has been placed in a node's check box, the tree view fires an AfterCheck event, which is handled by the TreeViewEventHandler delegate. The AfterCheck event is carried by the TreeViewEventArgs class. One of properties of this class is called Action, which specifies why or how the event occurred. The Action property is in fact a value based on the TreeViewAction enumerator. Its members are:
ByKeyboard: This indicates that the event was fired by pressing a key
ByMouse: This indicates that the event was fired based on an action on the mouse
Collapse: This indicates that event was fired when the tree collapsed
Expand: This indicates that the event was fired when the tree expanded
Unknown: None of the above reasons caused the event, but the event was fired
The other property of the TreeViewEventArgs class is called Node. This member is of type TreeNode. It carries a reference to the node that fired the event, whether it was clicked, checked, expanded, or collapsed.
To programmatically find out if a node is checked, check the value of its Checked property.
Tree Nodes and Icons
Each of the nodes we have used so far displayed a simple piece of text. To enhance the appearance of a node, besides its text, you can display a small icon to the left of its string. To do this, you must first create an ImageList control and assign it to the TreeView.ImageList property.
When creating a node, if you plan to display an icon next to it, you can use the following constructor of the TreeNode class:
public TreeNode(String text, int imageIndex, int selectedImageIndex);
This constructor allows you to specify the text that the node will display, the index of the picture it will use in the ImageList property, and the picture it will display when it is selected.
If you are creating a node with its children and you want to specify its pictures, use the following constructor of the TreeNode class:
public TreeNode(string text,
                            int imageIndex,
                            int selectedImageIndex,
                            TreeNode children[]);
Just as done previously, after defining the TreeNode object, you can add it to the tree by passing it to the TreeNodeCollection.Add() method. In the same way, you can create an array of TreeNode objects and pass it to the TreeNodeCollection.AddRange() method.
![]() Practical Learning:
Associating Icons With Nodes
Practical Learning:
Associating Icons With Nodes


private void Central_Load(object sender, EventArgs e)
{
            TreeNode nodRoot = tvwAutoParts.Nodes.Add("College Park Auto-Parts",
                                                      "College Park Auto-Parts", 0, 1);

            . . . No Change

            // Showing the years nodes
            for (int years = DateTime.Today.Year + 1; years > 1960; years--)
                nodRoot.Nodes.Add(years.ToString(), years.ToString(), 2, 3);

            // Expand the root node
            tvwAutoParts.ExpandAll();

            // Showing the makes nodes
            foreach (TreeNode nodYear in nodRoot.Nodes)
            {
                ArrayList lstMakes = new ArrayList();

                foreach (PartDescription part in parts)
                {
                    if (nodYear.Text == part.CarYear.ToString())
                    {
                        if (!lstMakes.Contains(part.Make))
                            lstMakes.Add(part.Make);
                    }
                }

                foreach (string strMake in lstMakes)
                    nodYear.Nodes.Add(strMake, strMake, 4, 5);
            }

            // Showing the models nodes
            foreach (TreeNode nodYear in nodRoot.Nodes)
            {
                foreach (TreeNode nodMake in nodYear.Nodes)
                {
                    ArrayList lstModels = new ArrayList();

                    foreach (PartDescription part in parts)
                    {

                        if ((nodYear.Text == part.CarYear.ToString()) &&
                            (nodMake.Text == part.Make))
                        {
                            if (!lstModels.Contains(part.Model))
                                lstModels.Add(part.Model);

                        }
                    }

                    foreach (string strModel in lstModels)
                        nodMake.Nodes.Add(strModel, strModel, 6, 7);
                }
            }

            // Showing the categories nodes
            foreach (TreeNode nodYear in nodRoot.Nodes)
            {
                foreach (TreeNode nodMake in nodYear.Nodes)
                {
                    foreach (TreeNode nodModel in nodMake.Nodes)
                    {
                        ArrayList lstCategories = new ArrayList();

                        foreach (PartDescription part in parts)
                        {

                            if ((nodYear.Text == part.CarYear.ToString()) &&
                                (nodMake.Text == part.Make) &&
                                (nodModel.Text == part.Model))
                            {
                                if (!lstCategories.Contains(part.Category))
                                    lstCategories.Add(part.Category);
                            }
                        }

                        foreach (string strCategory in lstCategories)
                            nodModel.Nodes.Add(strCategory, strCategory, 8, 9);
                    }
                }
            }

            tvwAutoParts.SelectedNode = nodRoot;
}
|
|
||
| Home | Copyright © 2010-2020, FunctionX | |
|
|
||