|
|
Problems happen in a program. Some of them
manifest themselves while you are developing your project. Some
others would show up during the lifetime of your application. This
seams to be an avoidable fact of life. The errors your program will
encounter can be classified in three categories: runtime, syntax,
and logic errors.
|
|
 Application:
Introducing Errors Application:
Introducing Errors
|
|
- Start Microsoft Visual Studio
- To create a new application, on the main menu, click File -> New
Project...
- In the middle list, click Console Application
- Change the Name to WattsALoan1
- Click OK
- On the main menu, click Project -> WattsALoan1 Properties
- Click the arrow of the Application Type box and select Windows
Forms Application
- In the Solution Explorer, right-click Module1.vb and click
Rename
- Type LoanEvaluation.vb and press Enter twice
- Change the document as follows:
Module LoanEvaluation

    Public Function Main() As Integer
        Return 0
    End Function

End Module
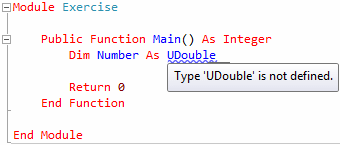
A syntax error is due to a misuse of the Visual
Basic language in your code. For example, the Visual Basic language has
a set of keywords that you should (must) not use to name your variable.
This rule is usually easy to respect if you are using a professional
text editor such as the Code Editor of Microsoft Visual Basic.
The Code Editor of Microsoft Visual Basic makes it
easy to be aware of syntax errors as soon as they occur:
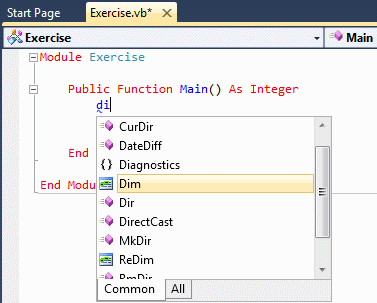
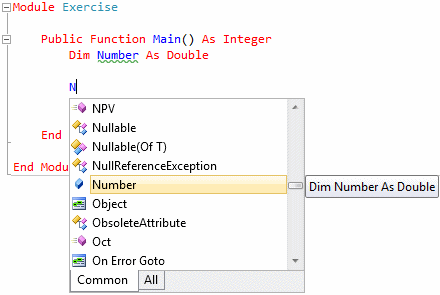
- When you start typing code, the IntelliSense starts building a
list of words that match the first characters and those that include
the characters already typed:
If you see a word you need and it is highlighted, you can press
Enter to select it. You can also double-click the word from the
list. If the list is long and the word does not appear yet, you can
keep typing (adding characters) until the word you want comes up
- If you mistype a word or a keyword, the Code Editor would
indicate the error by underlining the word. If you place the mouse
on it, a message would display the reason for the error:
- If you declare a variable, or once you have declared a variable,
whenever you want to use it, as soon as you start typing its name,
the IntelliSense would display a list that includes that variable
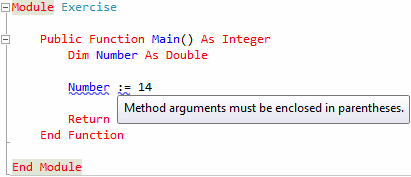
- The Visual Basic language is equipped with many operators and
each operator has rules. If you misuse an operator, the section of
your code would be underlined. You can position the mouse on it to
see the resulting error message:
As you can see, if you create your application in
Microsoft Visual Studio, the Code Editor is fully equipped with tools to
assist you to detect and correct syntax errors. If you still violate a
syntax rule, when you build your project, the compiler would detect the
error and point out the line, the section, and the file name where the
error occurred (we will come back to this in the next lesson).
|
Application:
Introducing Syntax Errors
|
|
- Change the document as follows:
Module LoanEvaluation

    Public Function Main() As Integer
        Dim Summary As String
        Dim Principal As Double = 0.0

        Summary = "Watts A Loan?" & vbCrLf

        Summary += "============================" & vbCrLf
        Summary += "Loan Summary" & vbCrLf
        Summary += "=------------------------------------------=" & vbCrLf
        Summary += String.Format("Principal:       {0:F}" & vbCrLf, Principal)
        Summary += "============================"

        MsgBox(Summary)
        Return 0
    End Function

End Module
A logic error occurs when the program (the code) is
written fine but the result it produces is not reliable. With a logic
error, the Code Editor does not see anything wrong in the document and
therefore cannot point out a problem. One of the worse types of logic
errors is one that makes a computer crash sometimes, regularly, or
unpredictably, while there is nothing obviously wrong in the code.
Logic errors are, or can be, difficult to spot
because you will have to know for sure that the result is wrong and why
(and sometimes worse, you will have to agree or accept that it is your
program that is causing a problem in the computer; imagine a user
reports that her computer crashes every time she starts the application
you created). Because you or the user of your program would know with
certainty that the result is questionable, you would have to use some
means of correcting it. One of the techniques you can use is referred to
as debugging.
A logic error is called a bug. Debugging is the
process of examining code to look for bugs or to identify problems.
Debugging is the ability to monitor the behavior of a variable, a
function, or another item throughout a program. Microsoft Visual Basic
provides many features to perform debugging operations.
The debugger is the program you use to debug your
code. The code or application that you are debugging is called the
debuggee.
Probably the most fundamental way of examining code
is to read every word and every line, with your eyes, using your
experience as a programmer. This can work for short code written in one
file and in one class. If the code to examine covers many pages or many
files, it could be aweful and tiresome to examine code with your eyes
line by line. Fortunately, to assist you with this operation, Microsoft
Visual Studio provides various tools and windows that you use, one
window or a combination of objects. One of the tools you can use is the
Standard toolbar that is equipped with various debugging buttons:

|
Starting and Continuing With Debugging
|
|
There are different ways you can launch the
debugging process:
- On the main menu, you can click Debug -> Start Debugging
- On the Standard toolbar, you can click the Start Debugging
button

- In the Solution Explorer, you can right-click the name of the
project, position the mouse on Debug, and click Step Into New
Instance
- You can press F5
In later sections, we will see other ways of
starting or proceeding with debugging. In some cases, we will see how
you can suspend debugging. When this has happened, to resume debugging:
- On the main menu, you can click Debug -> Continue
- On the Standard toolbar, you can click the Continue button
- You can press F5
We will see other ways of continuing with debugging.
As we will see in later sections, there are various
debugging approaches available in Microsoft Visual Studio. Sometimes you
will want to suspend or stop debugging.
To end debugging at any time:
- On the main menu, click Debug -> Stop Debugging
- On the Standard toolbar, click the Stop Debugging button

One of the primary pieces of information you want to
get is the value that a variable is holding. A window named Locals can
be used to show that value. Normally, when you start debugging, the
Locals window shows automatically. During debugging, if the Locals
window is hidden, to display it:
- On the main menu, click Debug -> Windows -> Locals
- Press Ctrl + Alt + V, release, then press L
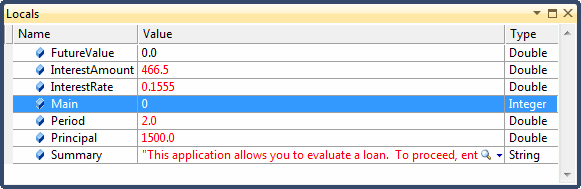
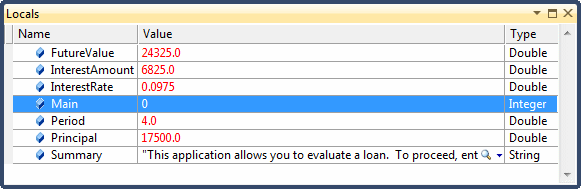
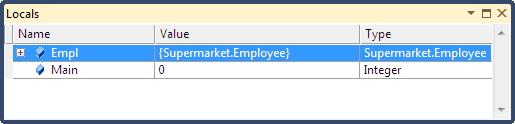
As its name indicates, the Locals window shows the
values of local variables as they are changed. If there is more than one
variable, the Locals window displays their names and gives a row to each
variable. The Locals window organizes its information in a table or
grid:
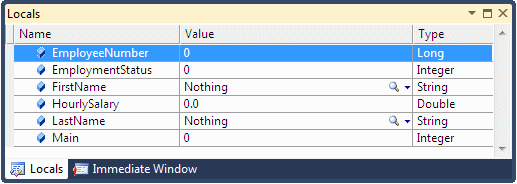
The Name column shows the name of each variable
declared in the method or the section that is being debugged. If the
variable is a class, a + button appears to its left, indicating that it
has fields (member variables):
In this case, to show the variables, that is, to
expand the node, click the + button. This would show the fields under
the variable name and the name of the class between curly brackets under
the Value column:
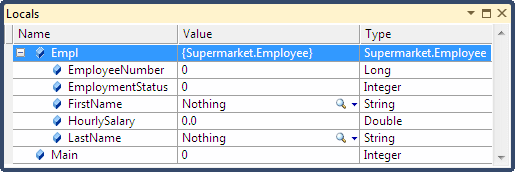
The Value columns shows the value of each variable.
When debugging starts, each variable shows its default value. As
debugging progresses, when a variable acquires a new value, the Locals
window updates it in the Value column. In some cases, instead of the
debugger changing the value, you can manually select and change it in
the Locals window and press Enter.
The Type column shows the data type of the variable.
If the variable is a class, the name of the class shows in the Type
column.
|
Executing One Statement at a Time
|
|
Just as done when reading code with your eyes, the
most basic way to monitor code is to execute one line at a time and see
the results. To support this operation, the debugger provides what is
referred to as stepping into.
To execute code one line at a time, while the file
that contains it is displaying:
- On the main menu, click Debug -> Step Into
- On the Standard toolbar, click the Step Into button

- In you are using Microsoft Visual Studio, press F8.
If you
are using Microsoft Visual Basic 2010 Express, press F11
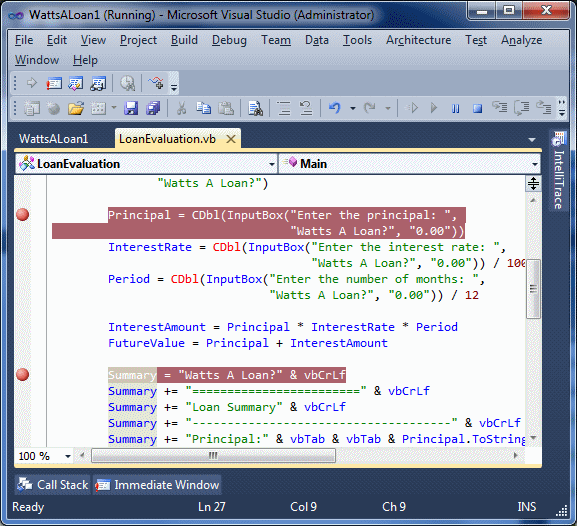
When code is being stepped into, the margin
corresponding to the line that is being examined display a
right-pointing yellow arrow:
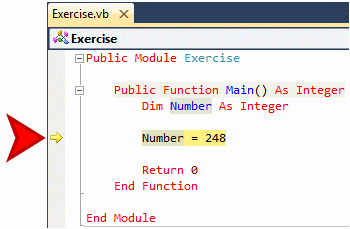
This lets you know what line is currently
considered.
|
Application:
Examining Local Variables
|
|
- While the Code Editor is displaying the code you typed, on the
main menu, click Debug -> Step Into
- To display the Locals window, on the main menu, click Debug ->
Window -> Locals
- Notice the yellow arrow button in the margin.
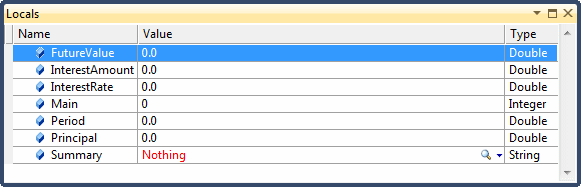
Notice that the
Locals window displays the name of the Main function and the
variables in the function.
To end debugging, on the main menu,
click Debug -> Stop Debugging
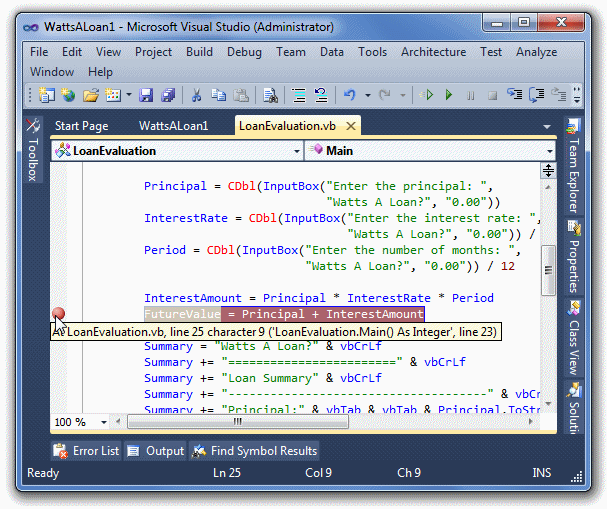
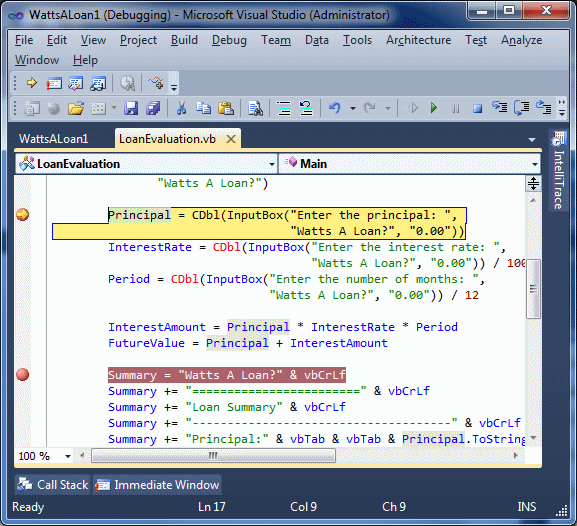
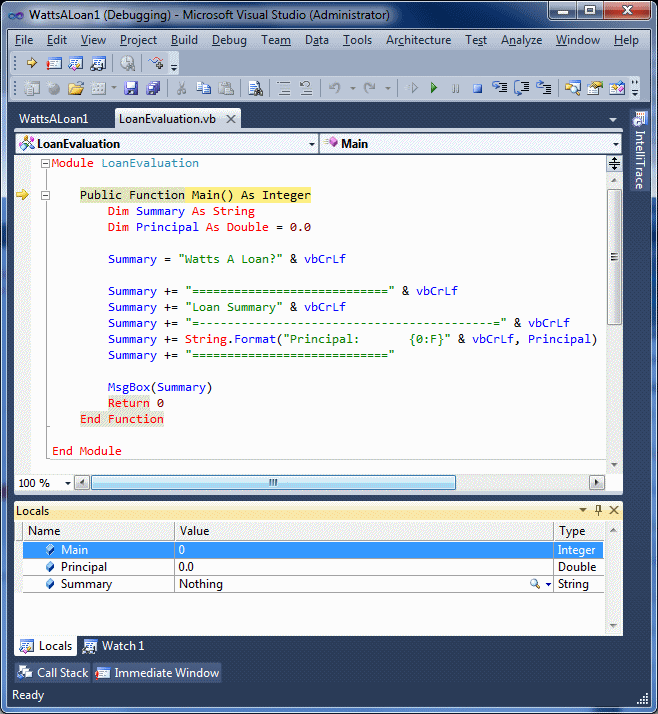
- Change the code as follows:
Module LoanEvaluation
Public Function Main() As Integer
Dim Summary As String
Dim Principal As Double
Dim InterestRate As Double
Dim Period As Double
Dim InterestAmount As Double
Dim FutureValue As Double
Summary = "This application allows you to evaluate a loan." & vbCrLf
Summary += "To proceed, enter the following values" & vbCrLf
MsgBox(Summary,
MsgBoxStyle.OkOnly Or MsgBoxStyle.Information,
"Watts A Loan?")
Principal = CDbl(InputBox("Enter the principal: ",
"Watts A Loan?", "0.00"))
InterestRate = CDbl(InputBox("Enter the interest rate: ",
"Watts A Loan?", "0.00")) / 100
Period = CDbl(InputBox("Enter the number of months: ",
"Watts A Loan?", "0.00")) / 12
InterestAmount = Principal * InterestRate * Period
FutureValue = Principal + InterestAmount
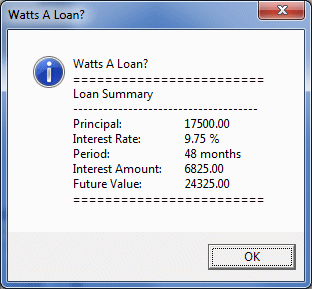
Summary = "Watts A Loan?" & vbCrLf
Summary += "========================" & vbCrLf
Summary += "Loan Summary" & vbCrLf
Summary += "-------------------------------------" & vbCrLf
Summary += "Principal:" & vbTab & vbTab & Principal.ToString("F") & vbCrLf
Summary += "Interest Rate:" & vbTab & InterestRate.ToString("P") & vbCrLf
Summary += "Period:" & vbTab & vbTab & CStr(Period * 12) & " months" & vbCrLf
Summary += "Interest Amount:" & vbTab & InterestAmount.ToString("F") & vbCrLf
Summary += "Future Value:" & vbTab & FutureValue.ToString("F") & vbCrLf
Summary += "========================"
MsgBox(Summary,
MsgBoxStyle.OkOnly Or MsgBoxStyle.Information,
"Watts A Loan?")
Return 0
End Function
End Module
- To restart debugging, on the main menu, click Debug -> Step
Into.
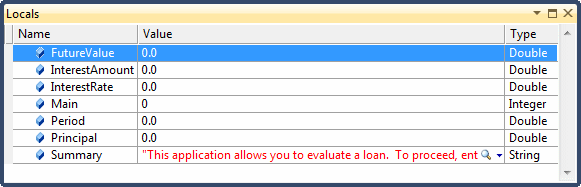
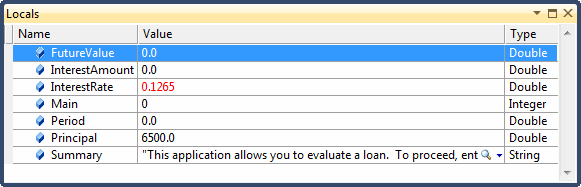
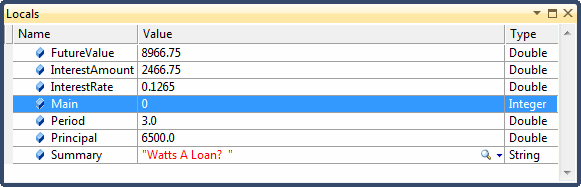
Notice that the Locals window displays a list of the local
variables and their starting values:
- To continue debugging, on the Standard toolbar, click the Step
Into button
- To continue debugging, press F8 twice
- Keep pressing F8 until a message box displays
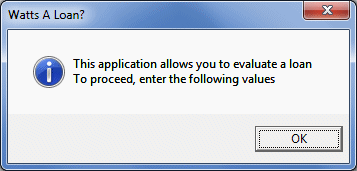
- Click OK
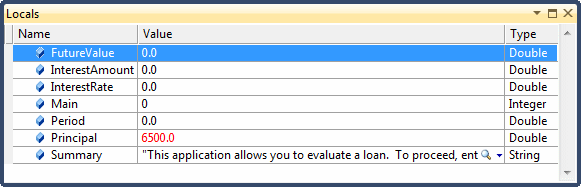
- Keep pressing F8 until an input box displays
- When asked to enter a value for the principal, type 6500
and press Enter
- When you are asked to provide the interest rate, type
12.65 and press Enter
- Press F8
- Press F8 again
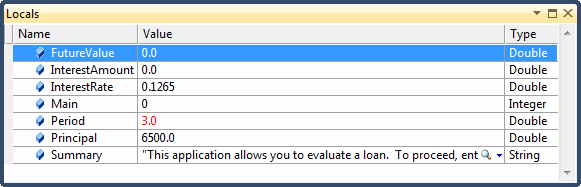
- When the number of months is requested, type 36
and press Enter.
Notice that the value of the period variable in
the Locals window has been changed
- Press F8
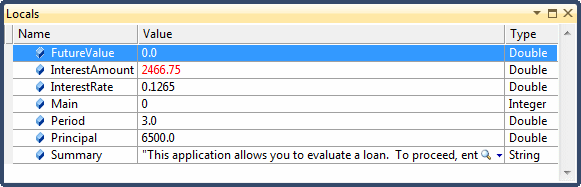
- Press F8
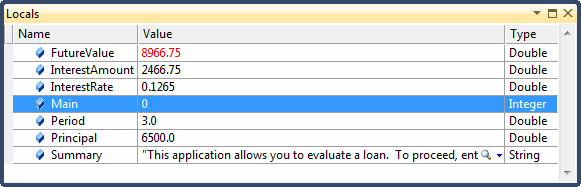
- Press F8
- Continue pressing F8 until the Summary message box displays
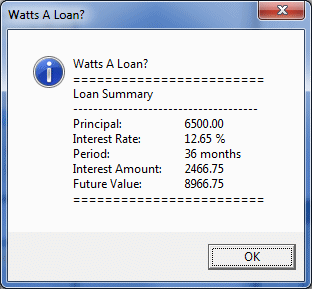
- Click OK to close the message box
When executing a program, you can specify a section
or line where you want the execution to pause, for any reason you judge
necessary. This approach is useful if you have checked code up to a
certain point and it looked alright. If you are not sure about code
starting at a certain point, this can be your starting point.
To execute code up to a certain point
- Right-click the line and click Run to Cursor
- Press Ctrl + F8
|
Application:
Running to a Point
|
|
- In the code, right-click the Summary = "Watts A Loan?" &
vbCrLf line and click Run To Cursor
- When requested, enter the following values. Press Enter after
entering each value. While you are entering them, check the moving
button in the Code Editor and observe the values in the Locals
window:
| Principal |
2450.00 |
| Interest Rate |
10.15 |
| Period |
28 |
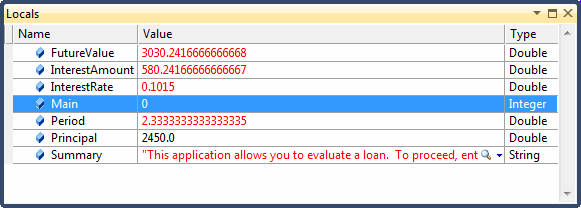
- Press F5 to continue