Home

Windows Controls: The Animation Control


Introduction to the Animation Control


Overview


An animation is a series of pictures put together to produce a video clip. It can be used to display the evolution of an ongoing task to the user. This makes such tasks less boring. For example, making a copy of a CD is usually a long process that can take minutes. To let the user know when such a task is being performed, you can display an animation.

Microsoft Windows provides a few small animations you can use for your applications. If you need an animation other than those supplied, you may have to create it. Microsoft Visual C++ is not the place to create an animation. You may need a graphics software to do this.

To use a regular animation, the video must be a standard Microsoft Windows audio/video format: Audio Video Interleaved or AVI. Therefore, it must be a file with the avi extension. If the file has both audio and video, only the video part would be considered.

Practical LearningPractical Learning: Introducing Animations

  1. To create a new application, press Ctrl + N
  2. Select MFC Application
  3. Set the Name to Video1
  4. Click OK
  5. In the first page of the wizard, click Next
  6. In the second page of the wizard, click Dialog Based and click Next
  7. In the third page of the wizard, click set the Title to Video Animation
  8. Click Finish
  9. Click TODO and press Delete
  10. Click the OK button and press Delete
  11. Change the caption of the Cancel button to &Close

Getting an Animation Control

An animation first originates from an avi file created by an external application. Therefore, you must already have the video you want to play in your application. To provide an animation for your application, at design time, from the Toolbox, click the Animation Control Animation and click the desired area on the host.

The animator control is based on the CAnimatorCtrl class. Therefore, if you want to programmatically create an animation, you must first declare a variable of type, or a pointer to, CAnimationCtrl. You can do this in the source code of the dialog class. After declaring the variable or pointer, to initialize the object, call its Create() member function. Here is an example:

class CControlsDlg : public CDialog
{
// Construction
public:
    CControlsDlg(CWnd* pParent = NULL); // standard constructor
    ~CControlsDlg();

    . . .

private:
    CAnimateCtrl *Player;
};

CControlsDlg::CControlsDlg(CWnd* pParent /*=NULL*/)
	: CDialog(CControlsDlg::IDD, pParent)
{
    //{{AFX_DATA_INIT(CControlsDlg)
    // NOTE: the ClassWizard will add member initialization here
    //}}AFX_DATA_INIT

    Player = new CAnimateCtrl;
}

CControlsDlg::~CControlsDlg()
{
    delete Player;
}

. . .

BOOL CControlsDlg::OnInitDialog() 
{
    CDialog::OnInitDialog();

    // TODO: Add extra initialization here
    RECT Recto = { 5, 5, 360, 360 };

    Player->Create(WS_CHILD | WS_VISIBLE,
		  Recto, this, 0x1884);

    return TRUE; // return TRUE unless you set the focus to a control
    // EXCEPTION: OCX Property Pages should return FALSE
}

Characteristics of the Animation Control


Opening an Animation

After creating the control, you must provide a video to play. This is done by opening a video file using the CAnimateCtrl::Open() member function. It is overloaded with two versions as follows:

BOOL Open(LPCTSTR lpszFileName);
BOOL Open(UINT nID);

The first version expects the path of the video file. Alternatively, you can first add the file as a resource to your project and use its identifier as argument to the second version. Here is an example:

BOOL CControlsDlg::OnInitDialog() 
{
    CDialog::OnInitDialog();

    // TODO: Add extra initialization here
    RECT Recto = { 5, 5, 360, 360 };

    Player->Create(WS_CHILD | WS_VISIBLE | ACS_TRANSPARENT,
		   Recto, this, 0x1884);
		   Player->Open("res\\clock.AVI");

    return TRUE; // return TRUE unless you set the focus to a control
    // EXCEPTION: OCX Property Pages should return FALSE
}

The Transparency of an Animation

In this case, the center of the video would match the center of your rectangle, even though the animation may still not exactly match the dimensions of your rectangle.

When playing the video, you have the option of displaying the original background color of the video or seeing through. When creating a video, its author can do it with transparency to allow seeing the color of the host. In this case, to display the color of the host while the video is playing, set the Transparent property to True. If you are creating the control programmatically, add the ACS_TRANSPARENT style:

BOOL CControlsDlg::OnInitDialog() 
{
    CDialog::OnInitDialog();

    // TODO: Add extra initialization here
    RECT Recto = { 5, 5, 360, 360 };

    Player->Create(WS_CHILD | WS_VISIBLE |
    		  ACS_TRANSPARENT | ACS_AUTOPLAY,
		  Recto, this, 0x1884);

    return TRUE; // return TRUE unless you set the focus to a control
    // EXCEPTION: OCX Property Pages should return FALSE
}

Practical LearningPractical Learning: Show an Animation

  1. From the Toolbox, click Animation Control
  2. Draw a rectangle from the upper left section of the dialog box to the right-middle
  3. In the Properties window, change the following characteristics:
    Auto Play: True
    Center: True
    Client Edge: False
    ID: IDC_ANIMATOR
    Transparent: True
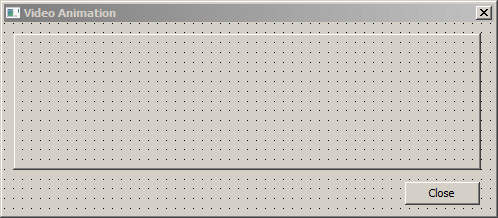
     
    Video Animation
  4. On the dialog box, right-click the animator control and click Add Variable
  5. In the Category combo box, make sure Control is selected.
    In the Variable Name, type m_Animator
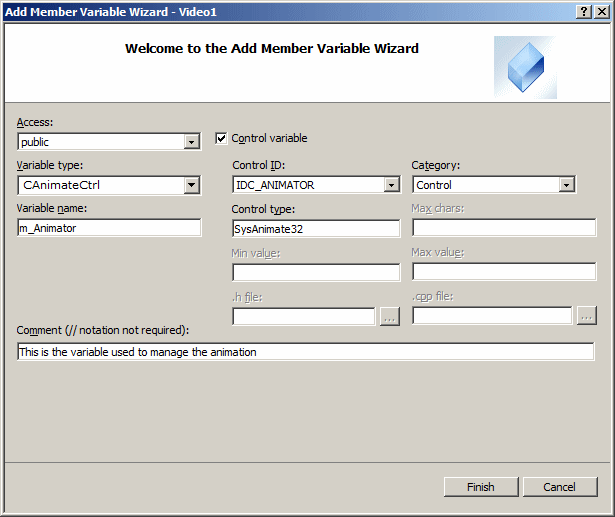
    Add Member Variable Wizard
  6. Click Finish


Playing an Animation

If you want the video to start displaying immediately once its host (the dialog box or form) comes up, set its Auto Play property to True. If you are dynamically creating the control and you want its video to play as soon as its parent comes up, add the ACS_AUTOPLAY style:

BOOL CControlsDlg::OnInitDialog() 
{
    CDialog::OnInitDialog();

    // TODO: Add extra initialization here
    RECT Recto = { 5, 5, 360, 360 };

    Player->Create(WS_CHILD | WS_VISIBLE |
    		  ACS_TRANSPARENT | ACS_AUTOPLAY,
		  Recto, this, 0x1884);

    return TRUE; // return TRUE unless you set the focus to a control
    // EXCEPTION: OCX Property Pages should return FALSE
}

As mentioned already, an animation is made of various pictures. Each picture is called a frame. The number of frames that make up an animation can influence its length. A video to play as animation is a file that puts these pictures together. Once you have the video, you can play it in an animation. If you want the animation to start playing as soon as its parent window comes up, you can create it with the ACS_AUTOPLAY style. Otherwise, to play the animation, you can call the CAnimateCtrl::Play() member function. Its syntax is:

BOOL Play(UINT nFrom, UINT nTo, UINT nRep);
  • The nFrom argument specifies the index number of the first frame to play. The frames are stored as a zero-based array. The first frame is 0, the second is 1, etc
  • The nTo argument is the last frame to play from the list of frames. If you want to play the video to the end, pass this argument with a value of -1
  • The nRep is the number of times the video should be played before stopping. If you want the video to play until you explicitly decide to stop it, pass this argument as -1

Suppose you have a long video or one made of various special pictures, if you want to display just one particular frame of the video, you can call the CAnimateCtrl::Seek() member function whose syntax is:

BOOL Seek(UINT nTo);

This member function allows the animation to just straight to the nTo frame number.

At any time, you can stop the video playing by calling the CAnimateCtrl::Stop() member function. Its syntax is:

BOOL Stop();

This member function simply stops the animation.

If you had added your Animator control at design time to the dialog box or form or other parent window, when the parent goes out of scope, it takes the Animator control with it. If you dynamically created the control, you should make sure that the control is destroyed when its parent also is. This is usually taken care of with the delete operator as done above. Furthermore, when it comes to the Animator control, after using it, to free the memory space it space, you should call the CAnimateCtrl::Close() member function. Its syntax is:

BOOL Close();

Practical LearningPractical Learning: Playing a Video File

  1. From the resources that accompany these lessons, copy the basketball.avi file and paste it in the video1 sub-folder of the current project
     
    Basket Ball
  2. In the Solution Explorer, double-click Video1Dlg.cpp
  3. In the OnInitDialog() event, load the video with the following line of code:
    BOOL CVideo1Dlg::OnInitDialog()
    {
        CDialogEx::OnInitDialog();
    
        // Set the icon for this dialog.  The framework does this automatically
        //  when the application's main window is not a dialog
        SetIcon(m_hIcon, TRUE);			// Set big icon
        SetIcon(m_hIcon, FALSE);		// Set small icon
    
        // TODO: Add extra initialization here
        m_Animator.Open(L"basketball.avi");
    
        return TRUE;  // return TRUE  unless you set the focus to a control
    }
  4. Display the dialog box
  5. On the main menu, click Project -> Class Wizard...
  6. In the Class Name combo box, select CVideo1Dlg
  7. Click the Messages tab and, in the Messages list, double-click WM_CLOSE
  8. Click Edit Code
  9. To close and destroy the animation when the user closes, implement the event as follows:
    void CVideo1Dlg::OnClose()
    {
    	// TODO: Add your message handler code here and/or call default
        m_Animator.Stop();
        m_Animator.Close();
    
    	CDialogEx::OnClose();
    }
  10. To test the application, press F5
  11. Return to your programming environment
  12. Change the design of the dialog box as follows:
     
    Video Animation
    Button: ID Caption
    IDC_START Start
    IDC_STOP Stop
  13. Double-click the Start button
  14. To give the user the ability to start the animation, implement the event as follows:
    void CVideo1Dlg::OnBnClickedStart()
    {
        m_Animator.Play(0, -1, -1);
    }
  15. Return to the dialog box and double-click the Stop button
  16. To allow the user to resume playing the video, implement the event as follows:
    void CVideo1Dlg::OnBnClickedStop()
    {
        m_Animator.Stop();
    }
  17. To test the application, press F5
     
    Video Animation
  18. Close the dialog box and return to your programming environment


Home Copyright © 2010-2016, FunctionX