Introduction to Web Projects
Introduction to Web Projects
A Web Project
Introduction
A computer project is a group of files and objects that contain the necessary instructions for the intended application to produce the desired results. A computer project is created with a computer language, such as C#. The C# language is used to create various types of applications. One category is an application for the Internet; that is, a type of application that displays on a Web browser.
Starting a Web Application
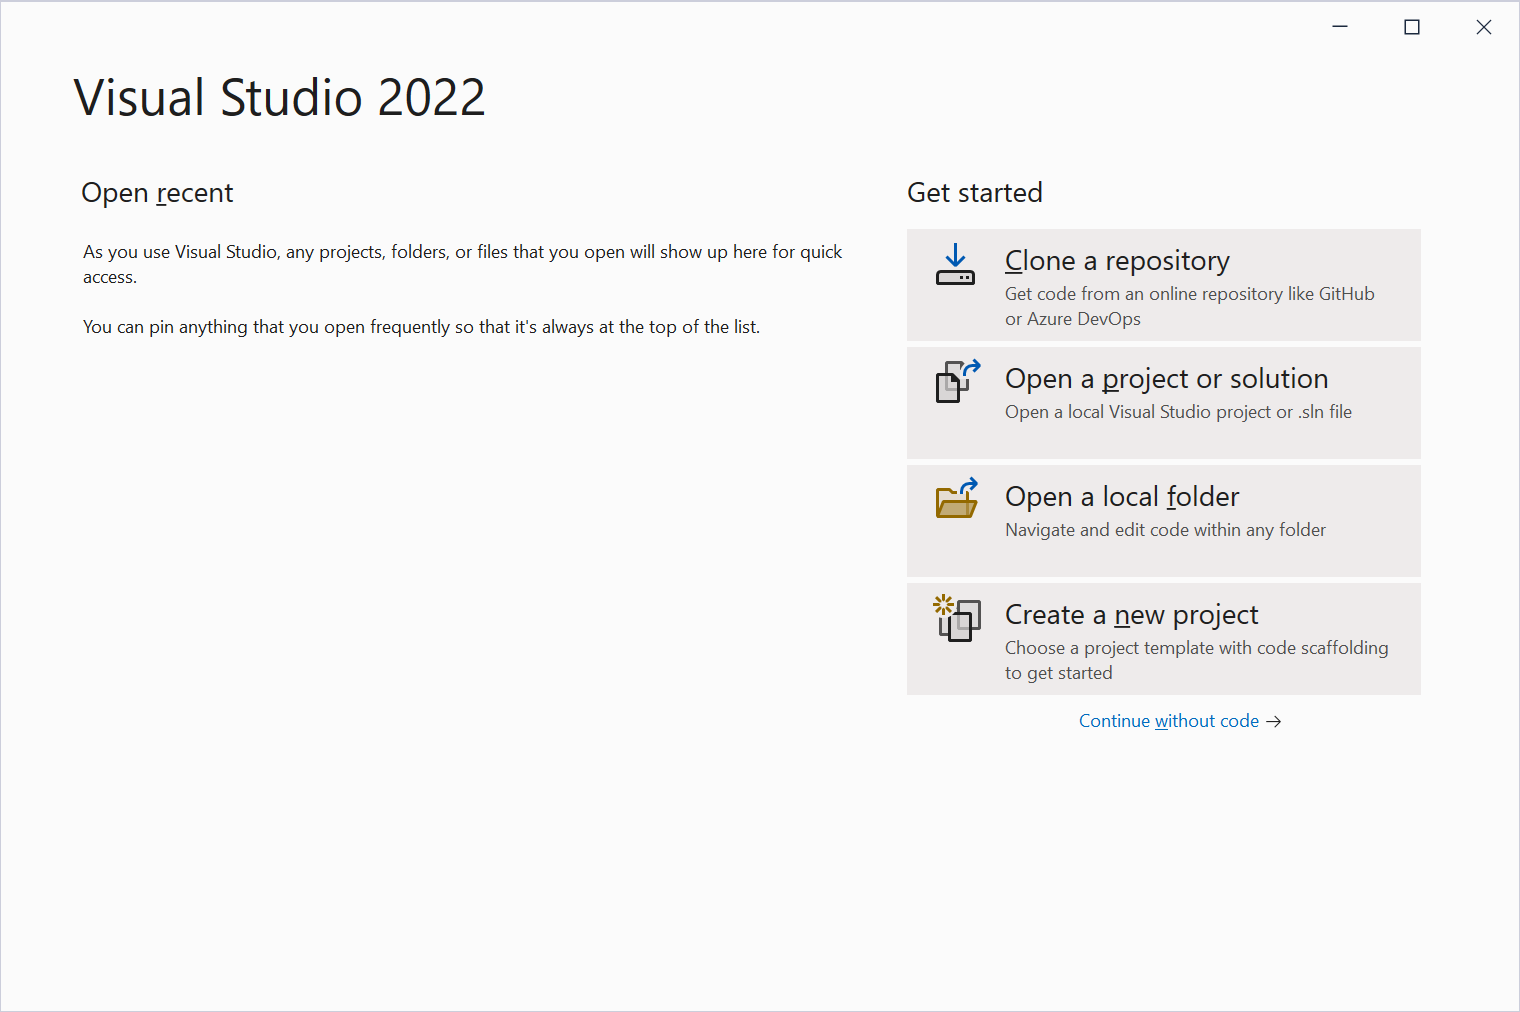
To create a Web-based application, you can use Microsoft Visual Studio, Visual Studio Code, or another appropriate programming environment. To launch Microsoft Visual Studio in a Microsoft Windows computer, you can click the Start/Windows button and click Visual Studio 2022. To start a project, if you had just launched Microsoft Visual Studio, it would display a Visual Studio 2022 dialog box. From there, under Get Started, click Create A New Project. If Microsoft Visual Studio was already opened, on the main menu, you can click File -> New -> Project...
![]() Practical Learning: Starting a Web Project
Practical Learning: Starting a Web Project


A Program File
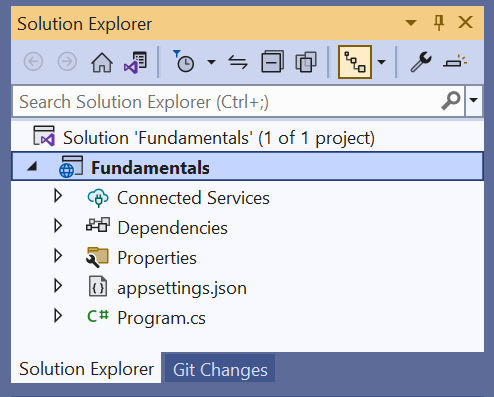
Every C# application must have at least one file in which you write all your code or that file acts as the central file that contains the fundamental code of your project. Normally, that file can have any name but must have the extension .cs. By tradition, this file is named Program.cs.
Normally, the primary file of a C# application contains a function (or method) named Main. Normally, you don't have to formally create a Main() function anymore. It is internally implied by the compiler. You can just create a primary document for your project and write in that document the code you would put in a Main() function.
An ASP.NET Core Web project too needs a starting file, and it is traditionally named Program.cs. It must contain code that would serve as the foundational setting for your project.
![]() Practical Learning: Accessing the Program Document
Practical Learning: Accessing the Program Document
A Web Server for a Web Application
A website resides on, or is installed in, a Web server. When you install Microsoft Visual Studio, it also installs a version of the Internet Information Services (IIS) known as IIS Express. It is a small Web server that can host ASP.NET applications. As a result, whenever you create an ASP.NET Core Web application, that Web server is available to host your application. Normally, the Web server has a configuration for settings that are necessary for a Web application to run. For example, it has a list of values, called arguments, that a Web site would need and stores those values in a static variable named args. Everyone of the values is created as a string. Therefore, args is actually an array of strings.
Creating a Web Application
As mentioned already, a Web application is one that is used with a Web browser. This means that the values (or results) of a Web application display on a browser. To support Web applications, the .NET Framework provides a sealed class named WebApplication:
public sealed class WebApplication : IAsyncDisposable, IDisposable,
                                     Microsoft.AspNetCore.Builder.IApplicationBuilder,
                                     Microsoft.AspNetCore.Routing.IEndpointRouteBuilder,
                                     Microsoft.Extensions.Hosting.IHost
A Web Application Builder
Earlier, we saw that the IIS Express Web server holds the information necessary to host a Web application. To let you get those values and make them available to your project, the .NET Framework provides a sealed class named WebApplicationBuilder:
public sealed class WebApplicationBuilder
This class doesn't have any constructor, so you cannot declare a variable of it. Still, it has some read-only properties for settings for a Web hosting. These are the Environment, the Host, the WebHost, and the Services properties.
Options for a Web Application
When you create a Web application, there are some initial values you must present to the compiler to make the application available. To support these initial values, the .NET Framework provides a class named WebApplicationOptions:
public class WebApplicationOptions
The WebApplicationOptions class is equipped with only one constructor, the default. You can use that constructor to declare a variable for the Web application. You can declare that variable in your starting file, Program.cs. Here is an example:
WebApplicationOptions wao = new WebApplicationOptions();
Probably the primary piece of information of any application is its name. To support this, the WebApplicationOptions class is equipped with a property named ApplicationName:
public string? ApplicationName { get; init; }
![]() Practical Learning: Initiating Web Site Options
Practical Learning: Initiating Web Site Options
WebApplicationOptions wao = new WebApplicationOptions();
The Arguments to a Web Application
Earlier, we saw that a Web server makes available the settings necessary to host a Web site. To support the values of that list, the WebApplicationOptions class is equipped with a property named Args:
public string[]? Args { get; init; }
To make these values available to your Web project, you can assign the args value to your WebApplicationOptions.Args property.
![]() Practical Learning: Passing Arguments to a Web Application
Practical Learning: Passing Arguments to a Web Application
WebApplicationOptions wao = new WebApplicationOptions()
{
    Args = args
};
Initiating a Web Application
The sealed WebApplication class doesn't have a constructor. Instead, it relies on its properties and methods to perform the necessary initial operations of a Web application. As a matter of fact, to let you create a Web application, the WebApplication class is equipped with a static method named CreateBuilder. The WebApplication.CreateBuilder() method is overloaded with three versions. One of the versions uses the following syntax:
public static WebApplicationBuilder CreateBuilder(WebApplicationOptions options);
Notice that this is a static method, which means you can call it from WebApplication, as in WebApplication.CreateBuilder(). The above version of the WebApplication.CreateBuilder() method takes a WebApplicationOptions object as argument. Therefore, you can pass a WebApplicationOptions variable as declared above. Here is an example:
WebApplicationOptions wao = new WebApplicationOptions()
{
    Args = args
};

WebApplicationBuilder builder = WebApplication.CreateBuilder(wao);
As an alternative, another version of the WebApplication.CreateBuilder() method uses the following syntax:
public static WebApplicationBuilder CreateBuilder (string[] args);
This time, instead of using a WebApplicationOptions object that holds an args value, you can pass that value directly to this version of the method. This would be done as follows:
WebApplicationBuilder builder = WebApplication.CreateBuilder(args);
![]() Practical Learning: Initiating a Web Application
Practical Learning: Initiating a Web Application
WebApplicationOptions wao = new WebApplicationOptions()
{
    Args = args
};

WebApplicationBuilder builder = WebApplication.CreateBuilder(wao);
Building a Web Application
After initializing a Web application, you must ask the compiler to build it. To support this, the WebApplicationBuilder class is equipped with a method named Build. Its syntax is:
public Microsoft.AspNetCore.Builder.WebApplication Build();
There is no mystery with this method. Simply call it from a WebApplicationBuilder object. Here is an example:
WebApplicationOptions wao = new WebApplicationOptions()
{
    Args = args
};

WebApplicationBuilder builder = WebApplication.CreateBuilder();

builder.Build();
Running a Web Application
After setting the necessary values of your Web application, you can indicate to the compiler that the application is ready. To let you do this, the WebApplication class is equipped with a method named Run. Its syntax is:
public void Run (string? url = default);
This method takes an optional string argument that indicates the address by which the website would be accessed. Since you are mostly working on a (test) project, this information is held by a JSON file named launchSettings.json. When you create an ASP.NET Core Web project, Microsoft Visual Studio creates a folder named Properties in your project and creates that JSON file in that folder. As a result, call the WebApplication.Run() method without passing an argument. You may remember that, when calling a function or method, if you will need its services only once, you can call the function or method directly where it is needed. Here is an example:
WebApplicationOptions wao = new WebApplicationOptions()
{
    Args = args
};

WebApplicationBuilder builder = WebApplication.CreateBuilder();

builder.Build().Run();
If you will need the return value of a function or method more than once, you can first declare a variable and assign the method call to the variable. As seen earlier, the WebApplicationBuilder.Build() method returns a WebApplication. Therefore, you can assign a WebApplicationBuilder.Build() call to a variable, and then call the Run() method of the WebApplication method on that variable. This can be done as follows:
WebApplicationOptions wao = new WebApplicationOptions()
{
    Args = args
};

WebApplicationBuilder builder = WebApplication.CreateBuilder();

// Build the project and get its WebApplication object
WebApplication app = builder.Build();

// Use the WebApplication object to run the project
app.Run();
![]() Practical Learning: Preparing a Web Application
Practical Learning: Preparing a Web Application
WebApplicationOptions wao = new WebApplicationOptions()
{
    Args = args
};

WebApplicationBuilder builder = WebApplication.CreateBuilder(wao);

WebApplication app = builder.Build();

app.Run();Introduction to Razor Pages
Overview
An ASP.NET Core Web application contains various types of documents, including HTML-based documents, documents with regular text, CSS, scripts, and graphic files, etc. A Razor Page is a regular text-based document in which you can create HTML tags and write some C# code. Some of the operations may need (even require) formal object-oriented programming with intermediate to advanced programming. The most common type of document used in an ASP.NET Core Web application is a Razor Page.
A Repository for Razor Pages
To keep track of the Razor Pages of your application, it is recommended that you create a folder named Pages in your ASP.NET Core Web application.
![]() Practical Learning: Creating a Repository for Razor Pages
Practical Learning: Creating a Repository for Razor Pages
Creating a Razor Page
You can create or add Razor Pages as needed (in the next sections and lessons, we will see that when you start an ASP.NET Core Web Application in Microsoft Visual Studio, the studio automatically generates a default starting Razor Page for you). To proceed, in the Solution Explorer:
In the Add New Item dialog box, specify the desired name of the file (don't add Model to the name). Click Add or press Enter. You will then be presented with a text-document that contains two lines of text and two lines with symbols.
Introduction to Page Models
A Razor Page is created as a C# class. ASP.NET Web applications expect a class associated to a Razor Page so that you write some C# code in that class. That code can easily be made available to the associated Razor Page. Such a class is called a Page Model.
To support page models, the .NET Framework provides a class named PageModel:
[Microsoft.AspNetCore.Mvc.RazorPages.Infrastructure.PageModel]
public abstract class PageModel : Microsoft.AspNetCore.Mvc.Filters.IAsyncPageFilter,
                                  Microsoft.AspNetCore.Mvc.Filters.IFilterMetadata,
                                  Microsoft.AspNetCore.Mvc.Filters.IPageFilter
The PageModel class is defined in the Microsoft.AspNetCore.Mvc.RazorPages namespace created in the Microsoft.AspNetCore.Mvc.RazorPages.dll assembly. To get an object you can use to perform object-oriented tasks for a Razor Page, create a class derived from PageModel. When creating your class, specify its name but end that name with Model. Here is an example:
using Microsoft.AspNetCore.Mvc.RazorPages;

namespace Valuable.Pages
{
    public class ExerciseModel : PageModel
    {

    }
}
Normally, you will (if not always) ask Microsoft Visual Studio to create a Page Model class for you. To do that, create a Razor Page as seen in earlier instructions. When you click Add or you press Enter in the Add New Item dialog box, Microsoft Visual Studio creates two documents tied among themselves. The class is created in a document whose file has the name you specified for the RazorPage + Model. The file has the extension .cshtml. The Page Model is a document of a file that uses the name you specified for the Razor Page, followed by a period, and followed by cshtml. The extension of that file is .cs.
At any time, you can open the Razor Page by double-clicking its node in the Pages folder. To open the associated Page Model, in the Pages folder, expand the name of the Razor Page and double-click the name below it.
Accessing the Services of a Razor Page
We saw that a Web application builder is an object that provides the settings held by the Web server. These settings are also referred to as services. To support those settings, the WebApplicationBuilder class is equipped with a read-only property named Services:
public Microsoft.Extensions.DependencyInjection.IServiceCollection Services { get; }
If you had created at least one Razor Page in your application, to let you indicate that you will use Razor Pages, the parent interface of the Services property is equipped with an overloaded extension method named AddRazorPages. The syntax of one of them is:
public static Microsoft.Extensions.DependencyInjection.IMvcBuilder AddRazorPages(this IServiceCollection services);
As you can see, this version doesn't take any argument. You can call this method after calling the WebApplication.CreateBuilder() method and getting the returned object of that call, as we saw already. Therefore, call the Services.AddRazorPages() method from an object returned by a WebApplication.CreateBuilder() call.
![]() Practical Learning: Accessing the Services of a Razor Page
Practical Learning: Accessing the Services of a Razor Page
WebApplicationOptions wao = new WebApplicationOptions()
{
    Args = args
};

WebApplicationBuilder builder = WebApplication.CreateBuilder(wao);

builder.Services.AddRazorPages();

WebApplication app = builder.Build();

app.Run();
Routing Razor Pages
To assist the compiler with routing issues related to Razor Pages, the WebApplication class is equipped with an extension method named MapRazorPages:
public static PageActionEndpointConventionBuilder MapRazorPages (this IEndpointRouteBuilder endpoints);
As you can see, this method doesn't take any argument. You can call this method from the object returned by a WebApplicationBuilder.Build() call.
![]() Practical Learning: Mapping Razor Pages
Practical Learning: Mapping Razor Pages
WebApplicationOptions wao = new WebApplicationOptions()
{
    Args = args
};

WebApplicationBuilder builder = WebApplication.CreateBuilder(wao);

builder.Services.AddRazorPages();

WebApplication app = builder.Build();

app.MapRazorPages();

app.Run();
Introduction to Page Models
A Page Document
A webpage document or a page document is an object on which you write some code, such as HTML tags, that will assist the browser to better display the webpage. As mentioned already, when you create a Razor Page, you get two documents. In both documents, you can write C# code. You can create classes and get objects from them. But there are restrictions on the Razor Page. That is, there are some types of C# code pieces you cannot write and there are some C# operations you cannot perform in that type of document, at least not the same way you would perform those same operations in a Page Model.
Introduction to Model-View-Controllers
The .NET Framework includes many options to develop Web projects. One option is named Web Forms, as a technique to create web projects.
Another technique to create Web-based applications (or ASP.NET Web projects) is called Model-View-Controller, or MVC. When you work in an MVC project, you have to create one or more documents that hold (part of) the HTML code as the webpages that will display to the visitor of your website. A document that displays on the browser, just like a regular webpage, is called a view.
If you need a class so that you can perform server-based operations (operations that are performed on, or by, the web server) and sent to the view, you have to create another file, named a controller. The controller is a class (that must be) derived from a .NET class named Controller. Because the controller is a class, you can use that class to write C# code, then access part of that code (or the values from that code) in your view.
We mentioned that, in an MVC application, you can have a view as a file that stands alone but you can create a controller that you want to associate to a view, you must let the compiler know, one way or another, that both the controller and the view are related. To do that, in an MVC application, in a controller class, you can create a method, and then generate a view that uses the name of the method. In other words, you can create different methods in the controller and, when you judge it necessary, create (or generate) a view for any method you want. As a result, you can can have many views associated with one controller.
In an MVC application, you can have many controllers and each controller would have its associated views. Normally, if you create your project in Microsoft Visual Studio and generate a view from a controller (which can be done by right-clicking a method in a controller class and clicking Add View...), the connection between the controller and the view is automatically made and the compiler would know what view is associated with what controller.
The Page of a Razor Page
Razor Pages don't use (or don't require) a controller. Instead, a webpage (or view) must be able to handle the requests presented to it. To provide that information to the compiler, in the top section of a Razor Page, you must have a line as @page:
@page
This must be the first line of a Razor Page document and it must stand alone. If you are creating your project in Microsoft Visual Studio, when you create a Razor Page, the studio generates the necessary Razor Page document and adds that line to the document for you.
A Model Object
When you create a Razor Page, the studio creates a class derived from PageModel. The compiler also generates an object named Model. That object allows the PageModel-derived class to communicate with its associated Razor Page. Thanks to that object, you can add members (fields, properties, methods) to the PageModel-derived class and access those members in the Razor Page. While in the Razor Page, to access something from the PageModel-derived class, type or use @Model, followed by a period, followed by the member from the PageModel class.
![]() Practical Learning: Creating a Razor Page
Practical Learning: Creating a Razor Page
Writing in a Razor Page
As mentioned already, a Razor Page is primarily a webpage. It can contain C# code. As seen in previous lessons, to write C# code in a Razor Page, create an @{} section and write your code inside the curly brackets. You can also create and use some @functions{} sections.
As a regular webpage document, a Razor Page can also contain HTML code. Write that code outside any @{} or @functions{} section. In fact, you can have many @{} or @functions{} sections in the same Razor Page. In that case, you can write your code between a closing curly bracket and an @{ or @functions{ line.
![]() Practical Learning: Writing in a Razor Page
Practical Learning: Writing in a Razor Page
@page
@model Fundamentals.Pages.IndexModel
@{
}

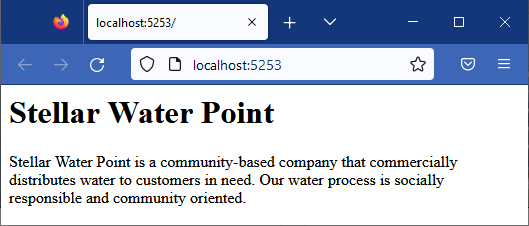
<h1>Stellar Water Point</h1>

<p>Stellar Water Point is a community-based company that commercially distributes water to customers in need. Our water process is socially responsible and community oriented.</p>
Console Code
Console applications are applications that display in a dark window (usually black, but can be customized). If you create an ASP.NET Core Web App in Microsoft Visual Studio, when you execute your project, the compiler first displays a dark window with website details about your project, such as the address of the site:
For testing purposes, you can write code that displays in the console window of your Web project.
The Layout or Central-Page of a Web Site
Introduction
Many times, the visitors of a website expect all its webpages to have a consistent appearance, only the contents of some sections would change. The common way to make this happen is to start the website with a central document that holds the design that other webpages would share. In an ASP.NET website, this central document is usually named _Layout.
To use a layout page in your project, in the Pages folder of your project, first create a sub-folder named Shared. When you create an ASP.NET Web application in Microsoft Visual Studio, that sub-folder is automatically created. If you work from scratch, you should create that sub-folder yourself.
![]() Practical Learning: Creating a Shared Folder
Practical Learning: Creating a Shared Folder
Creating a Layout Page
A layout page is a special type of document. Although it primarily contains HTML code, it is subject to some rules of ASP.NET Web applications. As a result, a layout page is a document that has the entension .cshtml. To assist you in creating a layout page, the Add New Item dialog box of Microsoft Visual Studio provides the Razor Layout option you can select. Accept or change the file name, and click Add or press Enter. If you create an ASP.NET Web project in Microsoft Visual Studio, the studio automatically creates a _Layout document for you and puts it in the Shared sub-folder of your project.
![]() Practical Learning: Creating a Layout Page
Practical Learning: Creating a Layout Page
The Content of a Layout Page
The central webpage, in this case the _Layout.cshtml document, of a website is primarily a regular webpage. It contains all the regular sections of a webpage, including the starting and closing HTML tag.
![]() Practical Learning: Writing in a Layout Page
Practical Learning: Writing in a Layout Page
<!DOCTYPE html>

<html>
<head>
    <meta name="viewport" content="width=device-width" />
    <title>@ViewBag.Title</title>
    <style>
        body                    { margin:           auto 0; }
        .main-menu              { font-weight:      bold;
                                  font-size:        2.75em; }
        .welcome                { font-weight:      bold;
                                  font-size:        2.02em; }
        .pcenter                { text-align:       center; }
        .top-bar                { width:            100%;
                                  background-color: maroon;
                                  border-top:       1px solid black;
                                  border-bottom:    1px solid black; }
        .corporate-menu         { display:          table;
                                  margin:           0 auto; }
        .corporate-menu ul      { list-style-type:  none;
                                  display:          inline; }
        .corporate-menu li      { display:          inline; }
        .corporate-menu a       { float:            left;
                                  text-decoration:  none;
                                  padding:          20px 15px;
                                  font-size:        14px;
                                  color:            white;  }
        .corporate-menu a:hover { color:            yellow;
                                  background-color: orange; }
    </style>
</head>
<body>
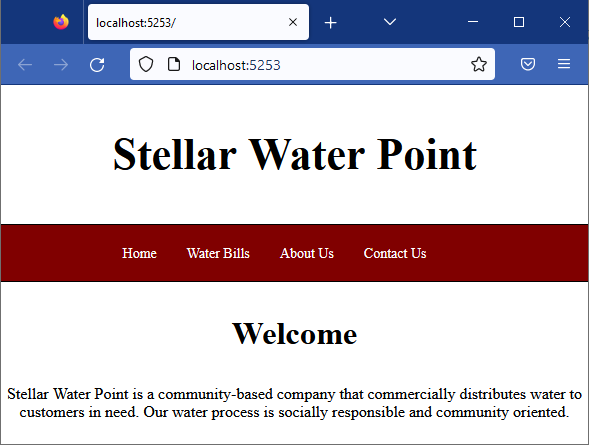
    <p class="main-menu pcenter">Stellar Water Point</p>

    <div class="top-bar">
        <div class="corporate-menu">
            <ul>
                <li><a href="/index">Home</a></li>
                <li><a href="/WaterBills">Water Bills</a></li>
                <li><a href="/AboutUs">About Us</a></li>
                <li><a href="/ContactUs">Contact Us</a></li>
            </ul>
        </div>
    </div>

    <div>
        @RenderBody()
    </div>
</body>
</html>@page
@model Fundamentals.Pages.IndexModel
@{
}
<p class="welcome pcenter">Welcome</p>
<p class="pcenter">Stellar Water Point is a community-based company that commercially distributes water to customers in need. Our water process is socially responsible and community oriented.</p>Indicating the Starting View of a Web Application
Just creating a layout page doesn't mean that that document would be the first to be displayed. In an ASP.NET Web application (both MVC and Core), you must indicate to the compiler that you have a special document that must execute before any other document. This document is referred to as a start view.
To create a start view document, display the Add New Item dialog box and select the _ViewStart option. _ViewStart is a simple document with just an @{} section. A start view object is equipped with a string property named _Layout. In the curly brackets of the _ViewStart.cshtml document, simply assign the name of your layout page as a string.
![]() Practical Learning: Creating a Start View
Practical Learning: Creating a Start View

|
|
|||
| Home | Copyright © 2001-2023, C# Key | Tuesday 06 December 2022 | Next |
|
|
|||