Introduction to Data Selection

Introduction to Data Selection
Fundamentals of Data Selection
Introduction
After creating a table and populating it with records, you may want to see what you can do with data stored in it. One of the most commonly performed operations by the users of a database is to look for data or to isolate records that respond to a particular criterion. Looking for data that is conform to a criterion is referred to as querying. The result of retrieving data based on a criterion is called a query. As a database developer, you perform queries by passing instructions to the database engine. This is done using some specially reserved words. |
 |
In this and other lessons, we will use a database named KatzResidences. The name itself means nothing. The database represents a fictitious apartment complex. The building has three levels: First, second, and third.
|
The apartments are referred to as units. These are what customers, named tenants, come to rent. Each unit is represented with:
|
 Practical Learning: Introducing Data Selection
USE master
GO

CREATE DATABASE KatzResidences2;
GO

USE KatzResidences2;
GO
CREATE SCHEMA Presentation;
GO
CREATE TABLE Presentation.Units
(
    UnitNumber nchar(3),
    Bedrooms int,
    Bathrooms real,
    Price money,
    Deposit money,
    Available bit
);

INSERT Presentation.Units
VALUES(N'101', 0, 1.00, 845.00,  200.00, 0),
      (N'102', 1, 1.00, 895.00,  250.00, 0),
      (N'103', 1, 1.00, 925.00,  275.00, 1),
      (N'104', 2, 1.00, 1050.00, 300.00, 0),
      (N'105', 1, 1.00, 885.00,  250.00, 1),
      (N'106', 3, 2.00, 1350.00, 425.00, 1),
      (N'107', 2, 2.00, 1185.00, 400.00, 0),
      (N'108', 0, 1.00, 865.00,  225.00, 1),
      (N'109', 2, 1.00, 1050.00, 350.00, 1),
      (N'110', 1, 1.00, 895.00,  250.00, 0),
      (N'111', 1, 1.00, 895.00,  250.00, 0),
      (N'112', 0, 1.00, 805.00,  200.00, 1),
      (N'201', 0, 1.00, 825.00,  200.00, 1),
      (N'202', 1, 1.00, 950.00,  325.00, 0),
      (N'203', 1, 1.00, 885.00,  250.00, 1),
      (N'204', 2, 2.00, 1125.00, 425.00, 1),
      (N'205', 1, 1.00, 1055.00, 350.00, 0),
      (N'206', 2, 1.00, 1165.00, 400.00, 1),
      (N'207', 1, 1.00, 895.00,  250.00, 0),
      (N'208', 0, 1.00, 815.00,  200.00, 1),
      (N'210', 1, 1.00, 895.00,  350.00, 1),
      (N'211', 2, 2.00, 925.00,  400.00, 1),
      (N'212', 3, 2.00, 1280.00, 500.00, 0),
      (N'301', 0, 1.00, 845.00,  200.00, 0),
      (N'302', 1, 1.00, 925.00,  250.00, 0),
      (N'303', 2, 1.00, 985.00,  275.00, 1),
      (N'304', 2, 2.00, 1250.00, 300.00, 0),
      (N'305', 1, 1.00, 945.00,  250.00, 1),
      (N'306', 3, 2.00, 1350.00, 425.00, 1),
      (N'307', 2, 2.00, 1285.00, 400.00, 0),
      (N'308', 0, 1.00, 875.00,  225.00, 1),
      (N'309', 2, 1.00, 1150.00, 350.00, 1),
      (N'310', 1, 1.00, 955.00,  250.00, 0),
      (N'311', 3, 2.00, 1325.00, 500.00, 0),
      (N'312', 0, 1.00, 825.00,  200.00, 1);
GOOpening a Table for Data Selection
Microsoft SQL Server provides many ways and tools to perform data analysis, using a Query Editor, the PowerShell, or else:

Practical Learning: Introducing Data Entry
Introduction
As introduced in the previous lesson, Microsoft SQL Server Management Studio provides various options to present a table for data selection. You can start by opening a table from the Object Explorer using the Edit Top 200 rows option. This would open the Diagram pane.
Practical Learning: Introducing the Diagram pane
A Criteria Pane
When performing data section, you will use many options. To make it convenient for you, you can use the Criteria pane.
Practical Learning: Getting the Criteria Pane
A SQL Pane for Data Selection
Although it is usually convenient to select records visually, at times you will want to write code. One way to do this is to use the SQL pane.
Practical Learning: Introducing the SQL pane
The Results of Data Selection
When performing data entry, you will always want to seen the results. The SQL pane makes it easy.
The Query Editor for Data Selection
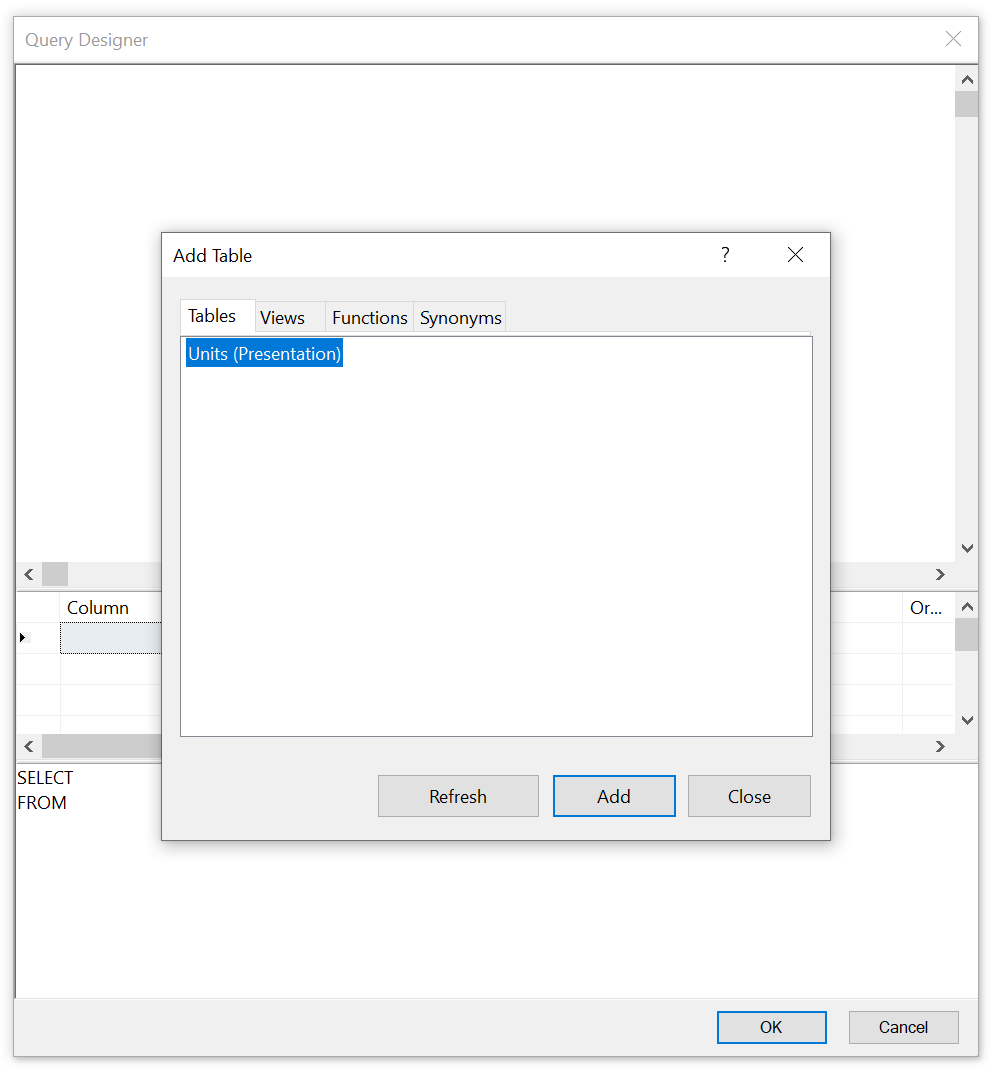
As an alternative to the Table window, you can use the Query Editor for data selection. To prepare a Query Editor for data selection:
Column Selection
Any of the above techniques allows you to select one or more columns to build the desired SQL statement.
After making your selections in the Query Designer, click OK. This would display a Query with a SQL statement. Also, the SQL Editor toolbar would be added in the toolbars section of Microsoft SQL Server Management Studio. To display the SQL Editor toolbar:
Referring to a Column
We will write many expressions that include the names of columns. In such expressions, you will need to indicate the particular column you are referring. There are various ways you can do this. To refer to, or to indicate, a table:
SQL Statement Execution
After creating a SQL statement, you can view its result, which you can get by executing the statement. To do this:

After executing the statement, the bottom section gets filled with data from only the selected column(s) of the table. We will see examples in the next sections and future lessons.
Other Utilities for Data Selection
Introduction
While the SQL Server Management Studio provides a graphical interface for data selection, it is not the only application you can use. Both the SQLCMD utility from the Command Prompt and the Windows PowerShell are other utilities you can use.
To start, open either the Windows PowerShell or the Command Prompt.
Using SQLCMD
If you want to use the Command Prompt, after opening it, type SQLCMD -q followed by a space and the appropriate expression. If you were already working in the SQLCMD utility, simply type the desired statement. In the next sections and lessons, we will study the statements used to analyze data.
Using PowerShell
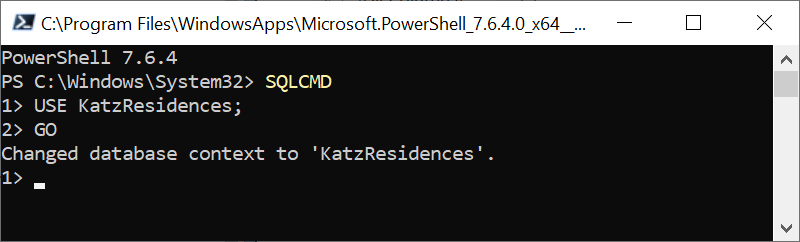
If you are using the Windows PowerShell, if you want to automatically specify the database to use, in the Object Explorer, right-click that database and click Start PowerShell. At the prompt, type the SQL statement and press Enter. In this case, the statement would execute against a table in the database you had selected. If you want the statement to apply to a different instance of the server, after the above formula, type -ServerInstance, followed by a space, and followed by the server instance in double-quotes.
Practical Learning: Starting PowerShell
Transact-SQL and Data Selection
Introduction
Data selection is actually performed using SQL code that contains one or more columns.
Showing the Results of SQL Data Analysis
After entering the SQL statement in a Table window or a Query Editor, you can execute it to see the result. The result would be displayed in the bottom section. There are two ways you can display the result(s).
To specify how you want to show the results of your SQL statement, if you are using the Query Editor, you have two options:


In the Query Editor, you are expected to write appropriate code that would constitute a SQL statement.
Getting the Number of Rows Selected
Remember that the lower section of the Query Editor contains two tabs. When a statement executes, by default, the Messages tab shows a message. It may show the number of records that were produced. In the same way, if you work from a Command Prompt, the last line would display the number of columns. In the Properties window, the Rows Returned field shows the number of rows that a SQL statement produced. If you don't want to show the message, use the NOCOUNT flag in the following formula: SET NOCOUNT { ON | OFF }
If you set the flag to ON, the message would not appear. If you are working in the Query Editor, a different message would come up, only to let you know that the "Command(s) completed successfully". If you are working from a Command Prompt, no message would display. If you want to display the number of rows again, call the NOCOUNT flag and set its value to OFF |
 |
Introduction to Field Selection
The most fundamental keyword used by SQL is SELECT. In order to process a request, you must specify what to select. To perform data analysis, the SELECT keyword uses the following syntax:
SELECT WhatField(s) FROM WhatObject;
 |
As stated already, SQL is not case-sensitive. This means that SELECT, Select, and select represent the same word. |
The SELECT and the FROM keywords are required. The WhatField(s) factor represents one or more columns from a table. WhatObject represents the name of the table that has the WhatField(s) column(s).
SELECTing ALL Fields of a Table
To visually select all records of a table, click the button at the intersection of the columns and the rows:
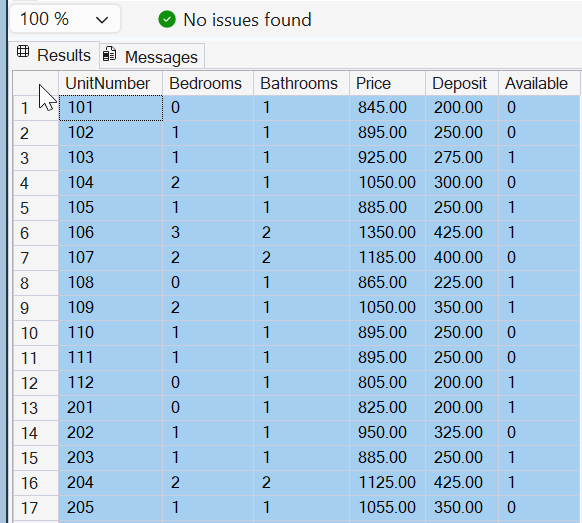
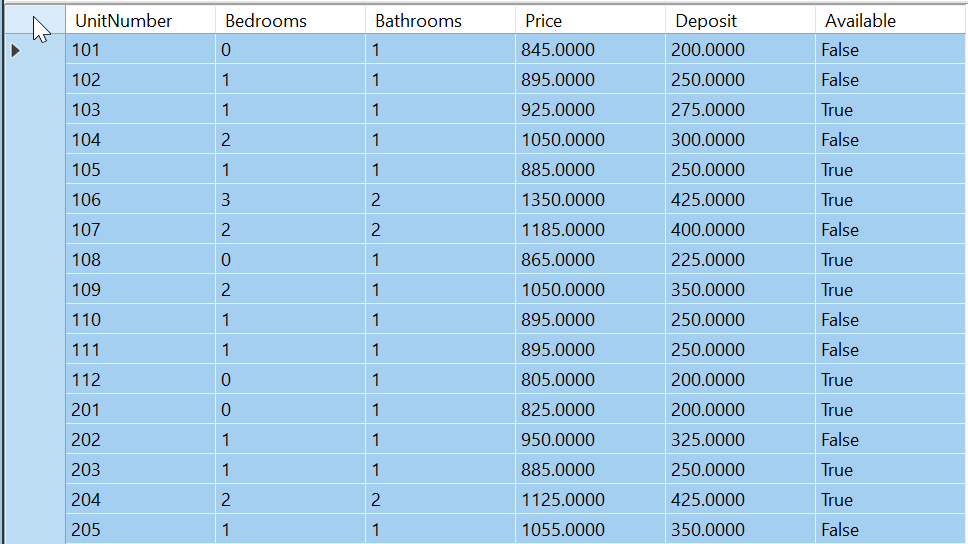
Using code, to select everything from a table, you can use the asterisk in the WhatField(s) placeholder of our formula. For example, to select all records from a table named Students, you can type:
SELECT * FROM WaterMeters;
After writing the expression in a Query Editor, you must execute the SQL statement to see its result. Here is an example:
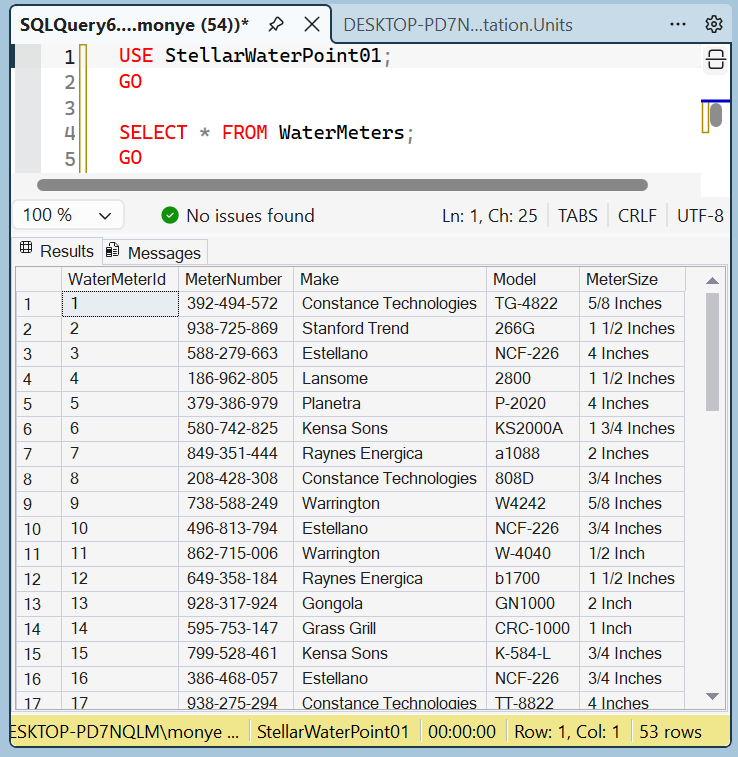
Alternatively, you can precede the asterisk with the ALL keyword.
Practical Learning: Selecting All Fields
SELECT ALL * FROM Presentation.Units;
GO
PS SQLSERVER:\SQL\SIRIOUS\DEFAULT> SQLCMD
1> USE KatzResidences;
2> GO
Changed database context to 'KatzResidences'.
1> SELECT ALL * FROM Presentation.Units;
2> GO
UnitNumber   Bedrooms    Bathrooms        Price         Deposit      Available
---------- ----------- -------------- ----------------- ------------ ---------
101             0          1.0          845.0000        200.0000         0
102             1          1.0          895.0000        250.0000         0
103             1          1.0          925.0000        275.0000         1
104             2          1.0         1050.0000        300.0000         0
105             1          1.0          885.0000        250.0000         1
106             3          2.0         1350.0000        425.0000         1
107             2          2.0         1185.0000        400.0000         0
108             0          1.0          865.0000        225.0000         1
109             2          1.0         1050.0000        350.0000         1
110             1          1.0          895.0000        250.0000         0
111             1          1.0          895.0000        250.0000         0
112             0          1.0          805.0000        200.0000         1
201             0          1.0          825.0000        200.0000         1
202             1          1.0          950.0000        325.0000         0
203             1          1.0          885.0000        250.0000         1
204             2          2.0         1125.0000        425.0000         1
205             1          1.0         1055.0000        350.0000         0
206             2          1.0         1165.0000        400.0000         1
207             1          1.0          895.0000        250.0000         0
208             0          1.0          815.0000        200.0000         1
210             1          1.0          895.0000        350.0000         1
211             2          2.0          925.0000        400.0000         1
212             3          2.0         1280.0000        500.0000         0
301             0          1.0          845.0000        200.0000         0
302             1          1.0          925.0000        250.0000         0
303             2          1.0          985.0000        275.0000         1
304             2          2.0         1250.0000        300.0000         0
305             1          1.0          945.0000        250.0000         1
306             3          2.0         1350.0000        425.0000         1
307             2          2.0         1285.0000        400.0000         0
308             0          1.0          875.0000        225.0000         1
309             2          1.0         1150.0000        350.0000         1
310             1          1.0          955.0000        250.0000         0
311             3          2.0         1325.0000        500.0000         0
312             0          1.0          825.0000        200.0000         1

(35 rows affected)
1>
Qualifying the Names of Fields
Qualifying the name(s) of (a) column(s) consists of indicating what table to which it (they) belongs. The way you do this depends on some issues.
The primary way to qualify the name of a column is to precede it with the name of the table followed by a period.
If you are using the asterisk * to select all records, precede it with the name of the table followed by a period. Here is an example:
SELECT Students.* FROM Registration.Students;
You can also qualify the name of a column using a schema. To do this, use the following formula:
SchemaName.TableName.ColumnName
Practical Learning: Qualifying the Names of Columns
|
 |
An alias is another name for an object. You can create an alias name for a table to use in an expression that involves a column.
To visually create an alias for a table, after opening to table to Edit Top 200 Rows, click the title bar of the table in the Diagram pane. In the Properties window, click Alias and type a letter or word(s) of your choice. Here is an example:
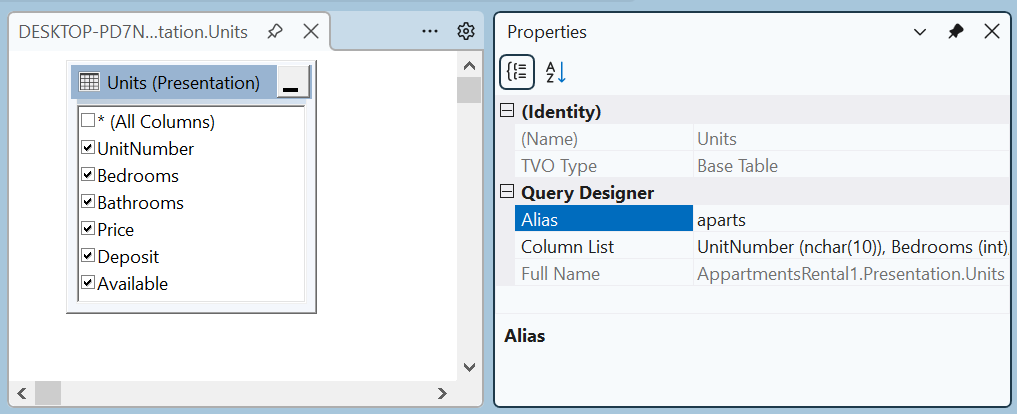
To create an alias of a table using code, use a letter or a word that will represent the table. First type the name of the table, followed by space, and followed by the letter or the word. An example would be Employees empl. If the table belongs to a schema, precede the name of the table with it. Here is an example:
SELECT * FROM Registration.Students pupils;
GO
We mentioned that you could qualify the name of a column or * with the name of the table. If the table has an alias, you can qualify the column using the alias. This:
SELECT Registration.Students.* FROM Registration.Students;
GO
Is the same as
SELECT pupils.* FROM Registration.Students pupils;
GO
You can also use an alias that is made or more than one word. If you are visually creating the alias, select the table and type the words in the Properties window. As soon as you press Enter, square brackets would be added to the left and the right of the name. If you are using SQL code, you can include the alias name in double-quotes. Here is an example:
SELECT FirstName
FROM   Registration.Students "Little Angels";
GO
Then, to qualify a column, use the quoted alias name. Here are examples:
SELECT "Little Angels".FirstName
FROM   Registration.Students "Little Angels";
GO
Instead of using double-quotes, an alterntive is to include the alias in square brackets []. When qualifying the name(s) of the column(s), you can use the alias either in double-quotes or in square brackets.
A Name AS an Alias
When creating an alias, you can include the AS keyword between the name of the table and its alias. Here is an example:
SELECT * FROM Registration.Students AS pupils;
GO
This is the same as:
SELECT pupils.* FROM Registration.Students AS pupils;
GO
Practical Learning: Using the Alias Name of a Table
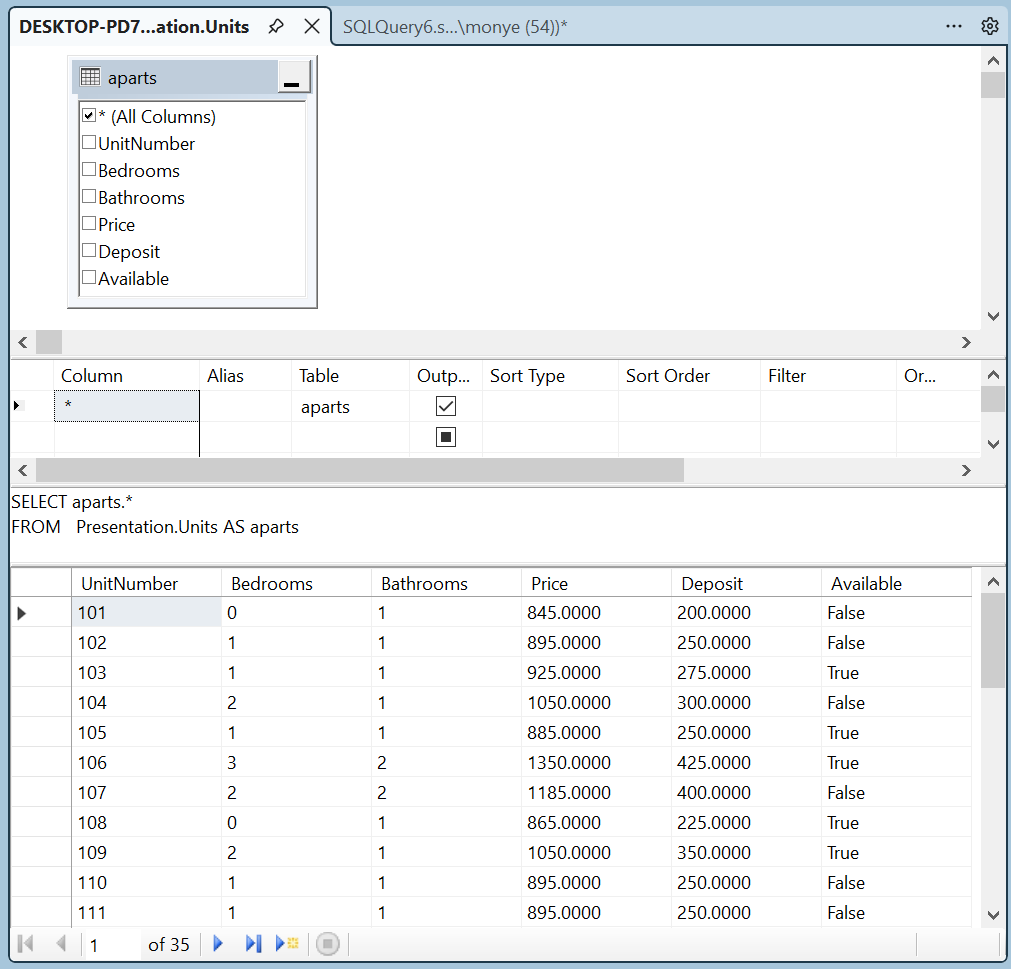
SELECT ALL aparts.*
FROM Presentation.Units aparts;
GO
Press Enter
A synonym is another name for an object that already has a name. That is, a synonym is a pseudo-name for an existing object. A synonym can be valuable if you want to provide a shorter name for an object. At first glance, a synonym for a table is like an alias. The difference is that an alias is created locally where you want to use it and it can be used only in the code where you create or define it. A synonym is a name you create globally as an object and you can use that name throughout the database.
You can create a synonym visually or programmatically. To visually create a synonym, in the Object Explorer, expand the database. Right-click Synonyms and click New Synonym:
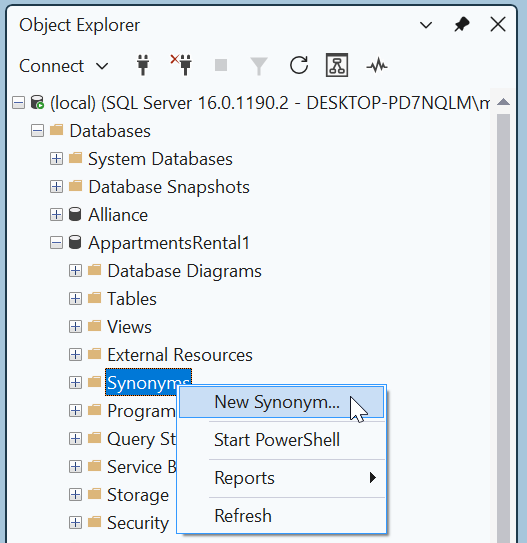
This would open the New Synonym dialog box.
The formula to programmatically create a synonym is:
CREATE SYNONYM [ schema_name_1. ] synonym_name FOR <object>
<object> :: =
{
    [ server_name.[ database_name ] . [ schema_name_2 ].| database_name . [ schema_name_2 ].| schema_name_2. ] object_name
}
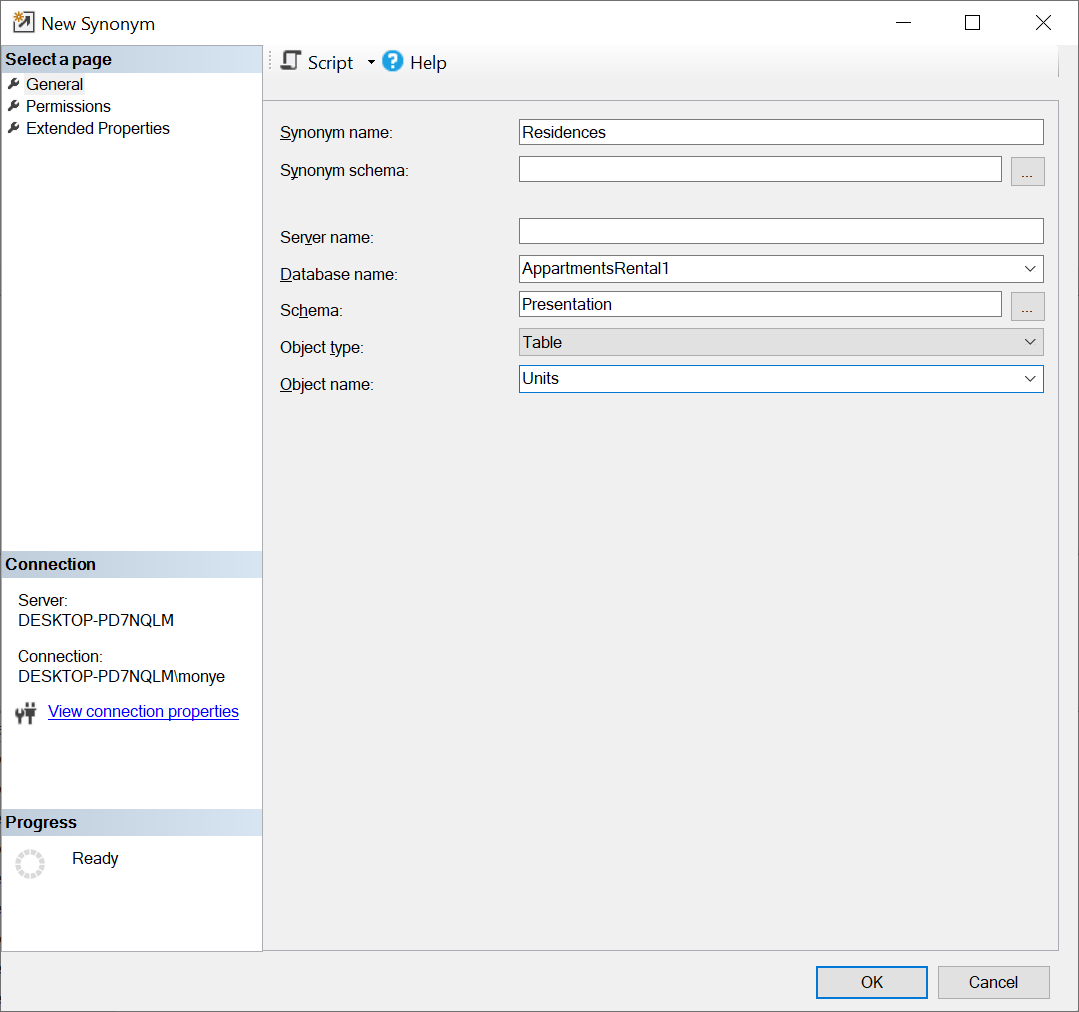
In the Synonym Name text box or placeholder, type the desired name. It can be anything that follows the rules of names in Transact-SQL. If the object belongs to a schema and if you want to represent that schema with a synonym, specify it in the Synonym Schema text box or in its placehoder. This is optional. As another option, if you want to indicate the server, type it in the Server Name text box of placeholder. By default, the synonym is meant to be created in the current database. Therefore, the New Synonym dialog box would have selected it in the Database Name text box. Otherwise, you can specify it. If the object belongs to a schema other than dbo, you can specify it in the Schema text box or its placeholder. Specify the object type in the indicated text box or placeholder. After doing this, if you are using the New Synonym dialog box, the Object Name combo box would hold the list of objects that belong to that schema, and you can select the desired one. If you are writing code, type the original object name after the schema. Here is an example:
If you are using the New Synonym dialog box, click OK and the synonym would be created. Here is an example of creating a synonym with code:
CREATE SYNONYM Staff
FOR Personnel.Employees;
GO
If you are programmatically creating the schema, execute your code.
To use a synonym, in the place where you would have used the name of the object, use the synonym. Here is an example that uses the synonym created visually:
SELECT FirstName FROM Pupils;
GO
Here is an example that uses the synonym created with code:
SELECT FirstName FROM Staff;
GO
You can also use the synonym to qualify the names of the columns. Here is an example:
SELECT Staff.FirstName FROM Staff;
GO
You can also create a local alias for the synonym and use it. Here is an example:
SELECT kids.FirstName
FROM Pupils kids;
GO
Practical Learning: Using a Synonym
CREATE SYNONYM Apartments
FOR Presentation.Units;
SELECT * FROM Apartments;
SELECT apts.* FROM Apartments apts;
Specifying What to Select
SELECTing One Column
As opposed to selecting all records, you may be interested in only one particular column whose fields you want to view. To visually select one record of a table, click the column header:
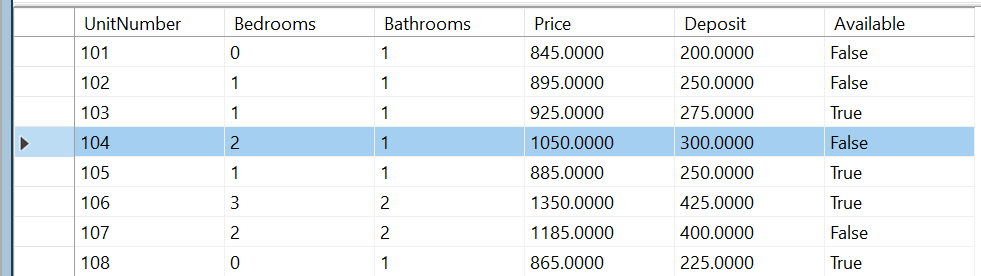
To select a column, you can replace the WhatField(s) placeholder of our formula with the name of the desired column. For example, to get a list of last names of students, you would execute the following statement:
SELECT LastName FROM Registration.Students;
GO
You can also qualify a column by preceding it with the name of the table followed by the period operator. The above statement is equivalent to:
SELECT Students.LastName FROM Registration.Students;
When you execute the statement, it would display only the column that contains the last names.
Practical Learning: Selecting One Field
to see the result:
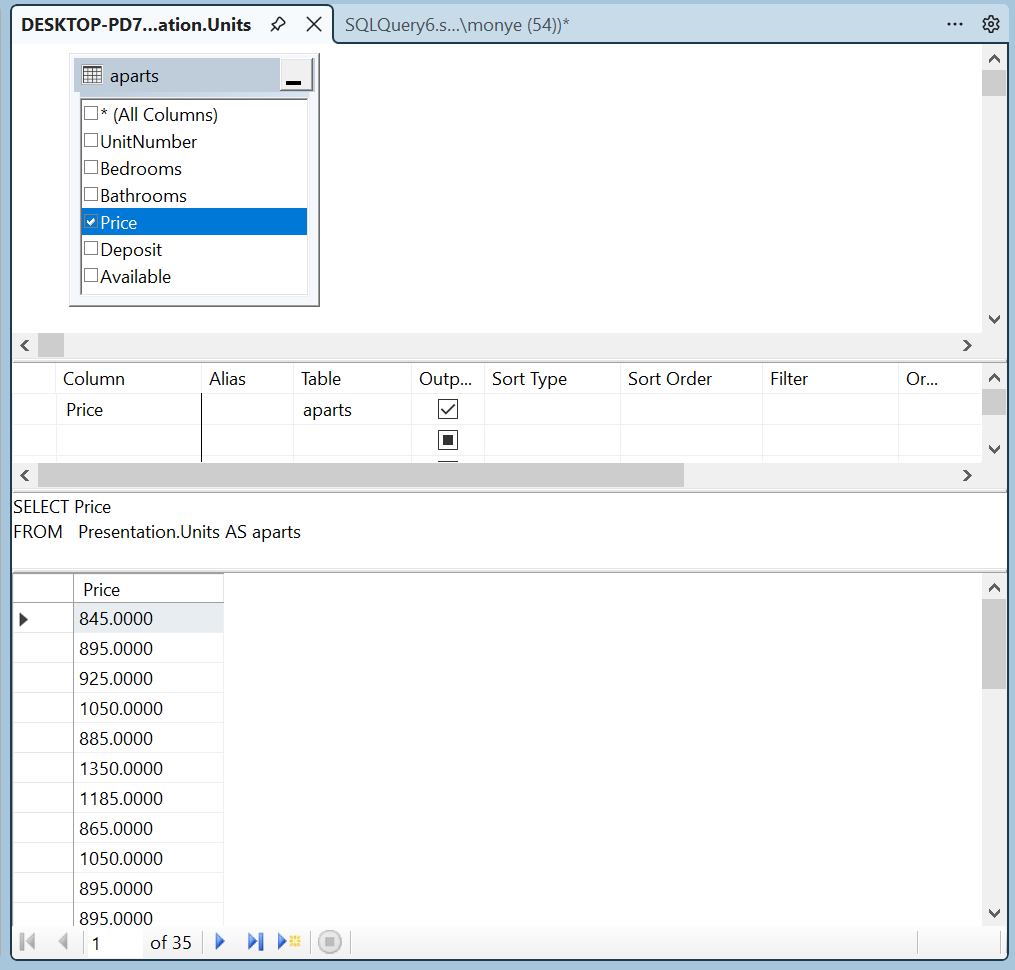
Notice that it produces 35 records and some prices appear more than once, which indicate that some appartments have the same price
SELECT aparts.UnitNumber FROM Presentation.Units aparts;
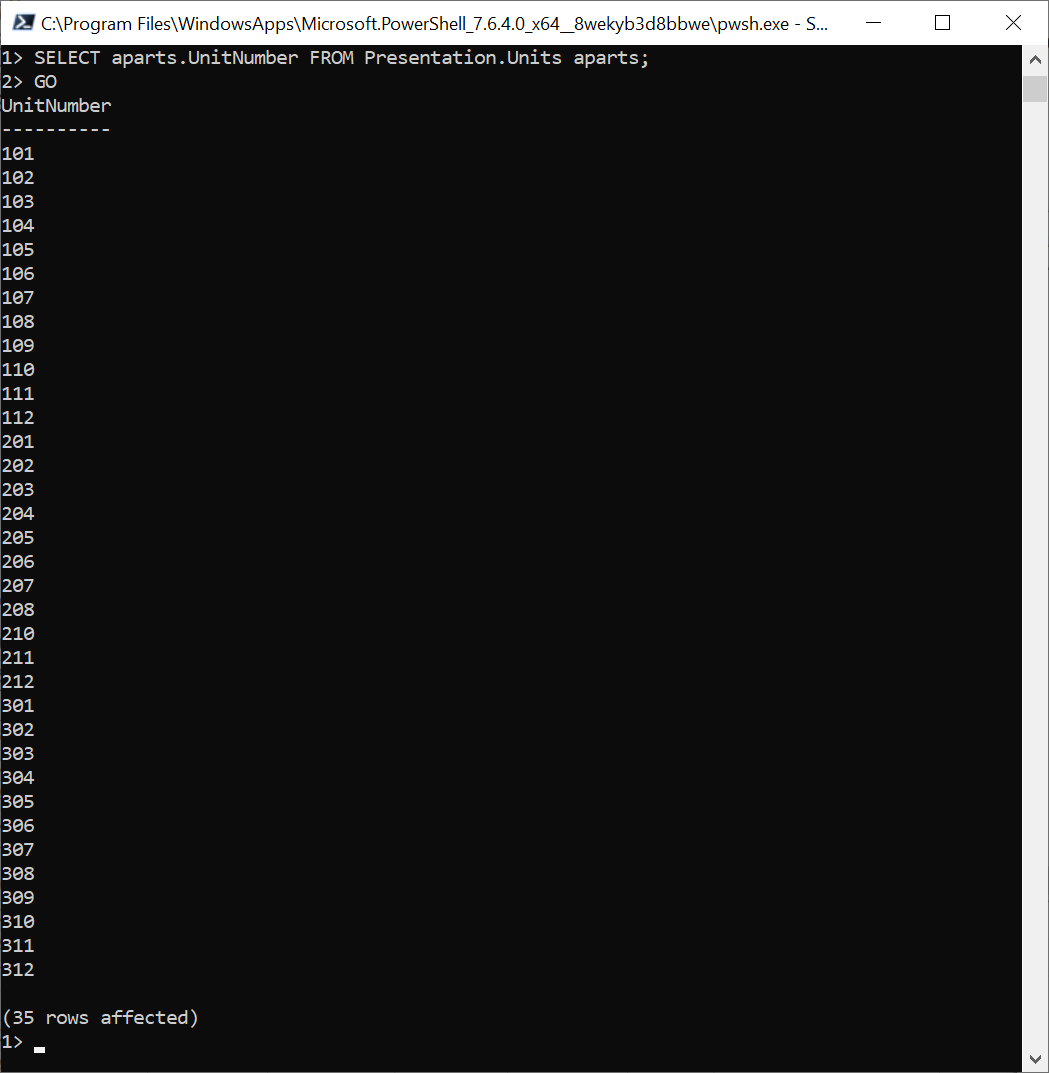
SELECT Bedrooms FROM Apartments;
SELECT apts.Bathrooms FROM Apartments apts;
If you specify a column to select from a table, every record would come up. This can cause the same value to repeat over and over. Here is an example:
This would produce:
CREATE DATABASE VideoCollection1;
GO

CREATE TABLE Videos
(
    Title nvarchar(50),
    Director nvarchar(50),
    Rating nvarchar(10),
    YearReleased int
);
GO
INSERT INTO Videos
VALUES(N'Her Alibi', N'Bruce Beresford', N'PG-13', 1998),
      (N'Two for the Money', N'D.J. Caruso', N'R', 2008),
      (N'Memoirs of a Geisha', N'Rob Marshall', N'PG-13', 2006);
GO
INSERT INTO Videos(Rating, Title, Director)
VALUES(N'R', N'Wall Street', N'Oliver Stone'),
      (N'G', N'Annie', N'John Huston'),
      (N'PG', N'Incredibles (The)', N'Brad Bird'),
      (N'PG-13', N'Sneakers', N'Phil Alden Robinson');

GO

SELECT Videos.Rating FROM Videos;
GO
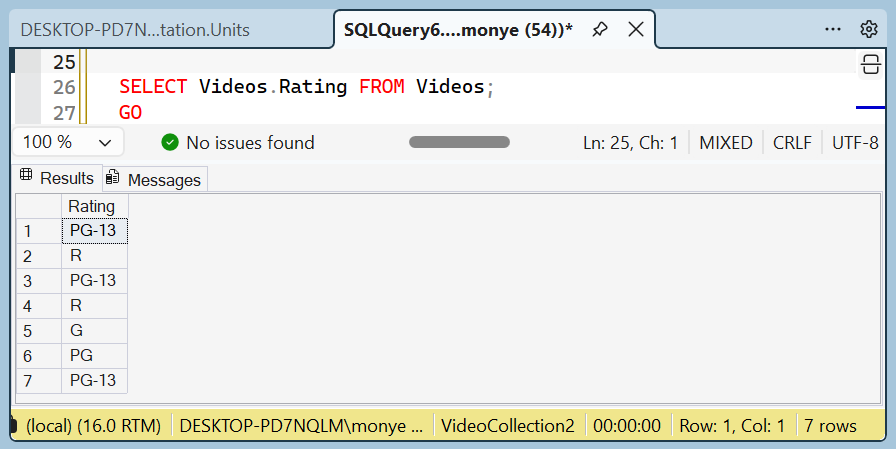
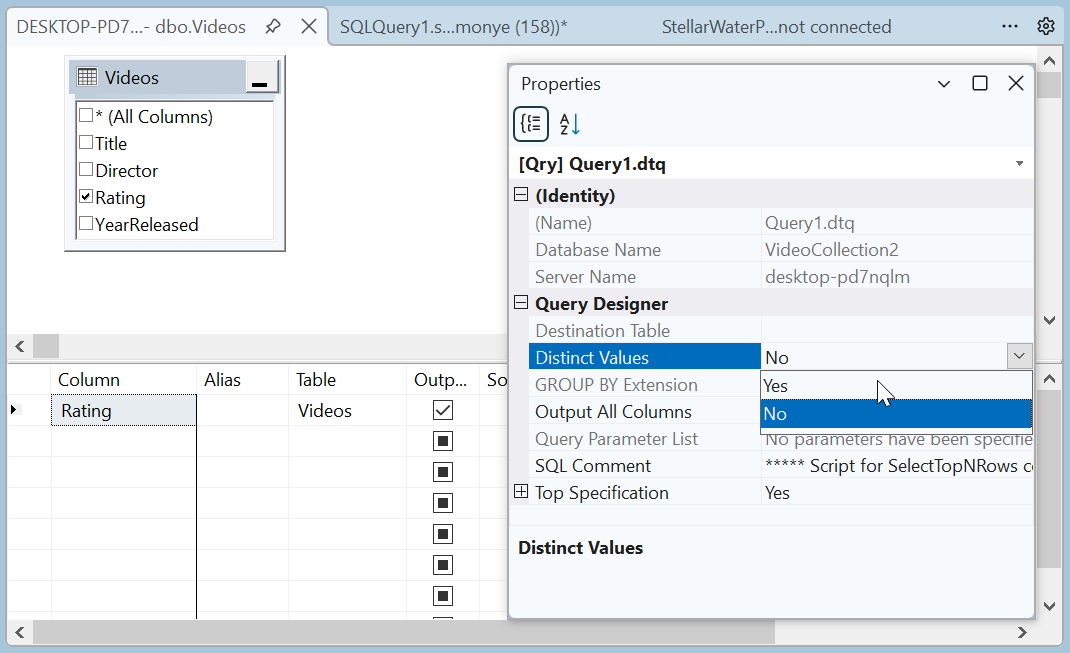
Notice that PG-13 and R are repeated. Sometimes you want to show each value only once. To visually get such a result, if you are working in the Query Designer, click the check box of the desired column in the Diagram pane or select the field in the Column of the Criteria pane. Then click an empty area in the Diagram pane to make sure the table is selected. In the Properties window, set the Distinct Values field to Yes:
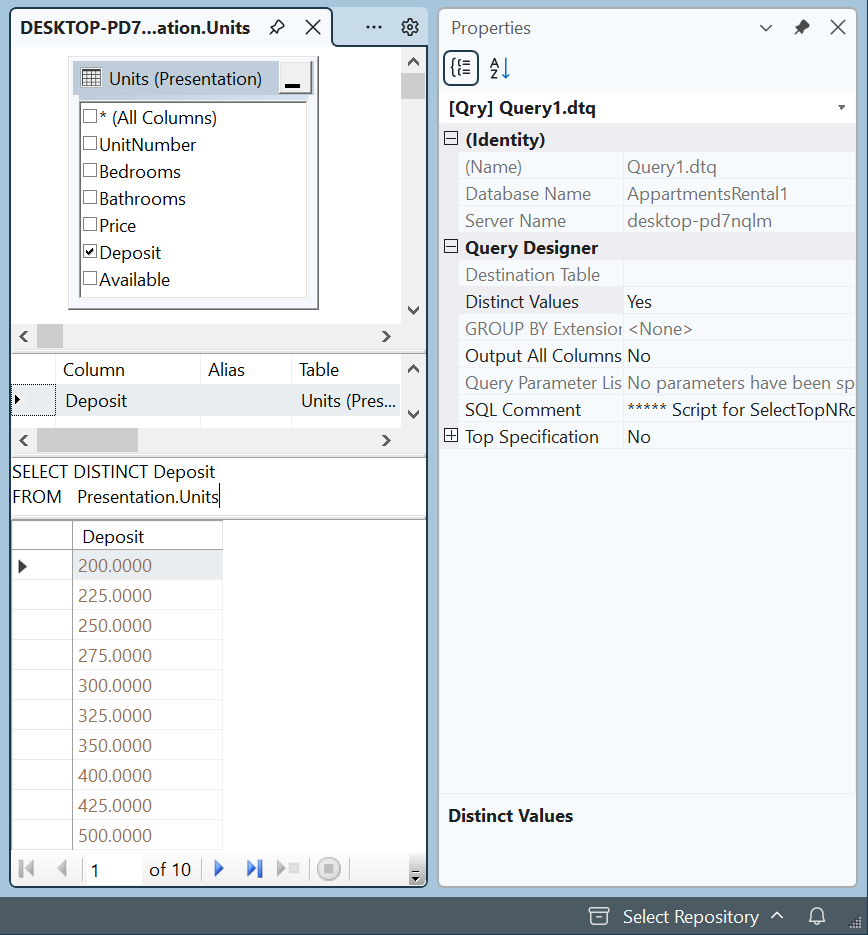
In the SQL, to get a list of distinct values, put the DISTINCT keyword between SELECT and the name of the column. Here is an example:
In most cases, you would get a better result if you select only one column. Still, you can use as many columns as you want.
Practical Learning: Producing Distinct Values
SELECT DISTINCT aparts.Bedrooms FROM Presentation.Units aparts;
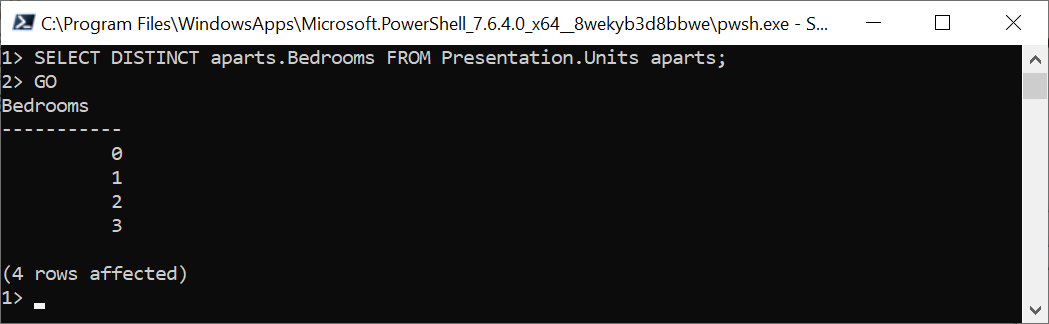
to see the result:
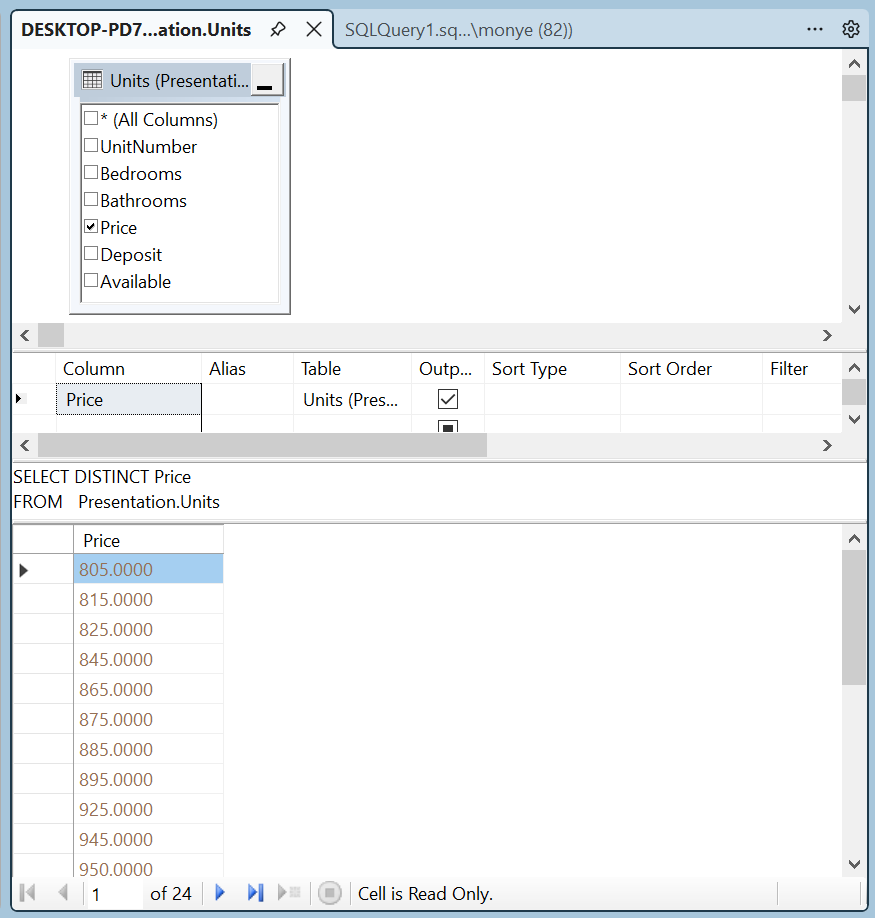
SELECTing Many Fields of the Same Table
To consider more than one column in a statement, you can list them in the WhatField(s) placeholder of our formula, separating them with a comma except for the last column. The syntax you would use is:
SELECT Column1, Column2, Column_n FROM WhatObject;
For example, to display a list that includes only the names, gender, email address and home phone of records from a table called Students, you would type:
SELECT FirstName, LastName, Gender, EmailAddress, HomePhone
FROM Registration.Students;
You can qualify each column by preceding it with the name of the table followed by the period operator. The above statement is equivalent to:
SELECT Students.FirstName,
       Students.LastName,
       Students.Gender,
       Students.EmailAddress,
       Students.HomePhone
FROM Registration.Students;
You don't have to qualify all columns, you can qualify some and not qualify some others. The above statement is equivalent to:
SELECT Students.FirstName,
       LastName,
       Students.Gender,
       EmailAddress,
       HomePhone
FROM Registration.Students;
When executed in a Query Editor, this expression would produce:
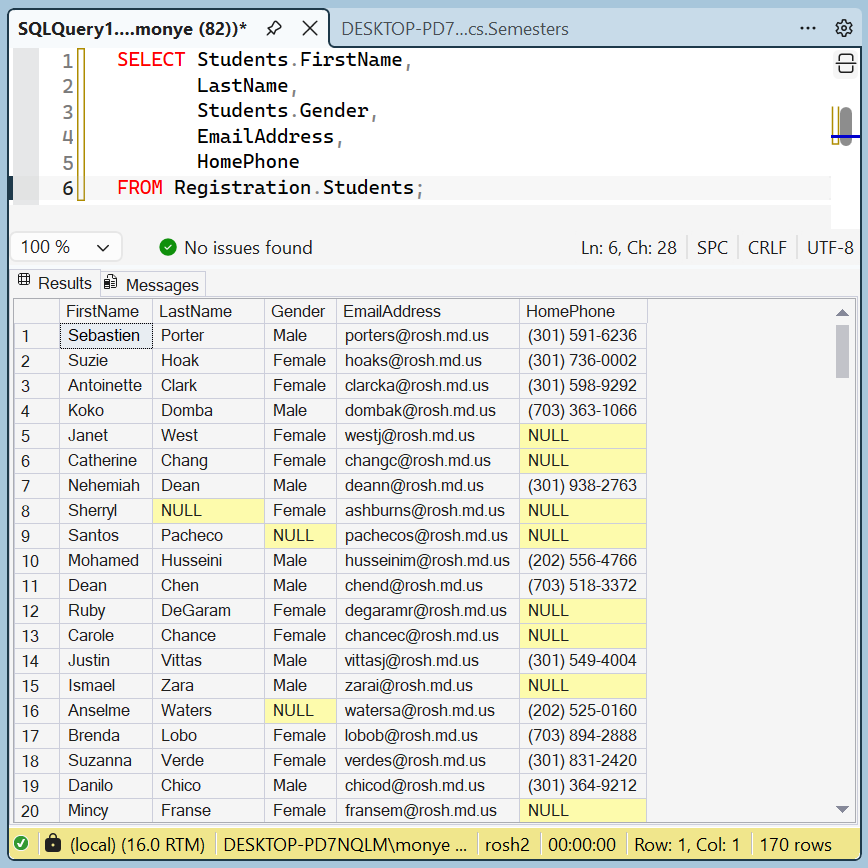
Once again, remember that you can use an alias name for a table by preceding each column with a letter or a word and a period operator, and then entering the name of the table followed by that letter or word. Here is an example:
SELECT std.FirstName,
       std.LastName,
       std.Gender,
       std.EmailAddress,
       std.HomePhone
FROM Registration.Students std;
Remember that if the alias is in more than one word, you can include it in either double-quotes or between square brackets. Here are examples:
SELECT [Little Angels].FirstName,
       "Little Angels".LastName,
       [Little Angels].HomePhone,
       "Little Angels".ParentsNames
FROM   Registration.Students [Little Angels];
GO
Practical Learning: Selecting Many Fields
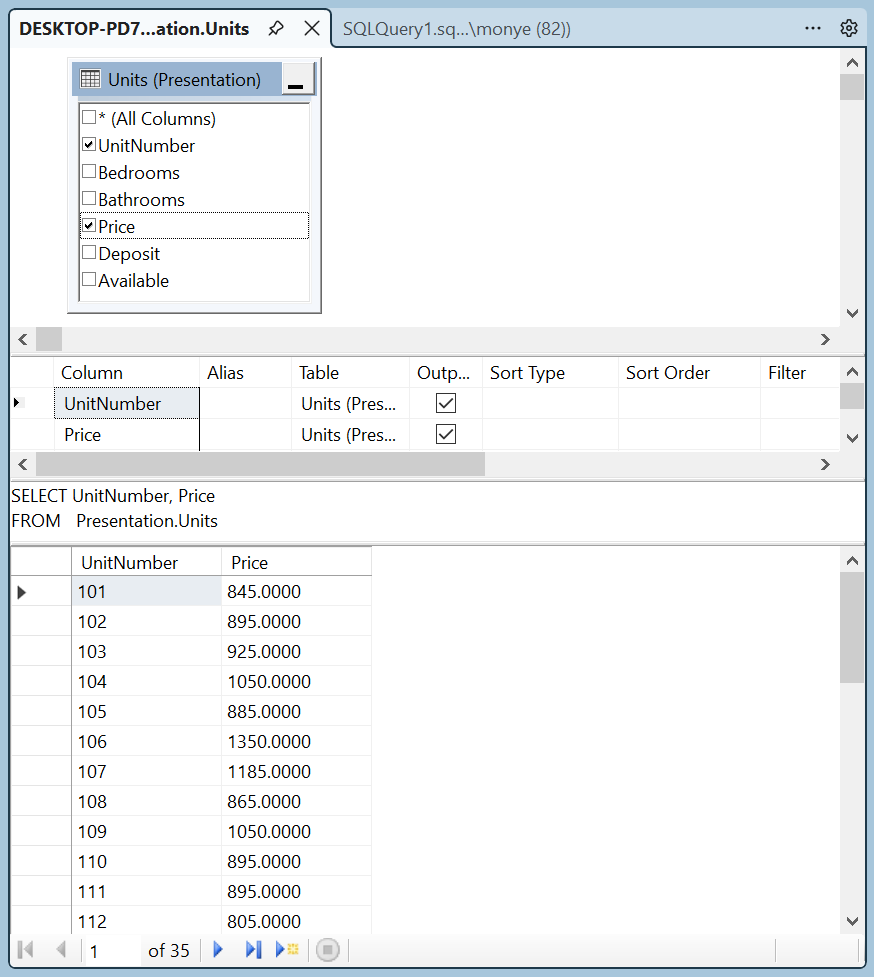
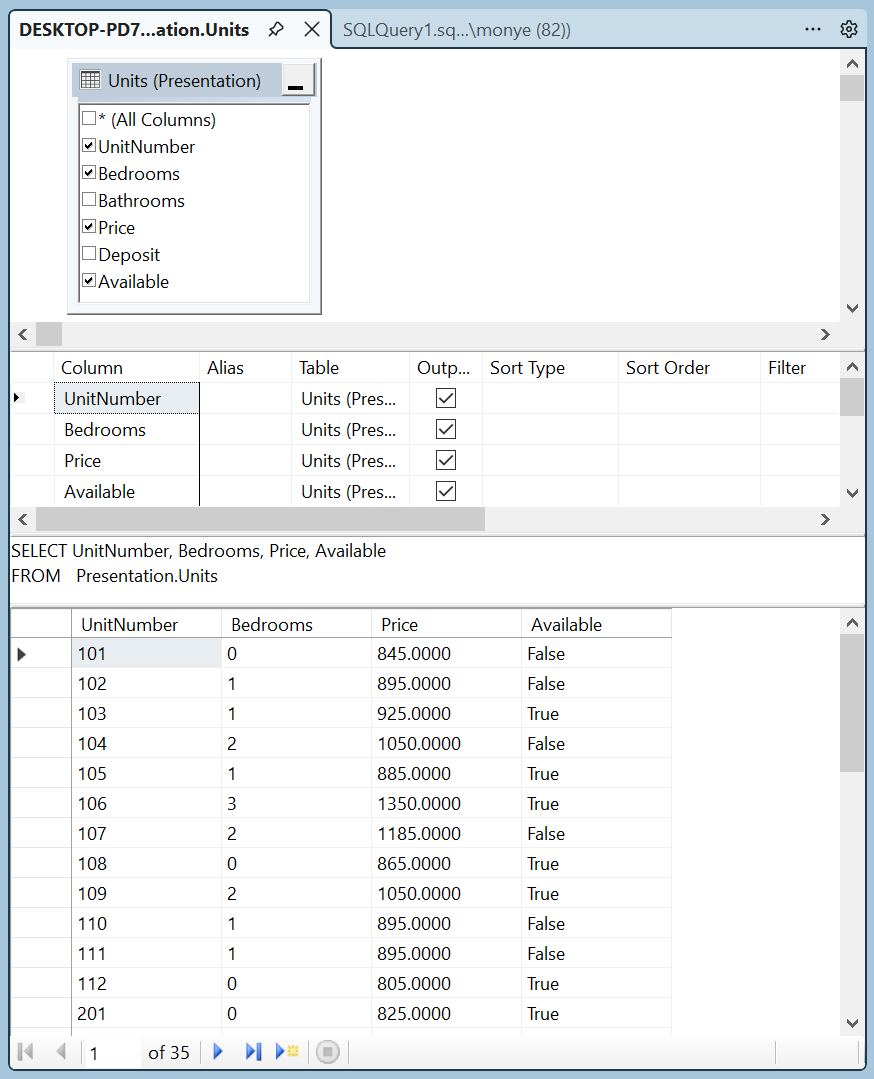
SELECTing Fields From Different Tables
If you have more than one table in your database, you can use a statement that selects any field(s) you want from those tables. Neither the tables nor the columns need to have anything in common. The formula to follow is:
SELECT WhatField(s) FROM Table_1, Table_2, Table_n
You start with SELECT followed by the list of fields from the tables. If the tables have columns with different names, you can simply list the name of each column. Consider the following tables:
CREATE DATABASE Exercise;
GO
USE Exercise;
GO
CREATE TABLE Employees
(
    [Empl #] nchar(7),
    [First Name] nvarchar(20),
    [Last Name] nvarchar(20),
    [Hourly Salary] money
);
GO
CREATE TABLE Products
(
    Number int,
    Name nvarchar(50),
    UnitPrice money,
);
GO

INSERT INTO Employees
VALUES(N'207-025', N'Julie', N'Flanell', 36.55),
      (N'926-705', N'Paulette', N'Simms', 26.65),
      (N'240-002', N'Alexandra', N'Ulm', 12.85),
      (N'847-295', N'Ellie', N'Tchenko', 11.95);
GO
INSERT INTO Products
VALUES(217409, N'Short Black Skirt', 55.85),
      (284001, N'Pencil Skirt', 49.00);
GO
Here is an example of selecting columns from those tables:
SELECT [Empl #], [First Name], [Last Name], Name, UnitPrice
FROM Employees, Products;
GO
When you select fields from different tables, in the result, each of the records of the first table would display, each showing the first record (combination of the selected columns) of the second table. Then each of the records of the first table would show again, followed by the second record (combination of the selected columns) of the second table. This will continue until all records of the second table have displayed. Consequently, the resulting query would contain (Number of Records of First Table) x (Number of Records of Second Table). For example, if the first table contains 4 records and the second table contains 2 records, the statement would produce 4 x 2 = 8 records. Therefore, the above statement would produce:
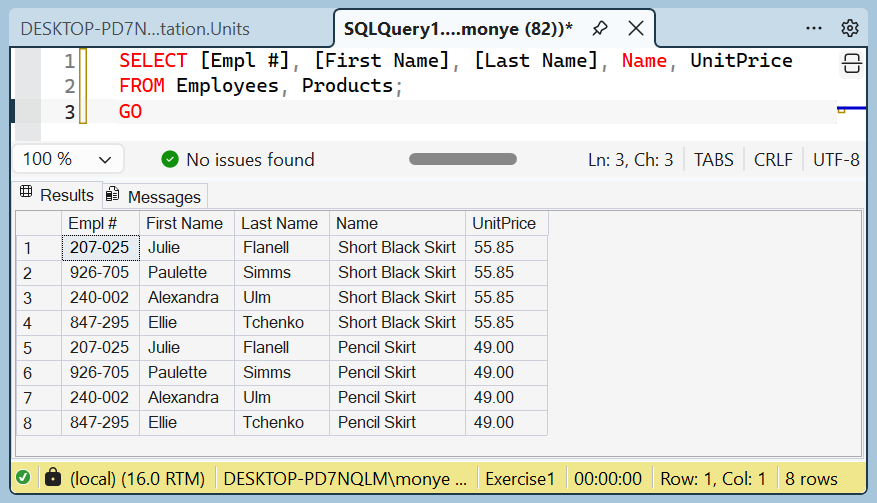
Imagine your tables have each a column with the same name:
DROP TABLE Employees;
GO
DROP TABLE Products;
GO
CREATE TABLE Employees
(
    [Empl #] nchar(7),
    Name nvarchar(50),
    [Hourly Salary] money
);
GO
CREATE TABLE Products
(
    Number int,
    Name nvarchar(50),
    UnitPrice money,
);
GO

INSERT INTO Employees
VALUES(N'207-025', N'Julie Flanell', 36.55),
      (N'926-705', N'Paulette Simms', 26.65),
      (N'240-002', N'Alexandra Ulm', 12.85),
      (N'847-295', N'Ellie Tchenko', 11.95);
GO
INSERT INTO Products
VALUES(217409, N'Short Black Skirt', 55.85),
      (284001, N'Pencil Skirt', 49.00);
GO
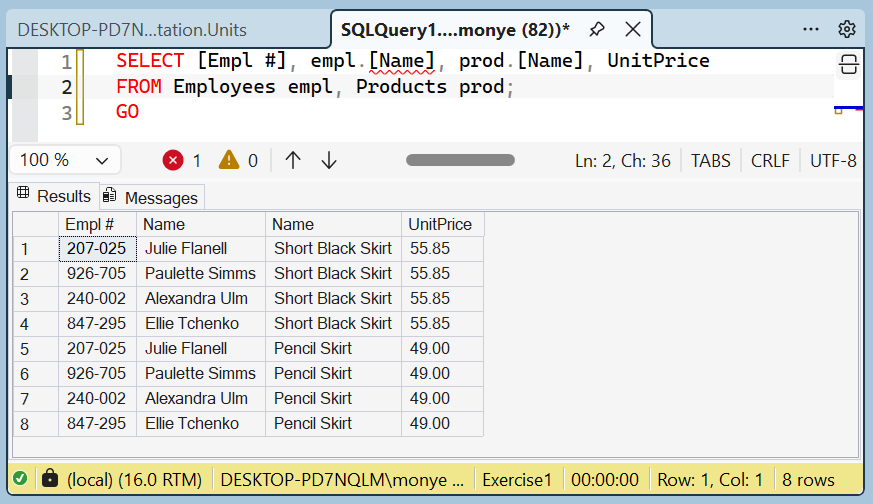
When selecting the columns, you must qualify at least the column(s) with the same name. Otherwise you would receive an error. Therefore, the above Name columns can be accessed as follows:
SELECT [Empl #], empl.Name, prod.Name, UnitPrice
FROM Employees empl, Products prod;
GO
This would produce:
Of course, you can qualify all columns of the tables. Here are examples:
DROP TABLE Employees;
GO
DROP TABLE Products;
GO
CREATE TABLE Employees
(
    [Empl #] nchar(7),
    [First Name] nvarchar(20),
    [Last Name] nvarchar(20),
    [Hourly Salary] money
);
GO
CREATE TABLE Products
(
	Number int,
	Name nvarchar(50),
	UnitPrice money,
);
GO

INSERT INTO Employees
VALUES(N'207-025', N'Julie', N'Flanell', 36.55),
      (N'926-705', N'Paulette', N'Simms', 26.65),
      (N'240-002', N'Alexandra', N'Ulm', 12.85),
      (N'847-295', N'Ellie', N'Tchenko', 11.95);
GO
INSERT INTO Products
VALUES(217409, N'Short Black Skirt', 55.85),
      (284001, N'Pencil Skirt', 49.00);
GO

SELECT empl.[Empl #], empl.[First Name], empl.[Last Name],
       prod.Name, prod.UnitPrice
FROM Employees empl, Products prod;
GO
Just as we have used only two tables, you can select records from three or more tables, following the same formula.
Selecting Many Tables
In the Query Editor or the Query Designer, you can show the records of as many tables as you want and those tables don't need to have anything in common. They don't even have to belong to the same database. Consider the following database named Cruise equipped with a table named Cabins:
CREATE DATABASE Cruise;
GO

USE Cruise;
GO

CREATE TABLE Cabins(
    CabinType nvarchar(20) not null,
    Deck nchar(20),
    Size int,
    Rate1Passenger money,
    Rate2Passengers money);
GO
INSERT INTO Cabins -- Size in sq/ft
VALUES(N'Inside', N'Riviera', 215, 289.00, 578.00),
      (N'Outside', N'Riviera', 185, 319.00, 638.00),
      (N'Outside', N'Riviera', 225, 389.00, 778.00),
      (N'Suite', N'Verandah', 295, 1009.00, 2018.00),
      (N'Inside', N'Upper', 185, 379.00, 758.00),
      (N'Inside', N'Main', 215, 359.00, 718.00),
      (N'Outside', N'Riviera', 185, 349.00, 698.00),
      (N'Suite', N'Main', 300, 885.00, 1680.00);
GO
Here is another database named Video Collection with a table named Videos:
CREATE DATABASE VideoCollection
GO

USE VideoCollection
GO

CREATE TABLE Videos
(
    Title nvarchar(50),
    Director nvarchar(50),
    WideScreen bit,
    Rating nchar(10),
    YearReleased int
)
GO

INSERT INTO Videos
VALUES(N'War of the Roses (The)', N'Dany de Vito', 0, N'R', 2001),
      (N'Memoirs of a Geisha', N'Rob Marshall', 1, N'PG-13', 2006),
      (N'Last Castle (The)', N'Rod Lurie', 1, N'', 2001),
      (N'Sneakers', N'Phil Alden Robinson', 1, N'PG-13', 2003);
GO
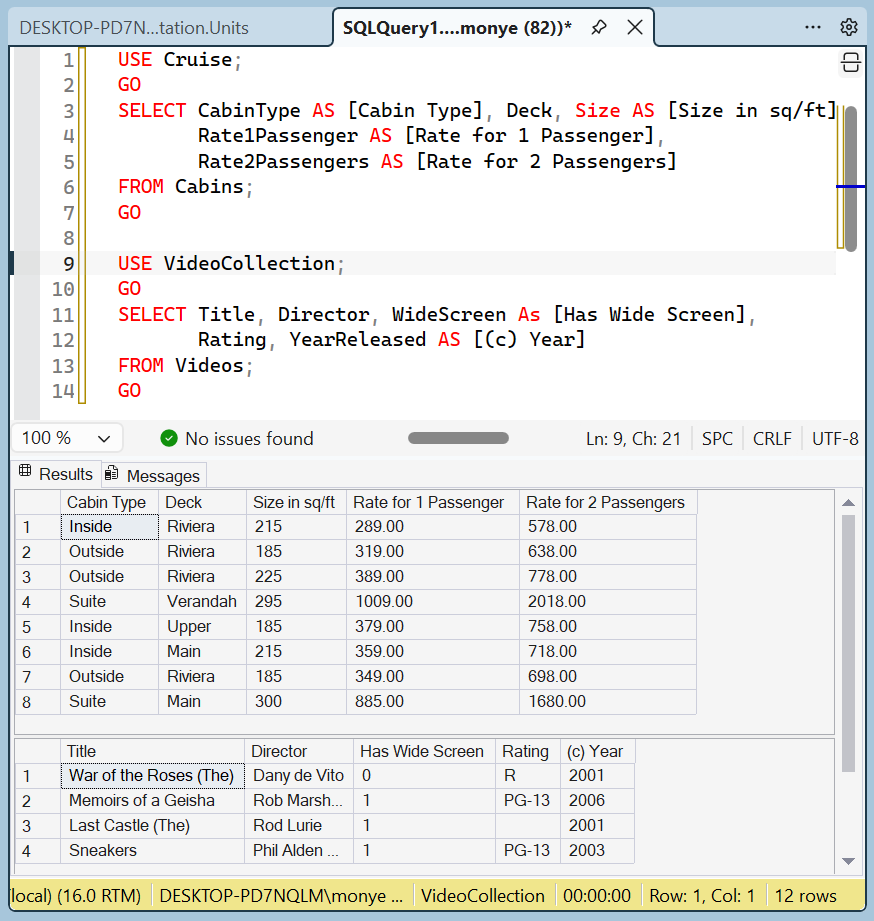
To show the records of more than one table, in the Query Editor, write a SELECT statement for each table and execute it. If the tables belong to different databases, make sure you indicate this. Here is an example:
USE Cruise;
GO
SELECT CabinType AS [Cabin Type], Deck, Size AS [Size in sq/ft],
       Rate1Passenger AS [Rate for 1 Passenger],
       Rate2Passengers AS [Rate for 2 Passengers]
FROM Cabins;
GO

USE VideoCollection;
GO
SELECT Title, Director, WideScreen As [Has Wide Screen],
       Rating, YearReleased AS [(c) Year]
FROM Videos;
GO
When executed, the lower part of the window displays the records of the tables, each table on its own part:
Practical Learning: Ending the Lesson
|
|
|||
| Previous | Copyright © 2008-2026, FunctionX | Last Update: Sunday 09 August 2026, 19:38 | Next |
|
|
|||
