Introduction to Application Help

Introduction to Application Help
Application Help Fundamentals
Introduction
When you have created an application, you should assist your users in figuring out how to use your application. You may think about training the users, which is good but may require your physical presence. Online Help is the ability to provide documents that can guide people about your application. Those file should be easily accessible to the users. One to make this possible to attach the files to your application.
There are various small but effective techniques you can use to provide help for your application.
![]() Practical Learning: Introducing Help
Practical Learning: Introducing Help
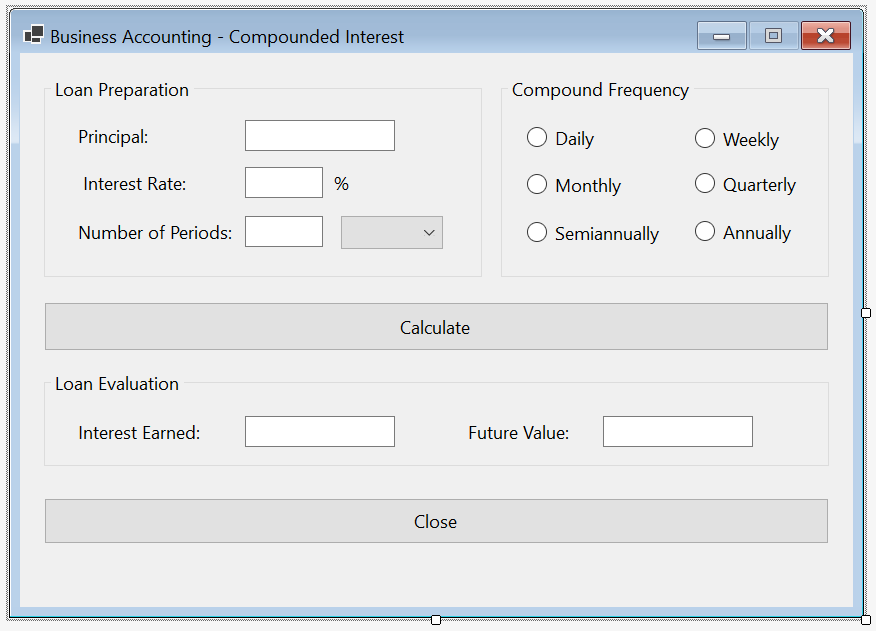
| Control | (Name) | Text | Other Properties | |
| GroupBox | Loan Preparation | |||
| Label | Principal | |||
| TextBox | txtPrincipal | TextAlign: Right | ||
| Label | Interest Rate: | |||
| TextBox | txtInterestRate | TextAlign: Right | ||
| Label | % | |||
| Label | Number of Periods: | |||
| TextBox | txtPeriods | TextAlign: Right | ||
| ComboBox | cbxPeriods | Items: Days Years Months |
||
| GroupBox | Compound Frequency | |||
| RadioButton | rdoDaily | Daily | ||
| RadioButton | rdoWeekly | Weekly | ||
| RadioButton | rdoMonthly | Monthly | ||
| RadioButton | rdoQuaterly | Quaterly | ||
| RadioButton | rdoSemiannualy | Semiannualy | ||
| RadioButton | rdoAnnualy | Annualy | ||
| Button | btnCalculate | Calculate | ||
| GroupBox | Loan Evaluation | |||
| Label | Interest Earned: | |||
| TextBox | txtInterestEarned | TextAlign: Right | ||
| Label | Future Value: | |||
| TextBox | txtFutureValue | TextAlign: Right | ||
| Button | btnClose | Close | ||
A Placeholder for a Text Box
One way to assist a user with text box is to display a suggestive string in a text box. To support this feature, the TextBox class, the parent of the .NET text box control, is equipped with a property named PlaceholderText :
public virtual string PlaceholderText { get; set; }
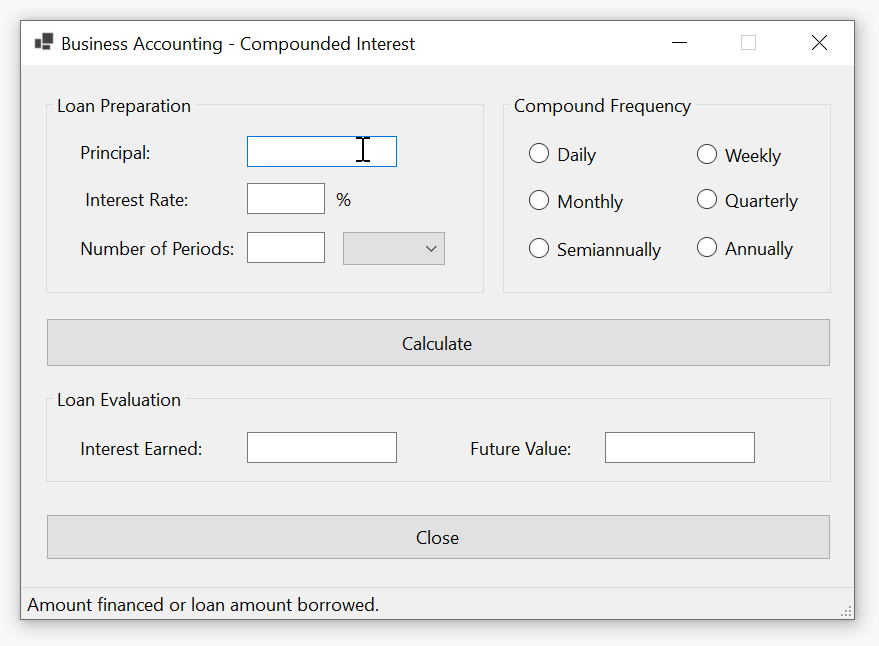
If you want to use this property, on the form, click a text box. In the Properties window, click the Plageholder field and type the desired string. Normally, you type something that cen suggest to the user what type of value is expected in the text box. The stirng of the placeholder appears when a control looses, or doesn't have, focus. Here are examples:
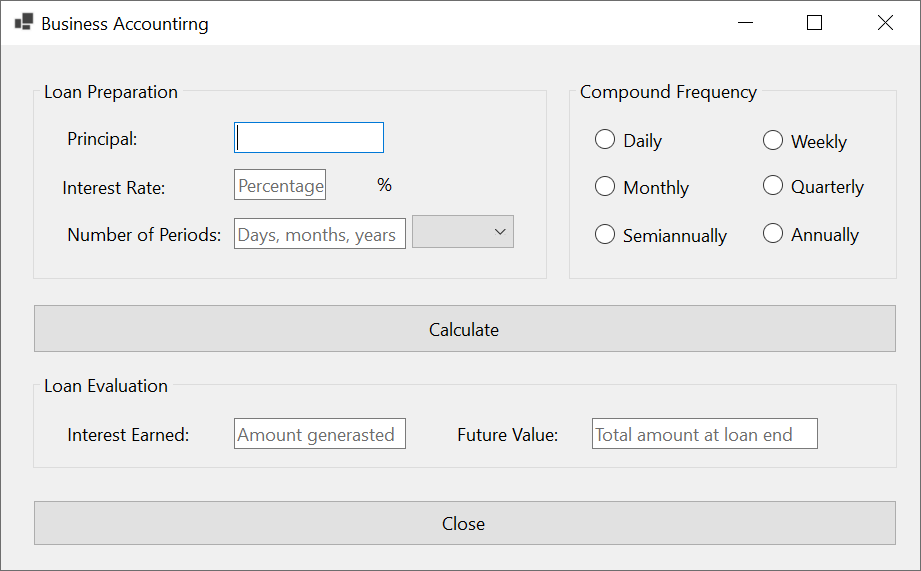
If the user types a value in the text box, the text of the placeholder disappears. As long as a text box has not received a value and the text box doesn't have focus, the control would display its placeholder text.
Message-Based Help
Status Bar Messages
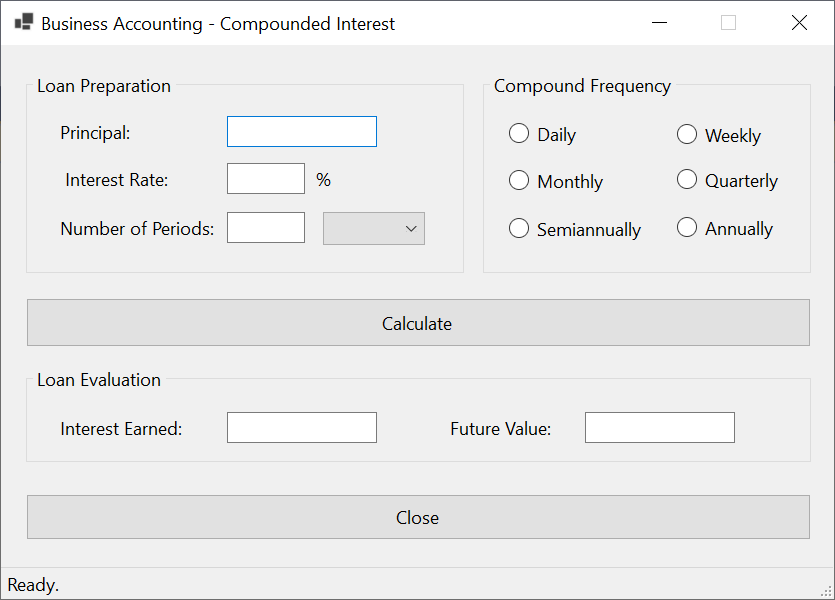
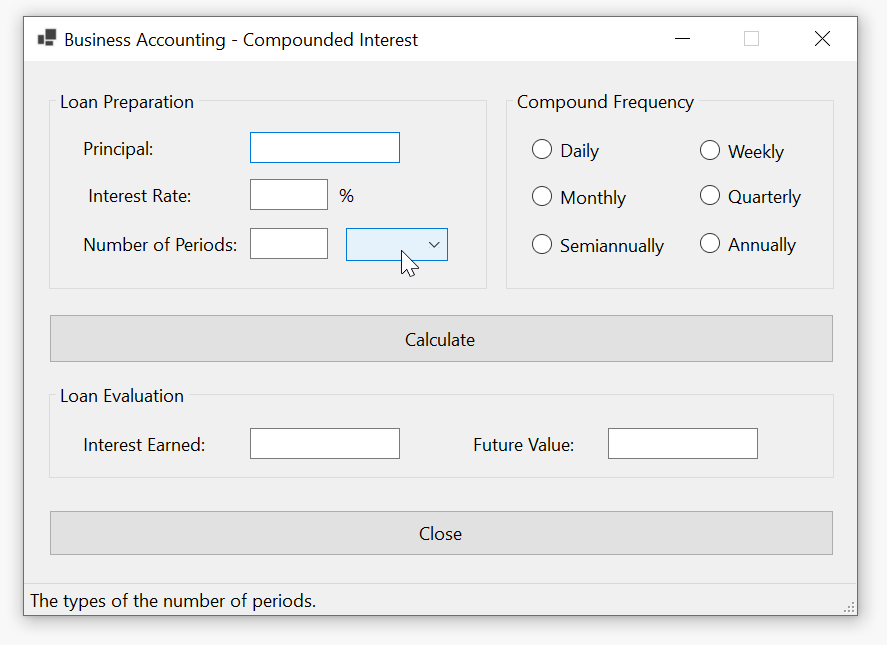
One way you can provide simple help consists of displaying short indicative messages on a status bar. To do this, you can first create sections, called panels, on a status bar and then display the necessary messages in the section of your choice. The message can be anything but it should consist of just a few words to fit in its section without going over board.
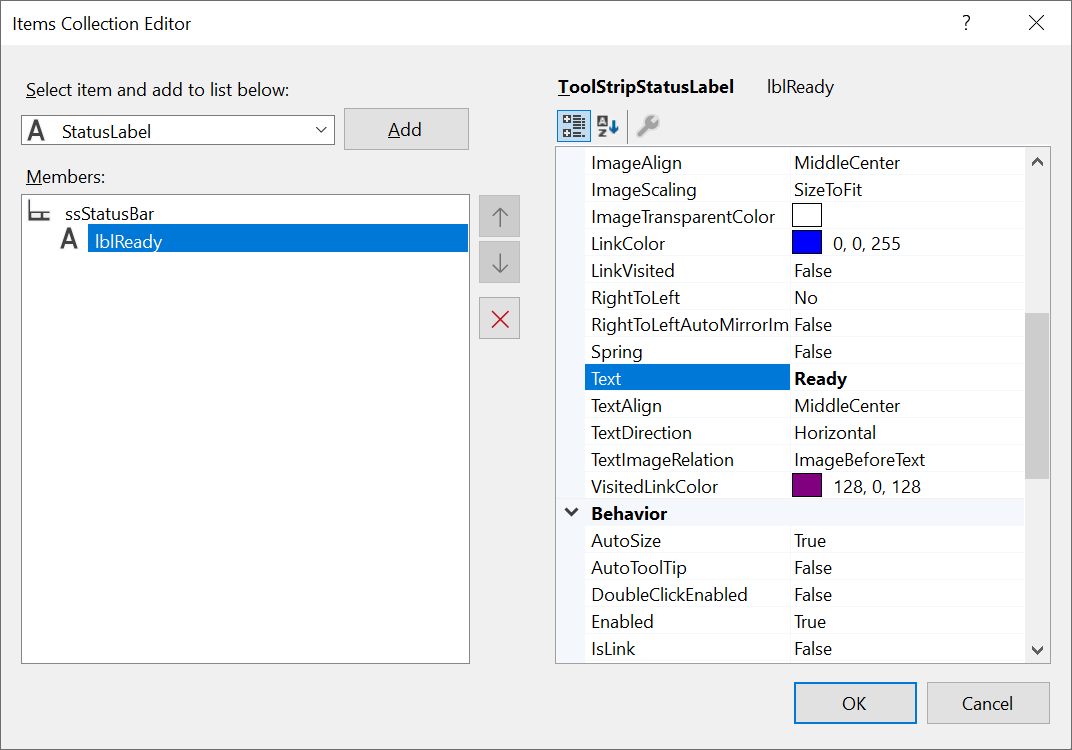
![]() Practical Learning: Helping Through a Status Bar
Practical Learning: Helping Through a Status Bar
namespace BusinessAccounting3
{
public partial class CompoundedInterest : Form
{
public CompoundedInterest()
{
InitializeComponent();
}
private void CompoundedInterest_MouseMove(object sender, MouseEventArgs e)
{
ssStatusBar.Items[0].Text = "Ready.";
}
private void txtPrincipal_MouseMove(object sender, MouseEventArgs e)
{
ssStatusBar.Items[0].Text = "Amount financed or loan amount borrowed.";
}
private void txtInterestRate_MouseMove(object sender, MouseEventArgs e)
{
ssStatusBar.Items[0].Text = "The factor by which the principal grows over a period.";
}
private void txtPeriods_MouseMove(object sender, MouseEventArgs e)
{
ssStatusBar.Items[0].Text = "The length of the loan in term of months, years, etc.";
}
private void cbxPeriods_MouseMove(object sender, MouseEventArgs e)
{
ssStatusBar.Items[0].Text = "The types of the number of periods.";
}
private void rdoDaily_MouseMove(object sender, MouseEventArgs e)
{
ssStatusBar.Items[0].Text = "Applied when accrued interest is evaluated daily.";
}
private void rdoWeekly_MouseMove(object sender, MouseEventArgs e)
{
ssStatusBar.Items[0].Text = "Interest earned calculated on a weekly basis.";
}
private void rdoMonthly_MouseMove(object sender, MouseEventArgs e)
{
ssStatusBar.Items[0].Text = "The interest earned is evaluated every month.";
}
private void rdoQuarterly_MouseMove(object sender, MouseEventArgs e)
{
ssStatusBar.Items[0].Text = "Calculation of the accrued interest once in three months.";
}
private void rdoSemiannually_MouseMove(object sender, MouseEventArgs e)
{
ssStatusBar.Items[0].Text = "The accrued interest is evaluated once in six months.";
}
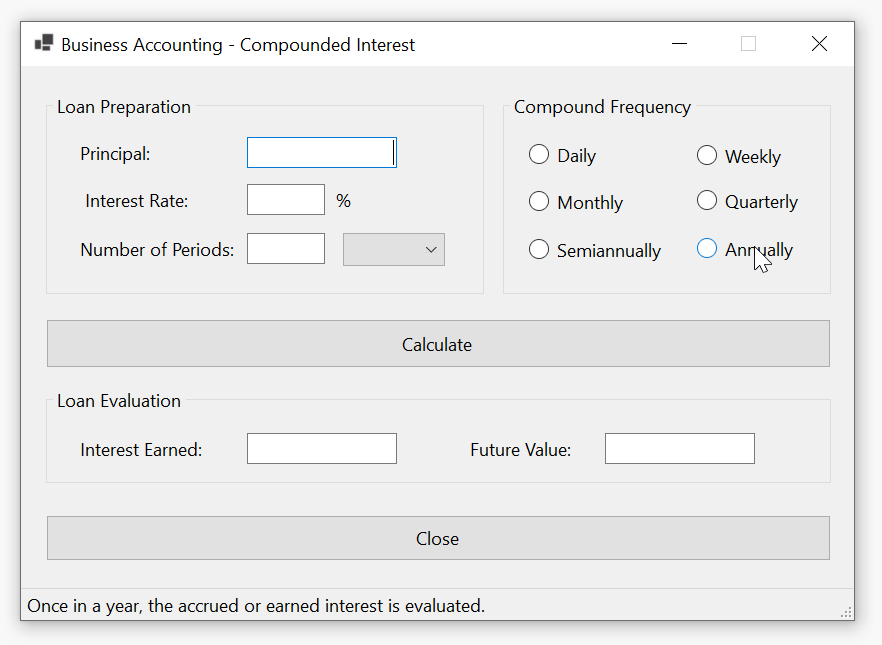
private void rdoAnnually_MouseMove(object sender, MouseEventArgs e)
{
ssStatusBar.Items[0].Text = "Once in a year, the accrued or earned interest is evaluated.";
}
private void btnCalculate_MouseMove(object sender, MouseEventArgs e)
{
ssStatusBar.Items[0].Text = "When values are ready, click this buttong to evaluate the loan.";
}
private void btnCalculate_Click(object sender, EventArgs e)
{
/* A compound type specifies the frequency by which
* the interest is evaluated. The options are that
* the evaluation be made hourly, daily, weekly, biweekly,
* semi-monthly, monthly, quaterly, semi-annually, or annually. */
double compoundType;
// The principal is the amount invested in getting a loan or the amount of money borrowed.
double principal = 0d;
// The interest rate is the fraction that influence the amount owned by the lender
double iRate = 0d;
// The period is the number of units by which the interest accrued is evaluated
double per = 0d;
if (string.IsNullOrEmpty(txtPrincipal.Text))
{
MessageBox.Show("You must provide a valid number for the principal.",
"Business Accounting", MessageBoxButtons.OK, MessageBoxIcon.Information);
return;
}
if (string.IsNullOrEmpty(txtInterestRate.Text))
{
MessageBox.Show("Please type a valid decimal number for the interest rate.",
"Business Accounting", MessageBoxButtons.OK, MessageBoxIcon.Information);
return;
}
if (string.IsNullOrEmpty(txtPeriods.Text))
{
MessageBox.Show("You are supposed to type a valid number for " +
"the number of days, weeks, months, quarters, or years.",
"Business Accounting", MessageBoxButtons.OK, MessageBoxIcon.Information);
return;
}
try
{
// Retrieve the value of the principal
principal = double.Parse(txtPrincipal.Text);
}
catch (FormatException fe)
{
MessageBox.Show("There is a problem with the value you provided " +
"for the principal." + Environment.NewLine +
"Please report the error as: " + fe.Message,
"Business Accounting", MessageBoxButtons.OK, MessageBoxIcon.Information);
}
try
{
// Retrieve the interest rate
iRate = double.Parse(txtInterestRate.Text);
}
catch (FormatException fe)
{
MessageBox.Show("You must provide a valid fractional number for the interest rate." + Environment.NewLine +
"You can present the error as: " + fe.Message,
"Business Accounting", MessageBoxButtons.OK, MessageBoxIcon.Information);
}
try
{
// Get the number of periods
per = double.Parse(txtPeriods.Text);
}
catch (FormatException fe)
{
MessageBox.Show("Please type the number of days, weeks, months, quarters, or years." + Environment.NewLine +
"The error resulting is: " + fe.Message,
"Business Accounting", MessageBoxButtons.OK, MessageBoxIcon.Information);
}
// Find out what radio button was clicked to apply the compound frequency
if (rdoDaily.Checked == true)
compoundType = 360d;
else if (rdoWeekly.Checked == true)
compoundType = 52d;
else if (rdoMonthly.Checked)
compoundType = 12d;
else if (rdoQuarterly.Checked)
compoundType = 4d;
else if (rdoSemiannually.Checked)
compoundType = 2d;
else
{
compoundType = 1d;
rdoAnnually.Checked = true;
}
double periods;
if (cbxPeriods.Text == "Days")
periods = per / 360d;
else if (cbxPeriods.Text == "Months")
periods = per / 12d;
else
{
periods = per;
cbxPeriods.Text = "Years";
}
// These values will make the calculation easier to read
double interestRate = iRate / 100d;
double i = interestRate / compoundType;
double n = compoundType * periods;
// Perform the necessary calculations
// double ratePerPeriod = interestRate / periods;
double futureValue = principal * Math.Pow(1 + i, n);
double interestEarned = futureValue - principal;
// Display the values in the appropriate text boxes
txtInterestEarned.Text = interestEarned.ToString("C");
txtFutureValue.Text = futureValue.ToString("C");
}
private void txtInterestEarned_MouseMove(object sender, MouseEventArgs e)
{
ssStatusBar.Items[0].Text = "The amount acculumated as interest.";
}
private void txtFutureValue_MouseMove(object sender, MouseEventArgs e)
{
ssStatusBar.Items[0].Text = "The total amount paied or accumulated at the end of the loan.";
}
private void btnClose_MouseMove(object sender, MouseEventArgs e)
{
ssStatusBar.Items[0].Text = "To end the application, click this button.";
}
private void btnClose_Click(object sender, EventArgs e)
{
Close();
}
}
}
 |
 |
 |
 |
| Control | (Name) | Text | Other Properties | |
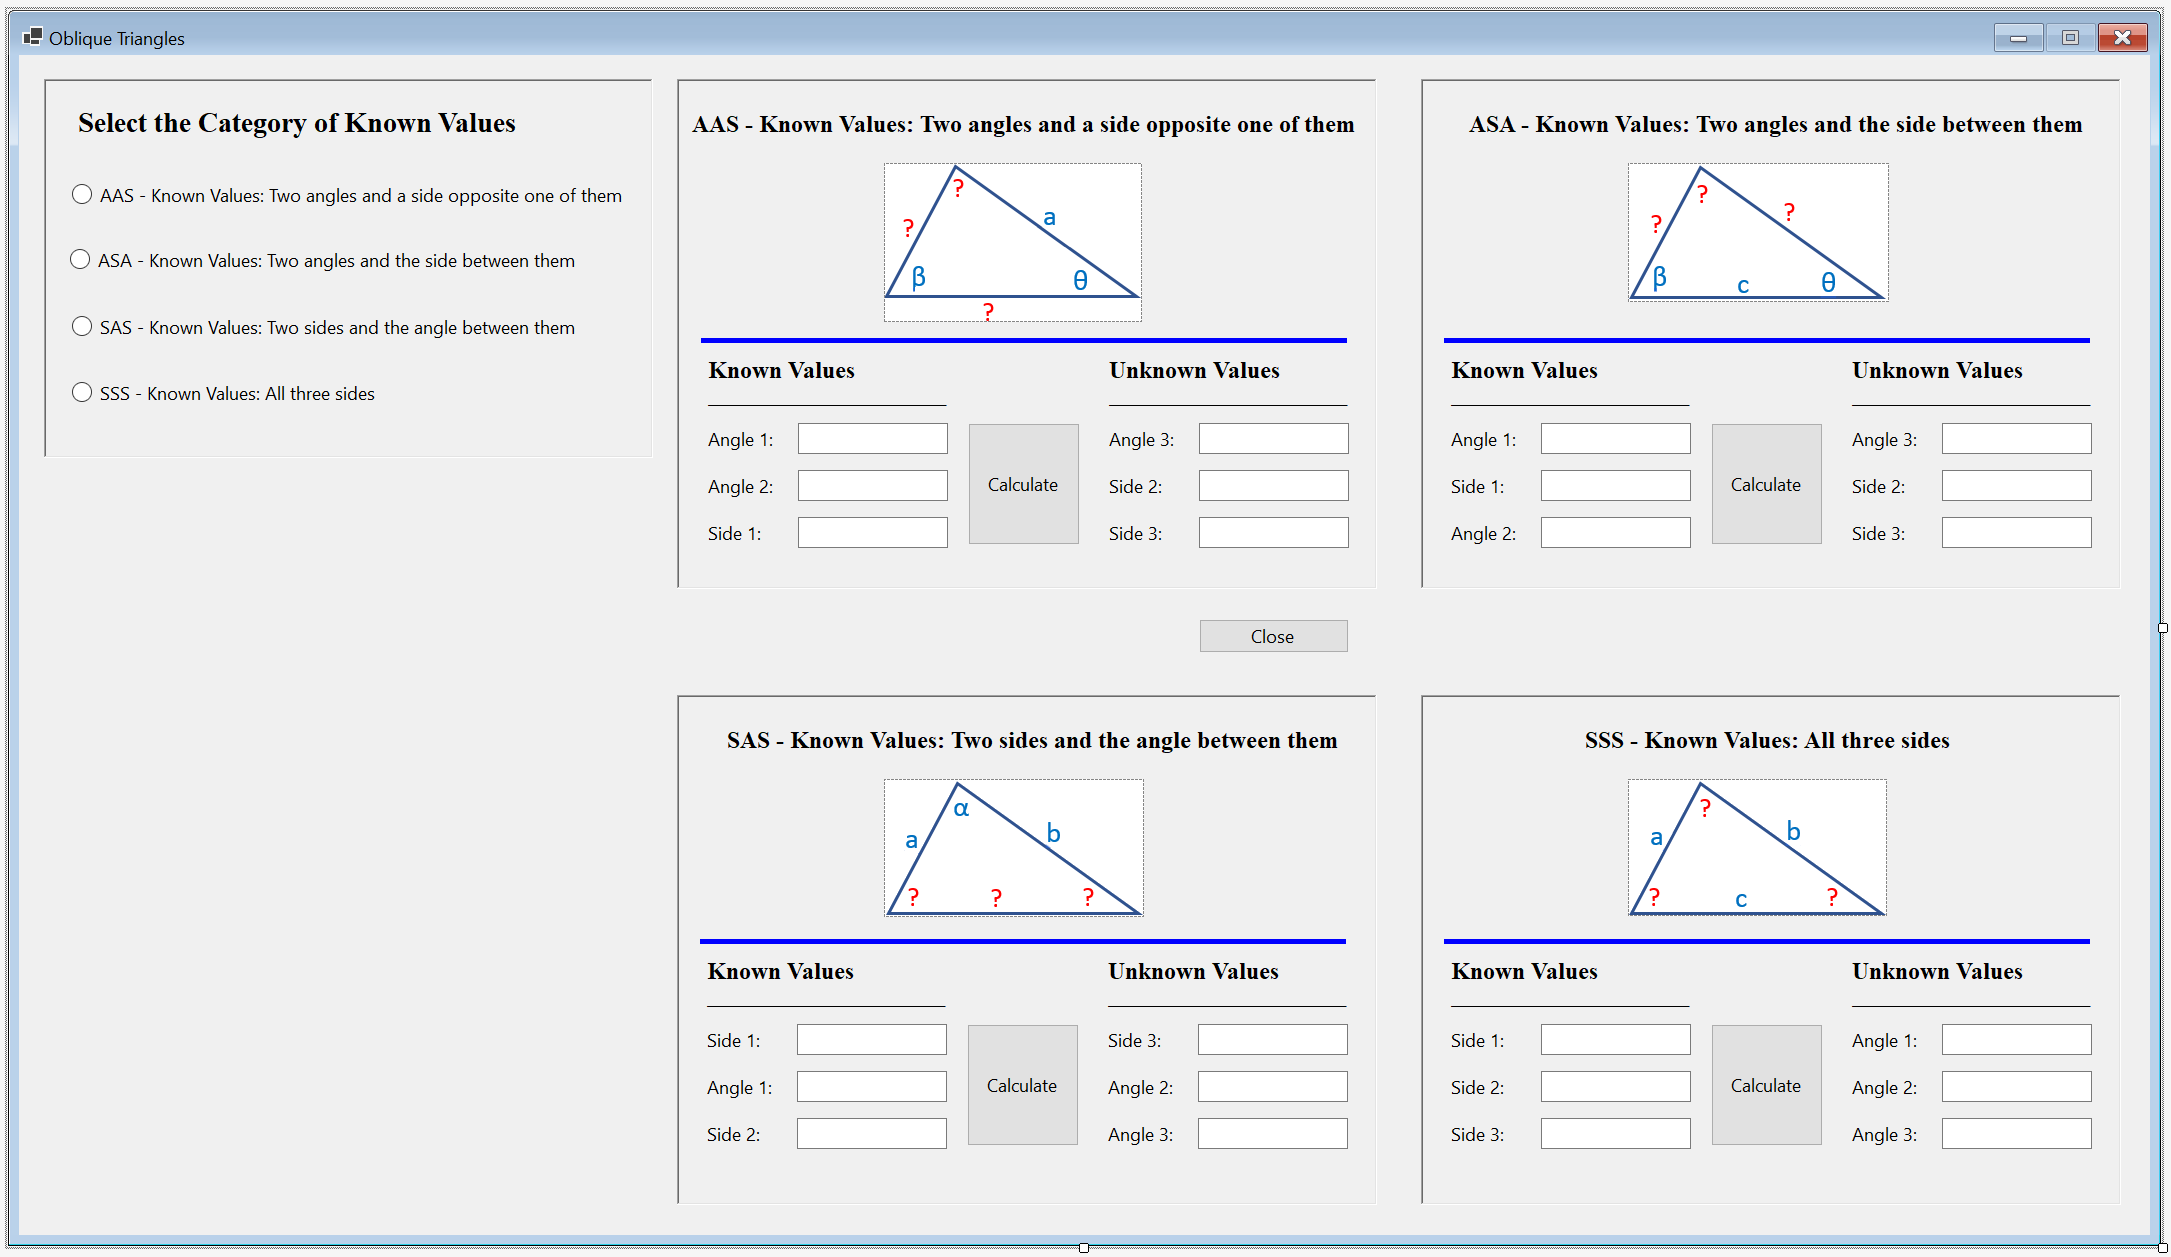
| Panel | pnlCategories | |||
| Label | Select the Category of Known Values | Font: Times New Roman, 9.75pt, style=Bold | ||
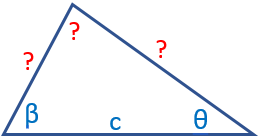
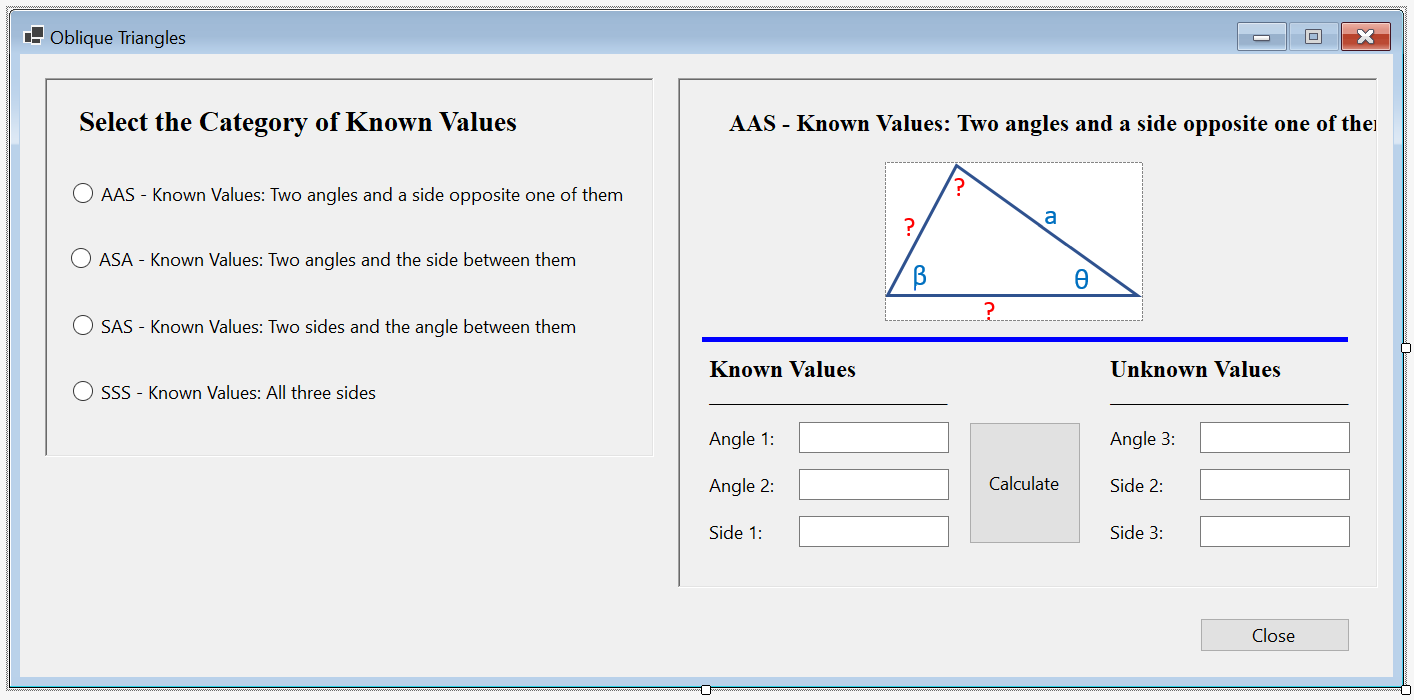
| RadioButton | rdoAAS | AAS - Known Values: Two angles and a side opposite one of them | ||
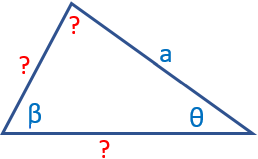
| RadioButton | rdoASA | ASA - Known Values: Two angles and the side between them | ||
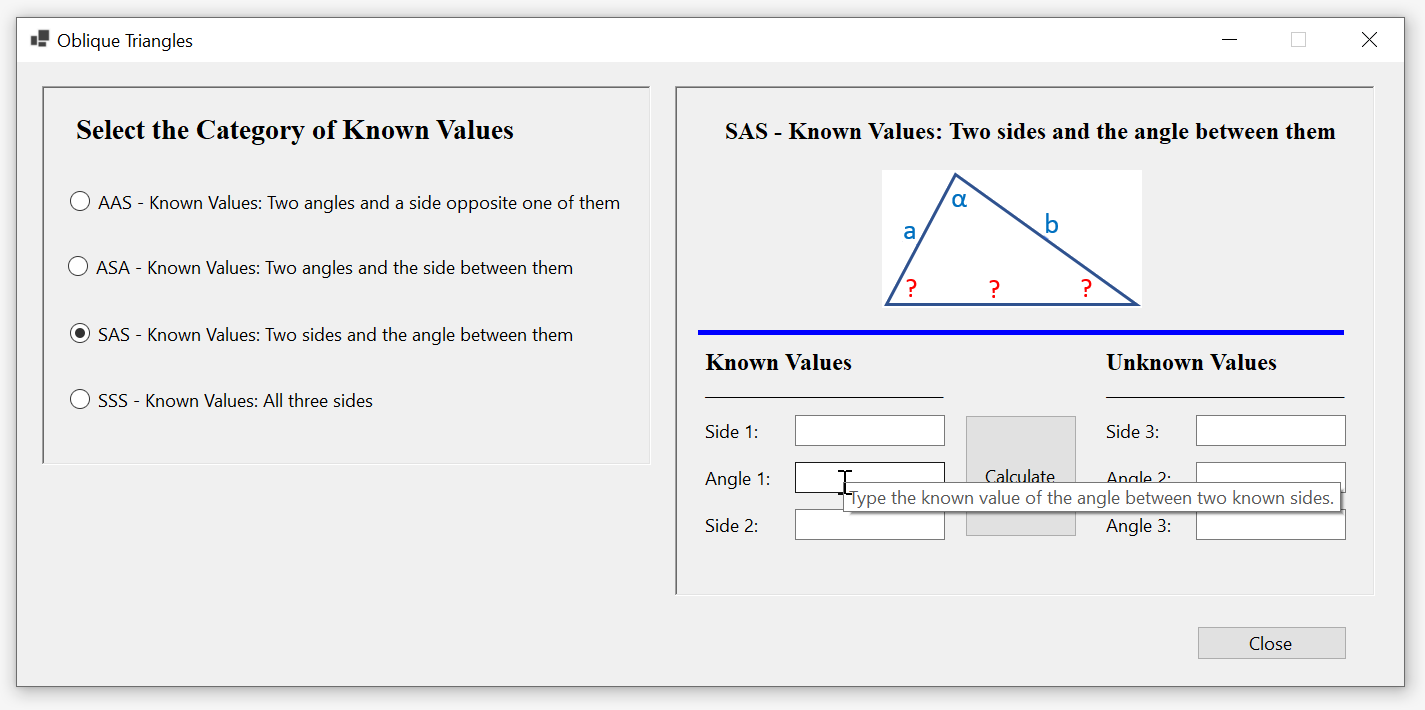
| RadioButton | rdoSAS | SAS - Known Values: Two sides and the angle between them | ||
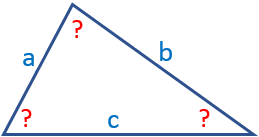
| RadioButton | rdoSSS | SSS - Known Values: All three sides | ||
| Panel | pnlAAS | |||
| PictureBox | pbxAAS | SizeMode: AutoSize | ||
| Label | BackColor: Blue AutoSize: False |
|||
| Label | Known Values | Font: Times New Roman, 12pt, style=Bold | ||
| Label | ______________________ | |||
| Label | Angle 1: | |||
| TextBox | txtAASAngle1 | TextAlign: Right | ||
| Label | Angle 2: | |||
| TextBox | txtAASAngle2 | TextAlign: Right | ||
| Label | Side 1 | |||
| TextBox | txtAASSide1 | TextAlign: Right | ||
| Button | btnAASCalculate | Calculate | ||
| Label | Unknown Values | Font: Times New Roman, 12pt, style=Bold | ||
| Label | ______________________ | |||
| Label | Angle 3: | |||
| TextBox | txtAASAngle3 | TextAlign: Right | ||
| Label | Side 2: | |||
| TextBox | txtAASSide2 | TextAlign: Right | ||
| Label | Side 3 | |||
| TextBox | txtAASSide3 | TextAlign: Right | ||
| Panel | pnlASA | |||
| PictureBox | pbxASA | Image: asa SizeMode: AutoSize |
||
| Label | Known Values | Font: Times New Roman, 12pt, style=Bold | ||
| Label | Angle 1: | |||
| TextBox | txtASAAngle1 | TextAlign: Right | ||
| Label | Angle 2: | |||
| TextBox | txtASAAngle2 | TextAlign: Right | ||
| Label | Side 1: | |||
| TextBox | txtASASide1 | TextAlign: Right | ||
| Button | btnASACalculate | Calculate | ||
| Label | Unknown Values | Font: Times New Roman, 12pt, style=Bold | ||
| Label | Angle 3: | |||
| TextBox | txtASAAngle3 | TextAlign: Right | ||
| Label | Side 2: | |||
| TextBox | txtASASide2 | TextAlign: Right | ||
| Label | Side 3: | |||
| TextBox | txtASASide3 | TextAlign: Right | ||
| Button | btnClose | Close | ||
| Panel | pnlSAS | |||
| PictureBox | pbxSAS | Image: sas SizeMode: AutoSize |
||
| Label | Known Values | Font: Times New Roman, 12pt, style=Bold | ||
| Label | Side 1: | |||
| TextBox | txtSASSide1 | TextAlign: Right | ||
| Label | Angle 1: | |||
| TextBox | txtSASAngle1 | TextAlign: Right | ||
| Label | Side 2: | |||
| TextBox | txtSASSide2 | TextAlign: Right | ||
| Button | btnSASCalculate | Calculate | ||
| Label | Unknown Values | Font: Times New Roman, 12pt, style=Bold | ||
| Label | Side 3: | |||
| TextBox | txtSASSide3 | TextAlign: Right | ||
| Label | Angle 2: | |||
| TextBox | txtSASAngle2 | TextAlign: Right | ||
| Label | Angle 3: | |||
| TextBox | txtSASAngle3 | TextAlign: Right | ||
| Panel | pnlSSS | |||
| PictureBox | pbxSSS | Image: sss SizeMode: AutoSize |
||
| Label | Known Values | Font: Times New Roman, 12pt, style=Bold | ||
| Label | Side 1: | |||
| TextBox | txtSSSSide1 | TextAlign: Right | ||
| Label | Side 2: | |||
| TextBox | txtSSSSide2 | TextAlign: Right | ||
| Label | Side 3: | |||
| TextBox | txtSSSSide3 | TextAlign: Right | ||
| Button | btnSSSCalculate | Calculate | ||
| Label | Unknown Values | Font: Times New Roman, 12pt, style=Bold | ||
| Label | Angle 1: | |||
| TextBox | txtSSSAngle1 | TextAlign: Right | ||
| Label | Angle 2: | |||
| TextBox | txtSSSAngle2 | TextAlign: Right | ||
| Label | Angle 3: | |||
| TextBox | txtSSSAngle3 | TextAlign: Right | ||
namespace ObliqueTriangles2
{
    public partial class ObliqueTriangles : Form
    {
        public ObliqueTriangles()
        {
            InitializeComponent();
        }

        private void ObliqueTriangles_Load(object sender, EventArgs e)
        {
            pnlSSS.Location = pnlSAS.Location = pnlASA.Location = pnlAAS.Location;
            rdoAAS.Checked  = true;
            rdoAAS_CheckedChanged(sender, e);
        }

        private void rdoAAS_CheckedChanged(object sender, EventArgs e)
        {
            pnlAAS.BringToFront();
        }

        private void rdoASA_CheckedChanged(object sender, EventArgs e)
        {
            pnlASA.BringToFront();
        }

        private void rdoSAS_CheckedChanged(object sender, EventArgs e)
        {
            pnlSAS.BringToFront();
        }

        private void rdoSSS_CheckedChanged(object sender, EventArgs e)
        {
            pnlSSS.BringToFront();
        }

        private void btnAASCalculate_Click(object sender, EventArgs e)
        {
            double angle1 = 0.00, angle2 = 0.00, side1 = 0.00;

            try
            {
                angle1 = double.Parse(txtAASAngle1.Text);
            }
            catch (FormatException)
            {
                MessageBox.Show("You must type a value for the lower left angle of the AAS shape.", "Obliques Triangles");
            }

            try
            {
                angle2 = double.Parse(txtAASAngle2.Text);
            }
            catch (FormatException)
            {
                MessageBox.Show("You must type a value for the lower right angle of the AAS shape.", "Obliques Triangles");
            }

            try
            {
                side1 = double.Parse(txtAASSide1.Text);
            }
            catch (FormatException)
            {
                MessageBox.Show("You must type a value for the right side of the AAS shape.", "Obliques Triangles");
            }

            // Here, we use the law of sines
            double angle3 = 180 - (angle1 + angle2);
            double side2  = side1 * Math.Sin(angle2 * Math.PI / 180) / Math.Sin(angle1 * Math.PI / 180);
            double side3  = side1 * Math.Sin(angle3 * Math.PI / 180) / Math.Sin(angle1 * Math.PI / 180);

            txtAASAngle3.Text = angle3.ToString();
            txtAASSide2.Text  = side2.ToString();
            txtAASSide3.Text  = side3.ToString();
        }

        private void btnASACalculate_Click(object sender, EventArgs e)
        {
            double angle1 = 0.00, side1 = 0.00, angle2 = 0.00;

            try
            {
                angle1 = double.Parse(txtASAAngle1.Text);
            }
            catch (FormatException)
            {
                MessageBox.Show("You must type a value for the lower left angle of the ASA shape.", "Obliques Triangles");
            }

            try
            {
                side1 = double.Parse(txtASASide1.Text);
            }
            catch (FormatException)
            {
                MessageBox.Show("You must type a value for the bottom side of the AAS shape.", "Obliques Triangles");
            }

            try
            {
                angle2 = double.Parse(txtASAAngle2.Text);
            }
            catch (FormatException)
            {
                MessageBox.Show("You must type a value for the lower right angle of the ASA shape.", "Obliques Triangles");
            }

            double angle3 = 180 - (angle1 + angle2);
            double side2  = side1 * Math.Sin(angle2 * Math.PI / 180) / Math.Sin(angle1 * Math.PI / 180);
            double side3  = side1 * Math.Sin(angle3 * Math.PI / 180) / Math.Sin(angle1 * Math.PI / 180);

            txtASAAngle3.Text = angle3.ToString();
            txtASASide2.Text = side3.ToString();
            txtASASide3.Text = side2.ToString();
        }

        private void btnSASCalculate_Click(object sender, EventArgs e)
        {
            double side1 = 0.00, angle1 = 0.00, side2 = 0.00;

            try
            {
                side1 = double.Parse(txtSASSide1.Text);
            }
            catch (FormatException)
            {
                MessageBox.Show("You must type a value for the left side of the SAS shape.", "Obliques Triangles");
            }

            try
            {
                angle1 = double.Parse(txtSASAngle1.Text);
            }
            catch (FormatException)
            {
                MessageBox.Show("You must type a value for the top angle of the SAS shape.", "Obliques Triangles");
            }

            try
            {
                side2 = double.Parse(txtSASSide2.Text);
            }
            catch (FormatException)
            {
                MessageBox.Show("You must type a value for the right side of the SAS shape.", "Obliques Triangles");
            }

            // Here, we use the law of cosines
            double side3 = Math.Sqrt((side1 * side1) +
                                     (side2 * side2) -
                                     (2 * side1 * side2 * Math.Cos(angle1 * Math.PI / 180)));
            double angle2 = Math.Acos(((side3 * side3) +
                                       (side2 * side2) -
                                       (side1 * side1)
                                      ) / (2 * side3 * side2)) * 180 / Math.PI;
            double angle3 = 180 - (angle1 + angle2);


            txtSASSide3.Text  = side3.ToString();
            txtSASAngle2.Text = angle2.ToString();
            txtSASAngle3.Text = angle3.ToString();
        }

        private void btnSSSCalculate_Click(object sender, EventArgs e)
        {
            double side1 = 0.00, side2 = 0.00, side3 = 0.00;

            try
            {
                side1 = double.Parse(txtSSSSide1.Text);
            }
            catch (FormatException)
            {
                MessageBox.Show("You must type a value for the left side of the SSS shape.", "Obliques Triangles");
            }

            try
            {
                side2 = double.Parse(txtSSSSide2.Text);
            }
            catch (FormatException)
            {
                MessageBox.Show("You must type a value for the right side of the SSS shape.", "Obliques Triangles");
            }

            try
            {
                side3 = double.Parse(txtSSSSide3.Text);
            }
            catch (FormatException)
            {
                MessageBox.Show("You must type a value for the bottom side of the SSS shape.", "Obliques Triangles");
            }

            // Here, we use the law of cosines
            double angle1 = Math.Acos(((side3 * side3) +
                                       (side2 * side2) -
                                       (side1 * side1)
                                      ) / (2 * side3 * side2)) * 180 / Math.PI;
            double angle2 = Math.Acos(((side3 * side3) +
                                       (side1 * side1) -
                                       (side2 * side2)
                                      ) / (2 * side3 * side1)) * 180 / Math.PI;
            double angle3 = 180 - (angle1 + angle2);


            txtSSSAngle1.Text = angle1.ToString();
            txtSSSAngle2.Text = angle2.ToString();
            txtSSSAngle3.Text = angle3.ToString();
        }

        private void btnClose_Click(object sender, EventArgs e)
        {
            Close();
        }
    }
}Tool Tips
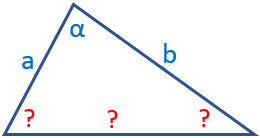
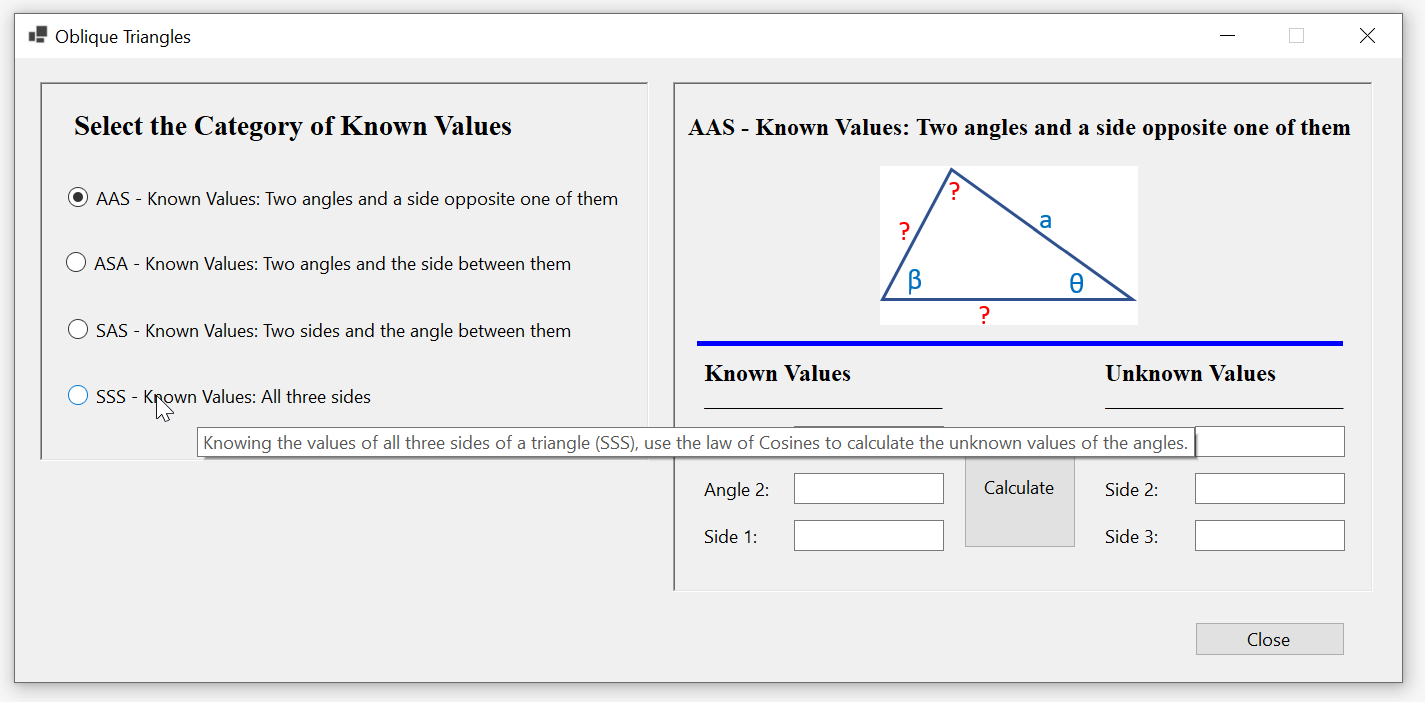
A tool tip is a small yellow box that displays a word or a group of words when the user positions the mouse on top of a control:

To create a tool tip system in a Windows Forms application, first add a ToolTip control to a form. After adding a ToolTip control, the form and all controls on it receive a new field in the Properties window. If the new ToolTip control is called ToolTip1, the new field in the Properties window for each control is ToolTip on ToolTip1. To display a tool tip for a control, first click it on the form. Then, in the Properties window, click ToolTip on ToolTip1, and type the desired tool tip.
![]() Practical Learning: Adding Tool Tips
Practical Learning: Adding Tool Tips
| Control | ToolTip On ttObliqueTriangles |
| rdoAAS | Selection to make if the value of one side, the angle oppsosite to that side, and another angle are known. The law of Sines is used to calculate the unknown values. |
| rdoASA | In this option, two angles are known. Also, the side between those angles is known. Use the law of Sines to find the unknown angle and the other two unknown sides. |
| rdoSAS | With SAS, the values of two sides and the angle between them are known. Use the law of Cosines to calculate the unknown side and the values of the other two angles. |
| rdoSSS | Knowing the values of all three sides of a triangle (SSS), use the law of Cosines to calculate the unknown values of the angles. |
| txtAASAngle1 | Value for one of the known angles |
| txtAASAngle2 | Value for one of the known angles |
| txtAASSide1 | Value for the known side |
| btnAASCalculate | Make sure you first provide the values for the known angles and the known side. |
| txtAASAngle3 | Calculated value for the unknown angle |
| txtAASSide2 | Calculated value for one of the unknown sides |
| txtAASSide3 | Calculated value for one of the unknown sides |
| txtASAAngle1 | In this ASA situation, type the value of one of the known angles. |
| txtASASide1 | In this ASA situation, type the value for the known side. |
| txtASAAngle2 | Type the value of the other known angle. |
| btnASACalculate | Make sure you provide the values for the known angles and the known side. |
| txtASAAngle3 | Calculated value for the unknown angle. |
| txtASASide2 | Calculated value for one of the unknown sides. |
| txtASASide3 | Calculated value for one of the unknown sides. |
| txtSASSide1 | Knowing the angle included in two known sides, type the value of one of the available sides. |
| txtSASAngle1 | Type the known value of the angle between two known sides. |
| txtSASSide2 | Enter the value of the second known sides. |
| btnSASCalculate | Make sure you first provide the values for the known sides and the known angle. |
| txtSASSide3 | Calculated value for the unknown side |
| txtSASAngle2 | Calculated value for one of the unknown angles. |
| txtSASAngle3 | Calculated value for one of the unknown angles. |
| txtSSSSide1 | All three sides are known. Type the value of one of them. |
| txtSSSSide2 | The values of all three sides must be available. Type one of them. |
| txtSSSSide3 | Enter the third known side |
| btnSSSCalculate | Make sure you first provide the values for the known sides |
| txtSSSAngle1 | Calculated value for one of the angles. |
| txtSSSAngle2 | Calculated value for one of the angles. |
| txtSSSAngle3 | Calculated value for one of the angles. |
| btnClose | Click here to close the form |
|
|
|||
| Previous | Copyright © 2004-2025, FunctionX | Monday 08 May 2023 | Next |
|
|
|||