The Form View
Introduction
Microsoft Access supports various types of views for
forms (and reports). One of them, the most regularly used as we have seen so
far, shows one record at a time. This is referred to as the Form View or the
Single Form.
To create a form view:
- On the Ribbon, click Create. In the Forms section:
- Click Form
- Click Blank Form
- Start the Form Wizard. After selecting the columns in the first step, in the second step, accept or select the Columnar option:

If the form exists already or if you are designing the form, in the Property Sheet of the form, click Format and set the Default View to Single Form:

 Practical
Learning: Introducing Form Views
Practical
Learning: Introducing Form Views
- Start Microsoft Access
- Click Blank Desktop Database
- Set the file name to Metro System1
- Click Create
- Leave the default table without closing it.
On the Ribbon, click Create
- In the Tables section, click Table Design
- Create the fields as follows:
| Field Name |
Field Size |
Caption |
| MetroLine |
10 |
Metro Line |
| Summary |
|
|
- In the top section of the window, right-click MetroLine and click Primary Key
- Right-click the table's tab and click Datasheet View
- When asked whether you want to save the table now, click Yes
- Set the table name to MetroLines and press Enter
- Create a few records as follows:
| MetroLine |
Summary |
| Red |
Connects Shady Grove to Glenmont, goes through DC, intersects with
Orange, Blue, Green, Yellow and Silver Lines. |
| Green |
Connects Greenbelt to Branch Ave, goes through DC, intersects with
Orange, Blue, and Silver Lines, tracks with Yellow Line. |
| Blue |
Connects Franconia-Springfield to Largo Town Center, on one part shares
tracks with Yellow Line, on another part shares tracks with Orange and
Silver Lines. |
| Yellow |
Connects Fort Totten to Huntington, on one part shares tracks with
Yellow Line, on another part shares tracks with Blue Line. |
| Orange |
Runs from Vienna to New Carollton, through DC, intersects with Green and
Yellow lines, shares tracks with Blue and Silver lines. |
- Close the table
- On the default table, double-click ID to edit it
- Type StationID and press Enter
- Right-click the table's tab and click Design View
- Set the table name to MetroStations and press Enter
- Complete the table as follows:
| Field Name |
Data Type |
Field Size |
Caption |
| StationID (Primary Key) |
|
|
Station ID |
| StationNumber |
Number |
|
Station # |
| StationName |
|
50 |
Station Name |
| MetroLine |
|
10 |
Metro Line |
| Location |
|
|
|
- Right-click the table's tab and click Datasheet View
- When asked whether you want to save the table now, click Yes
- Create a few records as follows:
| Station # |
Station Name |
Metro Line |
Location |
| 2014 |
Shady Grove |
Red |
Rockville, MD |
| 1862 |
Greenbelt |
Green |
Greenbelt, MD |
| 1862 |
Greenbelt |
Yellow |
Greenbelt, MD |
| 1660 |
Rockville |
Red |
Rockville, MD |
| 7940 |
Vienna/Fairfax-GMU |
Orange |
Fairfax, VA |
| 3940 |
College Park-U of MD |
Green |
College Park, MD |
| 2747 |
Largo Town Center |
Blue |
Largo, MD |
| 9722 |
Twinbrook |
Red |
Rockville, MD |
| 3940 |
College Park-U of MD |
Yellow |
College Park, MD |
| 9283 |
Prince George's Plaza |
Green |
Hyattsville, MD |
| 2938 |
Morgan Boulevard |
Blue |
Landover, MD |
| 9571 |
Dunn Loring-Merrifield |
Orange |
Vienna, VA |
- Close the table
- On the Ribbon, click Create
- In the Forms section, click Form Design
- Double-click the button at the intersection of the rulers
- In the Property Sheet, click Data and click Record Source
- In the Record Source, select MetroLines
- Save the form as MetroLines
- In the Tools section of the Ribbon, click Add Existing Fields
- In the Field List, double-click LineName
- Double-click Summary
- Design the form as you see fit. Here is an example:

- Close the form
- When asked whether you want to save, click Yes
Charateristics of a Form View
A form should have a tab or a title bar. If you want to allow the user to select one
or more records, the form view should have a record selector, which is controlled by the Record Selectors
property.
A form behaves like a wizard, which is a windows made of contiguous pages that
follow one another. As we know already, to move from one record to another, the user can click the
navigation buttons in the bottom part of the form.
A Form for Data Entry
To create a new record, the user can click the New (Blank) Record button and start
typing. Microsoft Access provides an alternative that allows you to present a ready-made form to
the for data entry only. The most important characteristics of this form is that its Data Entry
field in the Property Sheet must be set to Yes.
To create a form specially made for data entry, start or display a form in
Design View. In the Property Sheet, set the following characteristics:
- Record Source: Set it to the table that holds the records
- Navigation Buttons: Set this property to No because the user will not need to
move back and forth among records
- Data Entry: This is the most important property for this purpose. Its default value
is No. For a data entry form, set this property to Yes
Introduction to the Tabular Form
Overview
A tabular form displays its data in rows, that is, many records in the same view:

Actually, a tabular form displays its record in a section. Instead of showing one
record at a time, the form can show as many records as its size allows. Here is an example:

This type of form is referred to as continuous because the records are displayed
continuously in the same view. If the number of records is not too high, all of
them would display. If there are more records than the form's size can allow to
view, some records would be hidden. To view them, you can use the scroll bars.
Introduction to Creating a Tabular Form
To create a tabular form:
- On the Ribbon, click Create. In the Forms section, click More Forms, and click Multiple Items
- Start the Form Wizard. After selecting the columns in the first step, in the second step, click the Tabular option
If the form exists already or if you are designing the form, in the Property Sheet
of the form, click Format and set the Default View to Coontinuous Forms

Creating a Tabular Form from Juxtaposed Controls
A tabular form has its controls positioned next to each other
in their respective sections. This means that they appear like cells of a table.
Instead of adding and positioning them manually, Microsoft Access provides faster
means. To proceed, select the control. Then, in the Table section of the
Arrange tab of the Ribbon, click Tabular
 .
.
To select the controls of a juxtaposed group, click one of them and click the
cross cursor on the left. As an alternative, click one of the controls. On the Ribbon, click
Arrange and use the buttons in the Rows & Column section.
Practical
Learning: Creating a Tabular Form from Juxtaposed Controls
- On the Ribbon, click File and click Open
- In the list of files, click StatesStatistics1
- On the Ribbon, click Create
- In the Forms section, click Form Design
- Double-click the button at the intersection of the rulers.
In the
Property Sheet, click the All tab
- Change the following characteristics:
Caption: States Statistics - Summary
Record Source: States
Default View: Continuous Forms
- To save the form, press Ctrl + S
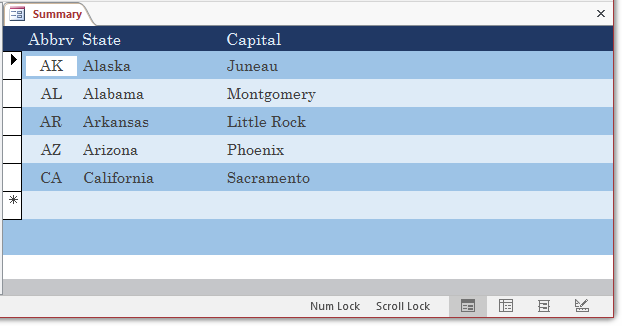
- Set the form name as Summary and press Enter
- In the Tools section of the Ribbon, click Add Existing Fields
- In the Field List, click Abbreviation
- Press and hold Shift
- Click Capital
- Release Shift
- Drag the selection to the form

- On the Ribbon, click Arrange
- Make sure all controls are selected on the form.
In the Table section, click Tabular

- In the Form Header section, click the square button and hold your mouse down

- Drag the selected controls to the left so that the group aligns with the left border of the form

- Click an unoccupied area of the form to dismiss the selection
- In the Detail section, click and drag Abbreviation up to position it just under the Detail bar

- Press Ctrl + A to select all controls on the form
- In the Table section of the Arrange tab of the Ribbon, click the Remove Layout button

- Resize the Detail section to be just enough for the controls on the form
- In the Form Footer section, drag the bottom border completely up

- Change the caption of the Abbreviation label (you can click it, then
click it again to put it into edit mode) to Abbrv
- Change the caption of the StateName label to State
- Resize the abbreviations label and text box to be just wide enough for
the Abbreviation label
- Resize the state label and the text box to be enough to accommodate the
widest name of a state
- On the form,. click the Form Header bar
- On the Ribbon, click Home
- In the Text Formatting section, click the down-pointing arrow of the Background Color
and select Blue, Accent 5, Darker 50% (Theme Colors: 9th column, 6th row)
- Click inside the vertical ruler on the left of the Form Header section
to select
all labels
- In the Home tab of the Ribbon, click the
arrow of the Font combo box and select Century (if you don't have that font,
select Times New Roman)
- Click the arrow of the Font Size
combo box and select 12
- Click the arrow of the Font Color button and select Blue, Accent 1, Lighter
80% (Theme Colors: 5th column, 2nd row)

- Click inside the vertical ruler on the left of the Detail section
to select
all text boxes
- On the Ribbon, click Format
- Click the
arrow of the Font combo box and select Century (if you don't have that font,
select Times New Roman)
- In the Control Formatting section, click the arrow of the Shape Fill
button and click Transparent
- In the Control Formatting section, click the arrow of the Shape Outline
button and click Transparent:
- Click the Detail bar
- In the Font section of the Format tab of the Ribbon, click the arrow
of the Background Color and select
Blue, Accent1, Lighter 40% (Theme Colors: 5th column, 4th row)

- Save the form
Characteristics of a Tabular Form
Introduction
A tabular form has some characteristics that set it apart from the Form View.
For example, a tabular form should (must) have a form header and a Detail section. It can also
have a form footer section. When desining the form, you should (must) put the labels of the
controls in the form header.
The Record Selectors
On a tabular form, the record selector is the box on the
left side of each individual record. This means that the view of the form can
display many record selectors, one for each record:

The Alternate Color
An alternate color is one that displays in every other record.
For example, if you create a tabular form or report, you can make all rows show their backgrounds in the
same color. Here is an example:

To make even rows show their background in one color
and odd rows show their background in another color, first set the background color
as seen in the previous section. For the alternate color, display the form or
report in Design View. On the Ribbon, click Format:
- In the Background section of the Ribbon, click the arrow of the Alternate Row
Color button and proceed to select or create a color:

- Right-click the Header bar or an empty area in the header section,
position the mouse on Alternate Fill/Back Color and select a color from the
window

- Access the Property Sheet of the header section. In the Format or the
All tab, click the Alternate Back Color field. Use either the arrow of the
combo box to select a color by name or use the ellispsis button to select color
by viewing it:

Here is an example:

Practical Learning:
Setting the Alternate Color
- On the form, click the Detail bar if necessary.
In the Font section of the Format tab of the Ribbon, click the arrow
of the Alternate Row Color button and select
Blue, Accent1, Lighter 80% (Theme Colors: 5th column, 2nd row)
- To preview the form, on the right side of the status bar, click the Form
View button
 :
:

- Save the form
- After viewing the form, on the right side of the status bar, click the Design View
button

The Navigation Buttons
Remember that all records of a tabular form displayin the same
view. For this reason, when desigging the form, you should set its Navigation Buttons
to No.The lower left section of a form displays the same navigation buttons
as the table: the First Record button  ,
the Previous Record button
,
the Previous Record button  ,
the Current Record text box
,
the Current Record text box  ,
the Next Record button
,
the Next Record button  ,
the Last Record button
,
the Last Record button  ,
and the New (Blank) Record button
,
and the New (Blank) Record button 
Unlike the table, the form does not require the navigation buttons. To
let you display or hide the navigation buttons, the Property Sheet of the form
is equipped with the Navigation Buttons property.
Practical Learning: Hiding the Navigation Buttons of a Form
- Double-click the button at hte intersection of the rulers.
In the
Property Sheet, click the Format tab
- In the Property Sheet, double-click Navigation Buttons to set its value to
No
- To preview the form, right-click the Central tab and click the Form
View button
- Close the form
- When asked whether to save the changes, click Yes
- On the Ribbon, click File and click Open
- In the list of files, click FunDS1 from the
previous lesson
- On the Ribbon, click Create
- In the Forms section, click Form Design
- Right-click the form and click Form Header/Footer
- Double-click the button at the intersection of the rulers.
In the Property Sheet, click the All tab and change the following properties:
Record Source: StoreItems
Caption: Fun Department Store - Store Items
Default View: Continuous Forms
Navigation Buttons: No
- Save the form as StoreItems
- In the Tools section of the Ribbon, click Add Existing Fields
- In the Field List, double-click ItemNumber, Manufacturer, Category, SubCategory, ItemName, and ItemSize
- On the form, right-click the left ItemSize (the label) and click Cut
- Right anywhere in the Form Header section and click Paste
- Move the label to the right side to make room
- In the same way, cut the other labels from the Detail section, paste them in the Form Header section
- Design the form as follows:

- To preview the form, right-click its title bar and click Form View
- Create the following records:
| Item # |
Manufacturer |
Category |
Sub-Category |
Item Name |
Item Size |
| 290699 |
Ralph Lauren |
Women |
Shoes |
Whip Snake Print Perfect |
6.5 |
| 379367 |
Calvin Klein |
Men |
Shoes |
Hervey Square-Toe Leather |
11 |
| 746827 |
|
Women |
|
Oyster Long Satin Nightgo |
|
| 388729 |
AK Anne Klein |
Women |
Shoes |
Claw Buckle-Detail Wedge |
1 |
| 668156 |
Ralph Lauren |
Girls |
Dresses |
Girls 2-6x Casey Cotton T |
4/4T |
| 345500 |
Calvin Klein |
Women |
Skirts |
Petite Crossing Paths Pri |
12 |
| 430669 |
Kenneth Cole New York |
Women |
Jewelry |
Goldtone Beaded Double-Dr |
|
| 426643 |
Calvin Klein |
Men |
Accessories |
Knit Scarf |
|
| 136843 |
AK Anne Klein |
Women |
Watches |
Ladies White Ceramic Crys |
|
| 366154 |
Coach |
Girls |
Dresses |
Girls 2-6X Cotton Tiered |
6X |
| 735312 |
Cole Haan |
Women |
Watches |
Ladies Black Python-Embos |
|
| 388663 |
Lauren by Ralph Lauren |
Women |
Belts |
Braided Leather Belt |
Medium |
| 441180 |
Ralph Lauren |
Girls |
Shirts |
Girls 2-6X Short-Sleeved |
3/3T |
| 211771 |
Ralph Lauren |
Women |
Dresses |
Petite Knit Tweed Short S |
12 |
| 545127 |
Calvin Klein |
Men |
Shoes |
Suede Desert Boots |
9.5 |
| 239679 |
Lauren by Ralph Lauren |
Women |
Dresses |
Sleeveless Shimmer Dress |
6 |
- Close the form
- When asked whether you want to save the form, click Yes
Datasheet Forms
Introduction
A datasheet form displays exactly like a table. To create a datasheet form:
- On the Ribbon, click Create. In the Forms section, click More Forms, and click Datasheet
- Start the Form Wizard. After selecting the columns in the first step, in the second step, click the Datasheet option
You can also display any form in Datasheet View. To do this:
- If the form is currently displaying in Form View
- Right-click somewhere on the form (either its tab/title bar or any
part of its body), and click Datasheet View
- On the Ribbon, click Home. In the Views section (on the left side of
the Ribbon), click the arrow button under View, and click Datasheet View

- On the status bar, click the Datasheet View button

On a datasheet form, the record selector is the same as for
a table in datasheet view.
Characteristics of a Datasheet Form
A datasheet form is primarily designed like a Form View. This means that
during designs, you can include the form header and the footer sections. You can then add the
controls as you see fit. When the form displays, only the controls of the Detail section will
display. This is not an anomaly but made by design. For example, you can add controls in the
form footer section so that those control would hold values that you are aware of and can use
in your expressions but the user doesn't need to see such values or controls.
A Split Form
A split form is made of two sections:

To automatically generate a split form, in the Navigation Pane, click
the table that holds the records. Then, on the Ribbon, click Create. In the Forms section,
click Split Form. To create a split form by design, start a form in Design View or display
an existing form in Design View. In the Property Sheet of the form, set its Record Source
to the table that holds the value andset its Default Value to Split Form. If it is a brand
new form without some previously created fields, use the Field List to add the desired
fields to it.
Sub-Forms (and Sub-Reports)
Introduction
A sub-form (or a sub-report) is a form (or a report) that is position
on the body of another form (or another report). In order to "include" one form
(or report) into another form (or report), both objects must have a relationship. The form
(or report) that is hosting the other form (or the other report) is the parent and has
(or must have) a primary key. The form (or report) that is added to the parent is called
the child form (or child report) and must have a foreign that will communicate with the
primary key of the parent table.
Microsoft Access Automatic Sub-Forms
Microsoft Access provides various techniques you can use to create a
sub-form. The simplest technique consists of using a wizard. To generate a form that
contains a sub-form, start the Form Wizard. In the first page of the wizard, in the
Tables/Queries combo box, select the parent object and, in the Available Fields list,
select the fields you want to display on the form. Then, in the Tables/Queries combo box
again, select the child list. In the Available Fields list, select the fields that the
sub-form should display. Continue with the wizard. In the second page, you must be able
to identify the relationship that will control the link between both lists. In other
words, you must be able to identify the primary key from the parent table and the
foreign key from the child table. Once this is clear, you can continue. In the third
page of the wizard, you will decide how you want the subform to display, as a tabular
list or as a datasheet. After making this decision, you can continue.
Practical Learning: Automatically Creating an Auto-Subform
- On the Ribbon, click File and click Open
- In the list of files, click VideoCollection1
- On the Ribbon, click Create
- In the Forms section, click Form Wizard
- In the Tables/Queries combo box, select Table: Directors
- In the Available Fields list box, double-click Director

- In the Tables/Queries combo box, select Table: Videos
- In the Available Fields list box, double-click the following fields to select them: Title,
CopyrightYear, Length, and Rating

- Click Next
- In the second page, make sure by Directors
is selected (if not, click it)

Click Next
- In the 3rd page, click the Tabular radio button

- Click Next
- In the 4th page of the wizard, accept the name of the (main) form as
Directors.
Change the name of the subform to sfVideos

- Click Finish

- After viewing the form, close it
Sub-Forms and Sub-Report Design
The alternative to the Form Wizard is to design your own sub-form or sub-report. You have
various options:
- You can create a form using the Form Wizard, then design a separate
sub-form and add it to the form
- You can create both the form and its sub-form using the Form Wizard, then
modify their designs
- You can design both the form and the sub-form separately, then join them
A sub-form can be created as a tabular form. To use a tabular form as
sub-form, its record source must include a foreign key that corresponds to the primary
key of the record source of the hosting form.
Practical Learning: Creating and
Using a Sub-Form
- On the Ribbon, click File and click Open
- In the list of files, click Metro System1
- On the Ribbon, click Database Tools
- In the Relationships section, click the Relationships button

- In the Show Table dialog box, double-click MetroLines
- Double-click MetroStations
- Close the Show Table dialog box
- Drag MetroLine from MetroLines and drop it on MetroLine in MetroStations
- In the Edit Relationships dialog box, make sure MetroLine is selected in both combo boxes and click Create

- Close the Relationships window
- When asked whether you want to save the changes, click Yes
- On the Ribbon, click File and click Open
- In the list of files, click Ceil Inn1 from the
previous lesson
- On the Ribbon, click Create
- In the Forms section, click Form Design
- Right-click the form and click Form Header/Footer
- Double-click the button at the intersection of the rulers
- In the Property Sheet for the form, click the All tab and change the following properties:
Record Source:
Occupancies
Default View: Continuous Forms
Width: 6.5
Navigation Buttons:
No
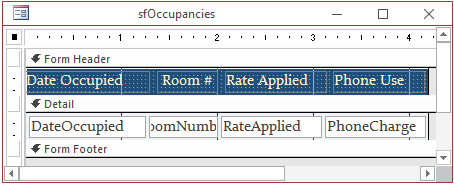
- Save the form as sfOccupancies
- In the Tools section of the Ribbon, click Add Existing Fields

- In the Field List, double-click DateOccupied, RoomNumber, RateApplied, and
PhoneUse
- Click an unoccupied area of the form to dismiss the selection
- On the form, right-click the left Location (the label) and click Cut
- Right-click the area under Form Header and click Paste
- Move the label to the right side
- In the same way, move the labels from the Detail section to the Form Header section
- Position the labels so you can see them and complete the design of the sub-form as you like. Here is an example:
- Close the form
- When asked whether you want to save the changes, click Yes
- In the Navigation Pane, right-click the Customers form and click Design View
- In the Navigation Pane, drag sfOccupancies and drop it on the form
- Complete the design of the form as you see fit. Here is an example:

- Save and close the sub-form
- On the Ribbon, click File and click Open
- In the list of files, click FunDS1
- On the Ribbon, click Create
- In the Forms section, click Form Design
- Right-click the form and click Form Header/Footer
- Double-click the button at the intersection of the rulers.
In the Property Sheet, click the All tab and change the following properties:
Record Source: SoldItems
Default View: Continuous Forms
Navigation Buttons: No
- Save the form as sfSoldItems
- In the Tools section of the Ribbon, click Add Existing Fields
- In the Field List, double-click SoldItemID, ItemNumber, ItemName, and ItemSize
- On the form, right-click the left ItemSize (the label) and click Cut
- Right anywhere in the Form Header section and click Paste
- Move the label to the right side
- In the same way, cut the other labels from the Detail section, paste them in the Form Header section
- Design the form as follows:

- Close the form
- When asked whether you want to save the form, click Yes
A Datasheet as a Sub-Form
A sub-form can be presented as a datasheet, in which case it would display exactly like a table, a series of columns and cells.
Practical Learning: Using a Datasheet as a Sub-Form
- On the Ribbon, click File and click Open
- In the list of files, click Road System1
- On the Ribbon, click Create
- In the Forms section, click Form Design
- Double-click the button at the intersection of the rulers
- In the Property Sheet for the form, click the All tab and change the following properties:
Record Source: to Intersections
Default View: Datasheet
Navigation Buttons: No
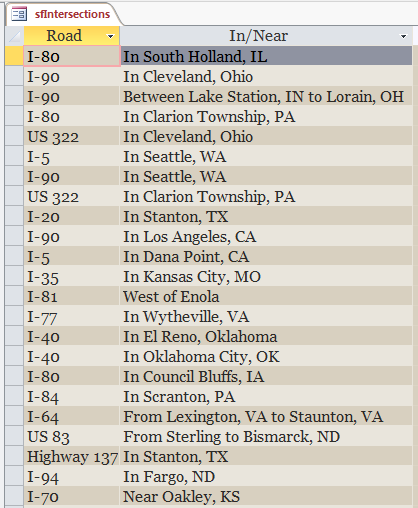
- Save the form as sfIntersections
- In the Tools section of the Ribbon, click Add Existing Fields
- In the Field List, double-click Road2
- Double-click InNear
- On the form, remove 2 from the left Road2 (the label) to display Road
- Change the caption of the left InNear (the label) to display In/Near

- In the Design View of the Ribbon, in the Views section, click the View button
- Double-click the right border of the In/Near column to make it fit the widest text
- Using the buttons in the Formatting section of the Datasheet tab and the buttons
in the Text Formatting section of the Home tab of the Ribbon, design the datasheet
as you see fit. Here is an example:
- Close the datasheet sub-form
- When asked whether you want to save the changes, click Yes
Dialog Boxes
Introduction
A dialog box is a rectangular object that is used to host or carry other controls:

Creating a Dialog Box
To create the dialog box, start a form in Design View. To convert an existing form into a dialog box, set its
Border Style property value to Dialog:

This reduces the system buttons to the Close button only.
There are two types of dialog boxes: modal and modeless.
Practical Learning: Creating a Modal Dialog Box
-
On the Ribbon, click Create and, in the Forms section, click Form Design
- Double-click the button at the intersection of the rulers to access
its properties.
In the Property Sheet, click the Format tab and click Border Style
- Click the arrow of the
Border Style field and select Dialog
-
Switch the form to Form View to preview
-
Switch it back to Design View
-
To complete the dialog box, in the Format tab of the Property Sheet, change the following properties:
Auto Center: Yes
Record Selectors = No
Navigation Buttons = No
Modal Dialog Boxes
A dialog box is characterized as modal if the user must close it before continuing with another task on the same application.
Modeless Dialog Boxes
A dialog box is referred to as modeless if the user does not have
to close it in order to continue using the application that owns the dialog box. To create a modeless dialog box, or to convert a form into
a modeless dialog box, in Design View, set the Popup property (Other and All
tabs) to Yes.
Practical Learning: Creating a Modeless Dialog Box
- The dialog box should still be opened in the Design View.
To make it a modeless dialog box, in the Property Sheet, click the Other tab.
Double-click Pop Up to change its value from No to Yes
- Close the form
- When asked whether you want to save, click No
A Message Box
Introduction
A message box is a smaller and simpler version of a dialog box. It is used to display a piece of
information to the user. The message box is equipped with a button the user can click to dismiss the message box.
Creating a Message Box
Unlike a form or a dialog box, a message box is not designed. Instead, to create a message box,
you use MsgBox() (in the next lesson, we will see where you can type it. In the parentheses, enter the message
you want to display. Obviously the message is provided as t3ext. Therefore it should be included inside double-quotes.
Practical Learning:
Ending the Lesson
- Close Microsoft Access
