 |
Introduction to Categories of Windows Controls |
|
Label-Based Controls
Introduction
A label is a simple control that displays text in a form
or a report. A label provides static text that the user cannot change.
Microsoft Access various objects used to add a label to a form or a report.
 Practical Learning: Introducing
Labels Practical Learning: Introducing
Labels
- Start Microsoft Access
- From the resources that accompany these lessons, open the Ceil Inn1
database
- In the Navigation Pane, right-click the Occupancies form and click Open
- After viewing the form, in the Views section of the Ribbon, click the button under View and click Design View
The Label Control
The most basic control used to display text on a form or report is
the Label control. To add a label to a form or report, in the Controls section of the
Design tab of the Ribbon, click Label
 and click the desired area in the form or the report. Type the text that the label will display.
Probably the most important and the most obvious characteristic of a label
is the text it displays. The text is the label's caption. If you click the Label control
 on the Ribbon
and click the form or report, you must first define its caption. This is done by
immediately typing text. If a label already has text, you can edit it. You can
double-click it to access its Property Sheet and edit the text in the Caption field.
On the other hand, to edit the caption of a label, on the form or report, click
inside the label. That would put it into edit mode and you can edit it as you wish. on the Ribbon
and click the form or report, you must first define its caption. This is done by
immediately typing text. If a label already has text, you can edit it. You can
double-click it to access its Property Sheet and edit the text in the Caption field.
On the other hand, to edit the caption of a label, on the form or report, click
inside the label. That would put it into edit mode and you can edit it as you wish.
 Practical Learning: Creating a Label Practical Learning: Creating a Label
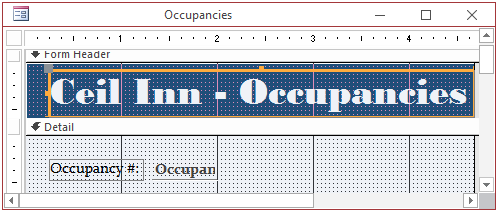
- In the Controls section of the Design tab of the Ribbon, click Label

- On the form, click under the Form Header bar
- Type Ceil Inn - Occupancies and press Enter
- On the Ribbon, click Home
- Using the tools in the Text Formatting section of the Ribbon, configure the label as follows:
Font: Bodoni MT (if you don't have that font, select Garamond)
Font Size: 28
Font Color: Light Blue 1 (Standard Colors: 5th column - 2th row)
- To resize the label, position the mouse on one of the handles surrounding the label and
double-click
- On the form, right-click the label you had created and click Copy
- In the Navigation Pane, right-click the Customers form and click Design
View
- Right-click unuder the Form Header bar and click Paste
- Change the text to Ceil Inn - Customers and position it like the other
- On the Ribbon, click File and click Open
- In the list of files, click FunDS1
- On the Ribbon, click Create
- In the Forms section, click Form Design
- Right-click the body of the form and click Form Header/Footer
- In the Property Sheet, click the All tab and change the following
properties:
Record Source: ShoppingSessions
Caption: Fun Department Store - Shopping Sessions
- Save the form as ShoppingSessions
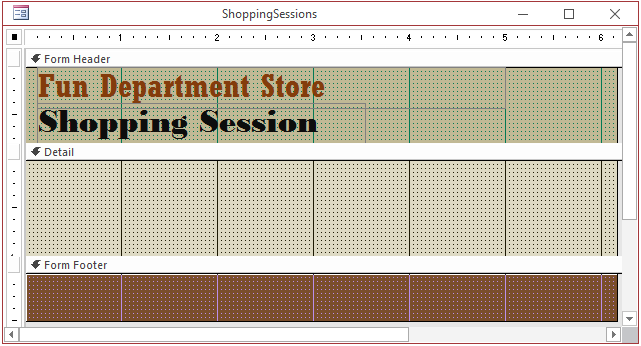
- In the Controls section of the Ribbon, click the Label and click under
the Form Header bar of the form
- Type Fun Department Store and press Enter
- In the Controls section of the Ribbon, click the Label
 and click under
the previous label on the form and click under
the previous label on the form
- Type Shopping Session and press Enter
- Complete the design as follows:
- In the Navigation Pane, right-click the StoreItems form and click Design
View
- In the Controls section of the Ribbon, click the Label and click under
the Form Header bar of the form
- Type Fun Department Stores - Store Items and press Enter
- Complete the design as follows:

- In the Navigation Pane, right-click the Employees form and click Design
View
- In the Controls section of the Ribbon, click the Label and click under
the Form Header bar of the form
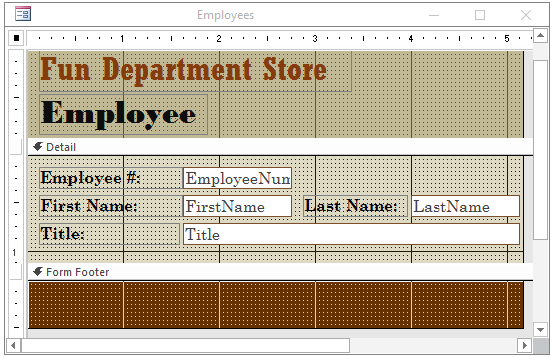
- Type Fun Department Store and press Enter
- In the Controls section of the Ribbon, click the Label and click under
the Form Header bar of the form
- Type Employee and press Enter
- Complete ethe design as follows:
- On the Ribbon, click File and click Open
- From the resources that accompany these lessons, open the Altair Realtors1
database
- When asked whether you want to save, click Yes each time
The Title Label
We know that a label can be used to create a title for a form or a report.
Microsoft Access provides a faster means of creating a title. This is
done using the Title control
 . When you use it, Microsoft Access retrieves the name
of the form, creates a label, and uses the name of the form as caption. . When you use it, Microsoft Access retrieves the name
of the form, creates a label, and uses the name of the form as caption.
Instead of going through the label to get a title, to
formally create a title, in the Controls section of the Design tab of the Ribbon, click the Title
control
 and click the form or report. When you click the form or report, if it did not
have the right header section, that section would be added to the form or
report. If it had the section, that section would be
used. The new label with the name of the form as caption would be added to
the header section.
When you create a Title label, Microsoft Access uses
some default characteristics, such as the font name and size, and apply them
to the label. Of course, you can change any of the characteristics, including
the caption of the title.
 Practical Learning: Adding
a Title Practical Learning: Adding
a Title
- In the Navigation Pane, double-click the Properties form to view it
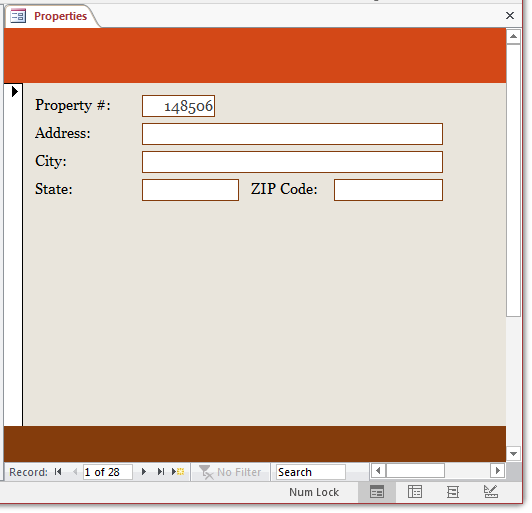
- After viewing the form, right-click its tab and click Design View
- In the Header / Footer section
of the Ribbon, click Title

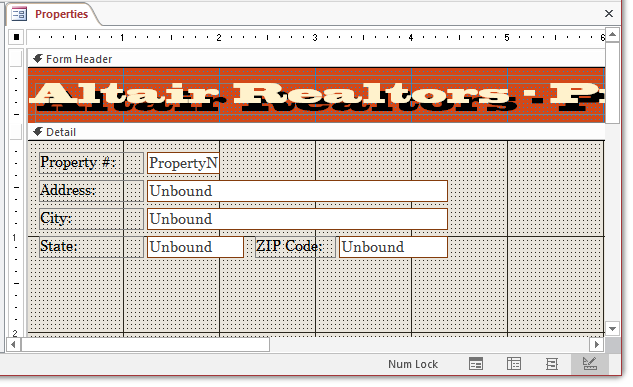
- As the label is still blinking, type Altair Realtors - Properties
and press Enter

- On the Ribbon, click Arrange
- In the Table
section of the Ribbon, click Remove Layout
- In the Property Sheet, click Format and click Add
- Change the following properties:
Name: lblTitleShadow
Top: 0.1667
Left: 0.0833
Font Name: Blackoak Std (if you don't have that font, select Georgia)
Font Size: 20
Fore Color: Text 1 (Theme Colors: 1st column, 2nd row)
- Double-click one of the points around the selected title:

- Right-click the title and click Copy
- Press Ctrl + V
- While the new title is still selected, in the Property Sheet, change the following properties:
Name: lblGoldTitle
Top: 0.0833
Left: 0
Fore Color: Accent 4, Lighter 80% (Theme Colors: 8th column, 2nd row)
- Close the form
- When asked whether you want to save, click Yes
- On the Ribbon, click File and click Open
- In the list of files, click Ceil Inn1
- On the Ribbon, click Create
- In the Forms section, click Form Design
- Double-click the button at the intersection of the rulers
- In the Property Sheet, click the Format tab and change the following characteristics:
Caption: Ceil Inn - Switchboard
Width: 6.25
Auto Center: Yes
Record Selectors: No
Navigation Buttons: No
- Click the body of the form to select the Detail section
- In the Format tab of the Ribbon, click Height and type 4.85
- To save the form, press Ctrl + S
- Set the file name as Switchboard and click OK
- Close the Switchboard form
The Date and Time
When displaying a form or report, if you want to show the current date and/or time, display
the form or report in Design View. In the Controls section of the Ribbon, click Date and Time
 and click the form
or report. The Date and Time dialog box would come up: and click the form
or report. The Date and Time dialog box would come up:

Use the dialog box to specify which one of the date or the time, including the formats,
would display. Once you are ready, click OK. If the form or report did not have the appropriate header and
footer section (the Form Header section for the form and the Report Header section for the report), the
section would be created. Here is an example:
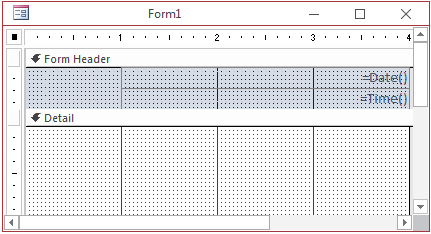
If the section existed already, it would be used to host the label. When the label is
created, by default, it is added to the header section (the Form Header section for the form and the
Report Header section for the report). If you do not like those positions, you can move the label(s). To
do this, simply click and drag it(them) to the desired section.
A Hyperlink
Introduction
A hyperlink is an object (a label, a picture, a button, etc) that can be
clicked to open an object of the database, an application on the computer, a file from the
network, or a web page. A hyperlink can be made to open almost any type of file.
Microsoft Access supports various types of hyperlinks.
A Labeled Link
Probably the easiest way to have a hyperlink is to add a label to a form
or report and transform that label into a link. Microsoft Access provides various ways to do
this. The easiest way is to display the form or a report in Design View. Then:
- Press Ctrl + K
- In the Controls section of the Ribbon, click the Hyperlink control
 and
click the form or report and
click the form or report
A dialog box made of various sections would come up. In the
left section, you can click Existing File or Web Page:
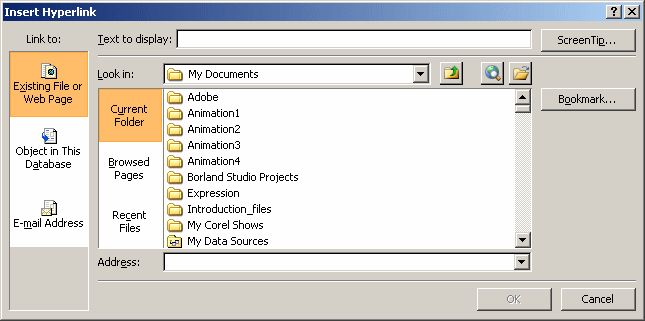
In this case, if you want to open a file, click Current
Folder and use the Look In combo box to specify the folder where the file is
located. Once you have specified the folder, in the large list box in the
middle-center of the dialog box, locate the file, click it and click OK.
If you want the link to open an object of the same database,
such as a form or a report, in the left column, click Object in This Database.
The middle-center of the dialog box would display a tree view. Before selecting
an object, expand its node, then select the object, and click OK.
A hyperlink is primarily a label. To change the caption of
the hyperlink, you can click it once and click it again to put it into edit
mode, and edit its caption. Here is an example:

You can also use the Property Sheet of the
hyperlink to manage its label.
 Practical Learning: Adding
a Hyperlink Practical Learning: Adding
a Hyperlink
- In the Navigation Pane, right-click Switchboard and click Design View
- On the Ribbon, click Design if necessary.
In the Controls section of the Ribbon, click Hyperlink

- In the Link To list of the Insert Hyperlink dialog box, click Object In
This Database
- In the Text to Display, type Customers
- In the main list, click the + button of Forms to expand it
- Under Forms, click Customers

- Click OK
- Drag the newly added label to the main area of the form
- In the Controls section of the Ribbon, click Hyperlink

- In the Link To list of the Insert Hyperlink dialog box, make sure Object
In This Database is selected (otherwise, click it).
In the Text to Display, type
Occupancies
- In the main list, click the + button of Forms to expand it
- Under Forms, click Occupancies
- Click OK
- Press Ctrl + K
- In the Link To list, make sure Object In This Database is selected
(otherwise, click it).
In the main list, expand the Forms node
- Double-click Rooms
- Save the form
A Link from a Label
You can transform a regular label into a link. To do this, in the Property
Sheet of the label, click Format and use the Hyperlink fields.
 Practical Learning: Transforming a Label to a Hyperlink Practical Learning: Transforming a Label to a Hyperlink
- On the Ribbon, click Design if necessary.
In the Controls section of the Ribbon, click Label
 and click on the form
under the other links and click on the form
under the other links
- Type Payments and press Enter
- On the form, double-click the new Payments label to access its properties.
In the Property Sheet, click Format if necessary.
Click Hyperlink Address and click its browse button
- In the Link To list, make sure Object In This Database is selected
(otherwise, click it).
In the Text to Display, make sure Payments displays (otherwise, type it).
In the main list, expand the Forms node
- Click Payments
- Click OK
- On the Ribbon, click Design if necessary.
In the Controls section of the Ribbon, click Label
 and click on the form
under the other links and click on the form
under the other links
- Type Employees and press Enter
- In the
Format tab of the Property Sheet, click Hyperlink Address and click its browse button
- In the Link To list, make sure Object In This Database is selected
(otherwise, click it).
In the Text to Display, make sure Employees displays (otherwise, type it).
In the main list, expand the Forms node
- Double-click Employees
- Press Ctrl + A to select all labels
- On the Ribbon, click Format
- In the Font section, set the following characteristics:
Font: Bodoni MT Black (if you don't have that font, select Garamond)
Font Size: 36
- As the labels are still selected, double-click one of the handles around it to resize the labels
- Move the labels and position them as you see fit or as follows:
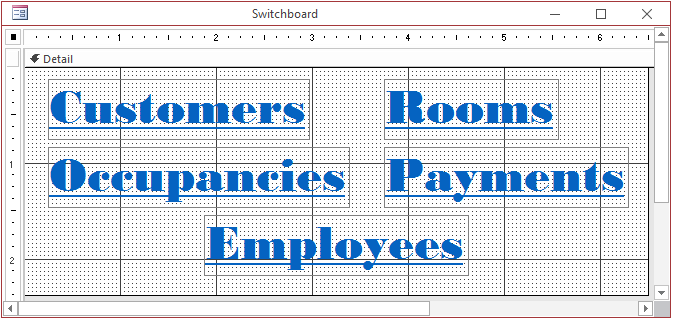
- Save the form
A Hyperlink as a Data Type
One of the ways Microsoft Access supports hyperlinks is as a data type
of a column. This allows you create a link to a document, to provide an email address, or
to indicate a webpage.
To create a new column that supports links:
- If the table is displaying in the Datasheet View:
- Click a cell under Click to Add. On the Ribbon, click Fields. In the Add
& Delete section, click More Fields and click Hyperlink
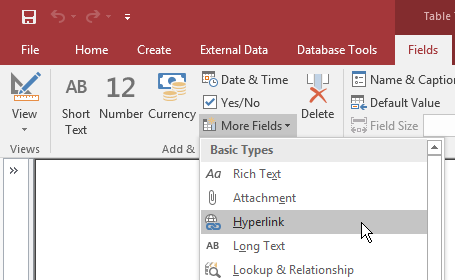
- On the table, click Click to Add and click Hyperlink
- If the table is displaying in the Design View, specify the name of the column
under Field Name. In the Data Type, select Hyperlink
You can also change the type of an existing field to support hyperlinks,
and you can insert a column that supports hyperlinks.
 Practical Learning: Creating a Link-Based Column Practical Learning: Creating a Link-Based Column
- On the Ribbon, click File and click Open
- In the list of files, click StatesStatistics1
- In the Navigation Pane, right-click the States table and click open
- On the table, click the empty cell under Click to Add
- On the Ribbon, click Fields
- In the Add & Delete section, click More Fields, and click Hyperlink
- Type StateWebsite and press Enter
- In the menu that appears, click Hyperlink
- Type Wikipedia and press Enter
- Press Esc
- Update a few records as follows:
| Abbrv |
StateWebsite |
Wikipedia |
| AL |
http://www.alabama.gov/ |
https://en.wikipedia.org/wiki/Alabama |
| AK |
http://alaska.gov/ |
https://en.wikipedia.org/wiki/Alaska |
| AZ |
https://az.gov/ |
https://en.wikipedia.org/wiki/Arizona |
| AR |
http://www.arkansas.gov/ |
https://en.wikipedia.org/wiki/Arkansas |
| CA |
http://www.ca.gov/ |
https://en.wikipedia.org/wiki/California |
|