 |
Combo and List Boxes |
|
Bound Combo Boxes
Introduction
A combo box is a Windows control that holds a list of text items. The user can select one item from the list. Microsoft Access supports bound and unbound combo boxes. The application also provides the tools to help you create and configure a combo box using either the Lookup Wizard or the Combo Box Wizard.
A Bound Combo Box
A combo box is said to be bound if its values come from a field of a table. Such a field must be the foreign key that represents the records of a related table.
The easiest way to create a bound combo box is to use a wizard because you would let Microsoft Access configure everything behind-the-scenes after you have just made some selections in the wizard. The combo box can be created in a table where it is referred to as a lookup field, or in a form where it is a formal combo box. If a lookup field is created in a
table, it can be added to a form or report where it would be created as a combo box. If only a value was provided for the foreign key of a table, then you must
formally create a combo box for it.
 Practical Learning: Introducing Combo Boxes Practical Learning: Introducing Combo Boxes
- Start Microsoft Access
- In the list of files, click Ceil Inn1
- In the Navigation Pane, double-click the Occupancies form
- After viewing the form, in the Views section of the Ribbon, click the
button under View and click Design View
- In the Tools section of the Ribbon, click Add Existing Fields
- In the Field list, drag EmployeeNumber and drop it on the form.
Notice that the control is a text box
- Press Delete to remove the new text box
- In the Controls section of the Ribbon, click the Combo Box
 and
click in the Detail section of the form and
click in the Detail section of the form
- In the first page of the wizard, make sure the first radio button is
selected. Read it and click Next:
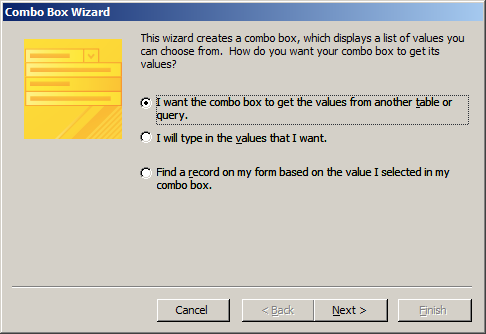
- In the second page of the wizard, click Table: Employees and click Next
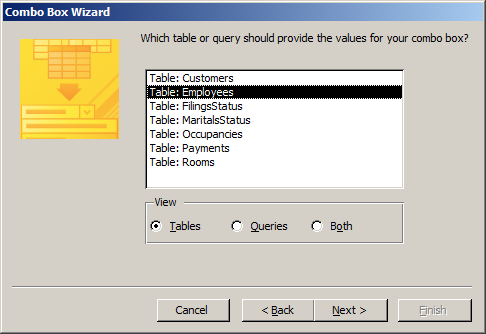
- In the third page of the wizard, double-click FirstName
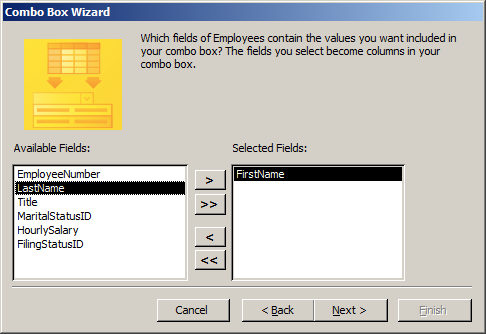
- Click Next
- Accept the step and click Next
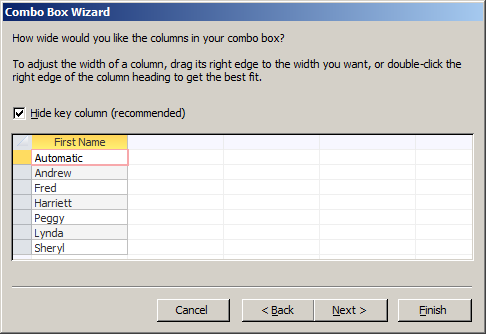
- Click the arrow of the combo box and select EmployeeNumber
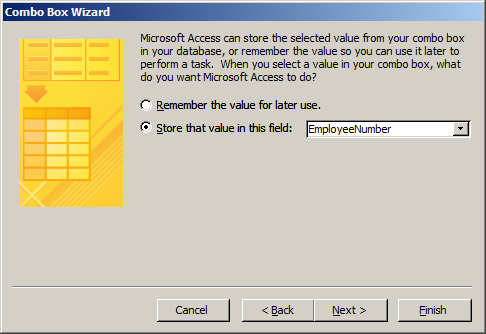
- Click Next
- In the text box, type Processed By:
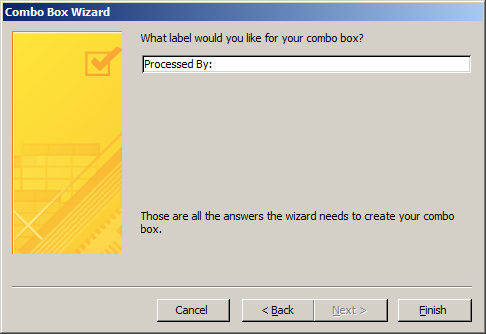
- Click Finish
- On the Ribbon, click Design if necessary.
In in the
Tools section, click Add Existing Fields
- In the Field List, drag DateOccupied and drop it on the form
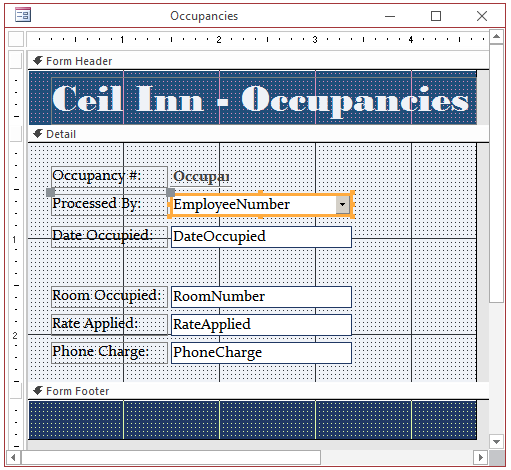
- Close the form
- When asked whether you want to save, click Yes
- In the Navigation Pane, double-click the Occupancies table to open it
- Click a cell under Processed For and notice that it is a simple text box
- In the Views section of the Ribbon, click the
View button
 (or click under it and click Design View) (or click under it and click Design View)
- Change the data type of AccountNumber to Lookup Wizard
- In the first page of the wizard, make sure the first radio button is
selected. Read it and click Next
- In the second page of the wizard, make sure Table: Customers is selected
(otherwise, select it) and click Next
- In the third page of the wizard, double-click FirstName and click Next
- Accept the step and click Next
- Accept the label as AccountNumber and click Finish
- When asked to save the table, click Yes
- When a message box warns you that some data may be lost, click Yes
- Close the table
- In the Navigation Pane, right-click the Occupancies form and click Design View
- In the Tools section of the Ribbon, click Add Existing Fields
- In the Field list, drag AccountNumber and drop it on the form,
Notice
that the control is a combo box
- Preview the form
and save it
The Characteristics of a Lookup Field/Combo Box
In some cases, if you create your lookup field of combo box
using the wizard, some factors may not produce the expected result. Fortunately, you can modify the configuration of the
control. Many options are available.
The configurations of the lookup field can be found in the
Lookup section of the bottom part of the table in Design View. The configuration
of a
combo box of a form can be found in the Data or the All tab of the Property
Sheet.
The available characteristics or properties are:
- Display Control: This is only available in a table, not on a form
or report. This property allows you to specify how the field would display its
value. The default is the combo box, which is suitable for most scenarios
- Row Source Type: This property specifies the type of list that contains the
actual values. The default is Table/Query, which indicates that the values
are stored in a table or a query. One of the options is
Field List, which is mostly available if the list is programmatically created
- Row Source: This is the list of values. There are many techniques
you can use to create that list. To build the list, you can right-click the
field and click Build. If you know the expression to apply, right-click the
field and click Zoom
- Bound Column: This is a number that specifies the number of columns
that will connect with the primary key. The default value is 1. This should be
the number of columns used in the primary key
- Column Count: This is a natural number that specifies the
number of columns that will appear when the user clicks the arrow of the
combo box on the field. If you select only one column from the Available
Fields list of the second page of the wizard, this property would have a
value of 1. Otherwise, if you want more columns, set this property
accordingly
- Column Heads: This property specifies whether the top section of the list
would have a caption
- Field Widths or Column Widths: The Field Widths appears in a form. The Column Widths appears in a form or a report.
This
property is made of one or more sections separated by semi-colons. Each
section contains a number that specifies the width of the corresponding column of the
lookup field when the list displays. In most cases, the first column, and that represents
the foreign key, is not presented to the user and therefore should be set to
0. Each one of the other sections shows the desired width of the column and
the columns can have different widths
- List Rows: This characteristic specifies the number of records that will be
visible when the list appears. You should use a value between 4 and 16 (the
default). A value higher than 16 is usually too long. Most programming
environments (in fact as set in the Microsoft Windows operating system) use
8
- List Width: This value is the total width of the list when it comes up.
This should be the sum of numbers from the Field Widths property
 Practical Learning: Configuring
a Combo Box Practical Learning: Configuring
a Combo Box
- In the Navigation Pane, right-click the Occupancies form and click Design View
- In the top section of the form, double-click the EmployeeNumber combo box
- In the Property Sheet, click the All tab
- Click Name and type EmployeeNumber and make sure Column Count is
set to 2
- Click Column Width and type 0; 1.65
Make sure Column Heads is set to No and list Rows is set to 16
- Click List Width and type 1.65
- Right-click Row Source and click Build...
- In the bottom section of the window, replace LastName with FirstName & " " & LastName
- Close the window
- When asked whether you want to save, click Yes
- Close the form
- When asked whether you want to save, click Yes
- In the Navigation Pane, right-click the Occupancies table and click
Design View
- In the top section of the table, click AccountNumber
- In the bottom section of the window, click the Lookup tab
- Right-click Row Source and click Build...
- In the bottom section of the window, replace FirstName with FirstName & " " & LastName
- Close the window
- When asked whether you want to save, click Yes
- Click Column Width and type 0; 1.35
- Click List Width and Type 1.35
- Switch the table to Datasheet View
- When asked whether you want to save, click Yes
- Close the table
- In the Navigation Pane, right-click the Occupancies form and click
Design View
- On the form, click the AccountNumber combo box and press Delete
- In the Tools section of the Ribbon, click Add Existing Fields
- From the Field list, drag each field that is not on the form and drop it
on the form
- Complete the design of the form. Here is an example:
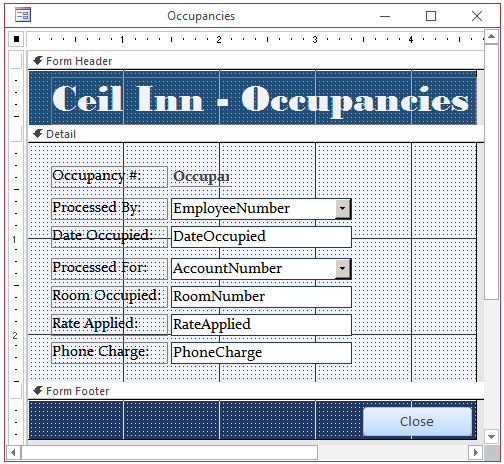
- Switch the form to Form View
- Close the form
- When asked whether you want to save, click Yes
An Unbound Lookup Field/Combo Box
Introduction
A combo box (or a lookup field) is said to be unbound if it holds its own list of
values instead of the values comming from a column of a table. Microsoft Access
provides the means of creating the controls and adding the values. As mentioned
for the bound combo box (or a lookup field), you can manually create and configure
the control or you can use a wizard.
To easily add a lookup field to a table, use the Lookup
Wizard. To easily add a combo box to form, use the Combo Box Wizard. In both
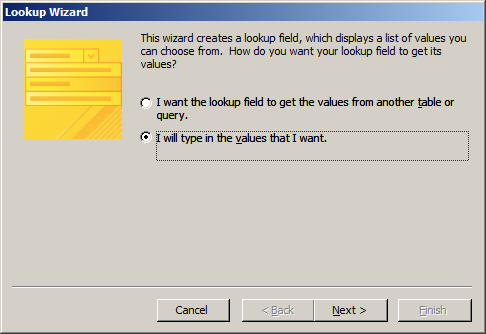
cases, in the first page of the wizrd, click the second radio button. If you had
created a lookup field in a table, you can drag its item from the Field List to
a form or report, in which case it would become a combo box, Of course, the control would receive the same name as the table's column. If you create a combo box
on form using the Combo Box Wizard, the control would receive a name that starts
with Combo. An example would be Combo21.
 Practical
Learning: Introducing Unbound Lookup Fields Practical
Learning: Introducing Unbound Lookup Fields
- On the Ribbon, click File and click Open
- In the list of files, click Altair Realtors1 from the
previous lesson
- In the
Navigation Pane, right-click the
Properties table and click Design View
- Under Field Name, right-click FinishedBasement and click Insert Rows
- Type PropertyType and press Tab
- Change the data type of Property Type to Lookup Wizard
- In the first page of the wizard, read the second radio button and
click it:
- Click Next
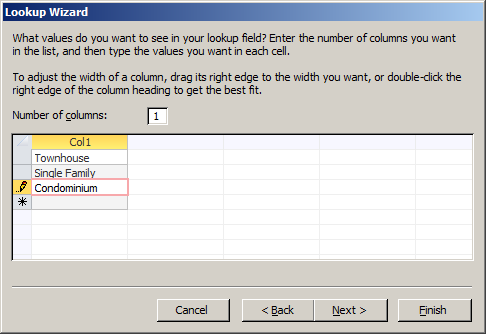
- In the second page of the wizard, under Col1, type Townhouse and press the down arrow key
- Type Single Family and press the down arrow key
- Type Condominium
- Click Next
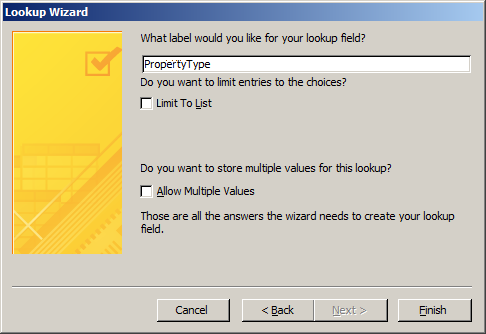
- Accept the label as PropertyType and click Finish
- In the bottom section of the window, click
Caption and type Property Type
The Characteristics of a Lookup Field/Combo Box
As mentioned previously, after creating a lookup field or a combo box
using the wizard, you can customize it. In fact, you cab configure the field or
the combo box by setting its properties. The configurations of a lookup field are done in the
Lookup section of a table in Design View. The configuration
of a combo box of a form are done in the Property
Sheet. The properties are:
- Display Control: This is the same as mentioned previously
- Row Source Type: For an unbound lookup field or combo box,
this property should be set to Value List
- Row Source: This is the list of values. The list is made of
sections separated by semi-colons. Each section contains a value (you can
optionally set the value in
double-quotes)
- Field Widths or Column Widths: This is the total widths of the
individual columns
 Practical
Learning: Controlling an Unbound Lookup Field Practical
Learning: Controlling an Unbound Lookup Field
- Under Field Name, right-click FinishedBasement and click Insert Rows
- Type Condition and press F6
- In the bottom section of the window, click Lookup
- Change the following characteristics:
Display Control: Combo Box
Row Source Type: Value List
Row Source Type: Excellent;Good Shape;Needs Repair;Unknown
- To switch the table, in the Design tab of the Ribbon, in the Views
section, click the View button
- When asked whether you want to save, click Yes
- Update the following records:
| Property # |
Property Type |
Condition |
| 524880 |
Single Family |
Good Shape |
| 688364 |
Single Family |
Excellent |
| 611464 |
Single Family |
Good Shape |
| 749562 |
Townhouse |
Good Shape |
| 427115 |
Single Family |
|
| 200417 |
Condominium |
Excellent |
| 927474 |
Townhouse |
Needs Repair |
| 682630 |
Single Family |
Good Shape |
| 288540 |
Condominium |
Good Shape |
- Close the table
- In the Navigation Pane, right-click the Properties form and click Design
View
- On the Ribbon, in the Tools section of the Design tab, click Add
Existing Fields
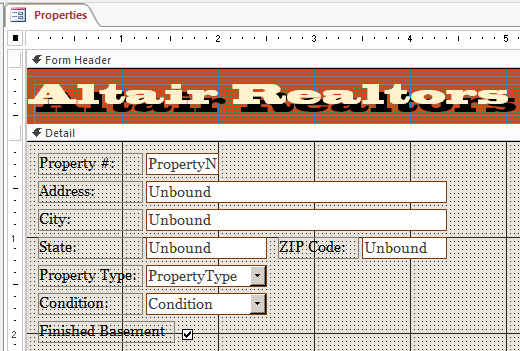
- From the Field List, drag PropertyType and Condition, and drop them on
the form
- Complete the design of the form as you see fit. Here is an example:
- Close the form
- When asked whether you want to save, click Yes
Combo Box Events
When using a combo box, depending on the characteristics of the control, if the user types
a value that is not in the list, the control would fire an event named On Not List.
You can use this event to display a message to the user and to take an appropriate action.
|

 and
click in the Detail section of the form


