Home

Numeric Values

Integer-Based Data Types

Introduction to Numeric Fields

A number is a digit (0, 1, 2, 3, 4, 5, 6, 7, 8, or 9), a combination of digits, or a combination of one or more digits, a separator, and one or more digits. Microsoft Access supports three categories of numbers and there are various ways you can apply one to a field. You can work in either the Datasheet View or the Design View of a Table.

To create a field that supports numbers:

  • In the Datasheet View:
    • Click Click to Add. In the list that appears, click Number. Then type the name of the field
    • Click a cell in the column that will succeed the new field. On the Ribbon, click Fields. In the Add & Delete section, click the Number button
  • If you are working in the Design View. Specify the name of the field. In the corresponding Data Type, select Number

Introduction to Natural Number-Based Fields

A natural number is one that contains either only one digit or a combination of digits and no other character. Examples of natural numbers are 122, 8, and 2864347. Microsoft Access supports different types of natural numbers.

Practical Learning: Introducing Numbers

  1. Start Microsoft Access
  2. In the list of files, click Altair Realtors1 from the previous lesson
  3. In the Navigation Pane, right-click the Properties table and click Design View
  4. In the top section of the window, right-click Pictures and click Insert Rows
  5. Type Stories and press Tab
  6. Click the arrow of the combo box and select Number
  7. Press F6

A Byte

A byte is a small positive natural number that is between 0 and 255. To create a field that will need this range of values, display the table in the Design View. Specify the Data Type of a field as Number. Then, in the lower section of the table, set its Field Size to Byte.

If you have a value that you want to convert to a Byte, call a function named CByte. Its syntax is:

CByte(Expression) As Byte

This function takes one argument as the value that needs to be converted. It then converts it to a Byte.

Practical Learning: Using a Byte Type

  1. Click the arrow of the Field Size combo box and select Byte
  2. Right-click the tab of the table and click Datasheet View
  3. When asked whether you want to save, click Yes
  4. Update the following records:
     
    Property # Stories
    524880 3
    688364 2
    611464 2
    749562 3
    927474 12
    682630 3
  5. Close the table
  6. In the Navigation Pane, right-click the Properties form and click Design View
  7. In the Tools section of the Ribbon, click Add Existing Fields
  8. From the Field List, drag Stories and drop it on the form
  9. Close the form
  10. When asked whether you want to save, click Yes

Integers

Integers and Microsoft Access

An integer is a natural number larger than the Byte. It can hold a value between -32768 and 32767. Because an integer can hold as much value as the Byte, you can apply the integer type wherever you would use a byte type. Microsoft Access supports the integer type through a data type called Integer. Like the byte, you can specify an Integer data type only in the Design View of a table.

To apply the Integer data type to a field, in the Design View of the table, after specifying the field's Data Type as Number, in the bottom section of the table, set its Field Size to Integer.

To convert a value to an integer, call a function named CInt. Its syntax is:

CInt(Expression) As Integer

The function takes a value or expression as argument. It then converts that value or expression to an integer.

Practical Learning: Applying the Integer Type

  1. In the Navigation Pane, right-click the Properties table and click Design View
  2. In the top section of the window, right-click Pictures and click Insert Rows
  3. Type YearBuilt
  4. Press Tab and type n (make sure Number has been selected)
  5. In the lower part of the window, click the arrow of the Field Side combo box and select Integer
  6. Click Caption and type Year Built
  7. Right-click the tab of the table and click Datasheet View
  8. When asked whether you want to save, click Yes
  9. Update the following records:
     
    Property # Year Built
    524880 1995
    688364 2000
    749562 2002
    427115 1982
    927474 1992
    682630 2005
    288540 2000
  10. Close the table
  11. In the Navigation Pane, right-click the Properties form and click Design View
  12. In the Tools section of the Ribbon, click Add Existing Fields
  13. From the Field List, drag YearBuilt and drop it on the form
  14. Close the form
  15. When asked whether you want to save, click Yes

Small Integers in SQL

Like Microsoft Access, the SQL supports various types of integers. To support the Microsoft Access integer type, the SQL provides a data type named SMALLINT. It is made for fields that need numbers between -32,768 and 32767. Here is an example of creating small integer-based field:

CREATE TABLE Elements
(
    AtomicNumber SmallInt,
    ElementName char(25)
);

To add a value for an integer-based field in SQL, simply specify its name in the appropriate placeholder. Here is an example:

INSERT INTO Elements(AtomicNumber, ElementName) VALUES(1, 'Hydrogen');

Long Integers

A Long Integer in Microsoft Access

A long integer is a natural number whose value is between –2,147,483,648 and 2,147,483,642. Examples are the population of a city, the distance between two places of far locations, the number of words of a book. Microsoft Access supports the long integer type through a data type named Long Integer (in reality the data type is named Long). To apply the long integer type to a field:

  • In the Datasheet View:
    • To create a new field, click Click to Add. In the menu that appears, click Number
    • To insert a new field, click the column that will precede it. On the Ribbon, click Fields. In the Add & Delete section:
      • Click the Number button Number
      • Click More Fields and click General
    • To change or configure the type of a number-based field, click any cell under it. On the Ribbon, click Fields. In the Formatting section, click the arrow of the Format combo box and select General Number
  • In the Design View, in the top section of the window, select the number-based column. In the bottom section of the window, in the Format combo box, select General Number

Normally, when you set the data type of a field to Number, it is automatically set to Long Integer. If that's the data type you want, there is nothing more to do.

If you have a value or expression to convert to a long integer, call a function named CLng. Its syntax is:

CLng(Expression) As Long

This function takes one argument that is a value or an expression. It converts it to a long integer.

Practical Learning: Using a Long Integer Type

  1. On the table, click any cell under Condition
  2. On the Ribbon, click Fields
  3. In Add & Delete section, click the Number button Number
  4. Type Bedrooms and press Enter
  5. Update the following records:
     
    Property # Bedrooms
    524880 4
    688364 4
    749562 3
    427115 2
    200417 2
    927474 3
    682630 4
    288540 1
  6. Close the table
  7. In the Navigation Pane, right-click the Properties form and click Design View
  8. In the Tools section of the Ribbon, click Add Existing Fields
  9. From the Field List, drag Bedrooms and drop it on the form
  10. Close the form
  11. When asked whether you want to save, click Yes
  12. On the Ribbon, click File and click Open
  13. In the list of files, click StatesStatistics1 from the previous lesson
  14. In the Navigation Pane, double-click the States table
  15. On the table, click Click to Add and click Number
  16. Type AreaSqrMiles and press Enter
  17. Right-click the tab of the table and click Design View
  18. Click the first empty cell under Field Name and type AreaSqrKm
  19. Set its data type as Number and, in the bottom side, notice that the Field Size is Long Integer
  20. Save the table

Long Integers and SQL

To support long integers, the SQL provides the INT, the INTEGER, and the LONG data types. They are equivalent to the Long Integer in Microsoft Access.

An Automatic Long Integer

Introduction

One of the rules that the primary key must follow is that it must be able to uniquely identify each record in the table. One way to solve this problem is to manually add a unique integer. Of course, adding the numbers manually can lead to errors. As an alternative, Microsoft Access can generate a unique number for each record.

Automatic Numbers in Microsoft Access

To support this concept, the application provides the AutoNumber type.

To automatically have a unique identifier associated with each new record in the database, create a field whose data type is AutoNumber. When a field receives this data type and when the first record is created, it receives the number 1. Every time a new record is created, the number is increased and assigned to the new record. The number never repeats. If a record is deleted, the numbers are not reset: the deleted record is gone with its assigned unique number. This ensures that each record keeps a unique number.

The AutoNumber in Microsoft Access is not an actual data type, just like the other options of the Data Type combo box of the Design View of the table (their names are only made friendly to help select a type). AutoNumber is actually a long integer.

There are two main ways you can apply the AutoNumber type to a column:

  • Start a new table in the Datasheet View. In this case, a new field named ID is automatically created. Behind-the-scenes, the data type applied to this column is the AutoNumber type (you shouldn't try to change this type)
  • Start a new table in Design View. Create a field and set its data type to AutoNumber

Automatic Numbers in the SQL

To support automatic numbers, the SQL provides a data type named COUNTER. Here is an example of using it:

CREATE TABLE TimeSheets
(
    TimeSheetID COUNTER,
    FullName CHAR(50)
);

Remember that, when performing data entry for a table that has an automatic number-based field, you don't provide a value for that field. Here is an example:

INSERT INTO TimeSheets(FullName) VALUES('Joan Sons');

Also remember that every time you create a new record, the value of the automatic number-based field is incremented by 1. Here is another example:

INSERT INTO TimeSheets(FullName) VALUES('Peter Mukoko');

As seen for the AutoNumber type in Microsoft Access, when a record is created in a table with the COUNTER type, the first value given to the field is 1, the second value is 2, and so on. Unlike the AutoNumber type that starts the records at 1, the COUNTER type allows you to specify by what value to start counting. To provide this information, add the parentheses to the COUNTER type. In the parentheses, enter the value by which to start. Here is an example:

CREATE TABLE Payrolls
(
    PayrollID counter(1001),
    EmployeeNumber text(10)
);

In this case, the first record will have a value of 1001 for the field. Here is an example:

INSERT INTO Payrolls(EmployeeNumber) VALUES('29-486');

The second record will be 1002. Here is an example:

INSERT INTO Payrolls(EmployeeNumber) VALUES('74-085');

And so on. Here is an example:

INSERT INTO Payrolls(EmployeeNumber) VALUES('38-475');

Here is an example of accessing the records:

SELECT * FROM Payrolls;

Instead of incrementing the records by 1, the COUNTER type allows you to specify by what range to increment. To provide this information, in the parentheses of COUNTER(), after the starting value, add a comma and the desired value. Here is an example:

CREATE TABLE Stations
(
    StationNumber counter(10070, 25),
    StationName varchar(50)
);

This time, the first record will have a value of 10070 for the field. Here is an example:

INSERT INTO Stations(StationName) VALUES('Ankoka');

The value of the second record will be incremented by 25. Here is an example:

INSERT INTO Stations(StationName) VALUES('Bulham');

And so on. Here is an example:

INSERT INTO Stations(StationName) VALUES(&#Fast Pursue');

Here is an example of accessing the records:

SELECT * FROM Stations;

The Auto-Number and Data Relations

A column or field created with the AutoNumber type is the good candidate for a primary key. If you start a new table in the Datasheet View and the automatic column is created, that column is also automatically made a primary key. Of course, you can create an AutoNumber field in the Design View and make it a primary key.

If the primary key is of type AutoNumber, the foreign key should use the Long Integer as its data type after selecting the Number in the Data Type combo box of the Design View of the table.

Decimal Numbers

Introduction

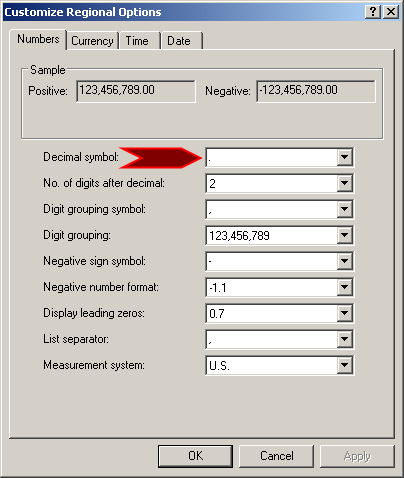
A real number is a number that displays a decimal part. This means that the number can be made of two sections separated by a symbol referred to as the Decimal Separator or Decimal Symbol. In US English, this symbol is the period:

Customize Regional Options

On both sides of the Decimal Symbol, digits are used to specify the value of the number. The number of digits on the right side of the symbol determines how much precision the number offers.

Microsoft Access supports various types of decimal numbers.

Decimal Numbers with Single Precision

When using a decimal number, you may or may not be interested in a high level of precision for that value. If precision is of lesser importance, Microsoft Access provides the Single data type. A single is a decimal number whose value can range from -3.402823e38 and -1.401298e–45 if the number is negative, or 1.401298e–45 and 3.402823e38 if the number is positive.

To apply the Single data type to a field, you must open the table in Design View. After specifying the field's type as Number, in the bottom section of the table, set the Field Size to Single.

Author Note

At the time of this writing, a bug in Microsoft Access 2016 prevents you from changing the field size of a Number data type:

Using a Single Data Type

We will make suggestions below.


If you have a value that you want to convert to a Single type, call a function named CSng. Its syntax is:

CSng(Expression) As Single

This function takes one argument as the value or the expression that needs to be converted. It then converts it to a Single value.

Practical Learning: Using a Single Data Type

  1. On the Ribbon, click File and click Open
  2. In the list of files, click Altair Realtors1
  3. In the Navigation Pane, right-click the Properties table and click Design View
  4. In the top section of the table, right-click FinishedBasement and click Insert Rows
  5. Type Bathrooms and press Tab
  6. Set the Data Type to Number
  7. In the lower section of the table, click Field Size, click the arrow of its combo box and select Single
  8. Close the table
  9. When asked whether you want to save, click Yes

SQL Real Numbers

To support decimal numbers with a single precision, the SQL provides two data types named SINGLE and REAL. Here are examples of using them:

CREATE TABLE Roads
(
    RoadName varchar(32),
    LengthInMiles SINGLE,
    LengthInKilometers REAL
);

Each of them is equivalent to the Microsoft Access Single data type.

At the time of this writing, there is a bug in Microsoft Access 2016: the Field Size in the Design View of a table doesn't display the options for a Number data type:

Using a Single Data Type

One solution is to write SQL code to create the table and its Single or Real data type as seen above. Another solution is, if the field was created already with a different type, to modify the column. Here is an example:

ALTER TABLE Roads
ALTER COLUMN LengthInMiles Single;

Remember that, after writing code, you must execute it, which is done by clicking the Run button Run in the Design tab of the Ribbon.

Decimal Numbers with Double Precision

If you want to use a number larger than the Single type can carry, use a data type named Double. This type is used for numbers that range from 1.79769313486231e308 to –4.94065645841247e–324 if the number is negative or from 1.79769313486231E308 to 4.94065645841247E–324 if the number is positive. Besides supporting large values and this high level of precision, the Double data type provides various other options. To apply these options, you can use either the Datasheet View or the Design View of the table.

To apply the Double data type to a field, open its table in Design View and set the field's Data Type to Number. Then, in the bottom section of the table, set its Field Size to Double.

To convert an expression or a value to a double type, call a function named CDbl. Its syntax is:

CDbl(Expression) As Double

This function takes one argument as a value or an expression to be converted. It then converts it to a Double type of value.

Practical Learning: Applying a Number With Double Precision

  1. On the Ribbon, click File and click Open
  2. In the list of files, click FunDS1 from the previous lesson
  3. In the Navigation Pane, right-click the SoldItems table and click Design View
  4. Click the first empty under Field Name, type PurchasePrice and press Tab
  5. Click the arrow of the Data Type combo box and select Number
  6. In the bottom side of the window, click the arrow of the Field Size combo box and select Double
  7. Save the table

Numeric Double-Precision and SQL

To support decimal numbers with double-precision, the SQL provides three data types named NUMBER, FLOAT and DOUBLE. These types are equivalent to the Microsoft Access Double data type. Here are examples of using them:

CREATE TABLE Elements
(
    AtomicNumber smallint,
    ElementName text(40),
    AtomicWeight float,
    MeltingPoint number,
    BoilingPoint double
);
 

Characteristics of Decimal Numbers

The Number of Decimal Places

A decimal number is expressed with a fraction between 0 and 1. Both sides of the number are separated by a special character which, in US English, is the period. To specify the number of decimal places for a number-based column, the Field Size of the column must be set to Single or Double:

  • In the Datasheet View of a form, click a cell under the column. On the Ribbon, click Fields. In the Formatting section, click either the Increase Decimal or the Decrease Decimal
  • In the Design View of a table, in the top section of the table, click the field. In the bottom section, select or specify the desired value in the Decimal Places combo box
  • In the Design View of a form or report, access the Property Sheet of the text box. In the Format tab, select or specify the desired value in the Decimal Places combo box

The Standard Notation

A number can be very large, made of many digits. An example is 971792074. To make a large number easy to read, you can separate the thousands with commas. An example is 971,792,074. This is referred to as the standard notation. To support the standard notation, the Number data type provides an option of the same name.

To apply the standard notation to a number-based field:

  • In the Datasheet View, on the Ribbon, click Fields:
    • If you are creating a new column at the end of the table, click Click to Add or click the empty cell under the Click to Add column. In the Add & Delete section of the Ribbon, click More Fields and click Standard
    • To change or configure an existing number-based column, click any cell under it. In the Formatting section of the Ribbon, click the arrow of the Format combo box and select Standard
  • In the Design View, in the top section of the window, select a number-based field. In the bottom section of the window, in the Format combo box, select Standard
  • In the Design View of a form or report, access the Property Sheet of the text box. In the Format tab, in the Format combo box, select Standard

Practical Learning: Applying the Standard Notation

  1. On the Ribbon, click File and click Open
  2. In the list of files, click StatesStatistics1
  3. In the Navigation Pane, right-click the States table and click Design View
  4. In the top side of the table, click AreaSqrMiles
  5. In the bottom side, click Format, then click the arrow of the Format combo box and select Standard
  6. Click Decimal Places, then click the arrow of its combo box and select 0
  7. Click Caption and type Area in Square Miles
  8. In the top side of the window, click below AreaSqrKm
  9. In the bottom side, change the following characteristics:
    Format: Standard
    Decimal Places: 0
    Caption: Area in Square Kilometers
  10. Close the table
  11. When asked whether you want to save, click Yes
  12. In the Navigation Pane, right-click the States form and click Design View
  13. In the Controls section of the Ribbon, click the Label control Label and click the Detail section of the Ribbon
  14. Type Area and press Enter
  15. In the Property Sheet, click Top and type 1.8333
  16. Click Left and type 0.25
  17. Format the label to appear like the State label
  18. In the Tools section of the Ribbon, click Add Existing Fields
  19. In the Field List, drag AreaSqrMiles and drop it in an unnoccupied area of the Detail section of the form
  20. Drag AreaSqrKmand drop it in an unnoccupied area of the Detail section of the form
  21. Format the new labels and text boxes to appear like their equivalent controls:

    States Statistics - Form Design

  22. Save the form and switch to Form View
  23. Create the records as follows:
     
    Abbreviation AreaSqrMiles AreaSqrKm
    AK 656424 1700139
    AL 52423 135775
    AZ 114006 295276
    AR 53182 137742
    CA 163707 424002
  24. Close the form
  25. In the Navigation Pane, right-click the Summary form and click Design View
  26. In the Controls section of the Ribbon, click the Label control and click the Form Header section
  27. Type Area
  28. In the Controls section of the Ribbon, click the Line control and draw a short horizontal line in the Form Header section
  29. In the Tools section of the Ribbon, click Add Existing Fields
  30. Drag AreaSqrMiles and drop it in the Detail section of the Ribbon
  31. Move the label to the Form Header section and change to caption to Sqr Miles
  32. Drag AreaSqrKm and drop it in the Detail section of the Ribbon
  33. Move the label to the Form Header section
  34. Format both the label and the text box to appear like the controls in the same sections

    States Statistics - The Standard Numeric Notation

  35. Save and close the form

A Number With Fixed Precision

A number is said to have a fixed precision if it doesn't include the thousands separator in its notation. Microsoft Access support this notation. It is set the same way we reviewed form the Standard notation.

Practical Learning: Using a Single Number With Fixed Precision

  1. On the Ribbon, click File and click Open
  2. In the list of files, click FunDS1
  3. In the Navigation Pane, double-click the StoreItems table
  4. On the table, click a cell under Click to Add
  5. On the Ribbon, click Fields
  6. In the Add & Delete section of the Ribbon, click More Fields and click Standard
  7. Type UnitPrice and press Tab
  8. Click a cell under UnitPrice
  9. In the Properties section of the Ribbon, click Name & Caption
  10. Set the Caption as Unit Price
  11. In the Description, type The original price of the item
  12. Click OK
  13. Right-click the title bar of the table and click Design View
  14. In the top section of the window, click UnitPrice
  15. In the bottom section, change the Field Size to Double
  16. Close the StoreItems table
  17. When asked whether you want to save, click Yes
  18. The SoldItems table should still be opened in the Design View with the PurchasePrice field selected.
    In the bottom side of the window, click the arrow of the Format combo box and select Standard
  19. Click Caption and type Purchase Price
  20. Close the table
  21. When asked whether you want to save, click Yes
  22. In the Navigation Pane, right-click sfSoldItems form and click Design View
  23. In the Tools section of the Ribbon, click Add Existing Fields
  24. In the Field List, drag PurchasePrice and drop it in the empty area under the Detail bar
  25. Right-click its label and click Cut
  26. Right-click under the Form Header bar and click Paste
  27. Format the label and the text box to appear like the other controls (font, color, border color)

    Floating-Point Number - The Standard Notation

  28. Close the form
  29. When asked whether you want to save, click Yes
  30. In the Navigation Pane, right-click the StoreItems form and click Design View
  31. On the form, click the text box below the Unit Price label and press Delete
  32. In the Tools section of the Ribbon, click Add Existing Fields
  33. In the Field List, drag UnitPrice and drop it in the empty area where the other text box was
  34. Right-click the label that was added and click Cut
  35. Format the text box to appear like the other text boxes (font, color, border color)

    Applying the Standard Notation

  36. Right-click the title bar of the form and click Form View
  37. Update the following records:
     
    Item # Unit Price
    290699 198
    379367 100
    746827 72.55
    388729 69.85
    668156 39.95
    345500 120
    430669 26.95
    426643 50
    136843 195
    366154 44.5
    735312 59.95
    388663 54.25
    441180 34.95
    211771 159.95
    545127 105.5
    239679 150
  38. Close the form
  39. When asked whether you want to save, click Yes
  40. On the Ribbon, click File and click Open
  41. In the list of files, click Altair Realtors1
  42. In the Navigation Pane, right-click the Properties table and click Design View
  43. In the top part of the window, click Bathrooms
  44. In the bottom part of the window, in the Format combo box, select Fixed
  45. Right-click the tab of the table and click Datasheet View
  46. When asked whether you want to save, click Yes
  47. Update the following records:
     
    Property # Bathrooms
    524880 2.5
    688364 3.5
    749562 2.5
    200417 1
    927474 2.5
    682630 3.5
    288540 1
  48. On the Ribbon, click File and click Open
  49. In the list of files, click FunDS1
  50. In the Navigation Pane, right-click the ShoppingSessions table and click Design View
  51. In the top part of the window, click the first empty cell under Field Name
  52. Type AmountTendered and press Tab
  53. In the Data Type combo box, select Number
  54. In the bottom part of the window, set the Field Size as Double
  55. Set the Format as Fixed
  56. Set the Caption as Amount Tendered
  57. Right-click the title bar of the table and click Close
  58. When asked whether you want to save, click Yes

Percentage Values

A number is referred to as percentage if it represents a fraction of 100 (it is actually a number between 0 and 1). In most cases, a percentage value is written with the percent symbol, which is %.

To create a field that supports percent values:

  • In the Datasheet View, click a cell in the number-based column. On the Ribbon, click Fields. In the Formatting section:
    • Click the arrow of the Format combo box and select Percent

      Format

    • Click the Apply Percent Format button Apply Percent Format
  • In the Design View, after specifying the data type of a field as Number, in the lower section of the window, click Format. Then click the arrow of the combo box and select Percent:

    Format

  • In the Design View of a form or report, access the Property Sheet of the text box. In the Format tab, in the Format combo box, select Percent

Practical Learning: Using Percentage Values

  1. The FunDS1 database should still be opened.
    In the Navigation Pane, right-click the StoreItems form and click Design View
  2. On the form, double-click the text box below the Rate label
  3. In the Property Sheet, click the Format tab and change the Format to Percent
  4. Close the form
  5. When asked whether you want to change, click Yes

Scientific Notations

Besides the regular format we are used to using to represent a number, another technique consists of writing the number as an exponent. Using this technique, instead of using 1000 to represent a thousand, you can use 1.00e3. This is referred to as scientific notation.

To apply the scientific notation to a field:

  • In the Datasheet View, after naming the column or clicking a cell under that column, on the Ribbon, click Fields. In the Formatting section, click the arrow of the Format combo box and select Scientific
  • In the Design View, after setting the column's data type to Number, in the bottom section of the table, click the arrow of the Format property and select Scientific
  • In the Design View of a form or report, access the Property Sheet of the text box. In the Format tab, in the Format combo box, select Scientific

Currency Values

Introduction

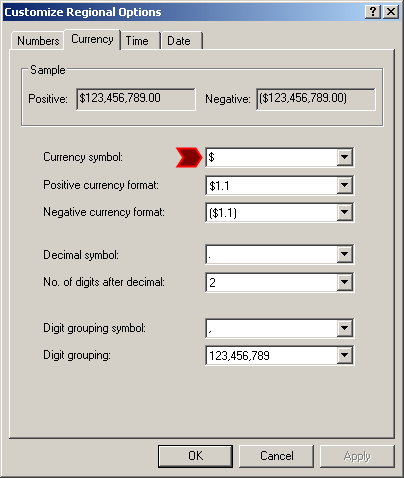
The currency refers to monetary values. To show that a number represents a currency as opposed to a regular decimal number, you can use a special character such as the dollar symbol $:

To support currency values, Microsoft Access provides the Currency data type. To apply the Currency data type to a field:

  • In the Datasheet View:
    • To create a new field that suppports currency values, click Click to Add. In the list that appears, click Currency:

      Currency

    • To insert a field, click a cell in the column that will precede it. On the Ribbon, click Fields. In the Add & Delete section, click the Currency button Currency
    • To change the data type of a field to currency, click a cell in that field. On the Ribbon, click Fields. In the Formatting section, click the arrow of the Data Type combo box and select Currency
  • In the Design View, after setting the column's data type to Number, in the bottom section of the table, set the Field Size to Double, click the arrow of the Format property and select Currency
  • In the Design View of a form or report, access the Property Sheet of the text box. In the Format tab, in the Format combo box, select Currency

To convert a value or an expression to a currency value, call a function named CCur. Its syntax is:

CCur(Expression) As Currency

This function takes one argument as the value or the expression that needs to be converted. It then converts it to a currency value.

Practical Learning: Using Currency Types

  1. The Properties table should still be opened in the Datasheet View.
    Click any cell under Year Built
  2. On the Ribbon, click Fields
  3. In the Add & Delete section, click the Currency button Currency
  4. Type MarketValue and press Enter
  5. Click any cell under MarketValue
  6. In the Properties section of the Ribbon, click Name & Caption
  7. In the Enter Field Properties dialog box, set the Caption to Market Value
  8. Set the Description to The listing value for which a customer should make an offer
  9. Click OK
  10. Update the following records:
     
    Property # Market Value
    524880 495880
    688364 620724
    611464 422625
    749562 425400
    427115 186225
    200417 215495
    927474 850500
    682630 375000
    288540 542750
  11. Close the table
  12. In the Navigation Pane, right-click the Properties form and click Design View
  13. In the Tools section of the Ribbon, click Add Existing Fields
  14. From the Field List, drag Bedrooms and drop it on the form

    Currency Values

  15. Close Microsoft Access
  16. When asked whether you want to save, click Yes

Previous Copyright © 2002-2019, FunctionX Next