Home

Topics on Data Selections

Alias Names

The Alias Name of a Table or Query

The alias is another name for the object used as the source of a query. You can create an alias when designing a query or in the SQL code. To visually create an alias, click anything in the top list of items. In the Property Sheet, change the value of the Alias field:

The Property Sheet of a Field of a Query

To create an alias in the SQL code, on the right side of the name of the table or query in the FROM clause, add a space and type a name of your choice. As an alternative, you can put the AS keyword before the alias. The alias can be in more than one word. If that's what you want to use, you must include it between [ and ].

After creating the alias, you can use it to qualify the name of a field in the SQL statement. You use the alias as if it were the name of the table or query applied to the field. Here is an example:

SELECT houses.PropertyNumber,
       houses.City,
       houses.PropertyType,
       houses.Condition,
       houses.Bedrooms,
       houses.Bathrooms,
       houses.FinishedBasement,
       houses.IndoorGarage,
       houses.Stories,
       houses.YearBuilt,
       houses.MarketValue
FROM Properties AS houses;

You can use the alias to qualify some or all fields. You can also use the alias to qualify the * field. Here is an example:

SELECT kids.* FROM Students kids;

Practical Learning: Creating an Alias for a Query

  1. Start Microsoft Access and open the Cruise2 database from the previous lesson
  2. On the Ribbon, click Create and click Query Design
  3. On the Show Table dialog box, click Close
  4. Right-click the title bar of the window and click SQL View
  5. Change the code as follows:
    SELECT EmployeeNumber,
           FirstName,
           LastName
    FROM Employees empl;
  6. To see the results, on the Ribbon, click the View button Datasheet View (or click the arrow below it and click Datasheet View)
  7. After viewing the result, on the Ribbon, click the button below View and click SQL View
  8. Change the code as follows:
    SELECT empl.EmployeeNumber,
           empl.FirstName,
           empl.LastName
    FROM Employees empl;
  9. To see the results, on the status bar of the window, click the Datasheet View button Datasheet View
  10. After viewing the results, right-click the tab of the window and click SQL View
  11. Change the code as follows:

    SELECT empl.EmployeeNumber,
           empl.FirstName,
           empl.LastName
    FROM Employees AS empl;
  12. To see the results, right-click the tab of the query and click Datasheet View
  13. In the status bar of the window, click the SQL View button Datasheet View
  14. Change the code as follows:
    SELECT  [staff members].EmployeeNumber,
            [staff members].FirstName,
            [staff members].LastName
    FROM Employees AS [staff members];
  15. Right-click the  tab of the window and click Datasheet View

The Caption of a Field

If you create a query and display its result, by default, each column displays its caption as the name of the column. If you want, you can display a different caption for any column of your choice. To do this, display the query in Design View. Add or select a column. Right-click the column and click Properties. In the Property Sheet, click Caption and type the desired caption. Of course, the caption ccan be made of many words.

In SQL, as seen for queries, the alias of a field can be created using the AS keyword as in the following formula:

column-name AS Alias

The column-name factor is the name of the column in the table (or query). The AS keyword is required. The Alias factor is the caption you want the column to display. Here are examples from the above query:

SELECT PropertyNumber AS [Prop #],
       PropertyType,
       Bedrooms AS Beds,
       Bathrooms AS Baths,
       [Year Built],
       [Market Value]
FROM Properties;

Practical Learning: Specifyng the Caption of a Field of a Query

  1. On the Ribbon, click File and click Open
  2. In the list of files, click StatesStatistics2 from the previous lesson
  3. When asked whether you want to save, click No
  4. On the Ribbon, click Create and, in the Queries section, click the Query Design
  5. In the Show Table dialog box, click States, click Add, and click Close
  6. In the list, double-click StateName and AreaSqrMiles
  7. If the Property Sheet is not displaying, right-click AreaSqrMiles in the bottom side of the window and click Properties.
    While AreaSqrMiles is selected, in the Property Sheet, click Caption and type Area (in Square Miles)

    Query Design - The Caption of a Field

  8. To see the results, in the Results section section of the Ribbon, click the Run button Run

    The Caption of a Field

  9. In status bar of the window, click the SQL View button Datasheet View

The Alias Name of a Field

To visually create an alias for a field, in the Design View of a query, on the left side of the column name, type the caption of your choice, followed by :, and followed by the name of the column. Here is an example:

Query Design - The Alias of a Field

Primary Operations on Fields Selections

Concatenating Some Strings

When creating a query, you can combine two or more columns to display them together as one. To concatenate two column names, you can use the + (or & (the ampersand)) operator. To concatenate more than two strings, enter their names separated by + (or &) operators.

Practical Learning: Concatenating Some Strings

  1. In the bottom side of hte window, replace StateName with State: [StateName] + ' - ' + [Abbreviation]

    To concatenate two column names, you can use the + operator. To concatenate more than two strings, enter their names separated by + operators. An example would be: FirstName + " " + LastName. To do this for a query, open it in Design View. In a Field box, enter the concatenating expression.

  2. To see the results, in the Results section section of the Ribbon, click the Run button Run

    Concatenating Some Strings

  3. In status bar of the window, click the SQL View button Datasheet View

An Expression for Data Selection

An arithmetic operator can be used to create an expression for the value of a field of a query.

Practical LearningPractical Learning: Using an Expression for Data Selection

  1. In the bottom side of the window, click the empty box on the right side of AreaSqrMiles, and type Area (in Kilometer Squares): AreaSqrMiles * 2.59
  2. In the top list, double-click AdmissionUnionOrder and AreaSqrMiles

    Using an Expression for Data Selection

  3. To see the results, in the Results section of the Ribbon, click the Run button Run

    Using an Expression for Data Selection

  4. On the Ribbon, click the View button Design View (or click the arrow button below View and click Design View)

Calling a Function for Data Selection

You can call a function to specify the values of a field of a query.

Practical LearningPractical Learning: Calling a Function for Data Selection

  1.  In the bottom side of the window, click the first empty box on the right side of Field and type Year of Admission to the Union: Year([AdmissionUnionDate])

    Calling a Function for Data Selection

  2. On the Ribbon, click the Run button Run

    Query Design - Sorting Records Using Functions

Sex: IIf([Gender]="Male","M","F")

This expression says, "If the the value of the Gender field is Male, display M, otherwise display F". If this expression is entered in the Field box of a query, when the query is run, a column named Sex would display and its values would result from the expression.

SELECTing Fields From Different Tables

If you have more than one table in your database, you can use a statement that selects any field(s) you want from those tables. Neither the tables nor the columns need to have anything in common. The formula to follow is:

SELECT what-field(s) FROM Table_1, Table_2, . . . Table_n

You start with the SELECT keyword followed by the list of fields from the tables. If the tables have columns with different names, you can simply list the name of each column. Here is an example:

SELECT AccountNumber, EmergencyName, EmployeeNumber, Title, HourlySalary
FROM Customers, Employees;

When you select fields from different tables, in the result, each of the records of the first table would display, each showing the first record (combination of the selected columns) of the second table. Then each of the records of the first table would show again, followed by the second record (combination of the selected columns) of the second table. This will continue until all records of the second table have displayed. Consequently, the resulting query would contain (Number of Records of First Table) * (Number of Records of Second Table). For example, if the first table contains 4 records and the second table contains 2 records, the statement would produce 4 x 2 = 8 records. Therefore, the above statement would produce:

If the tables have fields with the same name, you must qualify at least the column(s) with the same name. This can be done as follows:

SELECT AccountNumber,
       Customers.FirstName,
       Customers.LastName,
       EmergencyName,
       EmployeeNumber,
       Employees.FirstName,
       Employees.LastName,
       Title,
       HourlySalary
FROM Customers, Employees;

If you don't qualify the common names, you would receive an error when you execute the query.

Practical Learning: Selecting Fields From Different Tables

  1. On the Ribbon, click File and click Open
  2. In the list of files, click Cruise3 from the previous lesson
  3. On the Ribbon, click Create and click Query Design
  4. On the Show Table, click Close
  5. Right-click the title bar of the window and click SQL View
  6. Edit the content of the window as follows:
    SELECT AccountNumber,
           EmployeeNumber,
           EmergencyName,
           Nationality,
           DepartmentCode
    FROM Customers, Employees;
    
  7. On the Ribbon, click the View button Datasheet View
  8. After viewing the results, click the arrow of the View button on the Ribbon and click SQL View
  9. Change the code as follows:
    SELECT AccountNumber, 
           Customers.FirstName,
           Customers.LastName,
           EmployeeNumber,
           EmergencyName,
           Employees.FirstName,
           Employees.LastName,
           Nationality,
           DepartmentCode
    FROM Customers, Employees;
  10. On the Ribbon, click the View button Datasheet View
  11. After viewing the results, click the arrow of the View button on the Ribbon and click SQL View
  12. Change the code as follows:
    SELECT clients.AccountNumber, 
           clients.FirstName,
           clients.LastName,
           staff.EmployeeNumber,
           clients.EmergencyName,
           staff.FirstName,
           staff.LastName,
           staff.Nationality,
           staff.DepartmentCode
    FROM Customers AS clients, Employees AS staff;
  13. On the Ribbon, click the View button Datasheet View
  14. Close the Query window
  15. When asked whether you want to save, click No
 

Managing the Fields in a Query Window

Selecting a Column

Some operations require that you select a column from the bottom section of the query window:

  • To select a field in the lower section of the view, click the tiny bar of the column header:

    Selecting a Column in a Query

  • To select a range of columns, click the column header of one at one end, press and hold Shift, then click the column header at the other end

Since selecting a column in the Query window is a visual operation, there is no equivalent in SQL.

Removing a Column From a Query

If you don't need a column anymore on a query, you can either delete it or replace it with another column:

  • To delete a column:
    • Once it is selected, press Delete
    • Right-click the column header and click Cut
  • To delete a group of columns, select them and press Delete

To remove a column from a SQL statement, simply delete it. An example would be:

SELECT EmployeeName, DateHired, Title FROM Employees;

To

SELECT EmployeeName, Title FROM Employees;

Replacing a Column

To replace a column, click the arrow on the combo box that displays its name and select a different field from the list:

To replace a column, click the arrow on the combo box that displays its name and select a different field from the list

To replace a column from a SQL statement, simply change its name to the name of another existing column of the same table or query. An example would be:

SELECT EmployeeName, DateHired, Title, Salary FROM Employees;

To

SELECT EmployeeName, DateHired, EmailAddress, Salary FROM Employees;

Moving a Column

Columns on a query are positioned incrementally as they are added to it. If you don't like the arrangement, you can move them and apply any sequence of your choice. Before moving a column or a group of columns, you must first select it. Then:

  • To move a field, click its column header once. Click it again and hold your mouse down, then drag in the direction on your choice
  • To move a group of columns, first select the group and then proceed as if it were one column

Since moving a column in the query window is a visual operation, there is no equivalent in SQL. Otherwise, in the SQL statement, you can either edit the statement or delete the field in one section to put it in another section. An example would be:

SELECT EmployeeName, DateHired, EmployeeNumber, Salary FROM Employees;

Practical Learning: Moving a Column

  1. On the Ribbon, clcik File and click Open
  2. In the file of files, click Cruise2
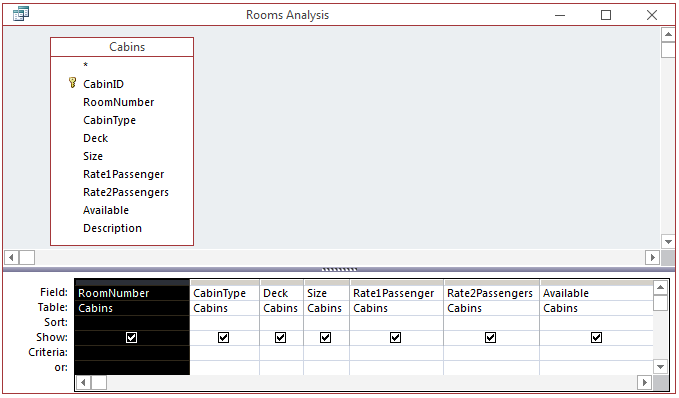
  3. In the Navigation Pane, right-click Rooms Analysis and click Design View
  4. Position the mouse on the bar above RoomNumber and click
  5. Click the same bar and hold the mouse down
  6. Drag to the left until the column is positioned to the left

    Query Design - Moving a Field

    Query Design - Moving a Field

  7. To view the result, click the View button Datasheet View
  8. To close the query, double-click its system icon
  9. A message asks you whether you want to save the query, click Yes

A Query as a Datasheet Object

Data Entry on a Query

A query uses the same approach of a table to present its data: it is made of columns and rows whose intersections are cells. Although the main purpose of a query is to either prepare data for analysis or to isolate some fields to make them available to other database objects, as done on a table, data can be entered in a query.

Data entry on a query is done the same as on a table: data is entered into cells. The Enter, Tab and arrow keys are used with the same functionality as the table. Like a table, a query provides the navigation buttons on its lower section, allowing you to move to the first, the previous, the next, the l ast or any record in the range of those available.

Practical Learning: Performing Data Entry on a Query

  1. In the Navigation Pane, double-click the Rooms Analysis query to open it
  2. Click the first empty field under the Room # column
  3. Type 208 and press Enter
  4. Create the records as follows:
     
    Category Cabin Type Deck Size Rate 1 Passenger Rate 2 Passenger Available
    208 Outside Riviera 225 sq/ft 425 800 Checked
    311 Inside Upper 170 sq/ft 275 500 Unchecked
    415 Inside Rivera 170 sq/ft 275 500 Unchecked
    210 Outside Verandah 225 sq/ft 450 850 Unchecked
  5. After using the query, close it

Query Printing

Like tables, queries provide you with a fast means of printing data. Once again, this should be done when you need a printed sheet but not a professionally printed document. Data printing on a query is done with the exact same approaches and techniques as for a table.

Practical Learning: Printing a Query

  1. The Cruise2 database should still be opened.
    In the Navigation Pane, double-click Rooms Analysis
  2. While the query is opened, on the Ribbon, click File and click Print
  3. Click Print
  4. Close the query

Query Aesthetic Formatting

The Datasheet View of a query appears exactly like that of a table. It is aesthetically formatted using the characteristics we reviewed in Lesson 5.

Practical Learning: Aesthetically Formatting a Query

  1. On the Ribbon, click File and click Open
  2. In the list of files, click the StatesStatistics2 used earlier in this lesson
  3. On the Ribbon, click Create and click Query Design
  4. In the Show Table dialog box, click States, click Add, and click Close
  5. In the top list, double-click StateName, AreaSqrKms, AdmissionUnionDate, and Region
  6. To see the result, in the Results section of the Ribbon, click the Run button Run Button

    Aesthetically Formatting a Query

  7. If necessary, on the Ribbon, click Home.
    Change the following characteristics:
    Font Name: Bookman Old Style (if you don't have that font, select Times New Roman)
    Font Color: Gold, Accent 4, Lighter 80% (Theme Colors: 8th column, 2nd row)
    Background Color: Blue, Accent 1, Darker 50% (Theme Colors: 5th column, 6th row)
    Alternate Row Color: Blue, Accent 1 (Theme Colors: 5th column, 1st row)

    Aesthetically Formatting a Query

  8. Close Microsoft Access
  9. Whenr asked whether you want to save the changes, click No

Previous Copyright © 2002-2021, FunctionX, Inc. Next