Lessons Logo

Managing Relationships


Numeric Fields Referencing

Most of your data entry will be performed on forms. This is done to protect your tables from (even unintentional) corruption. This means that, during table design, you should be aware of which table is doing what and why. The combo boxes we have created so far provide a good mechanism for data entry but as long as you know what data a field is holding, you don't necessarily have to create these combo boxes on tables. The only piece of information a foreign key field really needs is a number: the number is what connects it to the Primary Key field of the originating table. Therefore, once you understand the use of relationships and lookup fields, you can simply create a numeric field that acts as a liaison between two tables.

Practical Learning: Creating a Numeric Lookup Field

  1. Open the Video Collection database you started in the previous lesson
  2. From the Tables section of the Database window, open the Videos table in Design View
  3. Right-click CopyrightYear and click Insert Rows
  4. In the new empty field, type DirectorID and set its Data Type to Number
  5. In the lower section of the view, make sure the Field Size is set to Long Integer. In the Caption field, type Director
  6. Save the table and switch to Datasheet View
  7. Without closing the Videos table, from the Tables section of the Database window, double-click the Directors table to open it
  8. Display both tables so the Directors table is on top and in the background while the Videos table is at the bottom
  9. Then enter the number of the DirectorID from the Directors table to the corresponding Director in the Videos table
     
  10. Close both tables

Relationship Diagrams

The concept of relational database ensures data reliability on the concept of data moving from one source to another. There are many goals behind this theory. Data in your resources needs to be as accurate as possible. Provided your database is made of various objects, mainly tables, you should avoid any possible redundancy. In other words, data from one source should be unique. To accomplish these goals, you interrelate the various components of your database, namely tables (remember, data in your database depends on, or originates from, tables).

In our earlier illustration, we saw that a foreign key field created in a table acts as an ambassador. To make this effective, a formal relationship must be created between that field and the primary key field of the table it represents. There should be some type of link between both fields.

When you are creating a Lookup field, you are indicating that the value entered in this particular field will come from another table, and you specify the originating table. The originating table is the parent table. The target table is the child table.

The reason you established Primary Keys in your tables is because these are the fields used to build relationships between tables. They are used to verify the uniqueness of data. They also, prevent data in relationships being mixed. You can build a reliable relationship only between data of the same kind. We also saw that, to make it easy to recognize the primary key of a parent table and the foreign key of a child table, both fields should have the same name, although this has little to do with the database itself: as long as both fields have the same data type, the relationship can be created.

Tables and fields relationships are created and managed in a special window called the Relationship window. To display it, on the Database toolbar, you can click the Relationships button. Alternatively, on the main menu, you can click Tools -> Relationships. After clicking one of those, if no relationship exists among the tables in the current database, the Show Table dialog box would come up, asking you to select the tables whose relationship(s) you want to create. If at least one relationship has been created between two tables, the Relationship window would come up and display that relationship or the already existing relationships. In this case also, if a table of the current database is not represented in the window, to add it, display the Show Table dialog box, select the table, click Add and click Close. You can create a relationship only between two tables that are present on the Relationships window. This means that even if a table is part of your database and you want to link it to another table (of your database), if the table has not been added to the Relationships window, you cannot create or manage its relationship to another table. Of course, there are other ways you can create relationships without using the Relationships window but the Relationships window gives you advanced and detailed means of creating and managing relationships.

When the Relationships window is displaying, a new menu group is added to the main menu: it is the Relationships. To establish a relationship that does not yet exist between two tables, you can drag the primary key from the parent table to the foreign key of the desired table. If you drag it accurately, the relationship would be acknowledged and you can just click Create to make it formal. If you dropped the primary key on the wrong field, you would have time to select the appropriate fields in the Edit Relationship dialog box.

After working with the Relationships window, you can close it. You would be asked to save it in order to keep the relationship(s) created.

Practical Learning: Establishing Tables Relationships

  1. Open the Music Collection1 database
  2. On the Database toolbar, click the Relationships button
    The Show Table dialog box comes up. From here, you will specify what tables (or queries) will be used when building your relationship (s):
     
  3. Click MusicCategories once and click the Add button 
  4. Double-click the MusicAlbums
  5. On the Show Table dialog box, click the Close button
  6. To add another table as if we forgot it, right-click an empty area in the Relationships window and click Show Table…
  7. In the Show Table dialog box, click AlbumTracks. Then click Add and click the Close button
  8. Arrange the layout of your Relationships window so that the MusicAlbums table is in the middle of the MusicCategories table on its left and the AlbumTracks table on its right.
    The originating table uses its Primary Key and associates it to the field you choose in the target table. The target field is referred to as the Foreign Key
  9. Drag the MusicCategoryID field from the MusicCategories table and drop it on top of the MusicCategoryID field in the MusicAlbums table:
     
     
  10. The Edit Relationship dialog box comes up. This allows you to confirm creating a relationship
    Click the Create button to create the relationship
    Now you have a line relating these two tables
  11. Drag any field from the MusicAlbums table and drop it on top of any field in the AlbumTracks as if you missed the target
     
  12. Once again, the Edit Relationship dialog box comes up
    On the dialog, under the left Table/Query, click the field that is selected to display its combo box. In that left combo box, select AlbumID and press Tab
  13. Under Related Table/Query, click the field that is selected and click the arrow of its combo box
  14. Select AlbumID
     
  15. Click Create
  16. To add another table that we failed to include to the diagram, on the main menu, click Relationships -> Show Table…
  17. In the Show Table dialog box, double-click Artists and click Close
  18. Position the new table to the top left section of the Relationships window and move the MusicCategories table under it
  19. To create a new relationship, on the main menu, click Relationships -> Edit Relationship…
  20. On the Edit Relationship dialog box, click Create New…
  21. In the Create New dialog box, click the arrow of the Left Table Name combo box and select Artists. In the Right Table Name combo box, select MusicAlbums. In the Left Column Name combo box, select ArtistID. In the Right Column Name combo box, select RecordingArtistID
     
  22. Click OK
  23. In the Edit Relationship dialog box, click Create
     
  24. On the Relationship toolbar, click the Save button and close the Relationships window
  25. Now we will include a table without using the Relationships window. 
    Open the MusicAlbums table in Design View
  26. Click the Format field to give it focus
  27. Press Tab, type L and press F6
  28. When the first page of the Lookup Wizard comes up, accept the first radio button and click Next
  29. Click Formats and click Next
  30. In the list, double-click AlbumFormat and click Next:
     
  31. Agree to let Microsoft Access Hide The Primary Key and click Next
  32. Accept the label as Format and click Finish
  33. Accept to save the table
  34. Save the table and switch to the Datasheet View to verify that the Format field has a combo box and does not allow any value that is not coming from the Formats table
  35. Specify the appropriate formats
     
  36. When you have finished, close the MusicAlbums table
  37. To open the Relationships window, on the main menu, click Tools -> Relationships…
    Notice that, this time, the Relationships window opens because some relationships had already been created among tables
  38. On the main menu, click Relationships -> Show Table…
  39. On the Show Table dialog box, double-click Formats and click Close
  40. Notice that a joining line is created between the MusicAlbums table and the Formats table
     
  41. Save and close the Relationships window


Note
This feature is not available in MS Access 97. Therefore, if you are using that version, create the relationship as done above.

MOUS Topics

S3 Establish tables relationships
S13 Modify tables using Design View
 

Exercises 


Watts A Loan

  1. Open the Watts A Loan database. Start a new table in Design View and create it with the following fields:
     
    Field Name Data Type Additional Information
    LoanProcessingID AutoNumber Primary Key
    Caption: Loan Processing ID
    EmployeeID Number Caption: Processed By
    DateProcessed Date/Time Format: Short Date
    Input Mask: 99/99/00
    Caption: Date Processed 
    CustomerID Number Caption: Account Number
    TypeOfLoanID Number Caption: Type of Loan
    LoanAmount Currency Loan Amount
    InterestRate Number Field Size: Double
    Format: Percent
    Caption: Interest Rate
    PeriodicPayment Currency Caption: Periodic Payment
    FirstPaymentDueDate Date/Time Format: Short Date
    Input Mask: 99/99/00
    Caption: 1st Payment Due Date
    RegularPaymentsDueOn   Caption: Regular Payments Due On
    NumberOfPayments Number Field Size: Integer
    Caption: Number of Payments
    Notes Memo  

    Save it as LoanProcessing and close it

  2. Open the Relationships window and create the relationships as follows:


    If you are using Microsoft Access >= 2000, print the Relationships diagram and save it as Watts A Loan Map
 

Yugo National Bank

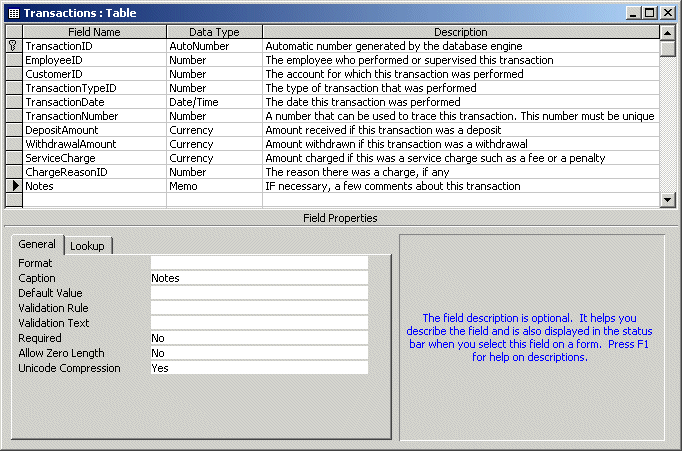
  • a) Open the Yugo National Bank and create a new table in Design View with the following fields:
     
    Field Name Data Type Additional Information
    TransactionID AutoNumber Primary Key
    Caption: Transaction ID
    Processed By    
    Account Number    
    Transaction Type    

    b) Save the table as Transactions
    c) Use the Field Builder to add the TransactionDate field of the Transactions sample table under the other fields
    d) Use the Field Builder to add the TransactionNumber field of the Transactions sample table under the other fields
    e) Use the Field Builder to add the DepositAmount field of the Transactions sample table under the other fields
    f) Use the Field Builder to add the WithdrawalAmount field of the Transactions sample table under the other fields
    g) Use the Field Builder to add the ServiceCharge field of the Transactions sample table under the other fields
    g) Use the Lookup Wizard for the Processed By field. Select the LastName, the Title, and the CanCreateNewAccount fields of the Employees table. Keep the label as Processed By
    h) Use the Lookup Wizard for the Account Number field. Select the AccountNumber and the AccountName fields of the Customers table. Keep the label as Account Number
    i) Use the Lookup Wizard for the Transaction Type field. Select the TransactionType field of the TransactionTypes table. Keep the label as Transaction Type
    j) Add a new field at the end of the table and name it Charge Reason. Use the Lookup Wizard for the Charge Reason field. Select the ChargeReason field of the ChargeReasons table. Keep the label as Charge Reason
    k) Add a new field under the others. Name it Notes and set its Data Type to Memo
    Save the table and close it

Yugo National Bank - Transactions Table  

Previous Copyright © 2002-2007 FunctionX, Inc. Next