Subforms

Overview of Subforms


Introduction

Relational database allows you to separate data in objects so that these objects can hold different pieces of information and make data available to other objects that need it. Sooner or later, users constantly need information held by one form while they are working on another form. There are various ways you can solve such a problem. One solution is to "embed" one form or report into another form or report.

A subform is a form that you position inside of another form. In order to "include" one form into another form, both objects must have a relationship, as we have learned in the past. The form that is hosting the other form is the parent. The form that is added to the parent is called the child form. The parent form must have a primary key that "links" or relates it to a foreign key in the child form. This foreign key of the child object must be of the same data type as the primary key on the parent object.


Microsoft Access >= 2000 Automatic Subforms

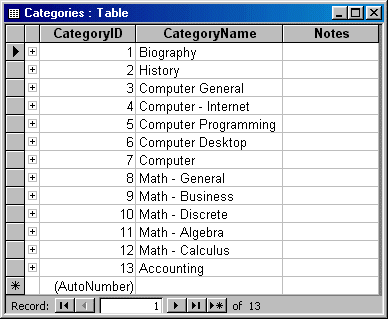
Microsoft Access 2000 and later versions allow you to quickly create a form that has a subform already. Before using this feature, you should make sure that the table you want to use has a sub datasheet, which can be verified by the + button on the left of its records:


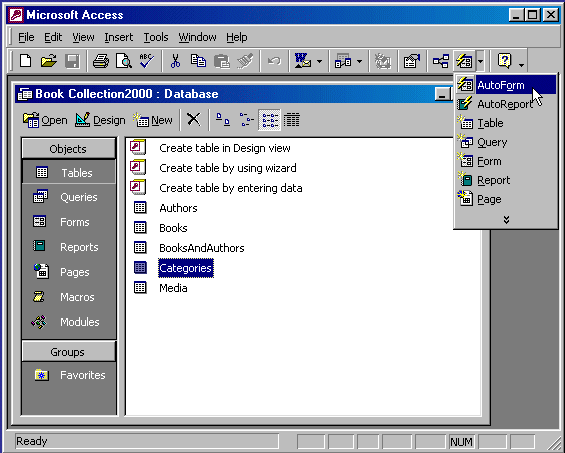
As you may know already, a sub datasheet exists if a relationship had previously been created between two tables. Using this feature, to create a form that is automatically equipped with a subform, after selecting the table on the Database Window, on the Database toolbar, you can click the arrow of the New Object button and select AutoForm.


Practical Learning: Automatically creating a Form With a Subform
  1. If you are using Microsoft Access 97, skip this exercise.
  2. Open the Book Collection1 database
  3. From the Tables section of the Database Window, double-click the Categories table to open it in Datasheet View
     
  4. After viewing it, close it but make sure it is sill selected in the Tables section of the Database window
  5. On the Database toolbar, click the arrow of the New Object button and select AutoForm:


  6. To close and save the new form, click its Close button
     
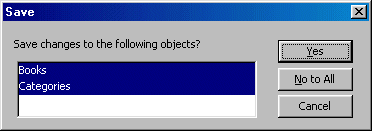
  7. When prompted whether you want to save the objects, click Yes

Automatic Forms

As done with all the other forms we have used so far, there are two main techniques you can use to create a subform. Keeping the tradition of its many wizards, Microsoft Access provides the means of automatically creating a subform. There is no particular design you need to follow for a subform. A subform is primarily a form. The only true rule you must follow is that one of its fields must have a field, usually its primary key, that will allow it to be related to a field on the form in which it would be added. If you are not using the Form Wizard, you can still design a form and make it a subform.

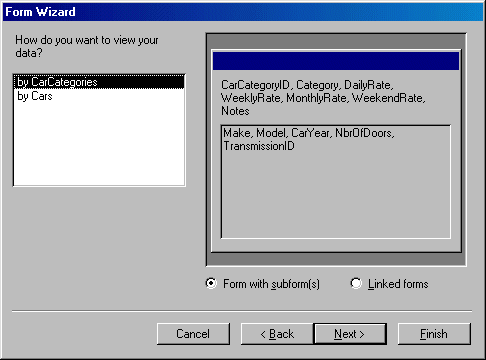
You can also create a form equipped with a subform, using the Form Wizard. To do this, in the first page of the wizard, select the parent form. Select the necessary fields for the form (report). In the Tables/Queries combo box, select another table or query that holds the fields for the child form (report). Continue with the wizard. The wizard will verify that the tables or queries share a relationship. If they do not, you would receive an error or the result of the form (report) would be unpredictable.

Practical Learning: Automatically Creating an Auto-Subform
  1. Open the Bethesda Car Rental1 database
  2. On the main menu, click Insert -> Form
  3. On the New Form dialog box, click Form Wizard and click OK
  4. In the Tables/Queries combo box, select CarCategories
  5. Click the Select All button 
  6. In the Tables/Queries combo box, select Table: Cars
  7. Double-click the following fields to select them: Make, Model, CarYear, NbrOfDoors, and TransmissionID
  8. Click Next
     
  9. On the second page, make sure the Form With Subform radio button is selected. Otherwise, select it
     
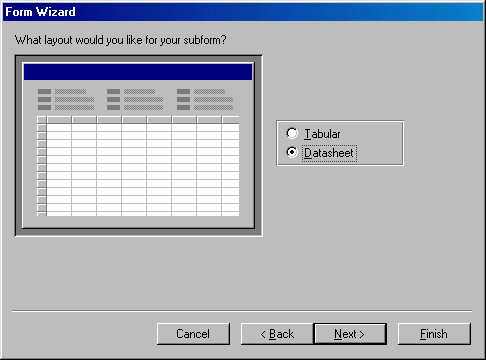
  10. On the 3rd page, make sure the Datasheet radio button is selected. Otherwise, click it. Click Next
  11. On the 4th page, click the Standard style and click Next
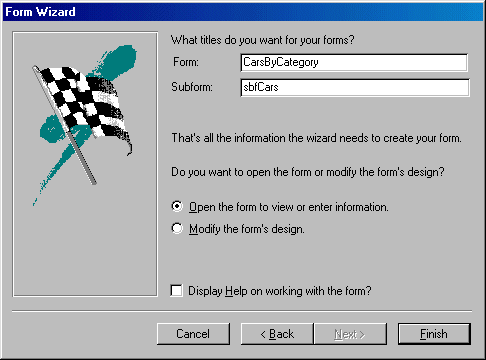
  12. Change the name of (main) form to CarsByCategory
  13. Change the name of the sbfCars
     
  14. Click Finish
  15. After viewing the form, switch it to Design View
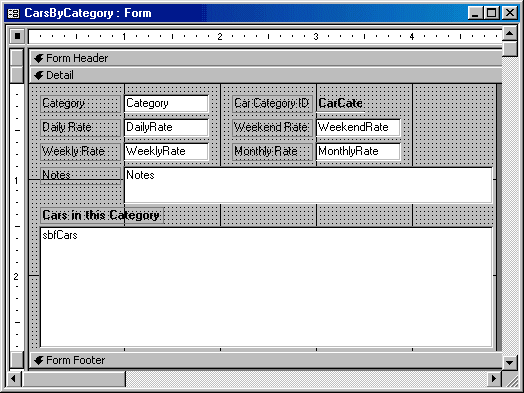
  16. Move the controls around and change their position to appear as follows:
     
  17. Save, preview, and close the form


Types of Subforms

Introduction

Microsoft Access provides various techniques to create a subform. We saw above how a form can be created automatically with a subform. This is sometimes referred to as Master-Detail. Besides using the wizards, you can also design a subform. Subforms typically come in three layouts and each can be used for a specific purpose.

Practical Learning: Introducing Subform Design

  1. Open the College Park Auto Shop1 database
  2. To create a new table, on the main menu, click Insert -> Table and, in the New Table dialog box, double-click Design View
  3. Create the following fields for the table
     
    Field Name Data Type Caption Additional Information
    WorkOrderID AutoNumber Work Order ID Primary Key
    Save the table as WorkOrders
    InvoiceNumber Text Invoice # Field Size: 20
    WorkOrderDate Date/Time Date Format: Long Date
    Input Mask: 99/99/00;0;_
    WorkOrderTime Date/Time Time Format: Medium Time
    Input Mask: 00:00;0:_
    EmployeeID Lookup Wizard   Start the Lookup Wizard and accept the first radio button. Select the Employees table. Select the LastName and Title fields. Click Next and click Finish.
    Caption: Processed By
    CustomerID Lookup Wizard   Start the Lookup Wizard and accept the first radio button. Select the Customers table. Select the TagNumber, the LastName, and the FirstName fields. Click Next and click Finish.
    Caption: Customer
    ProblemDescription Memo Problem Description  
    Labor1 Text    
    LaborCost1 Currency   Decimal Places: 2
    Labor2  Text    
    LaborCost2 Currency   Decimal Places: 2
    Labor3      
    LaborCost3 Currency   Decimal Places: 2
    Labor4      
    LaborCost4 Currency   Decimal Places: 2
    Labor5      
    LaborCost5 Currency   Decimal Places: 2
    Labor6      
    LaborCost6 Currency   Decimal Places: 2
    TaxRate Number Tax Rate Field Size: Double
    Format: Percent
    Default Value: 0.0755
    Comments Memo    
  4. Save and switch the table to Datasheet View
  5. Close the table
  6. To create a new form, on the main menu, click Insert -> Form. In the New Form dialog box, double-click Form Wizard
  7. In the first page of the wizard, in the Tables/Queries combo box, select WorkOrders
  8. In the Available fields list, double-click the following fields: WorkOrderID, InvoiceNumber, WorkOrderDate, WorkOrderTime, EmployeeID, CustomerID, ProblemDescription, and Comments
  9. Click Next
  10. In the second page, make sure the Columnar radio button is selected and click Next
  11. Select the Standard style and click Next
  12. Accept the suggested name of the form as WorkOrders and click Finish
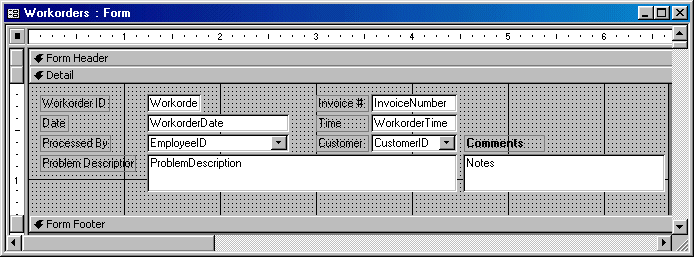
  13. After viewing the form, switch it to Design View and modify its design as follows:
  14. Save, preview and close the form

The Datasheet Form

The automatically created forms and reports provide a simplistic design. Instead of generating such form, or after creating them, you can design or redesign your subforms. To support this, there are three types of layout you can use for a subform.

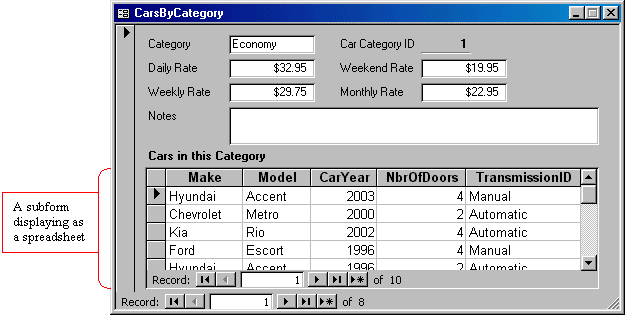
A subform, like a form can display like a spreadsheet, as seen on the above form:

Such a form is designed like any other. To get the spreadsheet display, select the form in Design View and, in the Properties window, change its Default View to Datasheet.

You can use the Datasheet view to display data as done on a table, if you have users who like working on columns, rows, and prefer to display all information in the same view, all records at the same time. If a subform contains sections other than the Details, the Datasheet layout would not show them. Therefore, use this view if either you do not need/want to show any field from the Form Header or the Form Footer sections.


Practical Learning: Using a Datasheet Subform

  1. Open the Music Collection2 database and click Forms in the Database window
  2. To create a new form, on the Database window, click the New button. When the New Form dialog box comes up, in the lower combo box, select AlbumTracks. In the upper list, double-click Design View
  3. Save the form as sbfTracks
  4. Reduce the width of the form so its right border is at 21/4
  5. If the Field List is not displaying, on the Form Design toolbar, click the Field List button
    In the Field List, click TrackNumber. Press and hold Shift. Then click TrackLength and release Shift. This selects the TrackNumber, the TrackTitle, and the TrackLength fields
  6. Click and drag the selected fields to the Detail section of the form. There is no need to change the positions or locations of the labels and text boxes. The only changes you should make are to click each label twice (not double-click; simply click it once and click it again) to put it into edit mode and then delete the colon “:” on the right side of each string. Also, click the TrackNumber text box and, on the Formatting toolbar, click the Center button. Other than that, your form could look as follows and nothing would change its behavior:
     
  7. Double-click the button at the intersection of both rulers. In the Properties window, click Format and change the following properties:
    DefaultView: Datasheet
    Record Selectors: No
    Navigation Buttons: No
    Dividing Lines: No
  8. Switch the form to Form View
  9. Right-click the # column header and click Column Width... Type 3.85 and press Enter
  10. Right-click the Track Title column header and click Column Width… Type 24.15 and press Enter
  11. Right-click the Length column header and click Column Width… Type 10 and press Enter
     
  12. Save and close the form
  13. Double-click MusicAlbums form to open it
  14. After viewing it, switch it to Design View and click the Tracks tab on the tab control
  15. On the Toolbox, make sure the Control Wizard button is clicked.
    To add the new subform, on the Toolbox, click the Subform/Subreport button and click in the body of the Tracks button
  16. In the first page of the Subform/Subreport Wizard, click the arrow of the combo box and select sbfTracks
  17. Click Next.
    In the second page of the wizard, make sure the Choose From A List radio button is selected. Also, in the Select One Of These Links list box, make sure the relationship is based on the AlbumID field
     
  18. Click Next
  19. Accept the suggested name of the subform as sbfTracks and click Finish
  20. Click the label that was added to the subform and press Delete (to remove the label). You will also need to move the subform and resize the property sheet
  21. Save and preview the form
     
  22. Close the form

The Single Form

A single form is the type of form that displays its data one record at a time. This concept, which was used on most forms we have used so far, can also be applied to a subform. The single layout can be valuable if you want to show one record from a related form as it is linked to a record on the current form. While a Datasheet form can clearly show that it is an embedded object, the fields of a single form can easily be mixed with those of the hosting form but it is usually determined to be apart.

A single subform is designed like a regular form where fields are created in the Detail section and other optional controls can be added to the other sections of the form. When selecting the fields that would be part of the subform, make sure you include only those that can be useful in the form that will host the subform.

Practical Learning: Designing a Single Subform

  1. Open the College Park Auto Shop1 database
  2. To create a new form, on the main menu, click Insert -> Form and, in the New Form dialog box, double-click Form Wizard
  3. In the first page of the wizard, in the Tables/Queries combo box, select Table: Customers.
    In the Available Fields list double-click FirstName, LastName, CompanyName, Address, City, State, ZIPCode, TagNumber, Make, Model, CarYear, and Mileage
  4. Click Next
  5. In the second page of the wizard, make sure the Columnar radio button is selected and press Enter
  6. In the third page of the wizard, click the Standard style and press Enter
  7. Change the name of the form to sbfCustomers and click Finish
  8. After viewing the form, switch it to Design View and redesign it as follows:
     
  9. Double-click the button at the intersection of the rulers and, in the Format tab of the Properties window, change the following properties:
    Scroll Bars: Neither
    Record Selectors: No
    Navigation Buttons: No
    Dividing Lines: No
  10. Save, preview, and close the form
  11. From the Forms section of the Database window, double-click the WorkOrders form to open, then switch it to Design View
  12. On the Toolbox, make sure the Control Wizard button is clicked.
    To use the above subform, on the Toolbox, click the Subform/Subreport button
  13. On the form, click under the ProblemDescription memo
     
  14. On the first page of the Subform/Subreport Wizard, click the arrow of the combo box and select sbfCustomers
     
  15. Click Next.
    In the second page of the wizard, make sure the Choose From A List radio button is selected and make sure the relationship is defined based on the CustomerID field
     
  16. Click Next
  17. Accept the suggested name of the subform and press Enter
  18. On the form in Design View, click the label of the newly added subform and press Delete (to remove the label). Move the subform to the left. On the Toolbox, click the Option Group control and click the lower-right side of the form. When the wizard comes up, click Cancel. Using the items from the Field list, add the LabelX and their corresponding LaborCostX
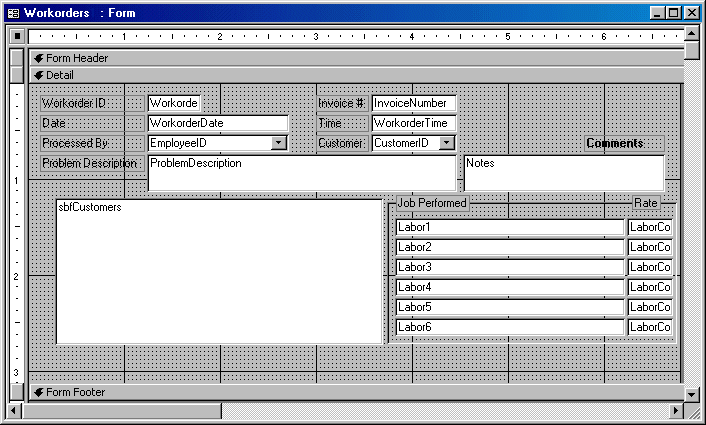
  19. Complete the design of the form as follows (below picture):
  20. Save, preview, and close the form

The Continuous Form

Microsoft Access provides another type of table, sometimes more flexible: the Continuous form. Like the Datasheet form, the Continuous form displays as many records as the height of the form can afford. While the fields of a Datasheet are usually “reproduced” as they would be on the source table, the fields of a Continuous form must be (carefully) designed to play their roles. We saw that a single form displays the values that belong to a record and only one record displays on the form. Here is an example:


A continuous form also displays one record at a time in the Detail section but each record displays under the previous record, like the Datasheet form except that the fields must be visually designed. Here is an example:


Unlike the datasheet form, but like the single form, a continuous form equipped with other sections than the Detail would display them in Form View. This means that you can include additional record in the other sections. Based on this, a typical design of a continuous form consists of creating some labels in the Form Header section and positioning their corresponding controls under them but in the Detail section. The fields can be horizontally aligned and adjacent each other. You should (strongly, if not must) avoid including Memo and OLE Objects (pictures, linked documents, etc) in a continuous form because such fields may take too much space. This would deceive the purpose of the continuous form.

As mentioned already, a continuous form is designed with the same care used on a single form. To make a form behave as a continuous form, it depends on the technique you use to create the form. If you create the form using the Form Wizard, in the second page of the wizard, select the Tabular radio button:


If you use the Form Wizard to create the form but select fields from more than one table (or query), in the third page of the wizard, select the Tabular radio button


If you are designing the form, in the Properties window set its Default View to Continuous Form.

Practical Learning: Designing a Subform or Subreport

  1. The College Park Auto Shop1 database should still be opened.
    To create a junction table, on the main menu, click Insert -> Table and, in the New Table dialog box, double-click Design View
  2. Set the first Field Name to OrderAndPartsID and set its Data Type to AutoNumber. Also, make it a Primary Key
  3. Save the table as OrderAndParts
  4. For the second field, set its Field Name to Work Order and set its Data Type to Lookup Wizard… When the wizard starts, make sure the first radio button is selected and click Next. Select the WorkOrders table and click Next. Double-click InvoiceNumber to select it and click Next then click Finish. When asked to save the table, click Yes and delete the 0 in the Default Value field
  5. Set the Field Name of the third field to Part and set its Data Type to Lookup Wizard… When the wizard starts, make sure the first radio button is selected and click Next. Select the Parts table and click Next. Click the Select All button , UnitPrice, and Description fields. Click Next


    and click Finish. When asked to save the table, click Yes and delete 0 in the Default Value
    6. Click the Lookup tab in the lower of the table and click Row Source. Click its ellipsis button. In the SQL Statement window, in the Sort field of the Description column, select Ascending
     
  6. Close the SQL Statement window. When asked whether you want to save it, click Yes
  7. Complete the table as follows:
     
    Field Name Data Type Caption Additional Properties
    OrderAndPartsID AutoNumber   Primary Key
    WorkOrderID Number Work Order  
    PartID Number Part  
    UnitPrice Currency   Unit Price
    Default Value: 0
    Quantity Number Integer Default Value: 1
  8. Save the table and switch it to Datasheet View
  9. Close the table
  10. To start a new form, on the main menu, click Insert -> Form
  11. In the New Form dialog box, click Design View. In the combo box, select OrderAndParts and click OK
  12. To save the form, on the Form Design toolbar, click the Save button 
  13. Type sbfParts and press Enter
  14. Right-click in the middle of the form and click Form Header/Footer
  15. If the Toolbox is not displaying, on the Form Design toolbar, click the Toolbox button.
    On the Toolbox, click the Label button
  16. Click just under the Form Header bar on the left side:
     
  17. Type Part and press Enter
  18. If the Field List is not available, on the Form Design toolbar, click the Field List button 
    From the Field List, drag PartID and drop it somewhere in the Detail section. Click its Part label to select it and press Delete to remove it
  19. Move the PartID combo box and place it under the Part label but in the Detail section
  20. On the Toolbox, click the Label and click under the Form Header bar to the right of the existing Part label. Type Part Name and Press Enter
  21. On the Toolbox again, click the Text Box control and click in the Detail section to the right of the existing combo box. Delete its TextX label and select the new Unbound text box. Using the Other tab of the Properties window, change its Name to txtPartName
  22. Design the rest of the form as follows:
     
  23. Double-click the button at the intersection of both rulers . In the Properties window, click the Format tab and change the form’s properties as follows:
    Default View: Continuous Form
    Record Selectors: No
    Navigation Buttons: No
    Dividing Lines: No
  24. Save, preview and close the form
  25. From the Forms section of the Database window, double-click the WorkOrders form to open it in Form View. After viewing it, switch it to Design View
  26. On the Toolbox, make sure the Control Wizard button is clicked 
    To add a subform for the parts, on the Toolbox, click the Subform/Subreport button
  27. On the form, click in the lower left side of the Detail section under the Customers subform
  28. On the first page of the Subform/Subreport Wizard, click the arrow of the combo box and select sbfParts
  29. Click Next
  30. In the second page of the wizard, make sure the Choose From A List radio button is selected. Also make sure the relationship is defined based on the WorkOrderID field and click Next
  31. Accept the suggested name of the subform and press Enter
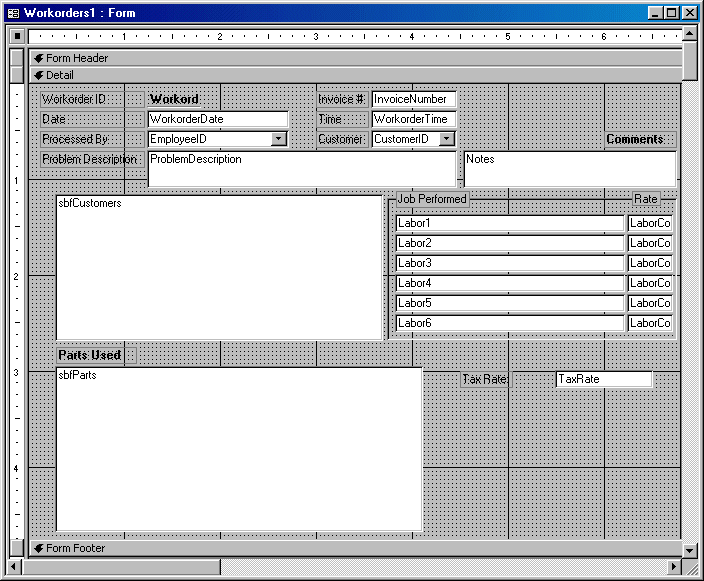
  32. On the form in Design View, click the label of the newly added subform and edit it to display Parts Used. To complete the list of fields from the source table, from the Field list, drag the TaxRate item and drop it in the lower right section of the form
  33. Complete the design of the form as follows (below screenshot):
  34. Save and preview the form
  35. Close the form

MOUS Topics


Exercises 

Watts A Loan

  1. Open the Watts A Loan database.
    Using the Form Wizard, create a Tabular form that includes the TransactionNumber, the TransactionDate, and the TransactionAmount fields from the Transactions table. Set its Style to Standard and save it as sbfAccountTransactions. Complete its design as follows:


    Save and close the form
  2. Create a new form based on the Customers table but that includes only the CustomerID, the AccountNumber, the FirstName, and the LastName fields. Save the form as CustomersTransactions.
    Add the sbfAccountTransactions to the bottom section and design the rest of the form as follows:


    Save the form and close it
 

Yugo National Bank

  1. Open the Yugo National Bank database.
    Use the Form Wizard to create a new Columnar form using the Standard style and based on the Customers table. Include the following fields: EmployeeID, DateCreated, AccountNumber, and CustomerName. Save the form as CustomersTransactions
    Use the Combo Box Wizard to add a combo box that uses the AccountType field from the AccountTypes table and store its values in the AccountTypeID field. Set its label to Account Type and change the Name of the combo box to cboAccountType
    Aadjust its design as follows before saving and closing it:
     
  2. Design a new form based on the Transactions table. Include the following fields: TransactionTypeID, TransactionDate, TransactionNumber, DepositAmount, WithdrawalAmount, and ServiceCharge
    Save the form as sbfTransactions
    Design it as a tabular form as follows before saving and closing it:
     
  3. Open the CustomersTransactions form in Design View and add the sbfTransactions form under the other controls before saving and closing it:
     
  4. Open the CustomersTransactions form to view the result then close it


Previous Copyright © 2002-2019, FunctionX Next