Microsoft Access Examples:
Georgetown Cleaning Services

|
Microsoft Access Examples: |

Introduction
In some sections of our Microsoft Access, we referred to a database application called Georgetown Cleaning Services. It was created simply to introduce or perform calculations. To make it more useful, we will expand it with some options.
Some times if you are asked to create an application for a store that sells a specific number of items based on a fixed list, you may ask for the list of items so you can create its elements in the application. Here is an example:

For such an application, when the list of items changes, you may have to modify the application and redistribute (or re-install it). One solution to this problem would consist of providing placeholders for an employee to fill out and process the order with them. Another problem that can be common with this type of application is that, while the form may be crowded with too many objects, most of the time, some items are rarely ordered.
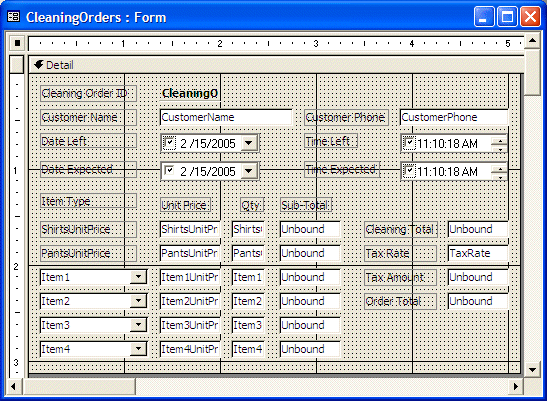
In this exercise, to make this type of application a little more flexible, we will use a few combo boxes that allow the user to simply select the items that are valid for the order.
![]() Practical Learning: Creating the Application
Practical Learning: Creating the Application
| Field Name | Data Type | Properties |
| CustomerName | Text | |
| CustomerPhone | Text | |
| DateLeft | Text | Default Value: =Date() |
| TimeLeft | Text | Default Value: =Time() |
| DateExpected | Text | |
| TimeExpected | Text | |
| ShirtsUnitPrice | Currency | Default Value: 1.25 |
| ShirtsQuantity | Number | Field Size: Byte |
| PantsUnitPrice | Currency | Default Value: 2.75 |
| PantsQuantity | Number | Field Size: Byte |
| Field Name | Data Type | Properties |
| Item1UnitPrice | Currency | |
| Item1Quantity | Number | Field Size: Byte |
| Field Name | Data Type | Properties |
| CustomerName | Text | |
| CustomerPhone | Text | |
| DateLeft | Text | Default Value: =Date() |
| TimeLeft | Text | Default Value: =Time() |
| DateExpected | Text | |
| TimeExpected | Text | |
| ShirtsUnitPrice | Currency | Default Value: 1.25 |
| ShirtsQuantity | Number | Field Size: Byte |
| PantsUnitPrice | Currency | Default Value: 2.75 |
| PantsQuantity | Number | Field Size: Byte |
| Item1 | Lookup Wizard | Default Value: "None" |
| Item1UnitPrice | Currency | |
| Item1Quantity | Number | Field Size: Byte |
| Item2 | Lookup Wizard | Default Value: "None" |
| Item2UnitPrice | Currency | |
| Item2Quantity | Number | Field Size: Byte |
| Item3 | Lookup Wizard | Default Value: "None" |
| Item3UnitPrice | Currency | |
| Item3Quantity | Number | Field Size: Byte |
| Item4 | Lookup Wizard | Default Value: "None" |
| Item4UnitPrice | Currency | |
| Item4Quantity | Number | Field Size: Byte |
| TaxRate | Number | Field Size: Double Format: Percent Default Value: 0.0575 |
Application's Related Calculations
Most of the theories we use in this application have already been reviewed in our lessons. The main purpose of this exercise is to take advantage of the DateTimePicker control. This control is not part of the Toolbox. If you want to use it, you must add it from the More Control option.
DateTimePicker is an ActiveX control created by Microsoft and that is available on most other programming environments that run on Microsoft Windows (Microsoft Visual Studio, Visual Studio .NET, Borland C++ Builder, Borland Delphi, Win32, etc). This control allows the user to conveniently select a date or a time instead of typing them. This tremendously reduces the likelihood of making mistakes. Furthermore, it allows the user to "visually" set a date or a time.
For our application, we will use one box for the date the customer left the items to be cleaned, another box for the time the items were left, a box for the date the customer is expected to pick up the cleaned items, and a box for the time the customer is expected pick up these items. The date and time left will be set automatically by the application but the user can change them. When processing a cleaning order, after the user sets the time the items were left, we will set the date and time expected. If a customer deposits his or her items before 9AM, the store will promise that the items would be ready the same day after 5PM. Any items deposited after 9AM would be ready only the following day after 8AM.
![]() Practical Learning: Configuring the Application
Practical Learning: Configuring the Application

Private Sub dtpTimeLeft_LostFocus()
    Dim DateLeft As Date
    Dim TimeLeft As Date
    Dim Time9AM As Date

    ' The time at 9AM
    Time9AM = TimeSerial(9, 0, 0)

    ' Retrieve the date and time the customer left the clothes
    DateLeft = Me.dtpDateLeft.Value
    TimeLeft = Me.dtpTimeLeft.Value

    ' If the customer left the clothes before 9AM
    ' the clothes are promised to be ready the same day
    If TimeLeft <= Time9AM Then
        Me.dtpDateExpected.Value = DateLeft
        Me.dtpTimeExpected.Value = TimeSerial(17, 0, 0)
    Else ' Otherwise, the clothes will be ready the following day
        Me.dtpDateExpected.Value = DateAdd("d", 1, DateLeft)
        Me.dtpTimeExpected.Value = TimeSerial(8, 0, 0)
    End If
End Sub| Name | Control Source | Format |
| txtSubTotalShirts | =Nz([ShirtsUnitPrice])*Nz([ShirtsQuantity]) | Currency |
| txtPantsSubTotal | =Nz([PantsUnitPrice])*Nz([PantsQuantity]) | Currency |
| txtItem1SubTotal | =Nz([Item1UnitPrice])*Nz([Item1Quantity]) | Currency |
| txtItem2SubTotal | =Nz([Item2UnitPrice])*Nz([Item2Quantity]) | Currency |
| txtItem3SubTotal | =Nz([Item3UnitPrice])*Nz([Item3Quantity]) | Currency |
| txtItem4SubTotal | =Nz([Item4UnitPrice])*Nz([Item4Quantity]) | Currency |
| txtCleaningTotal | =[txtSubTotalShirts]+[txtPantsSubTotal]+[txtItem1SubTotal]+[txtItem2SubTotal]+[txtItem3SubTotal]+[txtItem4SubTotal] | Currency |
| txtTaxAmount | =CLng(Nz([txtCleaningTotal])*Nz([TaxRate])*100)/100 | Currency |
| txtOrderTotal | =Nz([txtCleaningTotal])+Nz([txtTaxAmount]) | Currency |
|
|
||
| Home | Copyright © 2004-2019, FunctionX | |
|
|
||