
Getting Assistance With Data Entry
 |
Getting Assistance With Data Entry |
Character Retrieval |
|||
In order to create expressions that complete a database as we saw in the previous lesson, you can use various functions available from Microsoft Access.
|
The Chr() function is used to retrieve a character based on an ASCII character number passed to the function. It could be used to convert a number to a character. It could also be used to break a line in a long expression. The syntax of this function is: Chr(Number) Based on the table of ASCII characters, a call as Chr(65) would produce the letter A. Not all ASCII characters produce a known letter. For example, when Chr(10) is used in a string, it creates a "new line". |
|
The Message Box |
A message box is a Windows(operating system)-created form used to display some information to the user. As opposed to a regular form, the user cannot type anything on the box. There are usually two ways you can use a message box: you can simply display a message to, or request an answer from, the user.
To create a message box, you use a function called MsgBox. If you only want to display a message, the syntax you would use is:
MsgBox(Message To Display)
This function takes only one required argument, the message to display, that you must pass in the parentheses of the function. The message can be passed between double-quotes.
To display a message to the user, place a command-based control, such as a Button, to a form. Then, access the Properties window for the control. In the Events tab of the Properties, click On Click and assign the function to the field. An example would be:
=MsgBox("Remember to submit your time sheet")

When the user clicks the button, a message box would come up:
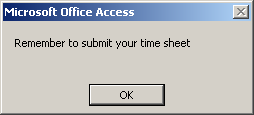
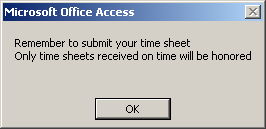
If you want to display the message box on various lines, edit the string to include a call to Chr(10). Here is an example:
MsgBox("Remember to submit your time sheet" + Chr(10)
       "Only time sheets received on time will be honored", )
This would produce:
The message to display can also come from another control on
the form. For example, you can retrieve the value of a control and pass it as
argument to the MsgBox() function.
The simplest message box displays only a message to the user, with one button
marked OK. If you want, you can display more than one button on the message box.
To support this, you can bed the following syntax of the MsgBox()
function:
MsgBox(Message to display, Options)
The second argument allows you to specify the button(s) to display. To do this, pass a constant integer as argument from the following table:
| Value | Buttons |
| 0 | |
| 1 | |
| 2 | |
| 3 | |
| 4 | |
| 5 |
Here is an example:
=MsgBox("Do you want to submit your time sheet?",4)
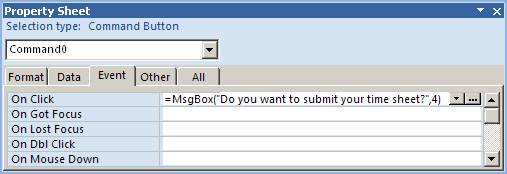
This would produce:
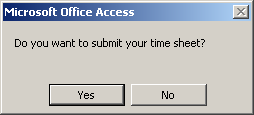
If you provide a value other than those in the list, the message box would display only the OK button.
Besides displaying a button, the second argument is also used to display an icon. To get an icon, you add one of the following values:
| Value | Icon | Suited when |
| 16 | Warning the user of an action performed on the database | |
| 32 | Asking a question that expects a Yes or No, or a Yes, No, or Cancel answer | |
| 48 | A critical situation or error has occurred. This icon is appropriate when informing the user of a termination or deniability of an action | |
| 64 | Informing the user of a non-critical situation |
To use one of these icons, add (a simple addition) its value to that of the desired button or combination of buttons from the previous table. Here is an example created with
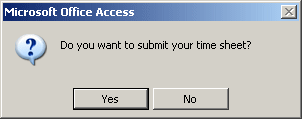
=MsgBox("Do you want to submit your time sheet?", 4 + 32)
This is the same as:
=MsgBox("Do you want to submit your time sheet?", 4 + 32)

This would produce:
When the buttons of a message box display, if the message box has more than one button, one of them has a thick border. This button is referred to as the default button. If the user presses Enter, such a button would be activated. Besides selecting the buttons and displaying an icon, the second argument can also be used to specify what button would have focus, that is, which one would have a thick border and would be applied if the user presses Enter. The default button is specified using one of the following values:
| Value | If the message box has more than one button, the default button would be |
| 0 | The first button |
| 256 | The second button |
| 512 | The third button |
| 768 | The fourth button |
To specify this option, add the number to the second argument.
When a message box comes up, it displays a title as Microsoft Office Access. If you want, you can specify your own title. To support this, you can pass a third argument to the MsgBox() function. This third argument is referred to as the caption. The syntax to use is:
MsgBox(Message to display, Options, Caption)
Pass the third argument as a string, for example in double-quotes. Here is an example:
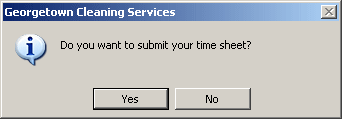
=MsgBox("Do you want to submit your time sheet?",
	4 + 64,
	"Georgetown Dry Cleaner")
This would produce:
Because MsgBox is a function, you can retrieve the value it returns and use it as you see fit. The value this function returns corresponds to the button the user clicked on the message box. Depending on the buttons the message box is displaying, after the user has clicked, the MsgBox() function can return one of the following values:
| If the button(s) displayed was(were) | And if the user clicked | The MsgBox() function returned |
| 1 | ||
| 1 | ||
| 2 | ||
| 3 | ||
| 4 | ||
| 5 | ||
| 6 | ||
| 7 | ||
| 2 | ||
| 6 | ||
| 7 | ||
| 4 | ||
| 2 |
Although most of the user's data entry will be performed on fields positioned on a form, you can display a special form to the user and expect a value. This form (actually a dialog box) is called an input box. To support this, Microsoft Access provides a function called InputBox and its basic syntax is:
InputBox(prompt)
The argument passed to the function is a message that would be displayed to the user. When the input box comes up, a form with a message and a text box would display to the user.
To display an input box to the user, place a control, such as a Button, to a form. Then, access the Properties window for the control. In the Properties window, use an appropriate field, such as On Click from the Events tab, and assign the function to the field. An example would be:
=InputBox("Enter the Radius of the Circle")
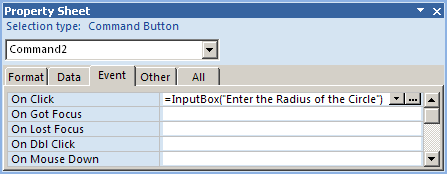
When the user clicks the button, an input box would display:

When an input box comes up, it does not display a caption in the title bar. If you want, you can display a title of your choice. To do this, pass a second argument to the InputBox() function. Here is an example:
=InputBox("Enter the Radius of the Circle","Geometric Figures")

This would produce:

When an input box comes up and you present a request, the user may not know what type of value you are expecting. To guide the user, you can provide a sample or default value. This value would display in the text box and it would be selected so the user can type to replace it.
To provide a default value to the input box, you can pass a third argument to the InputBox() function. Here is an example:
=InputBox("Enter the Radius of the Circle","Geometric Figures",10.5)
When the input box is called from this function, it would display as follows:

|
Introduction to Data Types |
Visually Specifying a Data Type
A data type represents the kind of information that a particular field should, would, or must hold. Every field in your database objects (tables, forms, and reports) should have the right type and you should select the most appropriate of them. This helps both you and the user who performs data entry. Furthermore, a good design will cause you less headache when creating calculated expressions (imagine trying to multiply a First Name by a Date Hired). As much as you can, you should make sure that the right kind of data is typed in the right field.
Microsoft Access can assist you with allowing or excluding categories of data in database fields. Based on this, you can make sure that the user would not type a contract's date in a project's contact name. To manage different types of information you enter in a database, Microsoft Access helps you organize data by categories.
![]() Practical Learning: Introducing Data Entry Assistance
Practical Learning: Introducing Data Entry Assistance
Setting the Data Type of a Field
To make your database efficient, in some circumstances, or depending on the project (or customer), you should exercise as much control as possible on data entry. This aspect is mostly controlled at two levels: tables and forms.
In Lesson 2, we saw that, when creating a table in Datasheet View, to create a column, you could double-click Add New Field to put it into edit mode, and type a name for the column. After specifying a name for the column, on the ribbon, you can click Datasheet. In the Data Type & Formatting section of the Datasheet tab, you can click the arrow of the Data Type combo box and select from the list.
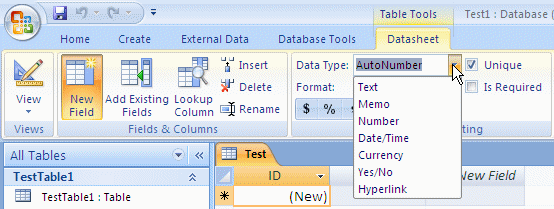
Alternatively, in Lesson 2, we saw that you could use the Field Templates window to add an already formatted field to your table. Here is an example:
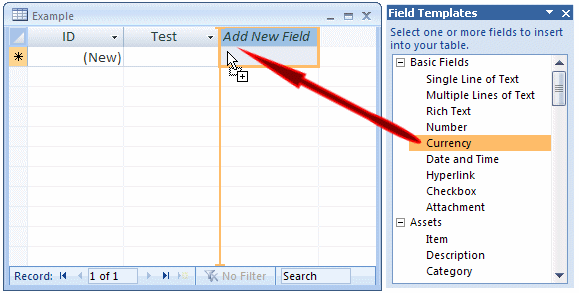
When you do this, Microsoft Access specifies the appropriate type for the column and configures it accordingly. For example, if you drag and drop a Currency type to your table, the column would be configured to receive only monetary numbers and it would reject inappropriate values.
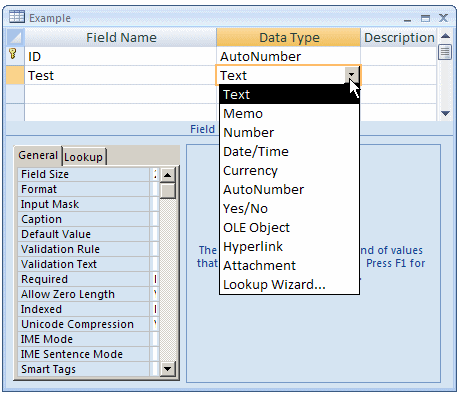
In reality, to assist you with controlling data entry, a database environment like Microsoft Access provides data types. To specify a data type for a field on a table, you must open the table in Design View and select a data type under the Data Type column for the corresponding field:
After a field has been configured on a table, when that field is used in a form, it would respect the formatting that was done on the table. Even if you create an unbound field on a form, you can still control how it accepts or rejects data. Therefore, data entry can also be configured at the form level. To provide this functionality, a form provides the same properties as the lower portion of the table's Design View.
![]() Practical
Learning: Introducing Data Types
Practical
Learning: Introducing Data Types
| Field Name |
| Property # |
| Address |
| City |
| State |
| ZIP Code |
| Bedrooms |
| Bathrooms |
| Year Built |
| Market Value |
Data Type Properties
To further control how data is entered and/or how it is displayed on a field, both the table in Design View and the Properties window in Form Design provide special fields.
Because the list of data types may appear short to you, each data type provides some configuration that allows you to configure how data for that field either would be selectively entered or would display. To do this, after selecting a data type in the Data Type column, in the lower section of the table, you can format or further configure the field. The lower part of the table Design View is made of two sections: the property pages on the lower left and the properties help section on the lower right:
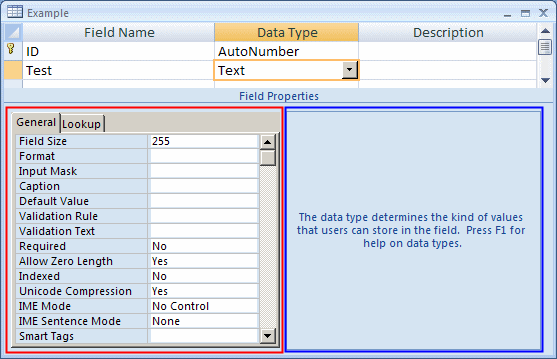
The kind of Data Type you set for a field in the upper section controls what displays in the lower section of the view. The General property page controls the features of the selected data type. The options in the General property page depend on the data type that was specified:
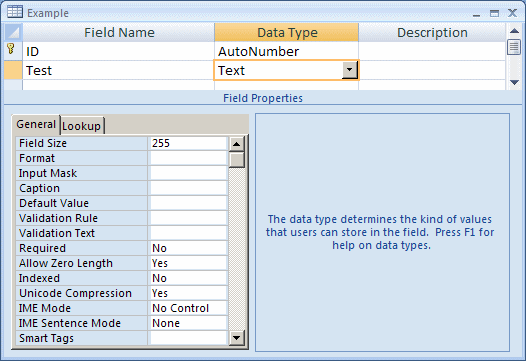
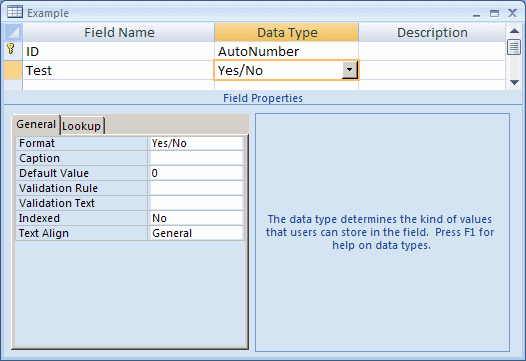
The Lookup tab allows you to specify a feature that is particular to the specific data type that was specified. For some data types, it would display a combo box. For some other data types, the Lookup property page would be empty.
|
Routine Assistance With Data Entry |
Default Value
Data entry consists of typing values in data fields or
selecting values from bound controls. Some records happen to have the same value
for a particular field, or most records hold a common value for a certain field.
When designing a table, you can assign the most commonly used value to such a
field so the user would not have to type it. The user would change the value
only if it is different from the usual. For example, when creating a database
for a small company, all employees may have the same telephone number but with
individual extensions. When a new record is being entered, the value would be
set already for the field.
To specify a regularly used value for a field, open the table in Design View,
select the field, and type the desired value in the Default Value field.
The default value should be appropriately typed:
![]() Practical
Learning: Setting Default Values
Practical
Learning: Setting Default Values
Validation Rule
A validation rule is a condition that the value entered in a field must meet in order to be valid. This rule is usually created as an expression and entered in the Validation Rule property of a field when the table or the form is opened in Design View.
Validation Text
When the condition in the Validation Rule field is not respected, you can display a message box to let the user know. The message for that text box can be created as a string in the Validation Text field.
Value Required for a Field
If you think that there must be an entry for a particular field for each record, you can require it from the user. When performing data entry, after creating a record, the user cannot move to the next record if a value for that field has not been provided. You can specify that the value of a field is required when creating a table, whether you are working in the Datasheet View or the Design View of the table:
![]() Practical
Learning: Specifying Required Fields
Practical
Learning: Specifying Required Fields

Indexed Fields
When data is entered in fields, it is possible to have the same value for a field in different records, such as two people who live in the same state. This is considered as a duplicate value. In some other cases, this may not be acceptable. For example, you may not want two employees to have the same employee number.
You can specify the indexation of a field when creating a table either in the Datasheet View or the Design View of the table. If you are creating or configuring a table in the Datasheet View, to specify the indexation of a field, click any cell of the column. Then, on the ribbon, click Datasheet. In the Data Type & Formatting section, click the Unique check box.
If you are creating or configuring a table in the Design View, in the top section, click the field. In the bottom section, click the arrow of the Indexed property. This characteristic can be set using one of 3 values:
![]() Practical
Learning: Controlling Indexed Fields
Practical
Learning: Controlling Indexed Fields
Introduction
So far, to enter a string in a table, we assumed that the user would type it. In some cases, this is fine. Sometimes, you may want to limit the number of entries that a user can enter for a field. For example, if you create a list of students and you want the user to specify their gender, if you leave it up to the person doing data entry, you may end up with entries such as W, Girl, Female, G, Woman, or F. Although all these could indicate that the records designate a female, when performing data entry, these entries would create confusion and unpredictable results. Fortunately, Microsoft Access provides various solutions to this type of problem.
On a table, you can create a list of values that the user would select for a field, instead of typing the value. Such a field is referred to as lookup. You can create the field whether in the Datasheet View or in the Design View.
The Lookup Field as a Combo Box
A lookup field appears as a combo box. To use it, the user can click the arrow and select from the list. There are various ways you can create a lookup field. In the Datasheet View:
The Field Templates provides various columns that are ready to be customized as lookup fields. To start, from the Field Templates, you can drag one of the following fields and drop it on the table:
After dragging and dropping of these fields, it would appear with a list. In some cases, such as those for the Condition and Status, the list may be fine enough. In some cases, the items in the list are provided only as placeholders and may not mean much. For example, the Category field provides a list that contains (1) Category, (2) Category, and (3) Category. To customize the list of a Field Templates item, click the arrow of the combo box. Under the list, a button would appear:
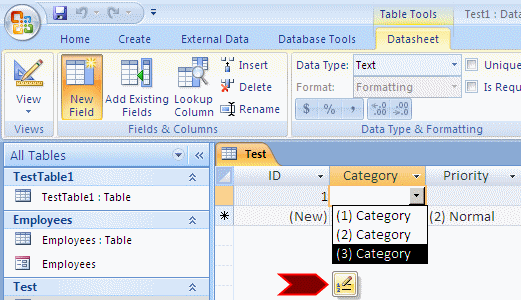
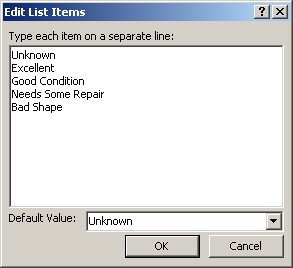
You can then click that button. An Edit List Item dialog box would come up:
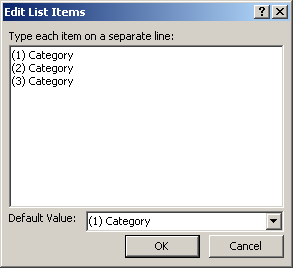
To change an item, select it in the list and replace it with a new string. To add a new item, click under the other items or click the end of the last item, press Enter, and type the desired item. The Default Value combo box allows you to specify what item would display as the default.
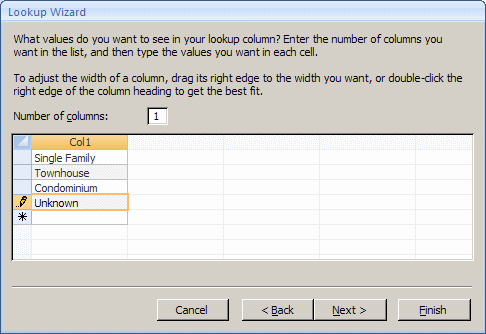
To create a lookup field in the Design View of a table, after specifying a name for the column, set its Data Type to Lookup Wizard... This would start the Lookup Wizard. You use exactly as we described the Lookup Column from the Datasheet View.
![]() Practical Learning: Setting a Preset List Of Items
Practical Learning: Setting a Preset List Of Items

|
Lesson Summary |
MCAS: Using Microsoft Office Access 2007 Topics
| S1 | Define data needs and types |
| C4 | Create fields and modify field properties |
Exercises
World Statistics
US Senate
|
|
||
| Previous | Copyright © 2008-2016, FunctionX, Inc. | Next |
|
|
||