- If a table is currently opened, to switch it to Design View, on the right
side of the status bar, click the Design View button

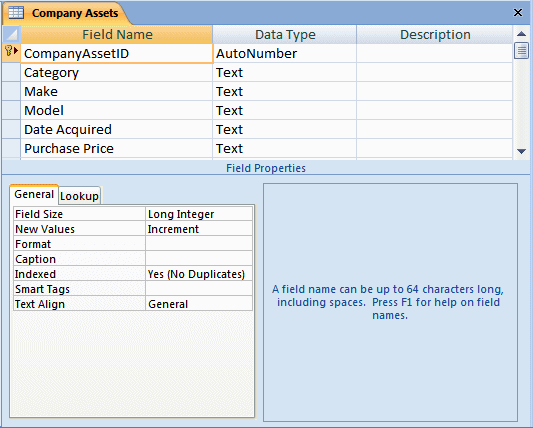
A table in Design View is divided in two sections: one in
the upper area and another in the bottom:

The top area is made of columns and rows. The lower portion of the window is made of two sections. The
left section is made of two tabs labeled General and Lookup. Each tab contains
two columns and various rows.
To create a column in the Design View, click an empty cell under Field
Name and type the desired name .
To change the name of an existing column, double-click its name in the
Field Name column to select it and type the desired name.
To edit the name of an existing column, click somewhere in the name to put
it into edit, use the Delete, the Backspace, and the arrow keys to edit it.
To create that would display on the status bar text, in the
Description section for the field, type the string you want.
On a column of a table, a caption is the string that the user sees on the
column header:
- To specify the caption of a field, in the top section of the Design View,
click the field under the Field Name column. In the lower section of the
window, click Caption and type the desired word or group of words
- To change the caption of a column but keep its name, switch the table to
Design View, under Field Name, click the field. In the lower section of the
window, click Caption, press F2 and edit the string
To rename a field in Design View, click it and type the new
name.
In a table's Design View, you can insert a new field at any position:
- To insert a new field, right-click the field that will succeed it, click Insert Rows, and type a name for the new column
- To insert a new column, you can click anywhere on the column that will succeed it. Then, on the
ribbon, click Design. In the Tools section of the Design tab, you can
click the Insert Rows button
- To insert a new column, you can also click anywhere on the column that will succeed
it, press Insert, and type the name of the new field
- To add a new column at the end of the table, click the first empty field under Field Name and type the desired name
|
Field Selection in Table Design View
|
|
In the Design View of the table:
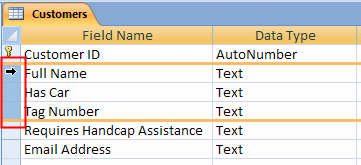
- To select one field, you can position the mouse on the box to its left
until the cursor turns into a right-pointing arrow:

Then click

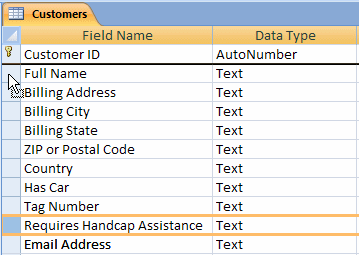
- To select more than one column, you can click and hold your mouse on one of the left boxes, then drag up or down to cover the other desired field
names:

When all desired field names are highlighted, release the mouse
- To select more than one column, you can also click one column that will be at one end, press and hold Shift, and then click the column that will be at the other end
- To select columns at random, click the left box of one of them, press and hold Ctrl, then click the box of each of the desired boxes
- To select all columns of a table, click the button of the left of
Field Name
|
Column Moving in Table Design View
|
|
- To move a field, click the box on the left side of its name and
release the mouse. Click that button again and hold your mouse down. Then drag up or down. A horizontal line will guide you. Once it gets to the desired location, release the mouse

- To move a group of columns, first select them and release the mouse.
Click and hold the mouse on the left box of one of the selected fields.
With the mouse down, drag up or down, referring to a horizontal line
as a guide. When the horizontal line gets to the desired location, release the mouse
To delete a
column:
- Right-click anywhere on its line (on the Field Name, the Data Type, or the Description columns) and click Delete
Rows
- When a column has focus, on the ribbon, you can click Design. In the Tools
section, you can click Delete Rows button
- You can select the column by clicking the box on the left side of its name
and press Delete
To delete a group of columns, first select them, then:
- You can press Delete
- You can right-click one of the selected items and click Delete Rows
- In the Tools section of the Design tab of the ribbon, you can click the
Delete button
|
|

