
Database Date and Time Values
 |
Database Date and Time Values |
|
Fundamentals of Times |
|
Introduction to Times |
|
A time is a non-spatial measure of the number of seconds that have elapsed in a set period. Starting at a specified period and counting incrementally, if the number of seconds reaches 60, the measure is called a minute. If the number of minutes reaches 60, the measure is called an hour. If 24 measures of hours occur, the measure is called a day (actually a day is 24 hours plus a few more seconds but the seconds are taken into consideration only every 4 years). |
![]() Practical
Learning: Introducing Time Values
Practical
Learning: Introducing Time Values
| Field Name | Data Type | Field Size | Format | Default Value |
| CleaningOrderID | ||||
| Customer Name | 50 | |||
| Customer Phone | 20 | |||
| Unit Price Shirts | Number | Double | Fixed | 1.25 |
| Quantity Shirts | Number | Integer | 0 | |
| Unit Price Pants | Number | Double | Fixed | 1.95 |
| Quantity Pants | Number | Integer | 0 | |
| Other Item1 | 50 | None | ||
| Unit Price Item1 | Number | Double | Fixed | 0.00 |
| Quantity Item1 | Number | Integer | 0 |
| None |
| Tie |
| Coat |
| Dress |
| Other |
| Jacket |
| Swede |
| Silk Shirt |
| Sweater |
| Comforter |
| Women Suit |
| Regular Skirt |
| Men's Suit 2Pc |
| Men's Suit 3Pc |
| Skirt With Hook |
| Field Name | Data Type | Field Size | Format | Default Value |
| Tax Rate | Number | Double | Percent | 0.0775 |
| Notes | Memo |
| Not Ready |
| Ready |
| Picked Up |

|
Time Rules |
By default, to display or handle time values in a database, Microsoft Access uses some letters and characters. The default rules are defined in the Regional and Language Settings of Control Panel:
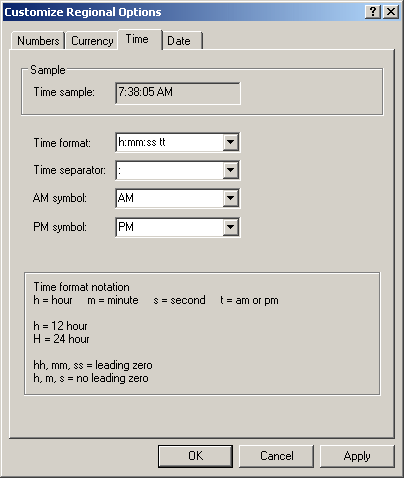
To support time values, Microsoft Access uses a data type named Date. Actually, if you are creating a field in a table, to support a time value, you use a category of data type called Date/Time. You can specify the type in the Datasheet View or in the Design View of a table.
To create a time-based field in the Datasheet View of a table:
If you are creating the table in Design View, to configure a field that can hold time values, specify its Data Type as Date/Time:

In the Datasheet View, you can create a field that shows time values in a standard format. In the Datasheet View, to create a field that holds one of the time formats set in the Control Panel, click under Click to Add. On the Ribbon, click Fields. In the Add & Delete section, click More Fields and click either the Time am/pm, the Medium Time, or the Time 24hour option:

![]() Practical
Learning: Applying the Time Type to a Field
Practical
Learning: Applying the Time Type to a Field
Microsoft Access allows you to customize how the time values would appear on the field. After creating a field, in the Datasheet View, click a cell under the column header. On the Ribbon, click Fields. In the Formatting section, select the desired option in the Format combo box as Long Time, Medium, or Short Time:

In the Design View, in the top section, click the name of the Date/Time field. In the lower section, click Format and select the desired option among Long Time, Medium, and Short Time:
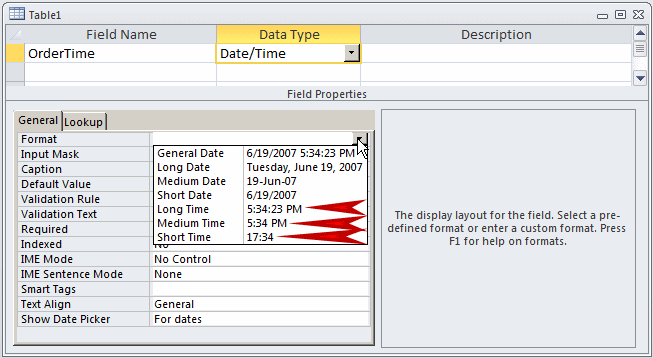
As you can see, the Format property in the Design View provides two columns of information. The left column shows the names of time formats. The right column shows a preview of each option.
![]() Practical
Learning: Applying Time Formats
Practical
Learning: Applying Time Formats
The Format property in the Design View is used to show
how the time values should appear in the field. First, the user must enter
the value. To assist the user with how to enter the time, you can create a
custom mask. To do this, you can click Input Mask and type a mask.
Otherwise, you can click the ellipsis button
![]() and follow the wizard.
and follow the wizard.
As stated already, the rules that specify what characters and symbols are used to display time values are in the Time tab of the Customize Regional Options. The characters used for the hours, the minutes, and the seconds are defined in the Time Format combo box:

To control how time values should display in a field, after setting its Data Type to Date/Time, use the Format property. The characters used to create a format are:
| Format | Used For | Used to Display |
| : | Separator | The character separator for
time values This character is set in the Regional (and Language) Settings of Control Panel |
| h or H | Hours | An hour number from 0 to 23 If the hour is less than 10, it would display without the leading 0 |
| hh or HH | Hours | An hour number from 0 to 23 If the hour is less than 10, it would display with the leading 0 such as 08 |
| n or N | Minutes | A minute number from 0 to 59 If the number is less than 10, it would display without the leading 0 |
| nn or NN | Minutes | A minute number from 0 to 59 If the number is less than 10, it would display with the leading 0 such as 06 |
| s or S | Seconds | A second value from 0 to 59 If the number is less than 10, it would display without the leading 0 |
| ss or SS | Seconds | A second value from 0 to 59 If the number is less than 10, it would display with the leading 0 such as 04 |
| ttttt | The time using the formula of the Long Time of the Regional Settings of Control Panel | |
| am/pm | AM and PM | am (in lowercase) if the time is configured to display in the standard (non military time) and if the time occurs in the morning, or pm (in lowercase) if the time is configured to display in the standard (non military time) and if the time occurs in the afternoon |
| AM/PM | AM and PM | AM (in uppercase) if the time is configured to display in the standard (non military time) and if the time occurs in the morning, or PM (in uppercase) if the time is configured to display in the standard (non military time) and if the time occurs in the afternoon |
| a/p | AM and PM | a (in lowercase) if the time is configured to display in the standard (non military time) and if the time occurs in the morning, or p (in lowercase) if the time is configured to display in the standard (non military time) and if the time occurs in the afternoon |
| A/P | AM and PM | A (in uppercase) if the time is configured to display in the standard (non military time) and if the time occurs in the morning, or P (in uppercase) if the time is configured to display in the standard (non military time) and if the time occurs in the afternoon |
| AMPM | AM and PM | The AM-PM character. Microsoft Access would refer to the format set in the Regional (and Language) Settings of Control Panel |
When combining these characters to create a format, you should follow the rules of your language. You should refer to the formula set in the Time property page of the Regional (and Language) Settings of Control Panel. Microsoft Access also refers to it for the character separator. If you want to include any other character, type it in double-quotes.
To create a time value, you use an appropriate combination of the above letters and characters. In most cases, you should include the combination between two # signs. An example would be:
#05:42#
This would represent 5:42 AM. Another example is:
#10:26 AM#
This also represents a time in the morning. Remember that you can also include the seconds in your time value.
Operations on Time Values
|
Conversion to a Time Value |
There are two main ways you start with a time value. You can provide it to an object or you can get it from your database. If you are providing it, you can use the rules and combinations we reviewed above. On the other hand, if a time value already exists in your database, you can retrieve and use it as you see fit. In most cases, the users know how to specify a time value. In some cases, when getting a time, it may not be in a correct or recognizable format. Normally, before involving a value in a time-based operation, you should first check and convert it to a recognizable format. To support this, you can called a function called CDate. Its syntax is:
CDate(Expression) As Time
This function takes one argument that can be passed as the name of a control, as a string that holds a time value, or as an expression that is supposed to produce a time value. If the value passed as argument holds a recognizable time, the function returns that time.
|
The Components of a Time Value |
As mentioned in our introduction, a time value is made of the hours, the minutes, and the seconds. If you already have a time or if you retrieve one from an object or you get one from an expression, you may be interested in only one or its components. There are functions you can use to get these values.
To get the hour value of a time, you can call the Hour() function. Its syntax is:
Hour(Expression) As Integer
To get the minute value of a time, you can call the Minute() function. Its syntax is:
Minute(Expression) As Integer
To get the second value of a time, you can call the Second() function. Its syntax is:
Second(Expression) As Integer
Each of these functions takes an argument that can be an expression that should produce a time value. The argument can also be the name of a control that holds a time value. The function then examines the argument and produces a number that represents the hour, the minute, or the second respectively.
|
The Current Time |
Microsoft Access provides various functions to perform date and time related operations. These functions allow you to add times, find the difference between time values, or add constant values to time values.
To give you the current time, Microsoft Access provides a function called Time.
![]() Practical
Learning: Getting the Current Time
Practical
Learning: Getting the Current Time
|
Adding to a Time Value |
One of the operations you can perform on a time consists of adding a value to it. To support this, you can use the DateAdd() function. To find a backward time, you can use the DateDiff() function.
The DateAdd() function is used to add an interval time value to a specific time. With it, you can add a number of seconds, minutes, or hours to another time. The syntax of the DateAdd() function is
DateAdd(Interval, Number, date) As Time
The Interval argument is required and it specifies the kind of value you want to add. This argument is passed as a string, thus enclosed between double quotes and can have one of the following values:
| Interval | Used To Get |
| s | Second |
| n | Minute |
| h | Hour |
| w | Numeric Weekday |
The Number argument is required also. It specifies the number of units you want to add. If you set it as positive, its value will be added. If you want to subtract, make it negative.
The date argument is the date to which you want to add the number.
|
Subtraction From a time |
The DateDiff() function is used to find the difference between two time values. It allows you to find the number of seconds, minutes, or hours when you supply two recognizable values. The DateDiff() function takes 5 arguments, 3 are required and 2 are optional.
The syntax of the function is
DateDiff(Interval, Time1, Time2, Option1, Option2) As Time
The Interval argument is required and it specifies the kind of value you want to subtract. This argument is passed as a string and can have one of the following values:
| Interval | Used To Get |
| s | Second |
| n | Minute |
| h | Hour |
Required also, the Time1 and Time2 arguments specify the time values that will be used when performing the operation.
Fundamentals of Dates
|
Introduction to Dates |
A date is a non-spatial measure of the number of days that have occurred in a period. When a certain number of days, namely 28, 29, 30, or 31 (depending on some factors), the measure is called a month. When 12 months have occurred, the measure is called a year (after 10 years have occurred, the measure is called a decade but the decade is not used in calculations; after 100 years have occurred, the measure is called a century but the century is not used in calculations; after 1000 years have occurred, the measure is called a millennium but the millennium is not used in calculations).
|
Introduction to Date Rules |
By default, to display date values in a database, Microsoft Access uses some letters and characters. As mentioned for times, the rules for dates are built in the operating system and you can check them in the Regional and Language Settings of Control Panel:
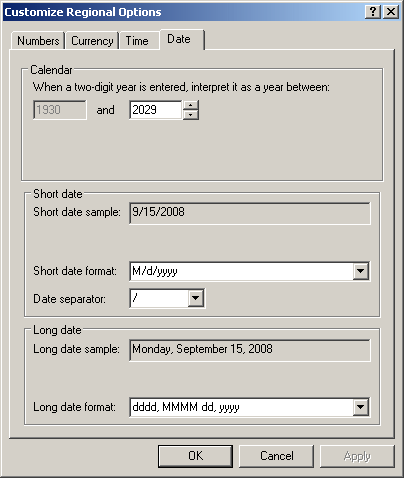
As reviewed for the time, to support date values, Microsoft Access internally uses a data type named Date. In a table, this data type is referred to as Date/Time. Over all, dates and times are considered differently but, to specify that a field would use date, time, or both, set its Data Type to Date/Time. You can specify this data type for a field what creating a table either in the Datasheet View or in the Design View.
To create a field that receives or displays date values, in the Datasheet View of a table:
If you are creating the table in Design View, to configure a field that can use date values, specify its Data Type as Date/Time.
As stated already, the Control Panel provides some standard formats for date values. To create a field that uses one of them, while a table is displaying in the Datasheet View, click under Click to Add. On the Ribbon, click Fields. In the Add & Delete section, click More Fields. In the Date and Time section, click either Short Date, Medium Date or Long Date.
![]() Practical
Learning: Applying a Date Type
Practical
Learning: Applying a Date Type
After a valid date value has been entered in a field, you can specify how the date would display, not necessarily how the date was entered:
Those are the most popular formats used for dates. If none of those satisfies you, you can use the following characters or symbols to create a desired format:
| Format | Used For | Used to Display |
| d | Days | The day as a number from 1 to 31 |
| dd | Days | The day as a number with a leading 0 if the number is less than 10 |
| ddd | Weekdays | The name of a weekday with 3 letters such as Mon, Tue, etc |
| dddd | Weekdays | The complete name of a week day such as Monday, etc |
| w | Week | The numeric day of the week such as 1 |
| ww | Week | The numeric week of the year, ranging from 1 to 53 |
| m | Months | The numeric month from 1 to 12 |
| mm | Months | The numeric month with a leading 0 if the number is less than 10 |
| mmm | Months | The short name of the month such as Jan, Feb, Mar, etc |
| mmmm | Months | The complete name of the month such as January, February, etc |
| q | Quarters | The numeric quarter of the year |
| yy | Years | Two digits for the year as 00 for 2000 or 03 for 2003 |
| yyyy | Years | The numeric year with 4 digits |
To use these letters, simply type the desired combination in the Format field. Here is an example:

This is configured to display a single digit for a day of the month if the day is less than 10, followed by the complete name of the month, followed by the year in 4 digits.
During data entry, the data entry person can enter a valid date. Once the field looses focus, it displays the date based on the format. Based on this, you can use any combination of formats but you should use a combination most regularly used in your language so the users would not be confused.
Besides the indicated characters, you may want to use some other characters to separate them. An example would be January 5, 2004, which uses a comma in the display. To create such sections, include the characters in double-quotes. What you would be doing is to ask Microsoft Access to display such characters "as is" while considering the non-quotes characters as part of the format. Here is an example:

![]() Practical
Learning: Applying a Date Format
Practical
Learning: Applying a Date Format
In the Design View of a table, the Format property
allows you to specify how a date would display in a field but not how the
user must enter it. To specify how the date must be typed in a field or
control, you can use the Input Mask property. You can either type the mask
or you can click the ellipsis button
![]() and follow the wizard. If you want to type your mask, you can use an
appropriate combination of the letters and symbols we saw above.
and follow the wizard. If you want to type your mask, you can use an
appropriate combination of the letters and symbols we saw above.
|
Operations on Date Values |
|
The Components of a Date |
As mentioned for the time, before involving a value or an expression in a date-based operation, you should first convert it. To support this operation, you can call the CDate() function.
We saw that a date was made of the days, the months, and the years components. On an existing date, you can get these values by calling their corresponding functions. To get the year part of a date, you can call the Year() function whose syntax is:
Year(Expression) As Integer
This function takes an argument that represents a date value. It then isolates the year that it returns as a number.
To get the month of a date, you can call the Month() function whose syntax is:
Month(Expression) As Integer
The function considers a date value as argument, gets its year, and returns it.
|
The Week in a Date |
The week is a combination of 7 days that consecutively occur in a date. To identify them, each day has a specific index and a specific name. In US English, the names of the days are Monday, Tuesday, Wednesday, Thursday, Friday, Saturday, and Sunday. In some cases, the days may be counted from Sunday (instead of Monday). The option to specify what is considered as the first day of the week is referred to as firstdayofweek and is represented in Microsoft Access by one of the following values:
| Value | Name |
| 0 | National Language Support (NLS) Setting |
| 1 | Sunday |
| 2 | Monday |
| 3 | Tuesday |
| 4 | Wednesday |
| 5 | Thursday |
| 6 | Friday |
| 7 | Saturday |
In most operations that involve date values, you will consider that the first day of the week is Sunday, represented with 1. In some cases, if you want to use another day as the starting point of a week, you can specify it from one of the above values.
To get the name of a week, you can use the WeekdayName() function whose syntax is:
WeekdayName(weekday As Integer,
	    Option As Boolean,
	    Optional firstdayofweek As Integer) As String
This function takes three arguments with only the first required. The first argument is passed as an integer and can be one of the above. The second argument is optional and it specifies whether the weekday name will be abbreviated. The third argument, firstdayofweek, also optional, specifies what day should be considered as the first day of the week. It can be one of the above numbers.
To get the index position of a day of a week from a date value, you can call the Weekday() function. Its syntax is:
Weekday(Expression, Optional firstdayofweek As Integer) as Integer
The first argument is required. It can be an expression or a control that must produce a date. If the function succeeds, it produces a number that represents the day of the week.
|
The Current Date |
As opposed to the time, if you want to know the current date on a computer, you can call a function named Date. To get both the current date and the current time of the computer, you can call a function named Now.
![]() Practical
Learning: Getting the Current Date
Practical
Learning: Getting the Current Date


| Name | Record Source |
| txtSubTotalShirts | =Nz([Unit Price Shirts])*Nz([Quantity Shirts]) |
| txtSubTotalPants | =Nz([Unit Price Pants])*Nz([Quantity Pants]) |
| txtSubTotalItem1 | =Nz([Unit Price Item1])*Nz([Quantity Item1]) |
| txtSubTotalItem2 | =Nz([Unit Price Item2])*Nz([Quantity Item2]) |
| txtSubTotalItem3 | =Nz([Unit Price Item3])*Nz([Quantity Item3]) |
| txtSubTotalItem4 | =Nz([Unit Price Item4])*Nz([Quantity Item4]) |

|
Adding to a Date Value |
Some of the operations performed on date values are also performed using either the DateAdd() or the DateDiff() functions.
The DateAdd() function is used to add an interval date value to a specified date. It is used to add a number of days, weeks, months, or years to another date. The syntax of the DateAdd() function is
DateAdd(Interval, Number, date) As Date
The Interval argument is required and it specifies the kind of value needed as a result. This argument can be passed as a string in double-quotes and can have one of the following values:
| Interval | Used To Get |
| w | Numeric Weekday |
| ww | Week of the Year |
| d | Day |
| y | Numeric Day of the Year |
| m | Month |
| q | Quarter |
| yyyy | Year |
The Number argument is required also. It specifies the number of units you want to add. If you set it as positive, its value will be added. If you want to subtract, pass it as a negative value.
The date argument is the date to which you want to add the number.
|
Subtraction From a Date |
The DateDiff() function is used to find the difference between two date values. It allows you to find the number of days, weeks, months, or years from two date values. The DateDiff() function takes 5 arguments, 3 are required and 2 are optional. Its syntax is:
DateDiff(Interval, Date1, Date2, Option1, Option2)
The Interval argument is required and it specifies the kind of value you want as a result. This argument is passed as a string and can have one of the following values:
| Interval | Used To Get |
| w | Numeric Weekday |
| ww | Week of the Year |
| d | Day |
| y | Numeric Day of the Year |
| m | Month |
| q | Quarter |
| yyyy | Year |
The Date1 and Date2 arguments are required. They specify the date values for the operation.
By default, the days of a week are counted starting on Sunday. If you want to start counting from another day, pass the Option1 argument using one of the following values: 1, 2, 3, 4, 5, 6, 7. There are other variances to that argument.
If your calculation involves weeks or finding the number of weeks, by default, the weeks are counted starting January 1st. If you want to count your weeks starting at a different date, use the Option2 argument to specify where the program should start.
Lesson Summary
|
Exercises |
Yugo National Bank
Open the Employees form and set the Can Create New Account field as follows for the following employees:
| Last Name | Can Create New Account? |
| Yuen | Checked |
| Marconi | Checked |
| Young | Checked |
| Holland | Checked |
| Kast | Checked |
| Lourde | Checked |
| Kirkland | Checked |
Close the form
Yugo National Bank
| Field Name | Field Size | Caption |
| ChargeReasonID | Charge Reason ID | |
| ChargeReason | 50 | Charge Reason |
| Description |
Save and close the table
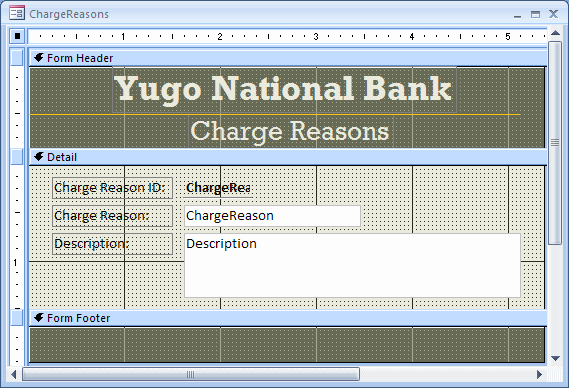
| Charge Reason ID | Charge Reason | Description |
| 1 | Monthly Charge | Applied every month to each accounts |
| 2 | Overdraft | Applied if a customer's account remains negative for 72 hours |
Close the form
Watts A loan
| Field Name | Data Type | Field Size | Caption |
| TransactionID | AutoNumber | Transaction ID | |
| TransactionNumber | Number | Integer | Transaction Number |
| TransactionDate | Date/Time | Transaction Date | |
| TransactionAmount | Number | Double, Fixed | Transaction Amount |
| Notes | Memo |
| Field Name | Data Type | Field Size | Caption |
| CustomerID | AutoNumber | Customer ID | |
| AccountDate | Date/Time | Account Date | |
| AccountNumber | Text | 20 | Account Number |
| FirstName | Text | 50 | First Name |
| MiddleName | Text | 50 | Middle Name |
| LastName | Text | 50 | Last Name |
| Address | Text | 100 | |
| City | Text | 50 | |
| State | Text | 50 | |
| ZIPCode | Text | 20 | ZIP Code |
| Country | Text | 50 | |
| HomePhone | Text | 40 | Home Phone |
| WorkPhone | Text | 40 | Work Phone |
| EmailAddress | Text | 60 | Email Address |
| Notes | Memo |

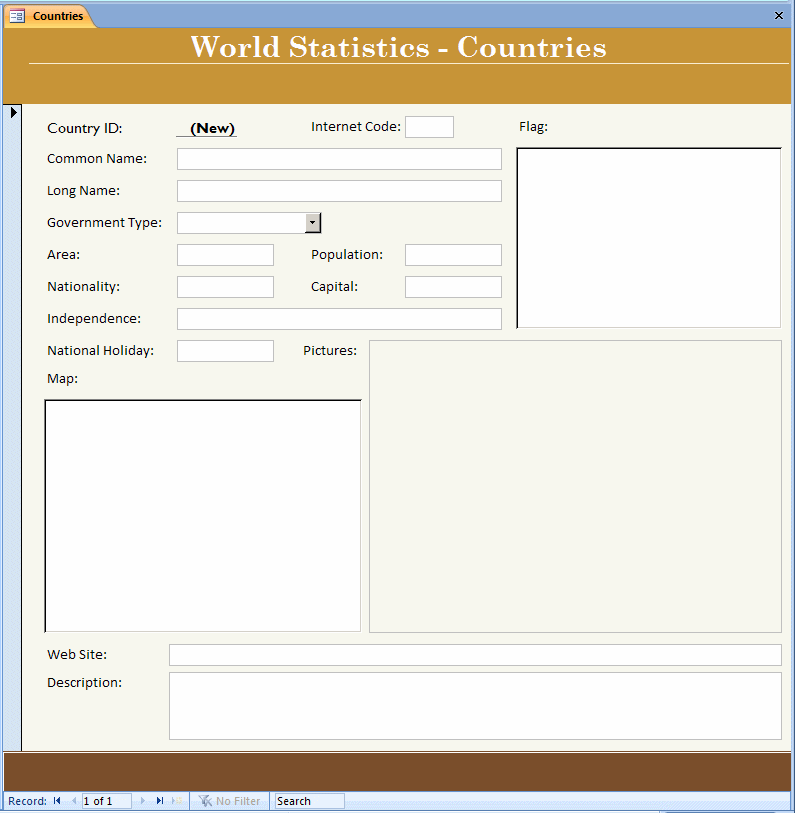
World Statistics
| Field Name | Data Type | Field Size | Caption |
| CountryID | |||
| CommonName | |||
| InternetCode | |||
| LongName | |||
| GovernmentType | |||
| Area | Number | ||
| Population | Number | ||
| Nationality | Text | 50 | |
| Capital | Text | 50 | |
| Independence | Date/Time | ||
| NationalHoliday | Date/Time | National Holiday | |
| Map | OLE Object | ||
| Flag | OLE Object | ||
| Pictures | Attachment | ||
| WebSite | |||
| Description | Memo |
 |
 |
US Senate
|
|
||
| Previous | Copyright © 2010-2019, FunctionX | Next |
|
|
||