
The Structure of a Database Table
 |
The Structure of a Database Table |
A Review of Tables
Introduction
Tables are the foundation of organizing lists of items. This concept is valid regardless of the type of list. As a database application is primarily a list of things, any concept we reviewed for tables is also valid for a formal database application. This means that the SQL uses the same approach at organizing information.
As we did for the databases, there are various ways you create a table for a Microsoft SQL Server application and each techniques uses its own approach, we will learn. Before creating a table, you must specify what database it would belong to. You can one of either the Northwind or the pubs databases that ship with Microsoft SQL Server or you can use one of your own.
|
|
private: System::Void btnCreateDB_Click(System::Object *  sender,
					System::EventArgs *  e)
{
	 String *strConnection = String::Concat(S"IF EXISTS (SELECT * "
                                        S"FROM   master..sysdatabases "
					S"WHERE  name = N'CountriesStats')"
					S"DROP DATABASE CountriesStats;"
					S"CREATE DATABASE CountriesStats;");
 	 SqlConnection *conDatabase = new
		SqlConnection(S"Data Source=(local);Integrated Security=sspi");
	 SqlCommand    *cmdDatabase = new SqlCommand(strConnection, conDatabase);

	 conDatabase->Open();

	 cmdDatabase->ExecuteNonQuery();
	 conDatabase->Close();
}Table Creation: Using the SQL Server Enterprise Manager
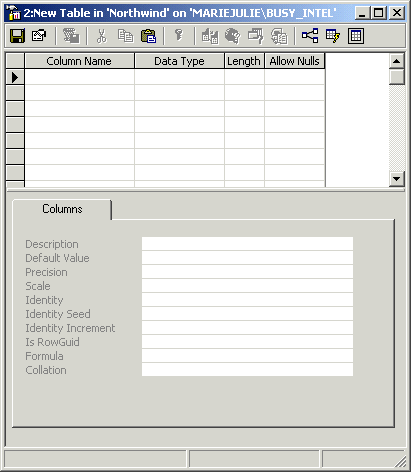
To create a new table in the Enterprise Manager, first expand the Databases node and locate the database that the table will belong to. If you right-click the name of the database, you can position the mouse on New and click Table... Alternatively, you can first select the database in the left frame. In the right frame, you can right-click the Tables icon and click New Table...

After selecting a database in the left frame, another alternative consists of right-clicking an empty area in the right frame, positioning the mouse on New... and clicking Table... Any of these three actions would display the New Table window and you can fill it up with information as we will review.
|
Table Creation: Using the Server Explorer |
Server Explorer: To create a new table for a Microsoft SQL Server database using Microsoft Visual Studio .NET, first display the Server Explorer. Expand everything up to the name of the server. You must also expand the server that the new table will belong to. The create the table, right-click the Tables node and click New Table:

This would display a window made of labels, columns, and rows. You can then complete it with the necessary information.
|
Table Creation: Using the SQL Query Analyzer |
The statement used to create a new table uses the following formula
CREATE TABLE TableName
The CREATE and TABLE keywords must be used to let SQL know that you want to create a table. The TableName factor specifies the name of the new table. The TableName can use the rules and suggestions we reviewed for the database objects.
After specifying the name of the table, you must list the columns of the table. The list of columns starts with an opening parenthesis "(". The list ends with a closing parenthesis ")". Each column must be separated from the next with a comma, except for the last column. You can include all columns on the same line if possible as follows:
CREATE TABLE Country(Column1, Column2, Column3)
Alternatively, to make your statement easier to read, you should create each column on its own line as follows:
CREATE TABLE Country(
Column1,
Column2,
Column3);
There are two primary pieces of information you must specify for each column: its name and its type. Therefore, the syntax of creating a column is:
ColumnName DataType Options
As mentioned for the database, the SQL Query Analyzer also provides a wizard to create a table. To access it, you can click the arrow of the New Query button on the toolbar, position the mouse of Create Table, and make a selection. If you click Create Table Basic Template, you would receive code with placeholders:
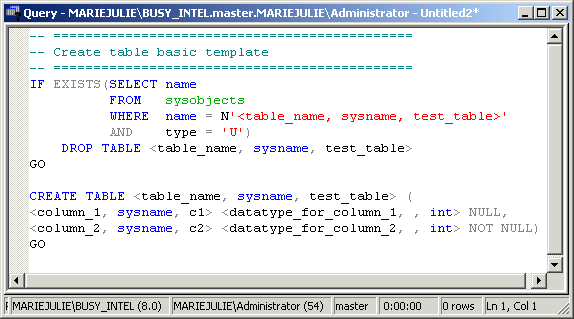
You can fill out the placeholders to complete the table.
|
Table Creation: Using ADO.NET |
To programmatically create a table, you can follow the same formula rules of creating a table using SQL code. Once the statement is ready, you can pass it to a SqlCommand object. To execute the statement, you can call the SqlCommand::ExecuteNonQuery() method.
|
The Name of Table |
While or after creating a table, you must name it.
If you are using the New Table window of the SQL
Server Enterprise Manager or if you had right-clicked the Tables node in
Server Explorer of Microsoft Visual Studio .NET, to name a table, you must
save it. You can do this while or after creating it. To save a table while
still working on it, on the toolbar, you can click the Save button ![]() .
If the table was not previously saved, you would be prompted to provide a
name for it. If you close a table that has not been saved, you would be
prompted to name it.
.
If the table was not previously saved, you would be prompted to provide a
name for it. If you close a table that has not been saved, you would be
prompted to name it.
If you are creating a table using SQL code in either the SQL Query Analyzer or in a Windows Forms Application code, you must name your table using the above formula of CREATE TABLE TableName.
The name of a table:
Besides these rules, you can make up yours. In our lessons, the name of a table
The Columns of a Table
|
The Name of a Column |
Although a table is used to hold information, its data is divided in columns and you must create each column following specific rules. The primary characteristic you must provide for a column is its name. If you are using the New Table window from SQL Server Enterprise, or the dbo.Table1 window from Microsoft Visual Studio .NET, you can type the name of each column under the Column Name section. If you are creating a SQL statement, you can type the name of the first column after the opening parenthesis.
The name of a column should follow the same rules and suggestions we reviewed for the database objects.
The Types of Data a Column Can Carry
After specifying the name of a column, the interpreter would need to know the kind of information the column will hold. You must specify the data type that is necessary for a particular column.
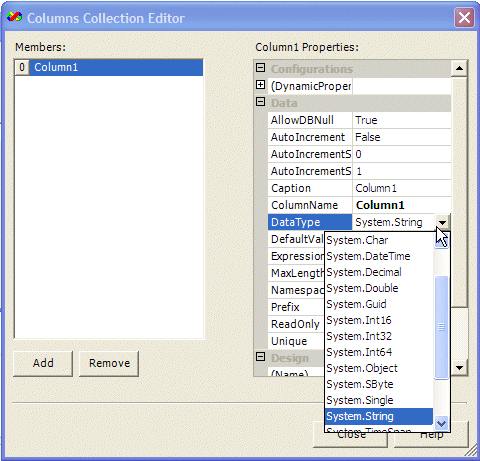
If you are using the New Table window from SQL Server Enterprise, or the dbo.Table1 window from Microsoft Visual Studio .NET, you can click the box under Data Type that corresponds to the column. This would convert the text box into a combo box. You can then select from the list of available types:

You can select the data type of each column under the Data Type section. If you are creating a SQL statement, after typing the name of the column, you must type the appropriate name of the desired data type. Remember that SQL is not case-sensitive but while you can write the data type in any case, you should not overlook the case you use for the names of columns.
The data types used on a table are are mostly equivalent to those we reviewed for DataColumns of a DataSet:
To support the data types used in a database, the .NET Framework provides the System::Data::SqlTypes namespace that provides a class for each SQL Server data type. The names of SQL data types are:
bit: The bit is the smallest data type. It is used for a field that would validate a piece of information as being true or false, On or Off, Yes or No, 1 or 0. This is also the data type you should select if a check box would be used to validate the value of this column. This means that it can be used where the C++' bool or the .NET Framework's System::Boolean data types would be applied. The .NET Framework database equivalent to this data type is the SqlBoolean class.
int: This is the same data type as the C++' int. It is a natural number that would be used if a column would hold numbers in the range of -2,147,483,648 to 2,147,483,647. This is also the same as the System.Int32 we reviewed for the DataTable objects when we studies DataSet tables. The .NET Framework database equivalent to this data type is the SqlInt32 class.
tinyint: This data type can be used for a column that would hold (very) small numbers that range from 0 to 255. It is equivalent to the .NET Framework's System::Byte database. Because C++ doesn't have a byte data type, the tinyint type can be used where a short or rather an unsigned short would be used. You should use this data type only when you know for sure that the values used on this column will be small. When in doubt, you should use int. The .NET Framework database equivalent to this data type is the SqlByte class.
smallint: The smallint data type follows the same rules and principles as the int data type except that it is used to store smaller numbers that would range between -32,768 and 32,767. This means it is equivalent to the C++' short integer or the .NET Framework's System::Int16 type. The .NET Framework database equivalent to this data type is the SqlInt16 class.
bigint: The bigint data type follows the same rules and principles as the int data type except that its field can hold numbers from -9,223,372,036,854,775,808 to 9,223,372,036,854,775,807. It is somehow equivalent to the C++' long integer but more accurately equivalent to the .NET Framework's System::Int64 data type. As such, you can apply this data type for a column that would hold (very) large numbers. The .NET Framework database equivalent to this data type is the SqlInt64 class.
binary: This data type is used for a column that would hold hexadecimal numbers. Examples of hexadecimal numbers are 0x7238, 0xFA36, or 0xAA48D. Use the binary data type if all entries under the column would have the exact same length (or quantity). If you anticipate that some entries would be different than others, then use the alternative varbinary data type. The varbinary also is used for hexadecimal numbers but allows dissimilar entries, as long as all entries are hexadecimals. The .NET Framework database equivalent to this data type is the SqlBinary class.
numeric and decimal: This data type is used on a column that will hold (either whole or) real numbers, numbers that include a decimal separator (the character used as the decimal separator as set in the Control Panel) between the digits. An example would be 12.125 or 44.80. If you anticipate such a number for a field, specify its data type as numeric or decimal (either decimal or numeric would produce the same effect in SQL Server). This data type is mostly equivalent to the C++' double or the .NET Framework's System::Double data type. The .NET Framework database equivalent to this data type is the SqlDecimal class.
float and real: A floating-point number is a fractional number, like the decimal and numeric types. Floating-point numbers can be used if you would allow the database engine to apply an approximation to the actual number that a field is supposed to carry. This is mostly equivalent to the C++' float or the .NET Framework's System::Single data type. As you may be aware when using float, this data type doesn't offer good precision. The .NET Framework database equivalent to this data type is the SqlDouble class.
money: As its name announces it, the money data type can be used on a column whose data would consist of currency values. A field with a money data type can hold positive or negative values from -922,337,203,685,477.5808 to +922,337,203,685,477.5807
The .NET Framework database equivalent to this data type is the SqlMoney class.
smallmoney: While the money data type can be used for a field that would hold large quantities of currency values, the smallmoney data type can be applied for a column whose value cannot be lower than -214,748.3648 nor higher than 214,748.3647
The .NET Framework database equivalent to this data type is the SqlMoney class.
char: A field of characters can consist of any kinds of alphabetical symbols in any combination, readable or not. If you want a column to hold a fixed number of characters, such as the book shelf numbers of a library, apply the char data type for such a column. This is equivalent to the C++' char and __wchar_t types of the .NET Framework's System::Char data type except that the SQL's char type is suitable if all fields of a column would have the same length. The .NET Framework database equivalent to this data type is the SqlString class.
varchar: Like the string is in C++ and most other languages, the varchar data type is the most common data type of SQL. It represents a string. This means that it can be used on any column whose values you cannot predict. In fact, it is the default data type of any column created in the New Table window of SQL Server Enterprise Manager or the dbo.Table1 window of Visual Studio .NET. Use this data type wherever you would use a String value. The maximum length of text that a field of varchar type can hold is equivalent to 8 kilobytes. The .NET Framework database equivalent to this data type is the SqlString class.
text: The text data type can be applied to a field whose data would consist of ASCII characters. As opposed to a varchar type of field, a text type of field can hold text that is longer than 8 kilobytes. The .NET Framework database equivalent to this data type is the SqlString class.
nchar, nvarchar, and ntext: These three types follow the same rules as the char, varchar, and text respectively, except that they can be applied to columns that would hold international characters, that is, characters of languages other than US English. This is done following the rules of Unicode formats. The .NET Framework database equivalent to these data types is the SqlString class.
datetime: As its name suggests, a datetime data type is used for a column whose data would consist of date and/or time values. The entries must be valid date or time values but SQL Server allows a lot of flexibility, even to display a date in a non-traditional format. The date value of a datetime field can be comprised between January 1st, 1753 and December 31, 9999. This data type is equivalent to the .NET Framework's DateTime data type. The .NET Framework database equivalent to this data type is the SqlDateTime class.
smalldatetime: The smalldatetime is an alternative to the datetime data type. It follows the same rules and principles as the datetime data type except that a date value must be comprised between January 1st, 1900 and June 6, 2079. This data type is equivalent to the .NET Framework's DateTime data type except that this one's date ranges are smaller. Whenever in doubt, use the datetime type (or the varchar). The .NET Framework database equivalent to this data type is the SqlDateTime class.
|
One way you can tune your database is to control the amount of text entered in a column's field. As various columns can hold different types of data, so can the same data type control its own mechanism of internal data entry. The length of data means different things to different fields. Columns that carry the same data type can have different lengths. Most columns use a default length. The only type you should think of changing the length of data is if the column is character (char) or string-based (varchar): You should not touch the others. To specify the length of a column, if you are using the New Table window from SQL Server Enterprise, or the dbo.Table1 window from Microsoft Visual Studio .NET, you can enter the desired number in the Length box that corresponds to the column. If you are creating a SQL statement, after typing the name of the type, type the opening parenthesis, followed by the desired number, followed by the closing parenthesis. The rules of Length columns are: Bit Fields: We saw already that a bit column type is meant for one of two answers. The user is supposed to simply let the database know that the answer is yes or no, true or false, on or off, 1 or 0. Therefore, the only length of this field is 1. Integers: The length of an integer is the number of bytes its field can hold. For an int type, that would be 4 bytes. Decimal and Floating-Point Numbers: The Length specifies how many bytes the field can store. Strings: The Length of a character or string column specifies the maximum number of characters that the field can hold. In some circumstances, you will need to change or specify the length as it applies to a particular field. For example, since you should use the varchar data type for a string field whose content will change from one record to another, not all varchar columns need to have the same length. Although a First Name and a Book Title columns should use the varchar type, both columns would not have the same length of entries. As it happens, people hardly have a first name that is beyond 20 characters and many book titles go beyond 32 characters. In this case, both fields would use the same data type but different lengths. On the other hand, for columns of datetime and money data types, you should accept the default length suggested by the database.
Table Maintenance Renaming a Table If you have a table whose name is not appropriate, you can change its name. Before renaming a table, make sure this is what you want to do and make sure you can take care of it in your code. If you rename a table, Microsoft SQL Server would take care of updating it in Microsoft SQL Server. If you had used the name in your Windows Forms Application code, of course, the new name would not be updated in your code. You made need to take care of it yourself. If you are working in SQL Server Enterprise Manager, to rename a table, first locate its database in the left frame and click the Tables node. In the right-click frame, right-click the name of the table and click Rename. You would proceed the same way you do in Windows Explorer or My Computer: the name would be put into edit mode so you can type the new one and press Enter. The SQL Server Enterprise Manager is the only utility that allows you to "visually" rename a table. If you are working in one of the other environments we have mentioned, you can only rename the table programmatically. To rename a table with code, Transact-SQL provides sp_rename. (Notice that the name starts with sp_. This is called a stored procedure. We will learn how to create them. For now, we can use them exactly as you have learned to use functions in C++: You don't need to know how they work but you can trust that they work and do what they are supposed to do. To rename a table, use the following call: EXEC sp_rename 'ExistingName', 'NewName' The EXEC sp_rename expression is required. The ExistingName factor is the name of the table you want to rename. The NewName factor is the name you want the table to have after renaming it. To rename a table in SQL Query Analyzer, make sure you are in the appropriate database first. Then use the above formula. Here is an example: USE CarRentalDB GO EXEC sp_rename 'CarsFrom1996To2000', 'CarsToRetire' GO To rename a table in a C++ code, pass the sp_rename code as string to a SqlCommand object and call the SqlCommand::ExecuteNonQuery() method. |
|
|
 |
|||||||||||||||||||||||||||
|
private: System::Void btnRenameTbl_Click(System::Object *  sender, System::EventArgs *  e)
{
	 String *strExistingName = this->txtExistingTblName->Text;
	 String *strNewName = this->txtNewTblName->Text;

	 if( strExistingName->Equals(S"") )
	 {
		 MessageBox::Show(S"To rename a table, you must provide a "
			              S"valid name for an existing table");
		 return;
	 }
	 if( strNewName->Equals(S"") )
	 {
		 MessageBox::Show(S"To rename a table, you must provide the name "
			              S"that will replace the existing name of the table");
		 return;
	 }

	 String *strConnection = String::Concat(S"sp_rename '", strExistingName,
			                                    S"', '", strNewName, S"';");
SqlConnection *conDatabase = new SqlConnection(S"Data Source=(local);Database='CountriesStats';Integrated Security=yes");
	 SqlCommand    *cmdDatabase = new SqlCommand(strConnection, conDatabase);

	 conDatabase->Open();

	 cmdDatabase->ExecuteNonQuery();
	 conDatabase->Close();

	 this->txtExistingTblName->Text = S"";
	 this->txtNewTblName->Text = S"";
}
|

|
Removing a Table |
|
If you have a table you don't need in your database, you can remove it. Before performing this operation, you should make sure you are familiar with the role of the table. For example, when you create a database in Microsoft SQL Server, the database system creates some tables necessary for internal use. You should not make any attempt to delete any of these tables. In fact, you should try to delete only a table you know you have created and you don't need anymore. If you work in a team environment and you find a table that may have been created by someone else, you should enquire before deleting it. To delete a table, first locate the database it belongs to. If you are working in the SQL Server Enterprise Manager, to delete a table, in the left frame, expand the database that contains the table and click the Tables node. Then, in the right frame, right-click the undesired table and click Delete. A Drop Objects warning dialog box would display, asking you to confirm your intention:
If you want to change your mind, click Cancel. If you still want to delete the table, select it in the dialog box and click Drop All. When in doubt, click Help. If you are working in the Server Explorer, to delete a table, locate it in the Tables category of its database. Then right-click the name of the undesired table and click Delete. A warning message box would display:
This allows you to change your mind or to confirm your intention. If you are working in the SQL Query Analyzer, the code used to delete a table uses the following formula: DROP TABLE TableName The DROP TABLE expression is required and it is followed by the name of the table as TableName. Here is an example: DROP TABLE FriendsOfMine GO If you are working from C++ code, create a DROP TABLE TableName; expression and pass it to a SqlCommand object before calling the SqlCommand::ExecuteNonQuery() method. It is extremely important to know that, when working with the DROP TABLE TableName statement, you would not receive any warning. If you are working in a Windows Forms Application, you should create your own warning in a message box to make sure that the user really want to delete the table. Columns Maintenance |
|
Columns Statistics |
So far, we have seen various ways to create a table. This means that you may be aware of the information about the columns you would have created. In you are working on a table created by someone else or you have forgotten what your old table looks like, you can enquire about the names of columns, their data types and other pieces of information related to the columns.
If you are working from SQL Server Enterprise Manager, to access the design of a table, first locate it from its database. Then right-click the table and click Design Table. This would display the Design Table window that is the same used to design a table. To view the structure of a table, you can right-click it, you can right-click it and click Properties or you can double-click it:
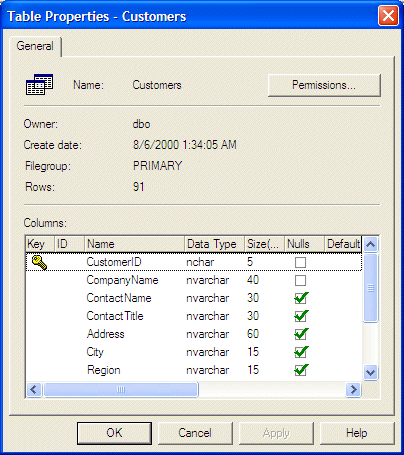
After viewing the table, you can click Cancel.
If you are working from the Server Explorer, to review the columns of a table, you can right-click it and click and click Design Table.
If you are working in SQL Query Analyzer, to get a list of the columns of a table, first specify the database, then type sp_help. Here is an example:
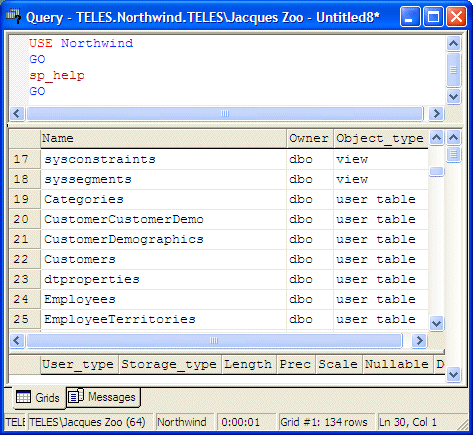
If you need more information about the columns, on the right side of sp_help, enter the name of the table in single-quotes (when we study functions and stored procedures, and based on your knowledge of C++, this technique is referred to as passing the name of the table as argument). Here is an example:

|
Adding a Column |
After creating a table or when using any existing table, you may find out that a column is missing. You can add a new column to a table if necessary.
If you are working in SQL Server Enterprise Manager or the Server Explorer, you can first display the table in the Design Table window (right-click the table and click Design Table). To add a new column at the end of the existing columns, in the first empty text box under the Column Name section, enter the name of the new column. To create a new column and make it the first column, right-click the first column and click Insert Column. To insert a new column anywhere in the table, right-click the column that would be under the new one and click Insert Column.
If you are working with SQL code, to create a new column, the formula to use is:
ALTER TABLE TableName ADD NewColumnName DataType Options
When using this statement, the ALTER TABLE expression and the ADD keyword are required. You must specify the name of the table that the new column will belong to. This is done using the TableName factor in our formula. Specify the name of the new column in the NewColumnName placeholder of our formula. On the right side of the NewColumnName placeholder, specify the options in the same way we described for columns.
If you are working from a Windows Forms Application code, create an ALTER TABLE expression and pass it to a SqlCommand object before executing it. Here is an example:
private: System::Void btnAddColumn_Click(System::Object *  sender, System::EventArgs *  e)
{
	 SqlConnection *conDatabase =
		new SqlConnection(S"Data Source=(local);Database='CountriesStats';Integrated Security=yes");
	 SqlCommand    *cmdDatabase =
		new SqlCommand(S"ALTER TABLE Countries ADD TypeOfGovernment varchar(100);",
				conDatabase);

	 conDatabase->Open();

	 cmdDatabase->ExecuteNonQuery();
	 conDatabase->Close();
}
Renaming a Column
|
If you find out that the name of a column is not appropriate in a table, you can change that name. If you are working from SQL Server Enterprise Manager or Server Explorer, first display the table in the Design Table window (right-click the table and click Design Table):
To rename a column, double-click its name to put it into edit mode and then edit its name. If you are working with SQL code, the code to rename a column uses the following formula: EXEC sp_rename 'ExistingName', 'NewName', 'COLUMN' The EXEC sp_rename expression and 'COLUMN' are required. The ExistingName factor is the name of the column you want to rename. The NewName factor is the name that will replace the existing name. To rename a column in SQL Query Analyzer, you must qualify the existing name of the column by typing the name of its table, followed by a period, and followed by the name of the column. Here is an example: USE CarRentalDB GO EXEC sp_rename 'CarsToRetire.AC', 'HasAirCondition' GO To rename a table in a C++ code, pass the sp_rename code as string to a SqlCommand object and call the SqlCommand::ExecuteNonQuery() method. Here is an example: |
private: System::Void btnRenameCode_Click(System::Object *  sender, System::EventArgs *  e)
{
	 String *strConnection = String::Concat(S"sp_rename 'Countries.Code', 'InternetCode', 'COLUMN';");
SqlConnection *conDatabase = new SqlConnection(S"Data Source=(local);Database='CountriesStats';Integrated Security=yes");
	 SqlCommand    *cmdDatabase = new SqlCommand(strConnection, conDatabase);

	 conDatabase->Open();

	 cmdDatabase->ExecuteNonQuery();
	 conDatabase->Close();
}
|
Deleting a Column |
|
If you have a column you don't need, you can remove that column from the table. To remove a column in the Design Table displayed from the SQL Server Enterprise or from the Server Explorer, you can first click that column, then right-click anywhere in the top section of the window and click Delete Column:
If you are working in the SQL Query Analyzer, the formula to delete a column is: ALTER TABLE TableName DROP COLUMN ColumnName In this formula, the ALTER TABLE and the DROP COLUMN expressions are required. The TableName factor is the name of the table that owns the column. The ColumnName factor is the name of the column to be deleted. To programmatically remove a column, create an ALTER TABLE statement using the above formula, pass the statement as string to a SqlCommand object before executing it. There is no warning when deleting a column. In the Design Table window, if you delete a column by mistake, you can close the table and refuse to save it. This is almost the only chance you have at keeping the column. If you are programmatically deleting a column, you can provide your own warning through a message box to make the user decide to continue or keep the column.
| |||||||||