
Relationships and Data Integrity
 |
Relationships and Data Integrity |
The Keys to a Good Relationship
Relational Databases
Imagine you are asked to create an application that allows a company to rent cars to potential customers. You may start by creating a list of cars that would be made available to customers. The list may include the type (make, model, and year) of the car and other pieces of information such as options (CD, AC, DVD, etc) that would be of interest to some of the customers. Here is an example of such a list:
| Car | |
| Make | Dodge |
| Model | Neon |
| Year | 2004 |
| HasCDPlayer | Yes |
| HasDVDPlayer | No |
When a new customer comes to the store to rent a car, the company clerk would need some of the customer's personal information to keep track of who has the car. The information about the customer may include her name, address, driver's license number, etc. The list of information about the customer may appear as follows:
| Customer | |
| Name | Janice Lalas |
| Driver's License Number | L-793-475-904 |
| Address | 1402 Lamer Lane |
| HomePhone | |
Once this information is collected, the clerk can present the available cars and their rental rates to the customer so she can select the type of car she wants. The clerk would also be interested to know how long the customer intends to keep the car. After using the car, the customer would bring it back to the store so the car can be made available to other customers.
When creating this application, you may be tempted to enter information about the car in the same list that includes the customer's information:
| Customer | |
| Name | Janice Lalas |
| Driver's License Number | L-793-475-904 |
| Address | 1402 Lamer Lane |
| HomePhone | |
| Car Rented | |
| Make | Dodge |
| Model | Neon |
| Year | 2004 |
| HasCDPlayer | Yes |
| HasDVDPlayer | No |
The problem here is that, when a different customer comes to rent the same car, the clerk would have to enter the same pieces of information. Experience shows that when the same information is manually entered over and over again, it could be different from one list to another as human beings are capable of making mistakes. The solution is to create separate lists: one list for the customers, another list for the cars. When a customer comes to rent a car, the clerk can select the customer's information from one list, select the information about the car from another list, and then process a rental order. This technique tremendously reduces the likelihood of making mistakes because information about each item, whether a customer or a car, is created only once and then made available to other lists that would need that information: this is the foundation of relational databases.
A relational database is an application in which information flows from one list to another. Microsoft SQL Server, like most database environments, is a relational database system: It allows you to create tables and link them so they can exchange information among themselves.
|
|
|
The Primary Key |
The transactions among various objects of a database should make sure information of one object is accessible to another object. The objects that hold information, as we have mentioned already, are the tables.
To manage the flow of information from one table (A) to another table (B), the table that holds the information, A, must make it available to other tables, such as B. There are two issues that must be dealt with:
To solve the first problem of uniquely identifying records inside of a table, in Lesson 15, we saw that you could create one column or a group of columns used as the primary key. In a relational database, which is the case for most of the databases you will be creating in SQL Server, each table should have at least one primary key.
To specify a primary key on a table, as we have already done
in the past, you
create one column as the PRIMARY KEY constraint and there can be only one
PRIMARY KEY constraint on a table. To do this in Enterprise Manager,
create a column and specify its data type. Then, on the toolbar, click the
Set Primary Key button ![]() .
.
To create a primary column using SQL, on the right side of the column definition, type PRIMARY KEY (remember, SQL is case-insensitive). Here is an example:
CREATE TABLE Departments (

DepartmentID INT PRIMARY KEY IDENTITY(1,1) NOT NULL,

Department VARCHAR(50))

GO
|
|
|
Foreign Keys
|
In our introduction to relationships, we illustrated a table that could be used to enter a customer's information and the car he wants to rent:
We also mentioned that it was not effective to put these two categories of information, namely the customer and the car, in the same list. The reason is that the same customer may come at different times to rent different types of cars and the same car is regularly rented by different customers. To reduce the likelihood of mistakes, you should separate these two categories, each in its own list:
This time, if you keep these two lists separate, when it is time to rent a car to a customer, you can use another list that allows the clerk to select the name of the customer, followed by the car she wants to rent:
To make this scenario work, there must be a column in the Rental Order list that represents the customers: this would be the Customer column in our illustration. The column that belongs to the Rental Order list but is used to represent the customers is called a foreign key. This column behaves like an ambassador who is not a citizen of the country where he works but instead represents his native country. Because a foreign key is used to represent a table other than the one where it resides, the table that the foreign key represents must have a primary key that would insure the uniqueness of records in the original table. The table that holds the necessary values and that has the primary key can be referred to as the parent table. In our above illustration, the Customers table is the parent. The table that holds the foreign key is referred to as the child table, which is the case for the Rental Orders list of our illustration. To create a foreign key, you can start by adding the necessary column in the table that will need or use it. There are rules and suggestions you should or must follow. As a suggestion, the name of the column used as the foreign key should be the same as the primary key of the table it represents. As a rule, the data type of the primary key of the parent table must be the same as the data type of the foreign key. If you are working with SQL code, to create a foreign key, when creating the table, before the closing comma of the name of a column (if the column is not the last in the table) or the closing parenthesis of the table (if the column is the last), you can type REFERENCES followed by the name of the parent table with parentheses. In the parentheses of the name of the parent table, enter the name of the primary key column. Here is an example: CREATE TABLE Departments ( DepartmentID INT PRIMARY KEY IDENTITY(1,1) NOT NULL, Department VARCHAR(50)) GO CREATE TABLE StaffMembers ( EmployeeID INT PRIMARY KEY IDENTITY(1,1) NOT NULL, FullName VARCHAR(50), DepartmentID INT REFERENCES Departments(DepartmentID)) GO When you create a table like this, the interpreter would know that, in the StaffMembers table, the DepartmentID column is a foreign key. If you want to explicitly indicate that the column is a foreign key, you can type FOREIGN KEY before specifying it with REFERENCES. Here is an example: CREATE TABLE StaffMembers ( EmployeeID INT PRIMARY KEY IDENTITY(1,1) NOT NULL, FullName VARCHAR(50), DepartmentID INT FOREIGN KEY REFERENCES Departments(DepartmentID)) GO You can also specify the name of the primary key of the parent table in parentheses you would include following FOREIGN KEY. This can be done as follows: CREATE TABLE StaffMembers ( EmployeeID INT PRIMARY KEY IDENTITY(1,1) NOT NULL, FullName VARCHAR(50), DepartmentID INT FOREIGN KEY(DepartmentID) REFERENCES Departments(DepartmentID)) GO If you are planning to reference the foreign key as an object somewhere in your code, you can give it an explicit name. To do this, when creating a table, type CONSTRAINT followed by the name of the foreign key constraint. Here is an example: CREATE TABLE StaffMembers ( EmployeeID INT PRIMARY KEY IDENTITY(1,1) NOT NULL, FullName VARCHAR(50), DepartmentID INT CONSTRAINT FK_Department FOREIGN KEY(DepartmentID) REFERENCES Departments(DepartmentID)) GO If you are working from the SQL Server Enterprise Manager or from the Server Explorer, to specify that a column is used as a foreign key, you can start by creating a column that has the same name and the same data type as the primary key of the parent table. Then, you can right-click anywhere in the table and click Relationships... This would open the Properties dialog box. To actually create a foreign key, in the Properties dialog box, you can click New. You would be asked to select the primary key from the parent table and the foreign from the child table. A name would be generated by the relationship. Once you are satisfied, you can click Close. |
||||||||||||||||||||||||||||||||||||||||||||||||||||||||
![]() Practical
Learning: Creating Foreign Keys
Practical
Learning: Creating Foreign Keys
|
Diagrams
|
If you have created the relationships of your tables using SQL code, you only have a vague idea of the flow of information among them. A diagram is a window that visually displays the relationships among tables of a database. A diagram also allows you to troubleshoot a relation when necessary. The Diagram window provides all the tools you need to create, view, change, delete or maintain relationships. To create a diagram, if you are working from the SQL Server Enterprise Manager, in the node of the database, you can right-click the Diagrams node and click New Database Diagram. This would launch the Create Database Diagram Wizard that you can follow to select the necessary tables. Once in the Diagram window, each table displays as a rectangle with dividing lines like a spreadsheet:
To effectively work on the tables, you should make sure you can identify each. If the view makes it difficult, you can zoom it. To do this, you can right-click a white area of the window, position the mouse on Zoom, and select a percentage. You can also click the Zoom button on the toolbar. Each table is equipped with a title bar on top that displays its name. If you forgot to add a table, you can right-click a white area in the window and click Add Table... This would display the list of tables of the same database, allowing you to select the desired table(s) before clicking Add and then Close. If you had added a table by mistake or you don't want to include an existing table in the diagram, to remove a table, you can right-click the table and click Remove Table From Diagram. To move a table, you drag its title bar. To create a relationship between two tables, you can right-click anywhere in the diagram and click Relationships... You would then proceed as we did in the section on Foreign Keys. To create or indicate a foreign key, you can drag the necessary column from a parent table to a child table. Once a relationship between two tables exists, there is a line that joins them. You can then manage the relationship. To identify a relationship, you can position the mouse on the line that joins the table:
To delete a relationship, you can right-click it and click Delete Relationship From Database. |
|
|
|
Relationships and Data Integrity
|
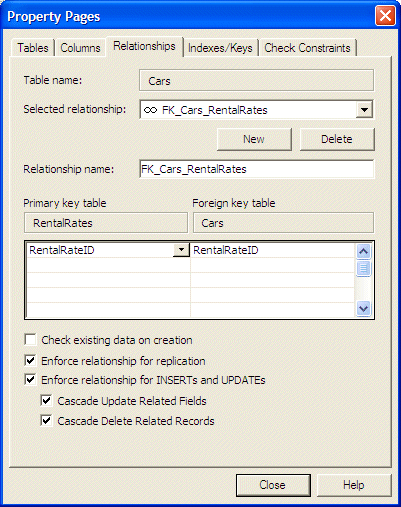
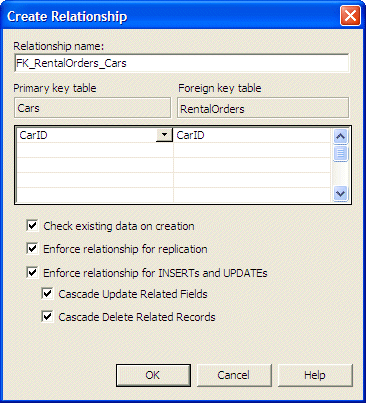
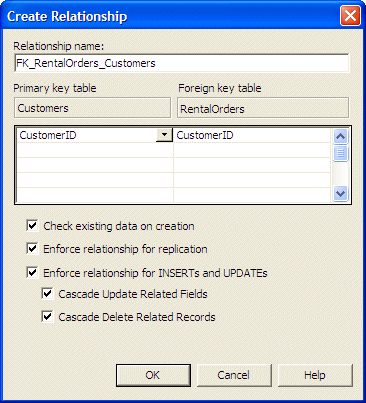
As mentioned in previous sections, relationships allow information to flow from one list, the parent table, to another list, the child table. When maintaining records, sometimes a piece of information may become obsolete. An employee may decide to change or to delete it from the parent table. This would cause the relation information in the child table to become orphan. When this happens, you need to take appropriate action. Referential integrity is the ability to take care of necessary details when data from a table gets changed or deleted. When a piece of information is changed in a parent table, you need to make sure that the change is replicated to the related child table. If you are creating or troubleshooting a table using the Design Table from the SQL Server Enterprise Manager or from Server Explorer, after displaying the Create Relationship or the Property Pages, you can click the Cascade Update Related Fields check box. If a piece of information is deleted in a parent, the records of the child table(s) that depended on it should be notified. If you are working from a table in the Design Table from the SQL Server Enterprise Manager or from Server Explorer, after displaying the Create Relationship or the Property Pages, you can click the Cascade Delete Related Records check box.
|
|
|
|
Windows Applications and Database Relationships |
|
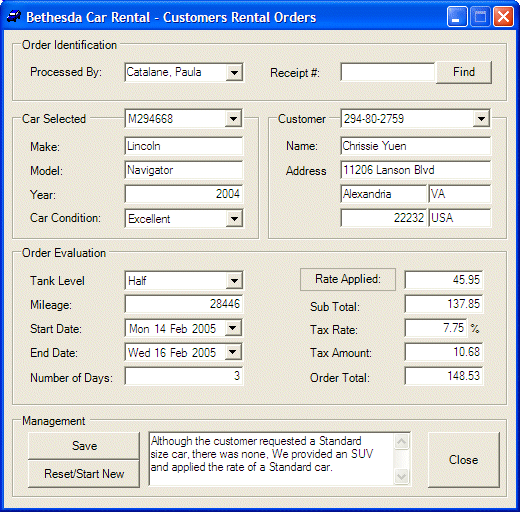
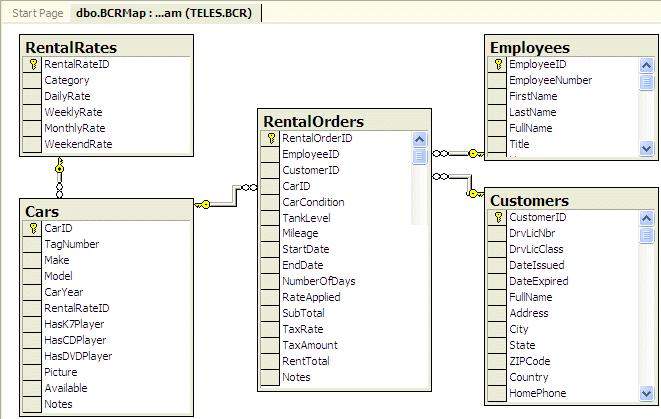
When creating an application that uses a database with related tables, to allow the user to select information from parent tables when using forms from child tables, you would configure list-based controls to get their data from the parent tables.
|
|
|

 |
||||||||||||
|
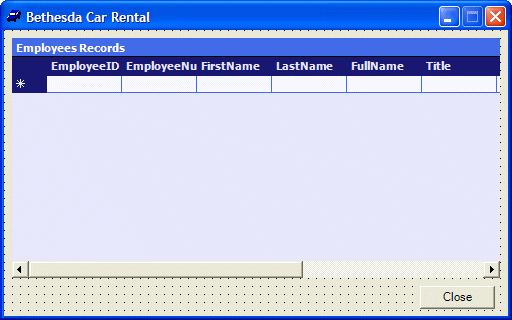
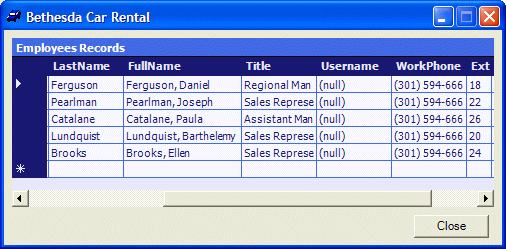
private: System::Void Employees_Load(System::Object *  sender, System::EventArgs *  e)

{

	 this->sqlDataAdapter1->Fill(this->dsBCR1);

}
|
private: System::Void dataGrid1_CurrentCellChanged(System::Object *  sender, System::EventArgs *  e)

{

	 this->sqlDataAdapter1->Update(this->dsBCR1);

}
|
private: System::Void btnClose_Click(System::Object *  sender, System::EventArgs *  e)

{

	 Close();

}
|
 |
||||||||||||||||||||||||||||||||||||||||||||||||||||||||||||||||||||||||||||||||||||||||||||||||||||||||||||||||||||||||||||||||||||
|
||||||||||||||||||||||||||||||||||||||||||||||||||||||||||||||||||||||||||||||||||||||||||||||||||||||||||||||||||||||||||||||||||||
 |
||||||||||||||||||||||||||||||||||||||||||||||||||||||||||||||||||||||||||||||||||||||||||||||||||||||||||||||||||||||||||||||||||||
|
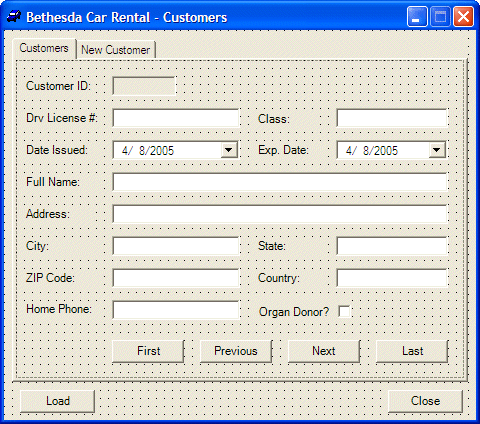
| Control | DataBinding | |
| Type | Value: dsBCR1 - Customers. | |
| txtCustomerID | Text | CustomerID |
| txtDrvLicNbr | Text | DrvLicNbr |
| txtDLClass | Text | DrvLicClass |
| dtpDateIssued | Value | DateIssued |
| dtpExpDate | Value | DateExpired |
| txtFullName | Text | FullName |
| txtAddress | Text | Address |
| txtCity | Text | City |
| txtState | Text | State |
| txtZIPCode | Text | ZIPCode |
| txtCountry | Text | Country |
| txtHomePhone | Text | HomePhone |
| chkOrganDonor | Checked | OrganDonor |
System::Void btnLoad_Click(System::Object *  sender, System::EventArgs *  e)

{

	 this->sqlDataAdapter1->Fill(this->dsBCR1);

}
|
System::Void btnFirst_Click(System::Object *  sender, System::EventArgs *  e)

{

	 this->pgeCustomers->BindingContext->get_Item(this->dsBCR1, S"Customers")->Position = 0;

	 this->sqlDataAdapter1->Update(this->dsBCR1);

}
|
private: System::Void btnPrevious_Click(System::Object *  sender, System::EventArgs *  e)

{

 this->pgeCustomers->BindingContext->get_Item(this->dsBCR1, S"Customers")->Position =

 this->pgeCustomers->BindingContext->get_Item(this->dsBCR1, S"Customers")->Position - 1;

	 this->sqlDataAdapter1->Update(this->dsBCR1);

}
|
private: System::Void btnNext_Click(System::Object *  sender, System::EventArgs *  e)

{

 this->pgeCustomers->BindingContext->get_Item(this->dsBCR1, S"Customers")->Position =

this->pgeCustomers->BindingContext->get_Item(this->dsBCR1, S"Customers")->Position + 1;

	 this->sqlDataAdapter1->Update(this->dsBCR1);

}
|
private: System::Void btnLast_Click(System::Object *  sender, System::EventArgs *  e)

{

this->pgeCustomers->BindingContext->get_Item(this->dsBCR1, S"Customers")->Position =

 this->pgeCustomers->BindingContext->get_Item(this->dsBCR1, S"Customers")->Count - 1;

	 this->sqlDataAdapter1->Update(this->dsBCR1);

}
|
private: System::Void btnClose_Click(System::Object *  sender, System::EventArgs *  e)

{

	 Close();

}
|
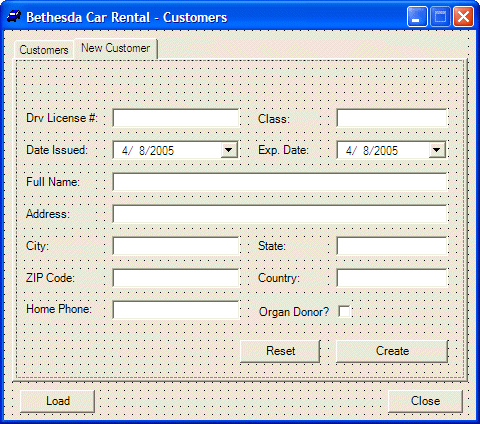
private: System::Void btnReset_Click(System::Object *  sender, System::EventArgs *  e)

{

	 this->txtNCDrvLicNbr->Text = S"";

	 this->txtNCDLClass->Text = S"C";

	 this->dtpNCDateIssued->Value = DateTime::Today;

	 this->dtpNCExpDate->Value    = DateTime::Today;

	 this->txtNCFullName->Text = S"";

	 this->chkNCOrganDonor->Checked = false;

	 this->txtNCAddress->Text = S"";

	 this->txtNCCity->Text = S"";

	 this->txtNCState->Text = S"MD";

	 this->txtNCZIPCode->Text = S"";

	 this->txtNCCountry->Text = S"USA";

	 this->txtNCHomePhone->Text = S"(000) 000-0000";


	 this->txtNCDrvLicNbr->Focus();

}
|
System::Void btnCreate_Click(System::Object *  sender, System::EventArgs *  e)

{

	 String *strDrvLicNbr = this->txtNCDrvLicNbr->Text;

	 String *strFullName = this->txtNCFullName->Text;


	 if( strDrvLicNbr->Equals(S"") )

	 {

	MessageBox::Show(S"You must provide the customer's driver's license number");

		 return;

	 }

	 if( strFullName->Equals(S"") )

	 {

		 MessageBox::Show(S"You must provide the customer's name");

		 return;

	 }


	 String *strInsert = String::Concat(S"INSERT INTO Customers(DrvLicNbr, DrvLicClass, "

		                           S"DateIssued, DateExpired, FullName, Address, "

				S"City, State, ZIPCode, Country, HomePhone, "

				S"OrganDonor) VALUES('",

				this->txtNCDrvLicNbr->Text, S"', '", txtNCDLClass->Text,

				S"', '", dtpNCDateIssued->Value, S"', '",

				dtpNCExpDate->Value, S"', '", txtNCFullName->Text,

				S"', '", txtNCAddress->Text, S"', '",

				txtNCCity->Text, S"', '", txtNCState->Text, S"', '",

				txtNCZIPCode->Text, S"', '", txtNCCountry->Text, S"', '",

		txtNCHomePhone->Text, S"', '", this->chkNCOrganDonor->Checked, S"');");


	 System::Data::SqlClient::SqlCommand    *cmdNewCustomer =

		new System::Data::SqlClient::SqlCommand(strInsert, this->sqlConnection1);


	 sqlConnection1->Open();


	 cmdNewCustomer->ExecuteNonQuery();

	 sqlConnection1->Close();


	 this->btnReset_Click(sender, e);

}
|
 |
|||||||||
|
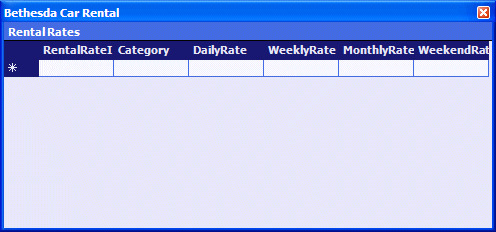
private: System::Void RentalRates_Load(System::Object *  sender, System::EventArgs *  e)

{

	 this->sqlDataAdapter1->Fill(this->dsBCR1);

}
|
 |
||||||||||||||||||||||||||||||||||||||||||||||||||||||||||||||||||||||||||||||||||||||||||||||||||||||||||||||||||||||||
|
||||||||||||||||||||||||||||||||||||||||||||||||||||||||||||||||||||||||||||||||||||||||||||||||||||||||||||||||||||||||
 |
||||||||||||||||||||||||||||||||||||||||||||||||||||||||||||||||||||||||||||||||||||||||||||||||||||||||||||||||||||||||
|
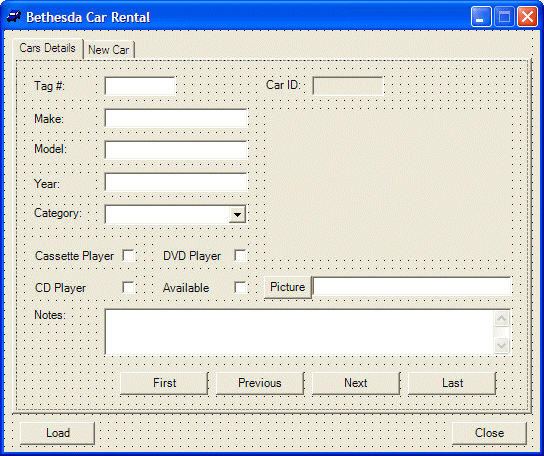
| Control | DataBindings Type | Selection: dsBCR1-Cars. |
Others |
| txtTagNumber | Text | TagNumber | |
| txtCarID | Text | CarID | |
| txtMake | Text | Make | |
| txtModel | Text | Model | |
| txtYear | Text | CarYear | |
| cboRentalRateID | SelectedValue | RentalRateID | DataSource: dsBCR1.RentalRates DisplayMember: Category ValueMember: RentalRateID |
| chkK7Player | Checked | HasK7Player | |
| chkDVDPlayer | Checked | HasDVDPlayer | |
| chkCDPlayer | Checked | HasCDPlayer | |
| chkAvailable | Checked | IsAvailable | |
| txtPicture | Text | Picture | |
| txtNotes | Text | Notes | |
| cboNCRentalRateID | SelectedValue | RentalRateID | DataSource: dsBCR1.RentalRates DisplayMember: Category ValueMember: RentalRateID |
private: System::Void btnPicture_Click(System::Object *  sender, System::EventArgs *  e)

{

	 if( openFileDialog1->ShowDialog() == DialogResult::OK )

	 {

		 this->txtPicture->Text = openFileDialog1->FileName;

		 this->pctCar->Image = Bitmap::FromFile(openFileDialog1->FileName);

	 }

}
|
private: System::Void btnNCPicture_Click(System::Object *  sender, System::EventArgs *  e)

{

	 if( openFileDialog1->ShowDialog() == DialogResult::OK )

	 {

		 this->txtNCPicture->Text = openFileDialog1->FileName;

		 this->pctNCar->Image = Bitmap::FromFile(openFileDialog1->FileName);

	 }

}
|
System::Void btnLoad_Click(System::Object *  sender, System::EventArgs *  e)

{

	 this->sqlDataAdapter2->Fill(this->dsBCR1);

	 this->sqlDataAdapter1->Fill(this->dsBCR1);

	 this->pctCar->Image = Bitmap::FromFile(this->txtPicture->Text);

}
|
System::Void btnFirst_Click(System::Object *  sender, System::EventArgs *  e)

{

	 this->pgeCars->BindingContext->get_Item(this->dsBCR1, S"Cars")->Position = 0;

	 this->pctCar->Image = Bitmap::FromFile(this->txtPicture->Text);

	 this->sqlDataAdapter1->Update(this->dsBCR1);

}
|
System::Void btnPrevious_Click(System::Object *  sender, System::EventArgs *  e)

{

	 this->pgeCars->BindingContext->get_Item(this->dsBCR1, S"Cars")->Position =

		 this->pgeCars->BindingContext->get_Item(this->dsBCR1, S"Cars")->Position - 1;

	 this->pctCar->Image = Bitmap::FromFile(this->txtPicture->Text);

	 this->sqlDataAdapter1->Update(this->dsBCR1);

}
|
System::Void btnNext_Click(System::Object *  sender, System::EventArgs *  e)

{

	 this->pgeCars->BindingContext->get_Item(this->dsBCR1, S"Cars")->Position =

		 this->pgeCars->BindingContext->get_Item(this->dsBCR1, S"Cars")->Position + 1;

	 this->pctCar->Image = Bitmap::FromFile(this->txtPicture->Text);

	 this->sqlDataAdapter1->Update(this->dsBCR1);

}
|
System::Void btnLast_Click(System::Object *  sender, System::EventArgs *  e)

{

	 this->pgeCars->BindingContext->get_Item(this->dsBCR1, S"Cars")->Position =

		 this->pgeCars->BindingContext->get_Item(this->dsBCR1, S"Cars")->Count - 1;

	 this->pctCar->Image = Bitmap::FromFile(this->txtPicture->Text);

	 this->sqlDataAdapter1->Update(this->dsBCR1);

}
|
private: System::Void btnClose_Click(System::Object *  sender, System::EventArgs *  e)

{

	 Close();

}
|
System::Void btnReset_Click(System::Object *  sender, System::EventArgs *  e)

{

	 this->txtNCTagNumber->Text = S"";

	 this->txtNCMake->Text = S"";

	 this->txtNCModel->Text = S"";

	 this->txtNCYear->Text = S"";

	 this->cboNCCategoryID->SelectedIndex = -1;

	 this->chkNCK7Player->Checked = false;

	 this->chkNCDVDPlayer->Checked = false;

	 this->chkNCCDPlayer->Checked = false;

	 this->chkNCAvailable->Checked = false;

	 this->txtNCPicture->Text = S"C:\\Programs\\Unknown.bmp";

	 this->pctNCar->Image = Bitmap::FromFile(this->txtNCPicture->Text);

	 this->txtNCNotes->Text = S"";


	 this->txtNCTagNumber->Focus();

}
|
System::Void btnCreate_Click(System::Object *  sender, System::EventArgs *  e)

{

	 String *strInsert = String::Concat(S"INSERT INTO Cars(TagNumber, Make, Model, "

		                                S"CarYear, RentalRateID, HasK7Player, "

				S"HasCDPlayer, HasDVDPlayer, Picture, "

				S"Available, Notes) VALUES('",

				this->txtNCTagNumber->Text, S"', '",

				txtNCMake->Text, S"', '", txtNCModel->Text,

				S"', '", txtNCYear->Text, S"', '",

				cboNCCategoryID->SelectedIndex, S"', '",

				chkNCCDPlayer->Checked, S"', '",

				chkNCDVDPlayer->Checked, S"', '",

				chkNCDVDPlayer->Checked, S"', '",

				txtNCPicture->Text, S"', '",

				chkNCAvailable->Checked, S"', '",

				txtNCNotes->Text, S"');");


	 System::Data::SqlClient::SqlCommand    *cmdNewCar = new

		System::Data::SqlClient::SqlCommand(strInsert, this->sqlConnection1);


	 sqlConnection1->Open();


	 cmdNewCar->ExecuteNonQuery();

	 sqlConnection1->Close();


	 this->btnReset_Click(sender, e);

}
|
 |
|||||||||||||||||||||||||||||||||||||||||||||||||||||||||||||||||||||||||||||||||||||||||||||||||||||||||||||||||||||||||||||||||||||||||||||||||||||||||||||||||||||||||||||||||||||||||||||||||||||||||||||||||||||||||||||||||||||||||||||||||||||||||||||||||||||||||
|
| Control | DataBindings Type | Selection: dsBCR1 -RentalOrders. |
Others |
| cboEmployeeID | SelectedValue | EmployeeID | DataSource: dsBCR1.Employees DisplayMember: FullName ValueMember: EmployeeID |
| cboCarID | SelectedValue | CarID | DataSource: dsBCR1.Cars DisplayMember: TagNumber ValueMember: CarID |
| cboCustomerID | SelectedValue | CustomerID | DataSource: dsBCR1.Customers DisplayMember: DrvLicNbr ValueMember: CustomerID |
private: System::Void RentalOrders_Load(System::Object *  sender, System::EventArgs *  e)

{

	 this->sqlDataAdapter4->Fill(this->dsBCR1);

	 this->sqlDataAdapter3->Fill(this->dsBCR1);

	 this->sqlDataAdapter2->Fill(this->dsBCR1);

	 this->sqlDataAdapter1->Fill(this->dsBCR1);

}
|
System::Void cboCarID_SelectedIndexChanged(System::Object *  sender, System::EventArgs *  e)

{

		 String *strTagNumber = S"000000";

		 String *strMake      = S"Not Found";

		 String *strModel     = S"Not Found";

		 String *strYear      = S"0";


		 // Get a reference to the records of the Cars table

		 DataRowCollection *rows = this->dsBCR1->Tables->Item[S"Cars"]->Rows;

		 // Check each record one by one

		 for(int i = 0; i < rows->Count; i++)

		 {

			 // Get the current tag number

		strTagNumber = dynamic_cast<String *>(rows->Item[i]->Item[S"TagNumber"]);


			 // If the current tag matches the one selected by the user...

			 if( strTagNumber->Equals(this->cboCarID->Text) )

			 {

				 // Retrieve its corresponding make, model, and year

			 strMake  = dynamic_cast<String *>(rows->Item[i]->Item[S"Make"]);

			 strModel = dynamic_cast<String *>(rows->Item[i]->Item[S"Model"]);

			 strYear  = dynamic_cast<String *>(rows->Item[i]->Item[S"CarYear"]);

			 // Since you found a match, STOP!!!

				 break;

			 }

		 }


		 // Display the make, model, and year of the selected car

		 this->txtMake->Text = strMake;

		 this->txtModel->Text = strModel;

		 this->txtCarYear->Text = strYear;

}
|
System::Void cboCustomerID_SelectedIndexChanged(System::Object *  sender, System::EventArgs *  e)

{

	 String *strDrvLicNbr   = S"000000";

	 String *strCustName    = S"Not Found";

	 String *strCustAddress = S"";

	 String *strCustCity    = S"";

	 String *strCustState   = S"";

	 String *strCustZIPCode = S"";

	 String *strCountry     = S"";


	 // Get a reference to the records of the Customers table

	 DataRowCollection *rows = this->dsBCR1->Tables->Item[S"Customers"]->Rows;

	 // Check each record one by one

	 for(int i = 0; i < rows->Count; i++)

	 {

		 // Get the current tag number

		strDrvLicNbr = dynamic_cast<String *>(rows->Item[i]->Item[S"DrvLicNbr"]);


		 // If the current driver's license number matches the one selected by the user...

		 if( strDrvLicNbr->Equals(this->cboCustomerID->Text) )

		 {

			 // Retrieve its corresponding information

		 strCustName    = dynamic_cast<String *>(rows->Item[i]->Item[S"FullName"]);

		 strCustAddress = dynamic_cast<String *>(rows->Item[i]->Item[S"Address"]);

		 strCustCity    = dynamic_cast<String *>(rows->Item[i]->Item[S"City"]);

		 strCustState   = dynamic_cast<String *>(rows->Item[i]->Item[S"State"]);

		 strCustZIPCode = dynamic_cast<String *>(rows->Item[i]->Item[S"ZIPCode"]);

		 strCountry     = dynamic_cast<String *>(rows->Item[i]->Item[S"Country"]);

			 // Since you found a match, STOP!!!

				 break;

		 }

	 }


	 // Display the details of the customer

	 this->txtCustName->Text    = strCustName;

	 this->txtCustAddress->Text = strCustAddress;

	 this->txtCustCity->Text    = strCustCity;

	 this->txtCustState->Text   = strCustState;

	 this->txtCustZIPCode->Text = strCustZIPCode;

	 this->txtCustCountry->Text = strCountry;

}
|
System::Void btnRateApplied_Click(System::Object *  sender, System::EventArgs *  e)

{

	 RentalRates *frmRates = new RentalRates();

	 frmRates->Show();

}
|
System::Void btnReset_Click(System::Object *  sender, System::EventArgs *  e)

{

	 this->cboEmployeeID->SelectedIndex = -1;

	 this->txtRentalOrderID->Text = S"";

	 this->cboCarID->SelectedIndex = -1;

	 this->txtMake->Text = S"";

	 this->txtModel->Text = S"";

	 this->txtCarYear->Text = S"";

	 this->cboCarCondition->SelectedIndex = 0;

	 this->cboCustomerID->SelectedIndex = -1;

	 this->txtCustName->Text = S"";

	 this->txtCustAddress->Text = S"";

	 this->txtCustCity->Text = S"";

	 this->txtCustState->Text = S"";

	 this->txtCustZIPCode->Text = S"";

	 this->txtCustCountry->Text = S"USA";

	 this->cboTankLevel->SelectedIndex = 0;

	 this->txtRateApplied->Text = S"24.95";

	 this->txtMileage->Text = S"0";

	 this->txtSubTotal->Text = S"0.00";

	 this->dtpStartDate->Value = DateTime::Today;

	 this->txtTaxRate->Text = S"7.75";

	 TimeSpan ts(1, 0, 0, 0);

	 this->dtpEndDate->Value = DateTime::Today.Add(ts);

	 this->txtTaxAmount->Text = S"0.00";

	 this->txtNumberOfDays->Text = S"1";

	 this->txtOrderTotal->Text = S"0.00";

	 this->cboEmployeeID->Focus();

}
|
private: System::Void dtpEndDate_ValueChanged(System::Object *  sender, System::EventArgs *  e)

{

	 DateTime startDate = this->dtpStartDate->Value;

	 DateTime endDate   = this->dtpEndDate->Value;

	 TimeSpan diff      = endDate.Subtract(startDate);

	 this->txtNumberOfDays->Text = (diff.Days + 1).ToString();

}
|
System::Void txtRateApplied_Leave(System::Object *  sender, System::EventArgs *  e)

{

	 double rateApplied = this->txtRateApplied->Text->ToDouble(0);

	 int numberOfDays   = this->txtNumberOfDays->Text->ToInt16(0);

	 double subTotal = rateApplied * numberOfDays;

	 this->txtSubTotal->Text = subTotal.ToString(S"F");

	 double taxRate = this->txtTaxRate->Text->ToDouble(0);

	 double taxAmount = subTotal * taxRate / 100;

	 this->txtTaxAmount->Text = taxAmount.ToString(S"F");

	 double orderTotal = subTotal + taxAmount;

	 this->txtOrderTotal->Text = orderTotal.ToString(S"F");

}
|
System::Void btnNewOrder_Click(System::Object *  sender, System::EventArgs *  e)

{

	 if( this->btnNewOrder->Text->Equals(S"New Rental Order") )

	 {

		 this->btnNewOrder->Text = S"Save";

		 this->btnReset_Click(sender, e);

	 }

	 else

	 {

	 String *strInsert = String::Concat(S"INSERT INTO RentalOrders("

		                            S"EmployeeID, CustomerID, CarID, "

				S"CarCondition, TankLevel, Mileage, "

				S"StartDate, EndDate, NumberOfDays, "

				S"RateApplied, SubTotal, TaxRate, TaxAmount, "

				S"RentTotal, Notes) VALUES('",

			cboEmployeeID->SelectedIndex.ToString(), S"', '",

			cboCustomerID->SelectedIndex.ToString(), S"', '",

				cboCarID->SelectedIndex.ToString(), S"', '",

				cboCarCondition->Text, S"', '",

				cboTankLevel->Text,  S"', '", txtMileage->Text,

				S"', '", dtpStartDate->Value, S"', '",

			dtpEndDate->Value, S"', '", txtNumberOfDays->Text,

			S"', '", txtRateApplied->Text->ToDecimal(0), S"', '",

				txtSubTotal->Text->ToDecimal(0), S"', '",

				txtTaxRate->Text->ToDecimal(0), S"', '",

				txtTaxAmount->Text->ToDecimal(0), S"', '",

				txtOrderTotal->Text->ToDecimal(0), S"', '",

				txtNotes->Text, S"');");


	 System::Data::SqlClient::SqlCommand    *cmdNewOrder = new

	System::Data::SqlClient::SqlCommand(strInsert, this->sqlConnection1);


		 sqlConnection1->Open();


	 	cmdNewOrder->ExecuteNonQuery();

		sqlConnection1->Close();


		 this->btnReset_Click(sender, e);

		 this->btnNewOrder->Text = S"New Rental Order";

	 }

}
|
 |
||||||||||||||||||
|
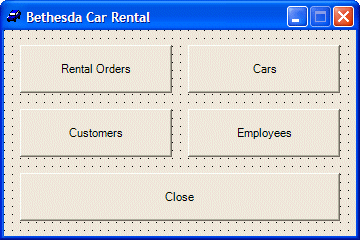
#pragma once #include "RentalOrders.h" #include "Cars.h" #include "Customers.h" #include "Employees.h" |
System::Void btnRentalOrders_Click(System::Object *  sender, System::EventArgs *  e)

{

	 RentalOrders *frmOrders = new RentalOrders();

	 frmOrders->Show();

}
|
System::Void btnCars_Click(System::Object *  sender, System::EventArgs *  e)

{

	 Cars *frmCars = new Cars();

	 frmCars->ShowDialog();

}
|
System::Void btnCustomers_Click(System::Object *  sender, System::EventArgs *  e)

{

	 Customers *frmCust = new Customers();

	 frmCust->ShowDialog();

}
|
System::Void btnEmployees_Click(System::Object *  sender, System::EventArgs *  e)

{

	 Employees *frmEmpl = new Employees();

	 frmEmpl->Show();

}
|
System::Void btnClose_Click(System::Object *  sender, System::EventArgs *  e)

{

	 Close();

}
|

System::Void btnFind_Click(System::Object *  sender, System::EventArgs *  e)

{

	 String *strReceiptNumber = this->txtRentalOrderID->Text;


	 if( strReceiptNumber->Equals(S"") )

	 {

		 MessageBox::Show(S"You must provide a receipt number to look for a rental order");

		 return;

	 }


 String *strFindOrder = String::Concat(S"SELECT * FROM RentalOrders WHERE RentalOrderID = '",

		 strReceiptNumber, S"'");


 	 System::Data::SqlClient::SqlConnection *conDatabase = new

System::Data::SqlClient::SqlConnection(S"Data Source=(local);Database='BCR';Integrated Security=yes");

	 System::Data::SqlClient::SqlCommand    *cmdDatabase = new

		 System::Data::SqlClient::SqlCommand(strFindOrder, conDatabase);


	 conDatabase->Open();


	 System::Data::SqlClient::SqlDataReader *rdrRentalOrder;

	 rdrRentalOrder = cmdDatabase->ExecuteReader();


	 while(rdrRentalOrder->Read())

	 {

 this->cboEmployeeID->SelectedIndex = (rdrRentalOrder->GetSqlInt32(1) - 1).ToString()->ToInt32(0);

 this->cboCustomerID->SelectedIndex = (rdrRentalOrder->GetSqlInt32(2) - 1).ToString()->ToInt32(0);

 this->cboCarID->SelectedIndex      = (rdrRentalOrder->GetSqlInt32(3) - 1).ToString()->ToInt32(0);

		 this->cboCarCondition->Text        = rdrRentalOrder->GetString(4);

		 this->cboTankLevel->Text           = rdrRentalOrder->GetString(5);

		 this->txtMileage->Text             = rdrRentalOrder->GetInt32(6).ToString();

		 this->dtpStartDate->Value          = rdrRentalOrder->GetDateTime(7);

		 this->dtpEndDate->Value            = rdrRentalOrder->GetDateTime(8);

		 this->txtNumberOfDays->Text        = rdrRentalOrder->GetInt16(9).ToString();

		 this->txtRateApplied->Text         = rdrRentalOrder->GetDecimal(10).ToString();

		 this->txtSubTotal->Text            = rdrRentalOrder->GetDecimal(11).ToString();

		 this->txtTaxRate->Text           = rdrRentalOrder->GetDecimal(12).ToString();

		 this->txtTaxAmount->Text           = rdrRentalOrder->GetDecimal(13).ToString();

		 this->txtOrderTotal->Text          = rdrRentalOrder->GetDecimal(14).ToString();

		 this->txtNotes->Text               = rdrRentalOrder->GetString(15);

	 }


	 rdrRentalOrder->Close();

	 conDatabase->Close();

}
|
|
|
||
| Previous | Copyright © 2005-2016, FunctionX | Next |
|
|
||