
Data Relationships
 |
Data Relationships |
The data-oriented applications we have created so far and that had more than one form for data entry presented a particular problem that should always be avoided: the ability to enter the same piece of information in more than one form. The reason is that when this is done, there is a chance that the intended information would be different in those objects. For example, the name of an employee entered in an employment application entered as Euzhan Palcy is not the same as Euzan Palsy entered in the time sheet. To avoid data redundancy, when creating an application that would use different objects such as forms, you can make it so that the information stored in one object can be made available to other objects that would need that information.
A relationship between two lists allows them to exchange information so that information stored in one list can be made available to another list. This makes sure that each piece of information is entered only once in the application from one object such as a form. Then, if another object, such as another form, needs that information, it can get it from the object that originally holds the information. To make this flow of information from one list to another possible, you must "connect" both lists. Imagine you are creating a list of videos as follows:
If you are creating a formal application from this list, you may want to create a list that includes only directors so you can provide more information about them since it would be cumbersome to try including details that are particular to a director but may be irrelevant to the video list. Based on this, you can create the list of directors as follows:
Once this list has been created, you can make the names of directors available to the list of videos. This would ensure that, when the name of a director has been entered in the list of directors, that name can simply be selected in the list of videos, reducing, even eliminating, the likelihood of making a mistake of mistyping a director's name in the list of videos. Furthermore, when a piece of information about a director needs to be changed, the change would be performed in the list of directors and any other list that receives that information would be automatically updated: This is the foundation of relational databases.
To make sure that a list of your application can make its information available to other lists of the same application, you must establish a relationship between both lists. To do this, each list that is involved in a relationship must designate one or more of its columns to communicate with the other list(s). For example, if you create a list of directors as we did above, you must specify at least one column that would manage that list's flow of information with the list of videos. Imagine you create a table called Directors equipped with a column called Director and the table belongs to a DataSet: #pragma once
namespace WinForms30
{
using namespace System;
using namespace System::ComponentModel;
using namespace System::Collections;
using namespace System::Windows::Forms;
using namespace System::Data;
using namespace System::Drawing;
. . . No Change
private:
/// <summary>
/// Required designer variable.
/// </summary>
System::ComponentModel::Container * components;
DataSet *dsVideoCollection;
DataTable *dtDirectors;
DataColumn *colDirector;
/// <summary>
/// Required method for Designer support - do not modify
/// the contents of this method with the code editor.
/// </summary>
void InitializeComponent(void)
{
. . . No Change
}
private: System::Void Form1_Load(System::Object * sender, System::EventArgs * e)
{
dsVideoCollection = new DataSet(S"Videos");
dtDirectors = new DataTable(S"Directors");
colDirector = new DataColumn(S"Director", System::Type::GetType(S"System.String"));
colDirector = dtDirectors->Columns->Add("Director");
dsVideoCollection->Tables->Add(dtDirectors);
}
};
}
To make sure that information from the Directors list can flow from this list to another, you must create a special column or use a combination of columns of the table. This column or this combination of columns is called a primary key. Any column can be used as the primary key. To specify that a column or a group of columns would be used as the primary key, you assign it to the DataTable::PrimaryKey property. This property is in fact a collection. To create a primary key, you can first create a DataColumn array, then you can assign that array to the DataTable::PrimaryKey property. Here is an example: #pragma once
namespace WinForms30
{
. . . No Change
private:
/// <summary>
/// Required designer variable.
/// </summary>
System::ComponentModel::Container * components;
DataSet *dsVideoCollection;
DataTable *dtDirectors;
DataColumn *colDirector[];
/// <summary>
/// Required method for Designer support - do not modify
/// the contents of this method with the code editor.
/// </summary>
void InitializeComponent(void)
{
. . . No Change
}
private: System::Void Form1_Load(System::Object * sender, System::EventArgs * e)
{
dsVideoCollection = new DataSet(S"Videos");
dtDirectors = new DataTable(S"Directors");
colDirector = new DataColumn*[1];
colDirector[0] = new DataColumn(S"Director",
System::Type::GetType(S"System.String"));
dtDirectors->Columns->Add(colDirector[0]);
dsVideoCollection->Tables->Add(dtDirectors);
dtDirectors->PrimaryKey = colDirector;
}
};
}
If you want to use more than one column as the primary key, include them in an array, as we learned in Lesson 8 to create arrays of columns. Then, assign that array to the DataTable::PrimaryKey property. Just as we have created a primary key for one table, you can create a primary key for any other table of your application as you judge them necessary. When a primary key column is created to serve solely for the relationships, by tradition, the name of that column ends with ID.
We have mentioned that any column or any group of columns can be made a primary key. In reality the idea behind a primary key is to manage the relationship between its list and the other lists of the application. To make sure that the flow of information is smooth between the list that holds the primary key and the lists that need its information, the particular information that the primary key columns holds should always be provided. Although its column is referred to as the primary key, the information stored in the fields under that column is primarily part of the record. If information is missing or is not provided in the primary key for a record, that record cannot be accessed by the other lists since the primary key would be empty. Because of this, you should not let the user think too much about what value to put in the primary key, whether to enter value in it or to skip it during data entry. Therefore, a primary key column should usually be made to hold simple integral numbers. Based on this, on any table involved in a relationship, you can create a special and particular column as the primary key and set its data type to an integer. In other words, the user should not be hesitating whether to enter a value or not: a regular number should be enough. Here is an example of creating a primary key column of type int: #pragma once
namespace WinForms30
{
. . . No Change
private:
/// <summary>
/// Required designer variable.
/// </summary>
System::ComponentModel::Container * components;
DataSet *dsVideoCollection;
DataTable *dtDirectors;
DataColumn *colDirectorID[];
DataColumn *colDirector;
. . . No Change
private: System::Void Form1_Load(System::Object * sender,
System::EventArgs * e)
{
dsVideoCollection = new DataSet(S"Videos");
dtDirectors = new DataTable(S"Directors");
colDirectorID = new DataColumn*[1];
colDirectorID[0] = new DataColumn(S"DirectorID",
System::Type::GetType(S"System.Int32"));
dtDirectors->Columns->Add(colDirectorID[0]);
colDirector = new DataColumn(S"Director",
System::Type::GetType(S"System.String"));
dtDirectors->Columns->Add(colDirector);
dsVideoCollection->Tables->Add(dtDirectors);
dtDirectors->PrimaryKey = colDirectorID;
}
};
}
If you are visually creating the tables for the application, in the Properties list for the table, you can click the Primary Key field to reveal its combo box, click the arrow of the combo box, and click the gray box on the left side of the column name: 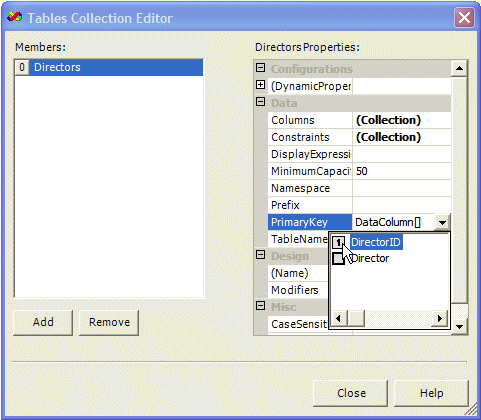 Because a primary key is also treated as a variable whose value can be called and accessed when necessary, it must have a C++ valid name. If you don't provide a name for a default name is used. Otherwise, you can name it. If you are programmatically creating the table, can also explicitly declare a variable that would hold the name of the primary key. If you are visually creating the table, to name its primary key, you can click the ellipsis button of the Constraints field of the table to open Constraints Collection Editor. If you had created the primary by directly clicking its gray box as done above, a default name would have been created and it would display in the Members list: 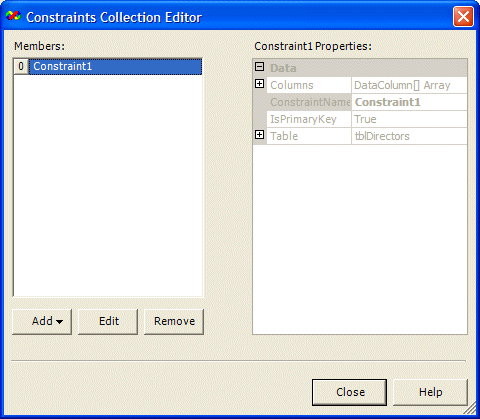 If you want to change the name of the primary key, you can select it in the Members list and click Edit. If you are creating a new primary key, in the Constraints Collection Editor, you can click Add -> Unique Constraint. In this and the previous case, you would be presented with the Unique Constraint dialog box. You should use it to enter the desired name of the primary key, click the check box of the column used as the primary key, click the Primary Key check box, and click OK: 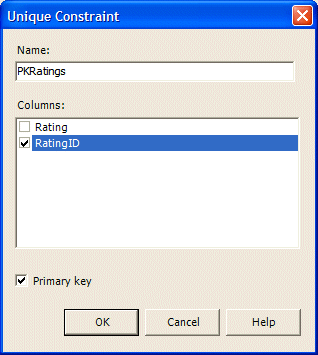
In the previous description, we mentioned that you should reduce the user's involvement with the details of a primary key column. In fact, if possible, you should keep the user away from the primary key. In the above description, we had let the user enter a number in the primary key. Another detail of the primary key is that its information must be unique for each record. For example, if you set its data type to string, the user should not be allowed to enter the same string twice. For example, two entries of Jonathan Demme should not be allowed under the Director column of the Directors list. If you let the user enter simple numbers as we suggested above, you should still make sure that the user cannot enter the same number twice under the DirectorID column. To help you cope with unique numbers, you can set up the primary column so its numbers automatically increase. To support this, the DataColumn class is equipped with the Boolean AutoIncrement property. If you set this property to true, the application would be in charge of automatically incrementing the numeric value of the record in the primary key column every time a new record is entered. This ensures that the user doesn't need to enter or remember to enter a value for that column. If the column has already been created and you want to find out whether its values automatically increment, you can check the value of its DataColumn::AutoIncrement property. If you set the DataColumn::AutoIncrement property to true, the first value of the column would be set to 0. The next value would be set to 1, and so on. This means that the count would start at 0. If you want the records to start at a value other than 0, assign the desired number to the DataColumn:AutoIncrementSeed property. If you set the DataColumn::AutoIncrement property to true, the values in the primary key column are automatically incremented by 1. If you want them to be incremented by a higher value, assign the desired number to the DataColumn::AutoIncrementStep property. The value you assign can be a long integer (up to __int64). If you are visually creating the column, you can first access its properties. Then, in the properties list, you can set the AutoIncrement property to True. This automatically set the column's DataType to System.Int32 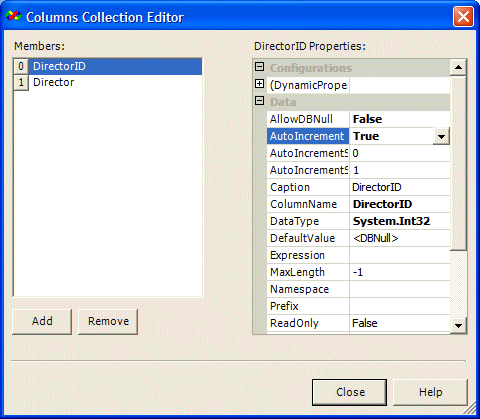 To specify the seed used, you can set the column's AutoIncrementSeed value to a value of your choice. This is usually set to 1.
When one list needs information that is stored in another list, the list that requests this information must have an existing relationship with the first list. The list that holds the information needed is referred to as the parent list or the parent table. Any list that needs this information is called a child list or a child table. As the primary key column was created for the parent list, the child list that needs this information must also have a column that serves to maintain the relationship. This type of column is called a foreign key. As its name indicates, a foreign key hardly belongs to the table where it is created. The foreign acts as an "ambassador". It represents the records that belong to the parent list. To get this foreign key on a column, you can create it or use an existing column of the child list. The end result is that the foreign key (of the child list) will be "connected" or "related" to the primary key (of the parent list).
A foreign key is primarily a column of the table. One of its rules is that it must have the same data type as that of the primary key it connects to. Its name can be any valid string but it is a tradition to end its name with ID to indicate that it serves in a relationship. To create a foreign key, in the Constraints Collection Editor, you can click Add -> Foreign Key Constraints. Then, in the Foreign Key Constraint, first provide a name for the variable. In the Parent Table combo box, you can select the table that acts as the parent. In the box under the Key Columns bar, you can select the primary key of the parent table. In the box under the Foreign Key Columns bar, you can select the column that behaves as the foreign key: 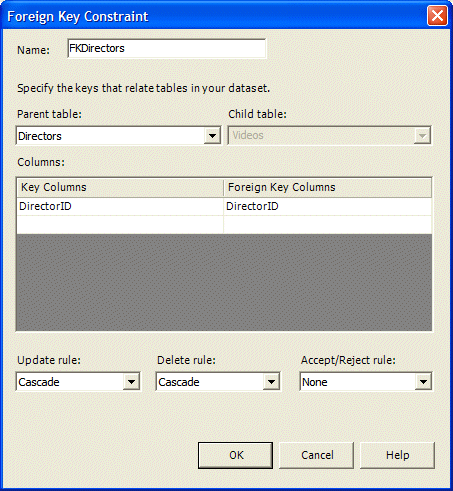
We mentioned that lists relationships allow data to flow from one list to another. During data entry, these relationships allow the user to convenient select values from one list and add them to another list with no need to type them. After the necessary entries have been performed on a list, the values that were added become "visible" to the foreign list but they still belong only to the original list. An issue may arise if the values of the parent list change or get removed. This type of problem and many others can be solved by using constraints. A constraint is a rule that is applied to a list when its data is changed. To support the concept of constraints, the DataSet class is equipped with a Boolean property called EnforceConstraints. If you plan to apply constraint rules to your application, set this property to true, which is also its default. If you don't care about these rules, you can set this property to false. To visually create a relationship, you can first select the DataSet object on the form. In the Properties window, you should make sure that the EnforceConstraints property is set to True. Then, you can click the Relations field, and click its ellipsis button to display the Relations Collection Editor. After clicking the Add button, you can specify a valid C++ variable name for the relationship. In the Parent Table combo box, you can select the table that would act as the parent. In the Child Table combo box, you can select the table that would receive data from the parent. In the fields under the Columns list view, you can select the primary key of the parent on the left and the foreign key of the child on the right: 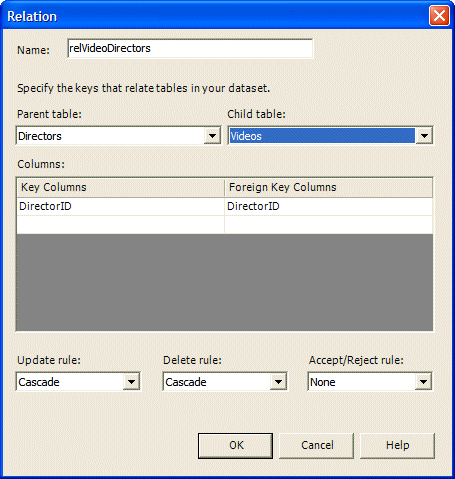
We reviewed that a relationship can be created between two list to allow the flow of information between their columns. We also described that the list that holds the original information is referred to as the parent list and the list that receives information is referred to as the child. If data has been performed in both lists, when data is deleted in the parent list, you must make sure that an update is performed on the child list so both list would be synchronized. To support this, you use a rule referred to as Cascade Update.
Instead of changing values in a parent table, data may get deleted. If this happens, the related records in the child table would not make sense anymore. This means that they should be deleted also. To support this, you apply a rule referred to as Cascade Delete.
During data entry, the user will face three typical situations with regards to every field in which he or she must enter information:
To assist the user with these types of decisions, you can improve your application and make it friendlier.
When the user comes to a new field to perform data entry, he or she can start typing the necessary characters as they may appear appropriate for the field. In some cases, you may want to restrict the number of characters that can be entered in a field. This characteristic can be controlled by using the DataColumn::MaxLength property. This property works only if the field is made to contain text. By default, the MaxLength property is set to -1, which means the field can receive up to the number of characters allowed by the String class. If you want to limit the number of characters allowed on the field, assign the desired integer to the MaxLength property of the column. |
|
The Nullity of a Field |
|
As mentioned earlier, when performing data entry, the user may decide to skip one or more fields, either because the value is not available or simply because the user would have decided to skip it. When no value is provided for a field, the field's value is referred to as null. In some cases, you may not want the fields of a certain column to allow null values. In other words, you may not want to consider a record complete if the field under that particular column is empty. To help you control the nullity of a column, the DataColumn class is equipped with the Boolean AllowDBNull property. To prevent the user from leaving the fields of a column empty during data entry or maintenance, set this property to true. This property's default value is false, which means it would allow the user to leave the fields empty. |
|
The Uniqueness of a Value |
|
In a list, many fields under a certain column can have the same value. For example, if you create a list of students and the list includes the city of residence for their address, it is very likely that many students would live in the same city. This also implies that many field under the state column would have the same city name over and over again. In some cases, you may want each record to have a unique value. For example, if you are registering the students and assign a student number to each, you may not want two students to hold the same number. To ensure that each field under a certain column holds a value different from the other fields, set its DataColumn::Unique property to true. |
|
Default Values |
|
If the fields of a certain column usually display the same value except in rare circumstances, you can provide a common value that would be used so that the user can skip the field but let the application fill it up. A value is referred to as default if it is always provided to a certain field when a new record is being created and that involves that field. For example, if you create a list of students of a high school and the list includes a column for the state, the students who register to that school are likely from the same state. When creating the application, you can set the name or abbreviation of that state to the appropriate column. To set the default value for a column, when creating, assign the desired value to the DataColumn::DefaultValue property. If you are "visually" creating the column, you can set its default value by typing it in the DefaultValue field of the column. When the default value has been set, when the user starts entering a new record, the field under that column would have a value already. If the user skips that field, the default value would be user. The user can still replace that value for another. If the user deletes the default value but doesn't enter another, then the field would be left empty for that record. If the list exists already and you think that a certain column has a default value, you can find out what that value is by checking the DefaultValue property of the column. |
|
Expressions |
|
Once again, during data entry, the user can be asked to enter new values in fields. In some cases, the value held by the fields of a column may be made by combining values from other fields of the same list, values from fields of other lists, values independent of any field of any table, or a combination. An expression is a technique of using such values to fill out a field. An expression is usually produced by performing a calculation. It can also be produced by using a function. To allow you to create an expression for a column, the DataColumn class is equipped with an Expression property. |
| Previous | Copyright © 2005-2016, FunctionX | |