Introduction

FunDS is an example of a fictitious company that sells clothes from its store in a mall. The clothes are stacked on shelves and tables from where customers can view and select them. When interested and after making a selection, a customer can bring one or more items to a cashier who would process a purchase order.

We will create a database that can assist the company to manage its business.

Practical LearningPractical Learning: Introducing Data Entry

  1. Start Microsoft Access
  2. Click Blank Desktop Database
  3. In the File Name text box, replace the name with FunDS1 (DS stands for department store)
  4. Click Create
  5. On the Ribbon, click FILE -> Options
  6. On the left list, click Current Database
  7. Click Overlapping Windows and Compact On Close
  8. Click OK
  9. Click OK
  10. Close Microsoft Access and re-open it with the Fun Department Store database

Employees and Cashiers

Employees and cashiers are staff members who create the inventory, process customers purchase orders, and perform other management tasks. We will create a simple table that holds employees information. To keep the database simple, we will use as little information as possible.

Practical LearningPractical Learning: Creating the Categories of Items

  1. On the Ribbon, click CREATE and, in the Queries section, click Query Design
  2. On the Show Table dialog box, click Close
  3. Right-click the Query1 window and click SQL View
  4. Replace the text with the following:
    CREATE TABLE Employees
    (
        EmployeeID Counter(1, 1) Not Null,
        EmployeeNumber Text(20),
        FirstName Text(25),
        LastName Text(25),
        FullName Text(50),
        Title Text(50),
        Notes Note,
        Constraint PK_Employees Primary Key(EmployeeID)
    );
  5. To execute the code, on the Ribbon, click the Run button Run
  6. On the Ribbon, click CREATE and, in the Forms section, click Form Design
  7. Using the Properties window, set the following characteristics:
    Record Source: Employees
    Auto Center: Yes
  8. Save the form as Employees
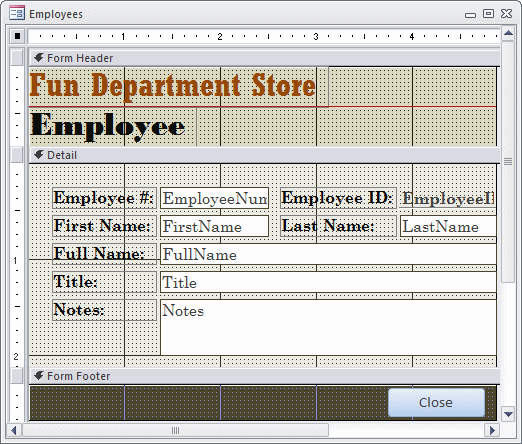
  9. Design it as follows:

    Fun Department Store - Employees

  10. Save the Employees form
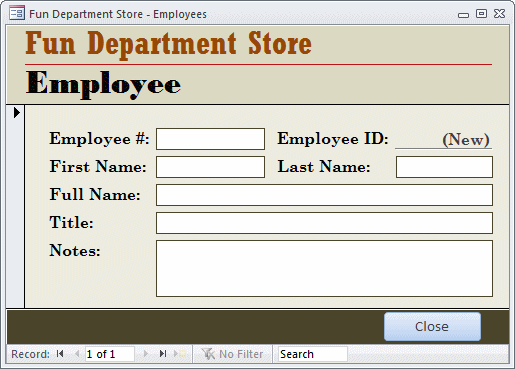
  11. Switch it to Form View

    Fun Department Store - Employees

  12. Create a few records as follows:
    Empl # First Name Last Name Full Name Title
    60958 Simon Sielaff Sielaff, Simon General Manager
    20858 Becky Crone Crone, Becky Head Cashier
    40295 Catherine Rosenstock Rosenstock, Catherine Cashier
    80284 Bernadette Wrights Wrights, Bernadette Cashier
    27046 Betty Lorre Lorre, Betty Intern
    60960 Lisa Chicone Chicone, Lisa Cashier
    39486 Daniel Drewise Drewise, Daniel Shift Manager
    93842 Steve Goetsch Goetsch, Steve Cashier
  13. Close the form

The Categories of Items

The clothes that FunDS sells are divided in some categories for easy inventory. The most common categories include women, men, girls, and boys. Of course, we will make it possible to add new categories.

Practical LearningPractical Learning: Creating the Categories of Items

  1. Replace the text in the Query1 window with the following:
    CREATE TABLE Categories
    (
        Category Text(40) Not Null,
        Constraint PK_Categories Primary Key(Category)
    );
  2. To execute the code, on the Ribbon, click the Run button Run
  3. On the Ribbon, click CREATE and, in the Forms section, click Form Design
  4. Using the Properties window, set the following properties:
    Record Source: Categories
    Auto Center: Yes
  5. Save the form as Categories
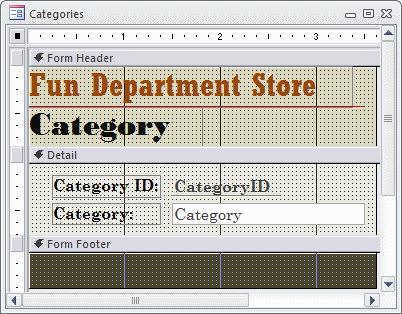
  6. Design it as follows:
     

    Fun Department Store - Categories

  7. Save the Categories form
  8. Switch it to Form View
  9. Create a few records as follows:
     
    Category
    Women
    Men
    Girls
    Boys
    Babies
  10. Save and close the Categories form

The Sub-Categories of Items

To further enhance the inventory, and to better assist customers, most commercial stores use categories under main categories. These are referred to as sub-categories. For a department store, sub-categories would include the types of clothes, such as shirts, dresses, or shoes.

Practical LearningPractical Learning: Creating the Categories of Items

  1. Replace the text in the Query1 window with the following:
    CREATE TABLE SubCategories
    (
        SubCategory Text(40) Not Null,
        Constraint PK_SubCategories Primary Key(SubCategory)
    );
  2. To execute the code, on the Ribbon, click the Run button Run
  3. On the Ribbon, click CREATE and, in the Forms section, click Form Design
  4. Using the Properties window, set the following characteristics:
    Record Source: SubCategories
    Auto Center: Yes
  5. Save the form as SubCategories
  6. Design it as follows:
     

    Fun Department Store - Categories

  7. Save the Sub-Categories form
  8. Switch it to Form View
  9. Create a few records as follows:
    Sub-Category
    Shirts
    Pants
    Shoes
    Dresses
    Skirts
    Jackets
    Coats
    Suits
    Sweaters
    Belts
    Ties
    Hats
    Handbags
    Watches
    Jewelry
    Accessories
    Beauty & Grooming
  10. Close the Sub-Categories form

The Items' Manufacturers

Manufacturers and people and companies that make clothes that the Fun Department Store company sells. Normally, a department store keeps as much information as possible about the manufacturers. Companies also keep track of their suppliers. To keep our database simple, we will need just the name of the manufacturer. Many manufacturers use different names to categorize the items they make. We will create two fields for names for each manufacturer.

Practical LearningPractical Learning: Creating the Categories of Items

  1. Replace the text in the Query1 window with the following:
    CREATE TABLE Manufacturers
    (
        Manufacturer Text(40) Not Null,
        OtherName Text(40),
        Notes Note,
        Constraint PK_Manufacturers Primary Key(Manufacturer)
    );
  2. To execute the code, on the Ribbon, click the Run button Run
  3. On the Ribbon, click CREATE and, in the Forms section, click Form Design
  4. Using the Properties window, set the following characteristics:
    Record Source: Manufacturers
    Auto Center: Yes
  5. Save the form as Manufacturers
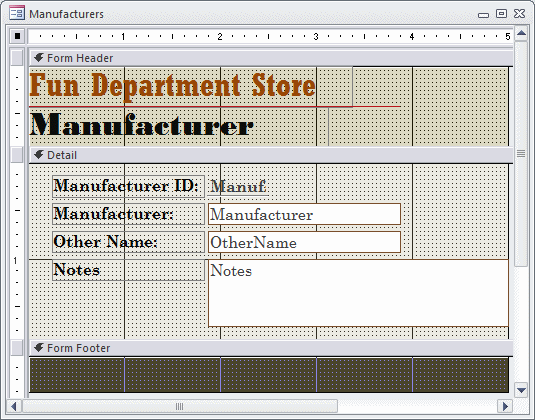
  6. Design it as follows:
     

    Fun Department Store - Manufacturers

  7. Save the Manufacturers form
  8. Switch the form to Form View
  9. Create a few records as follows:
     
    Manufacturer Other Name Notes
    Ralph Lauren Polo Ralph Lauren Names include Ralph Lauren, Lauren by Ralph Lauren, Polo Ralph Lauren
    Polo Ralph Lauren Ralph Lauren Names include Ralph Lauren, Lauren by Ralph Lauren, Polo Ralph Lauren
    Lauren by Ralph Lauren Ralph Lauren Names include Ralph Lauren, Lauren by Ralph Lauren, Polo Ralph Lauren
    Kenneth Cole Kenneth Cole New York Names include Kenneth Cole, Kenneth Cole Reaction, Kenneth Cole New York
    Kenneth Cole New York Kenneth Cole  Names include Kenneth Cole, Kenneth Cole Reaction, Kenneth Cole New York
    Kenneth Cole Reaction Kenneth Cole Names include Kenneth Cole, Kenneth Cole Reaction, Kenneth Cole New York
    Calvin Klein CK Calvin Klein Names include Calvin Klein, CK Calvin Klein
    CK Calvin Klein Calvin Klein Names include Calvin Klein, CK Calvin Klein
    Anne Klein AK Anne Klein Names include Anne Klein, AK Anne Klein
    AK Anne Klein Anne Klein Names include Anne Klein, AK Anne Klein
    Nautica    
    Tommy Hilfiger    
    Cole Haan    
    Giorgio Armani    
    Timex    
    Johnston & Murphy    
    Citizen    
    Coach    
    Guess    
    Seiko    
    Clarks    
  10. Close the Manufacturers form

The Store Inventory

Probably the most important part of a department store is the list of items it sells. To keep an inventory, we will use the following information for each item sold in the store:

Practical LearningPractical Learning: Creating the Store Inventory
  1. On the Ribbon, click CREATE
  2. In the Forms section, click Form Design
  3. Using the Properties window, change the following characteristics:
    Caption: Fun Department Store - New Store Item
    Auto Center: Yes
    Record Selectors: No
    Navigation Button: No
    Dividing Lines: Yes
  4. Save the form as NewStoreItem
  5. On the Ribbon, click Design and, in the Controls section, click More.
    Make sure the Use Control Wizards option is selected Use Coontrol Wizards.
    In the Controls section of the Ribbon, click the Combo Box Combo Box
  6. Click the form (somewhere under the Header bar)
  7. In the first page of the wizard, make sure the first radio button is selected and click Next
  8. In the second page of the wizard, click Table: Manufacturers
  9. Click Next
  10. Double-click Manufacturer and OtherName
  11. Click Next
  12. Click Next
  13. Click Next
  14. Click Finish
  15. In the Controls section of the Ribbon, click the Combo Box Combo Box
  16. Click the form (somewhere under the Header bar)
  17. In the first page of the wizard, make sure the first radio button is selected and click Next
  18. In the second page of the wizard, make sure Table: Categories is selected and click Next
  19. Double-click Category
  20. Click Next
  21. Click Next
  22. Click Next
  23. Click Finish
  24. In the Controls section of the Ribbon, click the Combo Box Combo Box
  25. Click the form (somewhere under the Header bar)
  26. In the first page of the wizard, make sure the first radio button is selected and click Next
  27. In the second page of the wizard, click Table: SubCategories
  28. Click Next
  29. Double-click SubCategory
  30. Click Next
  31. Click Next
  32. Click Next
  33. Click Finish
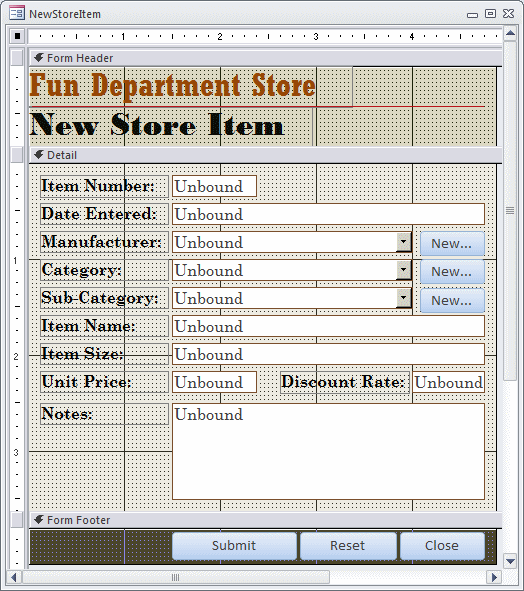
  34. Complete the design of the form as follows:
     
    Fun Department Store - New Store Item
    Control Name Caption
    Text Box Text Box ItemNumber Item Number:
    Text Box Text Box DateEntered Date Entered:
    Combo Box Text Box ManufacturerID Manufacturer:
    Button Button NewManufacturer New...
    Combo Box Text Box CategoryID Category:
    Button Button NewCategory New...
    Combo Box Text Box SubCategoryID Sub-Category:
    Button Button NewSubCategory New...
    Text Box Text Box ItemName Item Name:
    Text Box Text Box ItemSize Item Size:
    Text Box Text Box UnitPrice Unit Price:
    Text Box Text Box DiscountRate Discount Rate:
    Text Box Text Box Notes Notes:
    Button Button cmdSubmit Submit
    Button Button cmdReset Reset
    Button Button cmdClose Close
  35. On the form, right-click the Reset button and click Build Event...
  36. In the Choose Builder dialog box, click Code Builder and click OK
  37. Implement the event as follows:
    Private Function SetDateEntered(ByVal Days As Integer) As Date
        SetDateEntered = DateAdd("d", Days, Date)
    End Function
    
    Private Sub cmdReset_Click()
        ItemNumber = CStr(Int((999999 - 100000 + 1) * Rnd + 100000))
        DateEntered = SetDateEntered(-Int(180 * Rnd + 1))
        ManufacturerID = ""
        CategoryID = ""
        SubCategoryID = ""
        ItemName = ""
        ItemSize = ""
        UnitPrice = ""
        DiscountRate = "0.00"
    End Sub
  38. In the Object combo box, select Form
  39. Implement the Load event as follows:
    Private Sub Form_Load()
        cmdReset_Click
    End Sub
  40. In the Object combo box box, select cmdNewManufacturer
  41. Implement the event as follows:
    Private Sub cmdNewManufacturer_Click()
    On Error GoTo cmdNewManufacturer_Error
        
        ' Display the Manufacturers form as a dialog box
        DoCmd.OpenForm "Manufacturers", , , , acFormAdd, AcWindowMode.acDialog
        
        ' After using the Manufacturers form, when the user closes it,
        ' refresh the Manufacturer combo box
        Manufacturer.Requery
        
    cmdNewManufacturer_Exit:
        Exit Sub
        
    cmdNewManufacturer_Error:
        MsgBox "An error occured when trying to update the list." & vbCrLf & _
               "=- Report the error as follows -=" & vbCrLf & _
               "Error #: " & Err.Number & vbCrLf & _
               "Error Message: " & Err.Description
               Resume cmdNewManufacturer_Exit
    End Sub
  42. In the Object combo box, select cmdNewCategory
  43. Implement the event as follows:
    Private Sub cmdNewCategory_Click()
    On Error GoTo cmdNewCategory_Error
        
        DoCmd.OpenForm "Categories", , , , acFormAdd, AcWindowMode.acDialog
        
        Category.Requery
        
    cmdNewCategory_Exit:
        Exit Sub
        
    cmdNewCategory_Error:
        MsgBox "An error occured when trying to update the list." & vbCrLf & _
               "=- Please report the error as follows -=" & vbCrLf & _
               "Error #: " & Err.Number & vbCrLf & _
               "Error Message: " & Err.Description
               Resume cmdNewCategory_Exit
    End Sub
  44. In the Object combo box, select cmdNewSubCategory
  45. Implement the event as follows:
    Private Sub cmdNewSubCategory_Click()
    On Error GoTo cmdNewSubCategory_Error
        
        DoCmd.OpenForm "SubCategories", , , , acFormAdd, AcWindowMode.acDialog
        
        SubCategory.Requery
        
    cmdNewSubCategory_Exit:
        Exit Sub
        
    cmdNewSubCategory_Error:
        MsgBox "An error occured when trying to update the list of sub-categories." & vbCrLf & _
               "=- Please report the error as follows -=" & vbCrLf & _
               "Error #: " & Err.Number & vbCrLf & _
               "Error Message: " & Err.Description
               Resume cmdNewCategory_Exit
    End Sub
  46. In the Object combo box, select ManufacturerID
  47. In the Procedure combo box, select NotInList
  48. Implement the event as follows:
    Private Sub ManufacturerID_NotInList(NewData As String, Response As Integer)
    On Error GoTo ManufacturerIDNotInList_Error
        Dim NewManufacturerID As Long
        
        If IsNull(ManufacturerID) Then
            ' Set the value of the combo box empty
            ManufacturerID = ""
        Else
            ' If the foreign key currently has a value,
            ' assign that value to the declared value
            NewManufacturerID = ManufacturerID
            ' Set the foreign key to null
            ManufacturerID = Null
        End If
        
        ' The combo box is ready to receive a new value.
        ' To make it happen, display the Manufacturers form
        ' as a dialog box so the user would not use
        ' the Store Items form while the Manufacturers form is opened
        ' When opening the Manufacturers form, create a new record
        ' and display the new manufacturer in it
        If MsgBox("The '" & NewData & "' manufacturer does not exist in the database. " & _
                  "Do you want to add it?", _
                  vbYesNo, "Fun Department Store - FunDS") = vbYes Then
            DoCmd.OpenForm "Manufacturers", , , , acFormAdd, AcWindowMode.acDialog, NewData
        
            ' After using the Manufacturers dialog box, let the user close it.
            ' When the user closes the Manufacturers form, refresh the ManufacturerID combo box
            Manufacturer.Requery
        
            ' If the user had created a new manufacturer,
            ' assign its ManufacturerID to the variable we had declared
            If ManufacturerID <> 0 Then
                ManufacturerID = NewManufacturerID
            End If
            
            ' Assuming that the manufacturer was created, ignore the error
            Response = acDataErrAdded
        Else
            ' If the manufacturer was not created, indicate an error
            Response = acDataErrContinue
        End If
        
    ManufacturerIDNotInList_Exit:
        Exit Sub
        
    ManufacturerIDNotInList_Error:
        MsgBox "An error occured when trying to update the list." & vbCrLf & _
               "=- Report the error as follows -=" & vbCrLf & _
               "Error #: " & Err.Number & vbCrLf & _
               "Error Message: " & Err.Description
               Resume ManufacturerIDNotInList_Exit
    End Sub
  49. In the Object combo box, select CategoryID
  50. In the Procedure combo box, select NotInList
  51. Implement the event as follows:
    Private Sub CategoryID_NotInList(NewData As String, Response As Integer)
    On Error GoTo CategoryIDNotInList_Error
        
        Dim NewCategoryID As Long
        
        If IsNull(CategoryID) Then
            CategoryID = ""
        Else
            NewCategoryID = CategoryID
            CategoryID = Null
        End If
        
        If MsgBox(NewData & " is not a valid category of this database. " & _
                  "Do you want to add it?", _
                  vbYesNo, "Fun Department Store - FunDS") = vbYes Then
            DoCmd.OpenForm "Categories", , , , acFormAdd, AcWindowMode.acDialog, NewData
        
            Category.Requery
        
            If CategoryID <> 0 Then
                CategoryID = NewCategoryID
            End If
            
            Response = acDataErrAdded
        Else
            Response = acDataErrContinue
        End If
        
    CategoryIDNotInList_Exit:
        Exit Sub
        
    CategoryIDNotInList_Error:
        MsgBox "An error occured when trying to update the list." & vbCrLf & _
               "=- Report the error as follows -=" & vbCrLf & _
               "Error #: " & Err.Number & vbCrLf & _
               "Error Message: " & Err.Description
               Resume CategoryIDNotInList_Exit
    End Sub
  52. In the Object combo box, select SubCategoryID
  53. In the Procedure combo box, select NotInList
  54. Implement the event as follows:
    Private Sub SubCategoryID_NotInList(NewData As String, Response As Integer)
    On Error GoTo SubCategoryIDNotInList_Error
        
        Dim NewSubCategoryID As Long
        
        If IsNull(SubCategoryID) Then
            SubCategoryID = ""
        Else
            NewSubCategoryID = SubCategoryID
            SubCategoryID = Null
        End If
        
        If MsgBox(NewData & " is not a valid sub-category of this database. " & _
                  "Do you want to add it?", _
                  vbYesNo, "Fun Department Store - FunDS") = vbYes Then
            DoCmd.OpenForm "SubCategories", , , , acFormAdd, AcWindowMode.acDialog, NewData
        
            SubCategory.Requery
        
            If SubCategoryID <> 0 Then
                SubCategoryID = NewSubCategoryID
            End If
            
            Response = acDataErrAdded
        Else
            Response = acDataErrContinue
        End If
        
        Exit Sub
        
    SubCategoryIDNotInList_Error:
        MsgBox "An error occured when trying to update the sub-categories." & vbCrLf & _
               "=- Report the error as follows -=" & vbCrLf & _
               "Error #: " & Err.Number & vbCrLf & _
               "Error Message: " & Err.Description
               Resume Next
    End Sub
  55. Return to Microsoft Access
  56. In the Navigation Pane, right-click the Manufacturers form and click Design View
  57. In the Properties window, click Event and double-click On Load
  58. Click its ellipsis button to switch to Microsoft Visual Basic
  59. Implement the event as follows:
    Private Sub Form_Load()
        ' When this form opens, find out if it received an external 
        ' value from another object (such as the StoreItemEditor form).
        If Not IsNull(Me.OpenArgs) Then
        	' If it did, put that value in the Manufacturer text box
            Me.Manufacturer = Me.OpenArgs
            ' Since our database allows up to three different names for 
            ' a manufacturer, the user will optionnally fill the other two text boxes
        End If
    End Sub
  60. Return to Microsoft Access
  61. In the Navigation Pane, right-click the Categories form and click Design View
  62. In the Event section of the Properties window, double-click On Load
  63. Click its ellipsis button and implement the event as follows:
    Private Sub Form_Load()
        If Not IsNull(Me.OpenArgs) Then
            Me.Category = Me.OpenArgs
        End If
    End Sub
  64. Return to Microsoft Access
  65. In the Navigation Pane, right-click the SubCategories form and click Design View
  66. In the Event section of the Properties window, double-click On Load
  67. Click its ellipsis button and implement the event as follows:
    Private Sub Form_Load()
        If Not IsNull(Me.OpenArgs) Then
            Me.SubCategory = Me.OpenArgs
        End If
    End Sub
  68. Return to Microsoft Access
  69. Close all forms
  70. When asked to save, save
  71. Replace the text in the Query1 window with the following:
    CREATE TABLE StoreItems
    (
        StoreItemID COUNTER(100001, 1) NOT NULL,
        Constraint PK_StoreItems Primary Key(ItemID)
    );
  72. To execute the code, on the Ribbon, click the Run button Run
  73. In the Navigation Pane, right-click StoreItems and click Design View
  74. Change the list of fields as follows:
     
    Field Name Data Type Field Size Format Caption
    StoreItemID       Store Item ID
    ItemNumber Number     Item Number
    DateEntered Date/Time   Long Date Date Entered
    Manufacturer Short Text   40  
    Category Short Text   40  
    SubCategory Short Text   40 Sub-Category
    ItemName Short Text 80   Item Name
    ItemSize Short Text 40   Item Size
    UnitPrice Number Double Fixed  
    DiscountRate Number Double Percent Discount Rate
    Pictures Attachment      
    Notes Long Text      
  75. Save and close the StoreItems table
  76. In the Navigation Pane, right-click NewStoreItem and click Copy
  77. Right-click any part of the Navigation Pane and click Paste
  78. Type StoreItems as the name of the form
  79. Click OK
  80. In the Navigation Pane, right-click the StoreItems table and click Design View
  81. Using the Properties window, change the following characteristics:
    Record Source: StoreItems
    Caption: Fun Department Store - Store Items
    Record Selectors: Yes
    Navigation Buttons: Yes
    Allow Additions: No (the new records will be added using the NewStoreItem form; but this form can be used to update a record; this means that, for example, this form can be used to add the picture(s) of an item)
  82. On the form, right-click the Submit button and click Build Event
  83. In Microsoft Visual Basic, delete the code of the Click event of cmdSubmit, the Load event of the form, and the Click event of cmdReset
  84. Return to Microsoft Access
  85. Delete the Reset button
  86. Change the characteristics of the Submit button as follows:
    Name: cmdNewStoreItem
    Caption: New Store Item...
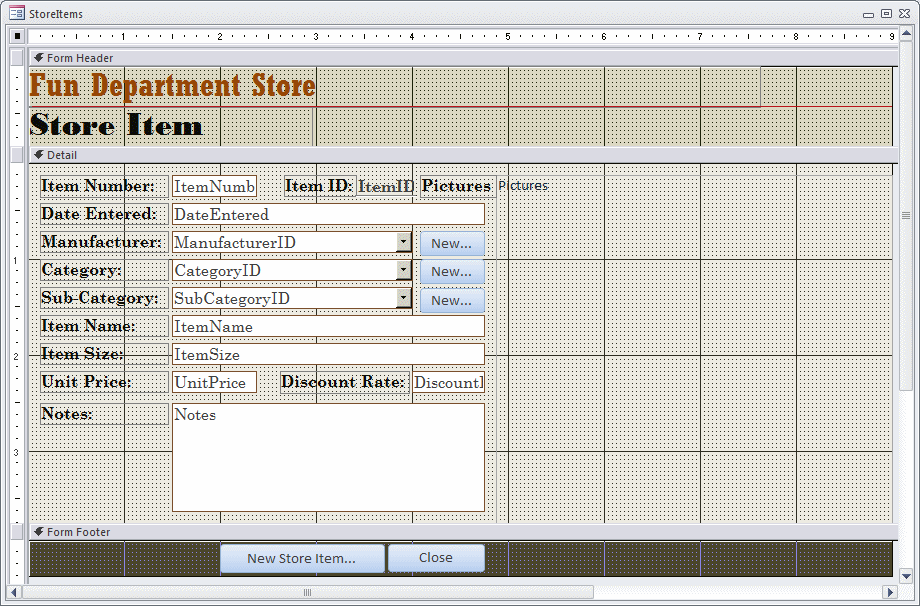
  87. Complete the design of the form as follows (appropriately set the Control Source of each control, it is the same as the name of the control):

    Fun Department Store - Store Items

  88. Save the form
  89. Right-click the New Store Item button and click Build Event...
  90. In the Choose Builder dialog box, double-click Code Builder
  91. CliClick the ellipsis button and implement the event as follows: 
    Private Sub cmdNewStoreItem_Click()
        DoCmd.OpenForm "NewStoreItem"
    End Sub
  92. Save and close the StoreItems form
  93. In the Navigation Pane, right-click the Submit button and click Build Event...
  94. Double-click Code Builder
  95. Implement the event as follows:
    Private Sub cmdSubmit_Click()
        Dim curFunDS As Database
        Dim rstStoreItems As Recordset
        
        Set curFunDS = CurrentDb
        Set rstStoreItems = curFunDS.OpenRecordset("StoreItems")
        
        rstStoreItems.AddNew
        rstStoreItems("ItemNumber").Value = ItemNumber
        rstStoreItems("DateEntered").Value = CDate(DateEntered)
        rstStoreItems("ManufacturerID").Value = ManufacturerID
        rstStoreItems("CategoryID").Value = CategoryID
        rstStoreItems("SubCategoryID").Value = SubCategoryID
        rstStoreItems("ItemName").Value = ItemName
        rstStoreItems("ItemSize").Value = ItemSize
        rstStoreItems("UnitPrice").Value = CDbl(UnitPrice)
        rstStoreItems("DiscountRate").Value = CDbl(DiscountRate)
        rstStoreItems("Notes").Value = Notes
        rstStoreItems.Update
        
        cmdReset_Click
        
        Set rstStoreItems = Nothing
        Set curFunDS = Nothing
    End Sub
    
    Private Sub cmdClose_Click()
        DoCmd.Close
    End Sub
  96. In the Navigation Pane, double-click NewStoreItem
  97. Create the Store Items
  98. Close the form

Shopping Sessions

We will consider a shopping session one more items that a customer purchases. Normally, a customers selects items in the store and brings them to the cashier who will vallidate the purchase. For our database, we will create a unique receipt number. For our inventory, we will need to keep track of who (the employee) processed the purchase, the date and time the purchase occured, and the total the customer paid.

Shopping Items

One of the most important pieces of information on a receiptis what the customer bought. For our application, each purchased item is represented by an item number, the name of the item that was purchased, and how much the customer paid for it. To process a shopping session, we will need only the item number. All the information related to that item number can be found on the table of store items.

On the shopping session form, we will represent the customer's selected items using a sub-form.

Practical LearningPractical Learning: Creating a Shopping Session

  1. Access the Query1 window and replace the text in it with the following:
    CREATE TABLE ShoppingSessions
    (
        ReceiptNumber Counter(100001, 1) Not Null,
        Constraint PK_ShoppingSessions Primary Key(ReceiptNumber)
    );
  2. To execute the code, on the Ribbon, click the Run button Run
  3. Close the Query1 window
  4. When asked whether you wanto save, click No
  5. In the Navigation Pane, right-click ShoppingSessions and click Design View
  6. Complete the table as follows:
     
    Field Name Data Type Field Size Format Caption Default Value
    ReceiptNumber       Receipt #  
    EmployeeNumber Short Text 20   Employee #  
    ShoppingDate Date/Time   Long Date Shopping Date =Date()
    ShoppingTime Date/Time   Medium Time Shopping Time =Time()
    TaxRate Number Double Percent Tax Rate 0.075
    Notes Long Text        
  7. Save and close the table
  8. On the Ribbon, click CREATE and, in the Table section, click Table Design
  9. Complete the table as follows:
     
    Field Name Data Type Field Size Format Caption
    ShoppingItemID AutoNumber     Shopping Item ID
    ReceiptNumber Number     Receipt #
    ItemNumber Number     Item Number
    ItemName Short Text 80   Item Name
    ItemSize Short Text 40   Size
    PurchasePrice Number Double Fixed Purchase Price
  10. Right-click ShoppingItemID and click Primary Key
  11. Close the table
  12. When asked whether you want to save, click Yes
  13. Set the Name to ShoppingItems
  14. Click OK
  15. On the Ribbon, click CREATE and, in the Forms section, click Form Design
  16. Using the Properties window, set the following characteristics:
    Record Source: ShoppingItems
    Default View: Continuous Forms
    Navigation Buttons: No
  17. Save the form as sfShoppingItems
  18. Design the form approximately as follows:
     
    Fun Department Store - Shopping Items
    Control Name Caption Control Source
    Label Label   Item #  
    Label Label   Item Name  
    Label Label   Size  
    Label Label   Price  
    Line Line      
    Text Box Text Box ItemNumber   ItemNumber
    Text Box Text Box ItemName   ItemName
    Text Box Text Box ItemSize   ItemSize
    Text Box Text Box PurchasePrice   PurchasePrice
    Text Box Text Box txtPurchasePriceTotal   =Sum(Nz([PurchasePrice]))
  19. Click the ItemNumber text box
  20. In the Properties window, click Event and double-click On Lost Focus
  21. Click the ellipsis button and implement the event as follows:
    Private Sub ItemNumber_LostFocus()
    On Error GoTo ItemNumber_LostFocus_Error
    
        Dim dbFunDS As Database
        Dim rsStoreItems As Recordset
        
        If IsNull(ItemNumber) Then
            Exit Sub
        End If
        
        Set dbFunDS = CurrentDb
        Set rsStoreItems = dbFunDS.OpenRecordset("SELECT * FROM StoreItems WHERE ItemNumber = " & CLng(ItemNumber))
        
        If IsNull(rsStoreItems) Then
            MsgBox "There is no item with that number.", _
                   vbOKOnly Or vbInformation, _
                   "FunDS: Fun Department Store"
            Exit Sub
        Else
            With rsStoreItems
                ItemName = .Fields("ItemName")
                ItemSize = .Fields("ItemSize")
                PurchasePrice = .Fields("UnitPrice")
            End With
        End If
        
        rsStoreItems.Close
        dbFunDS.Close
        Set rsStoreItems = Nothing
        Set dbFunDS = Nothing
          
        Exit Sub
    
    ItemNumber_LostFocus_Error:
        Rem Error #3021 means the record set is empty.
        Rem In this form, Error #3021 means the user probably entered an invalid item number
        If Err.Number = 3021 Then
            MsgBox "The item number you entered was not found in our inventory.", _
                   vbOKOnly Or vbInformation, _
                   "FunDS: Fun Department Store"
        Else
            MsgBox "There was a problem when processing this shopping order. " & vbCrLf & _
                   "Please report the error as follows." & vbCrLf & _
                   "Error      #" & Err.Number & vbCrLf & _
                   "Description: " & Err.Description, _
                   vbOKOnly Or vbInformation, _
                   "FunDS: Fun Department Store"
        End If
        
        Resume cmdAdd_ClickExit
    End Sub
  22. Access the properties of the form footer section and set the Visible property to No
  23. Save and close the sfShoppingItems form
  24. On the Ribbon, click CREATE and, in the Forms section, click Form Design
  25. Using the Properties window, set the Record Source to ShoppingSessions
  26. Save the form as ShoppingSessions
  27. In the Controls section of the Ribbon, click Subform/subreport Sub-Form Sub-Report
  28. Click the form
  29. In the first page of the Subform Wizard, click the Use An Existing Form radio button and, in the list box, click sfShoppingItems
  30. Click Next
  31. Make sure Show ShoppingItems For Each Record... is selected.
    Click Next
  32. Click Finish
  33. Complete the design of the form approximately as follows:
     
    Fun Department Store - Shopping Sessions
    Control Name Caption Control Source
    Label Label   Employee #:  
    Text Box Text Box EmployeeNumber   EmployeeNumber
    Text Box Text Box txtEmployeeName   =IIf(IsNull([EmployeeNumber]),"",DLookUp("EmployeeName","Employees","EmployeeNumber = '" & [EmployeeNumber] & "'"))
    Label Label   Receipt #:  
    Text Box Text Box ReceiptNumber   ReceiptNumber
    Line Line      
    Sub-Form Sub-Form Sub-Report      
    Line Line      
    Label Label   Items Total:  
    Text Box Text Box txtItemsTotal   =[sfShoppingItems].[Form]![txtTotalPriceAfterDiscount]
    Label Label   Tax Rate:  
    Text Box Text Box TaxRate   TaxRate
    Label Label   Shopping Date:  
    Text Box Text Box ShoppingDate   ShoppingDate
    Label Label   Tax Amount:  
    Text Box Text Box txtTaxAmount   =CLng(Nz([txtItemsTotal])*Nz([TaxRate])*100)/100
    Label Label   Shopping Time:  
    Text Box Text Box ShoppingTime   ShoppingTime
    Label Label   Shopping Total:  
    Text Box Text Box txtShoppingTotal   =Nz([txtItemsTotal])+Nz([txtTaxAmount])
    Label Label   Notes:  
    Text Box Text Box Notes   Notes
  34. Save and close the ShoppingSessions form
  35. In the Navigation Pane, right-click the ShoppingSessions form and click Copy
  36. Right-click any area in the Navigation Pane and click Paste
  37. Set the Name to NewShoppingSession and click OK
  38. In the Navigation Pane, right-click NewShoppingSession and click Design View
  39. Using the Properties window, change the following characteristics:
    Navigation Buttons: No
    Data Entry: Yes
  40. Save and close the NewShoppingSession form
  41. In the Navigation Pane, double-click the StoreItems table
  42. Double-click NewShoppingSession
  43. Referring to the items numbers in the StoreItems table, create a few shopping sessions
  44. Close the objects

Data Analysis

Some time to time, the employees will want to analyze some records in the inventory. Microsoft Access provides all types of tools for visual data analysis. The only significant thing you need to do is to create one or more user-friendly forms (and/or queries that your users can use.

Practical LearningPractical Learning: Creating a Query

  1. To start a new form, on the Ribbon, click CREATE
  2. In the Forms section, click Form Design
  3. Using the Properties window, change the following characteristics of the form:
    Default View: Continuous Forms
    Auto Center: Yes
    Record Selectors: No
    Navigation Buttons: No
  4. In the Properties window, click Record Source, then click its browse button Browse
  5. In the Tables property page of the Show Table dialog box, double-click StoreItems
  6. On the Show Table dialog box, click Close
  7. From the StoreItems list, double-click ItemNumber, DateEntered, Manufacturer, Category, SubCategory, ItemName, UnitPrice, and DiscountRate
  8. In the lower section of the window, click DiscountRate and press Tab
  9. Type DiscountAmount: IIf(IsNull(DiscountRate), '', FormatNumber(UnitPrice * DiscountRate))
  10. Press Tab
  11. Type AfterDiscount: IIf(IsNull(DiscountRate), '', FormatNumber(UnitPrice - DiscountAmount))
  12. Close the Query Builder
  13. When asked whether you want to save, click Yes
  14. Save the form as InventoryAnalysis
  15. In the Controls section of the Ribbon, click the Combo Box and click under the Form Footer bar
  16. In the first page of the wizard, make sure the first radio button is selected and click Next
  17. In the second page of the wizard, click Table: Manufacturers
  18. Click Next
  19. In the third page of the wizard, double-click Manufacturer and click Next
  20. Click Next
  21. Click Next
  22. Click Next
  23. Make sure Remember The Value For Later Use is selected and click Next
  24. Click Finish
  25. In the Controls section of the Ribbon, click the Combo Box and click under the Form Footer bar
  26. In the first page of the wizard, make sure the first radio button is selected and click Next
  27. In the second page of the wizard, make sure Table: Categories is selected and click Next
  28. In the third page of the wizard, double-click Category and click Next
  29. Click Next
  30. Click Next
  31. Click Next
  32. Make sure Remember The Value For Later Use is selected and click Next
  33. Click Finish
  34. In the Controls section of the Ribbon, click the Combo Box and click under the Form Footer bar
  35. In the first page of the wizard, make sure the first radio button is selected and click Next
  36. In the second page of the wizard, click Table: SubCategories
  37. Click Next
  38. In the third page of the wizard, double-click SubCategory and click Next
  39. Click Next
  40. Click Next
  41. Click Next
  42. Make sure Remember The Value For Later Use is selected and click Next
  43. Click Finish
  44. In the Controls section of the Ribbon, click the Combo Box and click under the Form Footer bar
  45. In the first page of the wizard, click the second radio button
  46. Click Next
  47. In the second page of the wizard, click under Col1 and type lower than
  48. Press the down arrow key and type lower than or equal to
  49. Press the down arrow key and type equal to
  50. Press the down arrow key and type higher than or equal to
  51. Press the down arrow key and type higher than
  52. Press the down arrow key and type different from
  53. Click Next
  54. Click Next
  55. Click Finish
  56. In the Controls section of the Ribbon, click the Combo Box and click under the Form footer bar
  57. In the first page of the Combo Box Wizard, click the second radio button (I Will Type In The Values That I Want) and click Next
  58. Click under Col1 and type Ascending Order
  59. Press the down arrow key and type Descending Order
     
    Combo Box Wizard
  60. Click Next
  61. In the third page of the wizard, accept the first radio button and click Next
  62. Change the label to in and click Finish
  63. In the Properties window, change the combo box' Name to cbxSortOrder
  64. In the Controls section of the Ribbon, click the Combo Box Combo Box and click under the Form Footer bar
  65. In the first page of the Combo Box Wizard, click the second radio button (I Will Type In The Values That I Want) and click Next
  66. Click under Col1 and type Item Number
  67. Press the down arrow key and type Date Entered
  68. Complete the list with Manufacturer, Category, Sub-Category, Item Name, Unit Price, and Price After Discount
  69. Click Next
  70. In the third page of the wizard, accept the first radio button and click Next
  71. Change the label to Sort by:
  72. Click Finish
  73. In the Properties window, change its Name to cbxColumnNames
  74. In the Controls section of the Ribbon, click the Text Box Text Box and click under the Form Footer bar
  75. In the Controls section of the Ribbon, click the Button Text Box and click under the Form Footer bar. If the wizard starts, click Cancel
  76. Complete the design of the form as follows:
     

    Store Items Inventory

    Control Name Caption
    Combo Box Combo Box cbxManufacturers Show items made by:
    Combo Box Combo Box cbxColumnNames Sort By:
    Combo Box Combo Box cbxSortOrder in
    Combo Box Combo Box cbxCategories Show items made for:
    Combo Box Combo Box cbxOperators Show items whose price is:
    Text Box Text Box txtUnitPrice  
    Button Text Box cmdShowPrices Show
    Combo Box Combo Box cbxSubCategories Show items of type:
    Button Text Box cmdRemoveFilterSort Remove Filter/Sort
    Button Text Box cmdClose Close
  77. Save the form
  78. Double-click the cbxManufacturers combo box to access its properties and click the Events tab
  79. Double-click After Update, then click its ellipsis button Ellipsis
  80. Implement the event as follows:
    Option Compare Database
    Option Explicit
    
    Private strColumnName As String
    Private strSortOrder As String
    
    Private Sub cbxManufacturers_AfterUpdate()
        Filter = "Manufacturer = '" & cbxManufacturers & "'"
        FilterOn = True
    End Sub
  81. In the Object combo box, select cbxColumnNames
  82. In the Procedure combo box, select AfterUpdate
  83. Implement the event as follows:
    Private Sub cbxColumnNames_AfterUpdate()
    On Error GoTo cbxColumnNames_AfterUpdate_Error
      
        ' Get the string selected in the Sort By combo box
        ' and find its equivalent column name
        If cbxColumnNames = "Item Number" Then
            strColumnName = "ItemNumber"
        ElseIf cbxColumnNames = "Date Entered" Then
            strColumnName = "DateEntered"
        ElseIf cbxColumnNames = "Manufacturer" Then
            strColumnName = "Manufacturer"
        ElseIf cbxColumnNames = "Category" Then
            strColumnName = "Category"
        ElseIf cbxColumnNames = "Sub-Category" Then
            strColumnName = "SubCategory"
        ElseIf cbxColumnNames = "Item Name" Then
            strColumnName = "ItemName"
        ElseIf cbxColumnNames = "Unit Price" Then
            strColumnName = "UnitPrice"
        ElseIf cbxColumnNames = "Price After Discount" Then
            strColumnName = "AfterDiscount"
        Else
            strColumnName = ""
        End If
        
        ' Sort the records based on the column name from the combo box
        Me.OrderBy = strColumnName
        Me.OrderByOn = True
        
        ' Set the In combo box to ascending order by default
        cbxSortOrder = "Ascending Order"
    
        Exit Sub
        
    cbxColumnNames_AfterUpdate_Error:
        MsgBox "There was an error when trying to sort the records. " & _
               "Please report the error as follows." & vbCrLf & _
               "Error #: " & Err.Number & vbCrLf & _
               "Description: " & Err.Description & vbCrLf & _
               "Please contact the program vendor if " & _
           "he is not sleeping at this time."
        Resume Next
    End Sub
  84. In the Object combo box, select cbxSortOrder
  85. In the Procedure combo box, select AfterUpdate
  86. Implement the event as follows:
    Private Sub cbxSortOrder_AfterUpdate()
    On Error GoTo cbxSortOrder_AfterUpdate_Error
        
        ' Unless the user selects Descending Order...
        If cbxSortOrder = "Descending Order" Then
            strSortOrder = "DESC"
        Else ' We will consider that it should be sorted in ascending order
            strSortOrder = "ASC"
        End If
        
        Me.OrderBy = strColumnName & " " & strSortOrder
        Me.OrderByOn = True
        Exit Sub
        
    cbxSortOrder_AfterUpdate_Error:
        MsgBox "There was an error when trying to sort the records. " & _
               "Please report the error as follows." & vbCrLf & _
               "Error #: " & Err.Number & vbCrLf & _
               "Description: " & Err.Description & vbCrLf & _
               "Please contact the program vendor if " & _
           "he is not sleeping at this time."
        Resume Next
    End Sub
  87. In the Object combo box, select cbxCategories
  88. In the Procedure combo box, select AfterUpdate
  89. Implement the event as follows:
    Private Sub cbxCategories_AfterUpdate()
        Filter = "Category = '" & cbxCategories & "'"
        FilterOn = True
    End Sub
  90. In the Object combo box, select cmdShowPrices
  91. Implement the event as follows:
    Private Sub cmdShowPrices_Click()
    On Error GoTo cmdShowPrices_Click_Error
    
        Dim strFilter As String
        Dim dUnitPrice As Double
        
        If cbxOperators = "lower than" Then
            strFilter = "UnitPrice < "
        ElseIf cbxOperators = "lower than or equal to" Then
            strFilter = "UnitPrice <= "
        ElseIf cbxOperators = "equal to" Then
            strFilter = "UnitPrice = "
        ElseIf cbxOperators = "higher than or equal to" Then
            strFilter = "UnitPrice >= "
        ElseIf cbxOperators = "higher than" Then
            strFilter = "UnitPrice > "
        ElseIf cbxOperators = "different from" Then
            strFilter = "UnitPrice <> "
        Else
            MsgBox "You must select an operation to perform.", _
            vbOKOnly Or vbInformation, "Fun Department Store"
            Exit Sub
        End If
        
        If IsNull(txtUnitPrice) Then
            MsgBox "You must specify a unit price.", _
            vbOKOnly Or vbInformation, "Fun Department Store"
            Exit Sub
        End If
        
        Filter = strFilter & CDbl(txtUnitPrice)
        FilterOn = True
    
        Exit Sub
        
    cmdShowPrices_Click_Error:
        MsgBox "There was an error when trying to sort the records. " & _
               "Please report the error as follows." & vbCrLf & _
               "Error #: " & Err.Number & vbCrLf & _
               "Description: " & Err.Description & vbCrLf & _
               "Please contact the program vendor if " & _
           "he is not sleeping at this time."
        Resume Next
    End Sub
  92. In the Object combo box, select cbxSubCategories
  93. In the Procedure combo box, select AfterUpdate
  94. Implement the event as follows:
    Private Sub cbxSubCategories_AfterUpdate()
        Filter = "SubCategory = '" & cbxSubCategories & "'"
        FilterOn = True
    End Sub
  95. In the Object combo box, select cmdRemoveFilterSort
  96. Implement the event as follows:
    Private Sub cmdRemoveFilterSort_Click()
        OrderBy = ""
        Filter = ""
        
        OrderByOn = False
        FilterOn = False
        
        cbxOperators = ""
        cbxSortOrder = ""
        cbxCategories = ""
        cbxColumnNames = ""
        txtUnitPrice = "0.00"
        cbxManufacturers = ""
        cbxSubCategories = ""
    End Sub
  97. In the Object combo box, select cmdClose
  98. Implement the event as follows:
    Private Sub cmdClose_Click()
        DoCmd.Close
    End Sub
  99. Return to the form and save it

Home Copyright © 2012-2022, FunctionX Friday 06 May 2022 Home