Sample Application: Watts' A Loan
Sample Application: Watts' A Loan
Watts' A Loan is a fictitious company that provides small to mid-level loans to persons and small businesses. An individual can request a small loan in cash. The company also has a channel of business partners as furniture stores, musical instruments stores, car dealers, boat manufacturers, tractor sellers, etc. A person who applies for financing in one of those stores may get a loan from Watts' A Loan that will actually finance the loan.
![]() Practical Learning: Inserting Nodes
Practical Learning: Inserting Nodes
Employees
The employees of a company are the people who perform all types of transactions such as creating loans or processing payments. To represent the employees, we will create a table and related objects.
 Practical Learning: Creating Employees
| Field Name | Data Type | Field Size | Caption |
| EmployeeID | AutoNumber | Long Integer | Employee ID |
| EmployeeNumber | Short Text | 10 | Employee # |
| FirstName | Short Text | 20 | First Name |
| LastName | Short Text | 20 | Last Name |
| EmploymentTitle | Short Text | 50 | Employee Title |


| Control | Text | Font Name | Font Size | Other Properties |
| FormHeader | Back Color: Background 2, Darker 50% Special Effect: Raised |
|||
| Label | Watts' A Loan | Bodoni MT Black | 26 | Fore Color: Background 1, Darker 25% |
| Line | Border Color: Background 1, Darker 5% | |||
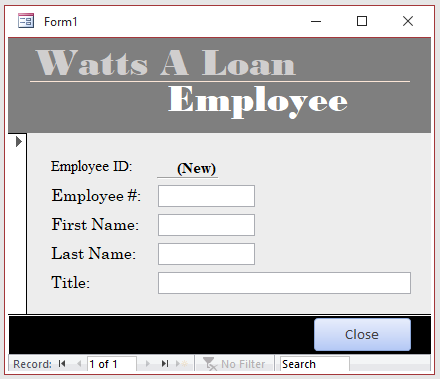
| Label | Employee | Bodoni MT Black | 26 | Fore Color: Background 1 |
| Labels | Employee ID:, Employee #:, First Name:, Last Name:, Employee Title: | Bell MT | 12 | Fore Color: Text 1, Lighter 40% |
| Text Box | EmployeeID | Bell MT | 12 | Fore Color: Text 1, Lighter 25% Enabled: No Locked: Yes |
| Text Boxes | EmployeeNumber:, FirstName:, LastName:, EmployeeTitle: | Bell MT | 12 | Fore Color: Text 1, Lighter 25% Border Color: Text 1 |
| FormFooter | Back Color: Text 1, Lighter 25% Special Effect: Raised |
|||
| Button | Close | Bell MT | 12 | Name: BtnClose Back Color: Accent 1, Lighter 40% Font Weight: Bold Fore Color: Text 1, Lighter 25% |
Private Sub cmdClose_Click()
    DoCmd.Close
End Sub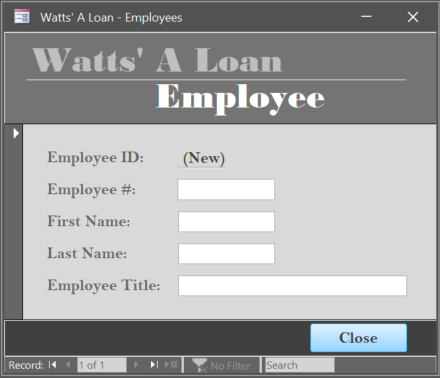
Loans Types
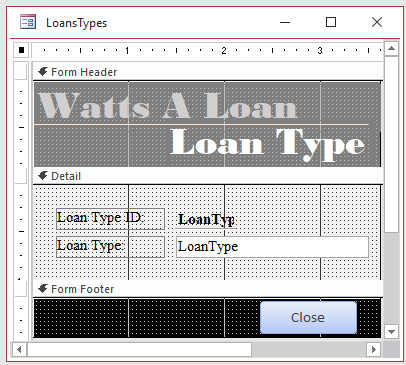
A typical lending company provides various types of loans. To prepare for the types of loans that our company will deal with, we will create a table.
![]() Practical Learning: Creating Types of Loans
Practical Learning: Creating Types of Loans
Field Size: 25
Caption: Type of Loan
| Control | Text | Font Name | Font Size | Other Properties |
| FormHeader | Back Color: Background 2, Darker 50% Special Effect: Raised |
|||
| Label | Watts' A Loan | Bodoni MT Black | 26 | Fore Color: Background 1, Darker 25% |
| Line | Border Color: Background 1, Darker 5% | |||
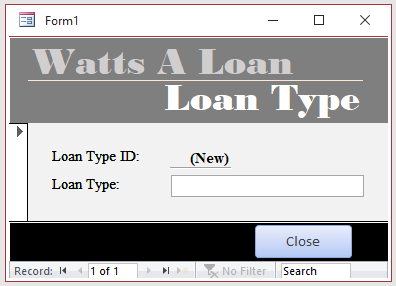
| Label | Loan Type | Bodoni MT Black | 26 | Fore Color: Background 1 |
| Labels | Loan Type ID:, Loan Type: | Bell MT | 12 | Fore Color: Text 1, Lighter 40% |
| Text Box | LoanTypeID | Bell MT | 12 | Fore Color: Text 1, Lighter 25% Enabled: No Locked: Yes |
| Text Box | LoanType:, FirstName:, LastName:, EmployeeTitle: | Bell MT | 12 | Fore Color: Text 1, Lighter 25% Border Color: Text 1 |
| FormFooter | Back Color: Text 1, Lighter 25% Special Effect: Raised |
|||
| Button | Close | Bell MT | 12 | Name: BtnClose Back Color: Accent 1, Lighter 40% Font Weight: Bold Fore Color: Text 1, Lighter 25% |
Private Sub cmdClose_Click()
    DoCmd.Close
End SubLoan Evaluation
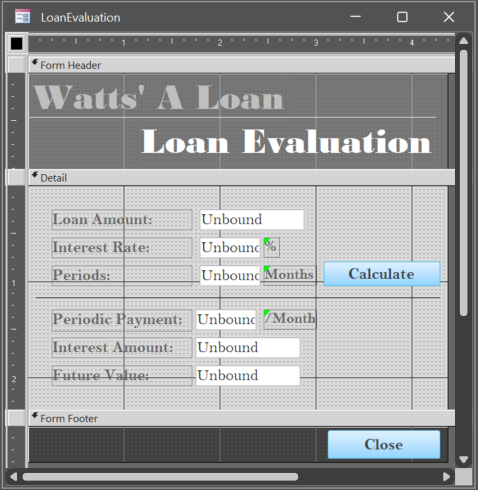
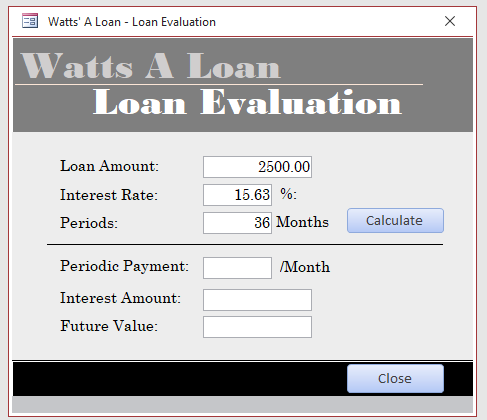
To assist the employees who will process loans, we can create a form that will be used to perform calculations.
![]() Practical Learning: Evaluating Loans
Practical Learning: Evaluating Loans
| Control | Text | Name | Font Name | Font Size | Other Properties |
| FormHeader | Fore Color: Background 1, Darker 25% | ||||
| Label | Watts' A Loan | Back Color: Background 2, Darker 50% Special Effect: Raised |
|||
| Line | Border Color: Background 1, Darker 5% | ||||
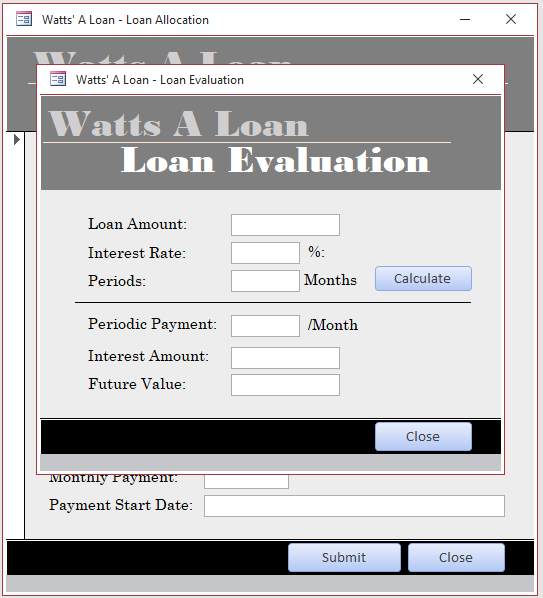
| Label | Loan Evaluation | Bodoni MT Black | 26 | Fore Color: Background 1 | |
| Label/Text Box | Loan Amount: | txtLoanAmount | Bell MT | 12 | Fore Color: Background 1 |
| Label/Text Box | Interest Rate: | txtInterestRate | Bell MT | 12 | Fore Color: Background 1 |
| Label | % | Bell MT | 12 | Fore Color: Background 1 | |
| Label/Text Box | Periods: | txtPeriods | Bell MT | 12 | Fore Color: Background 1 |
| Label | Months | Bell MT | 12 | Fore Color: Background 1 | |
| Button | Calculate | cmdCalculate | Bell MT | 12 | Fore Color: Background 1 |
| Line | Bell MT | 12 | Fore Color: Background 1 | ||
| Label/Text Box | Periodic Payment: | txtPeriodicPayment | Bell MT | 12 | Fore Color: Background 1 |
| Label | /Month | Bell MT | 12 | Fore Color: Background 1 | |
| Label/Text Box | Interest Amount: | txtInterestAmount | Bell MT | 12 | Fore Color: Background 1 |
| Label/Text Box | Future Value: | txtFutureValue | Bell MT | 12 | Fore Color: Background 1 |
| Button | Close | cmdClose | Bell MT | 12 | Fore Color: Background 1 |
Private Sub cmdCalculate_Click()
    Dim periods
    Dim loanAmount
    Dim futureValue
    Dim interestRate
    Dim interestPaid
    Dim interestAmount
    Dim periodicPayment

    loanAmount = CDbl(Nz(txtLoanAmount))
    interestRate = CDbl(Nz(txtInterestRate)) / 100#
    periods = CDbl(Nz(txtPeriods))

    periodicPayment = Pmt(interestRate / 12#, periods, -loanAmount)
    futureValue = FV(interestRate / 12#, periods, -periodicPayment)
    interestAmount = futureValue - loanAmount

    txtPeriodicPayment = FormatNumber(periodicPayment)
    txtFutureValue = FormatNumber(futureValue)
    txtInterestAmount = FormatNumber(interestAmount)
End SubPrivate Sub cmdClose_Click()
DoCmd.Close
End Sub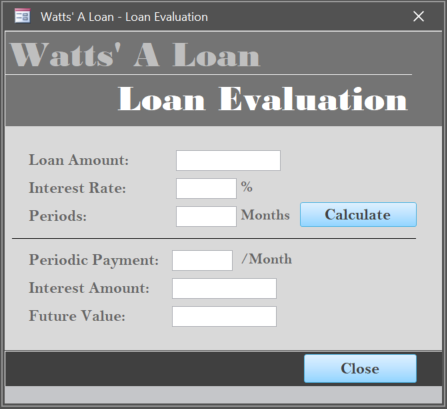
Loans Contracts
To get a loan, a customer must request it. At that time, a loan contract must be established. We will create a table and form that can be used to create and manage loans.
![]() Practical Learning: Procesing Loans Contracts
Practical Learning: Procesing Loans Contracts
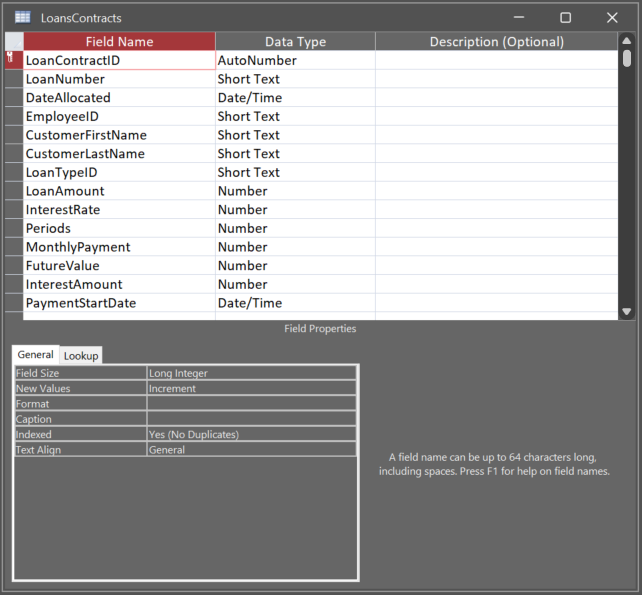
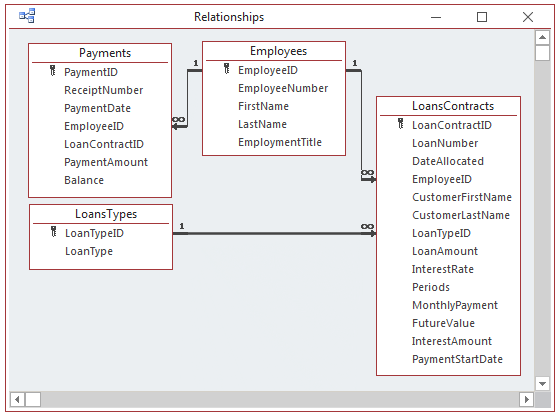
| Field Name | Data Type | Field Size | Format | Caption | Other Properties |
| LoanContractID | AutoNumber | Loan Contract ID | |||
| LoanNumber | Short Text | 20 | Loan # | ||
| DateAllocated | Date/Time | Long Date | Date Allocated | Input Mask: 00->L<LL-00 | |
| EmployeeID | Employee | ||||
| CustomerFirstName | Short Text | 20 | First Name | ||
| CustomerLastName | Short Text | 20 | Last Name | ||
| LoanTypeID | Loan Type | ||||
| LoanAmount | Number | Double | Currency | Loan Amount | |
| InterestRate | Number | Double | Percent | Interest Rate | |
| Periods | Number | Byte | Standard | Decimal Places: 0 | |
| MonthlyPayment | Number | Double | Currency | Monthly Payment | |
| FutureValue | Number | Double | Currency | Future Value | |
| InterestAmount | Number | Double | Currency | Interest Amount | |
| PaymentStartDate | Date/Time | Long Date | Payment Start Date | Input Mask: 00->L<LL-00 |

Column Heads:  Yes
Column Widths: 0";0.85";0.85";0.85";2.5"
List Width:    5.05


Column Widths: 0";1.5"
List Width:    1.5
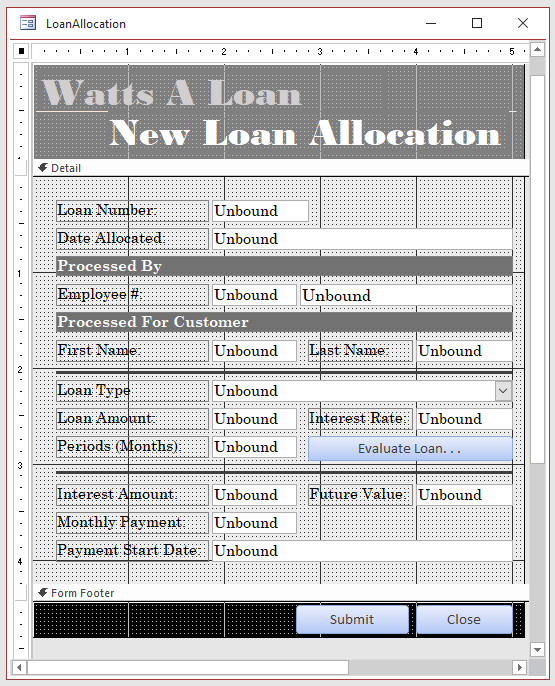
| Control | Caption | Name | Other Properties |
| Label | Watts' A Loan | ||
| Label | New Loan Allocation | ||
| Label/Text Box | Loan Number | txtLoanNumber | |
| Label/Text Box | Date Allocated | txtDateAllocated | |
| Label | Processed By | Back Color: #727272 | |
| Label/Text Box | Employee #: | txtEmployeeNumber | |
| Text Box | txtEmployeeName | ||
| Label | Processed For Customer | Back Color: #727272 | |
| Label/Text Box | First Name:: | txtCustomerFirstName | |
| Label/Text Box | Last Name: | txtCustomerLastName | |
| Line | Border Width: 2 pt Border Color: Dark Gray 5 |
||
| Combo Box | Loan Type: | cbxLoansTypes | Row Source: |
| Label/Text Box | Loan Amount: | txtLoanAmount | |
| Label/Text Box | Interest Rate: | txtInterestRate | |
| Label/Text Box | Periods (Months): | txtPeriods | |
| Button | Evaluate Loan | cmdEvaluateLoan | |
| Line | Border Width: 2 pt Border Color: Dark Gray 5 |
||
| Text Box | Interest Amount: | txtInterestAmount | |
| Label/Text Box | Future Value: | txtFutureValue | |
| Label/Text Box | Monthly Payment: | txtMonthlyPayment | |
| Label/Text Box | Payment Start Date: | txtPaymentStartDate | |
| Button | Submit | cmdSubmit | |
| Button | Close | cmdClose |
Private Sub txtEmployeeNumber_LostFocus()
    Dim dbWattsALoan As Database
    Dim rsEmployees As Recordset

    If IsNull(txtEmployeeNumber) Then
        Exit Sub
    End If

    Set dbWattsALoan = CurrentDb
    Set rsEmployees = dbWattsALoan.OpenRecordset("SELECT FirstName, LastName " & _
                                                 "FROM Employees " & _
                                                 "WHERE EmployeeNumber LIKE '" & Me.txtEmployeeNumber & "';")

    If rsEmployees.RecordCount > 0 Then
        txtEmployeeName = rsEmployees!LastName & ", " & rsEmployees!FirstName
    End If

    rsEmployees.Close
    dbWattsALoan.Close
End SubPrivate Sub cmdEvaluateLoan_Click()
DoCmd.OpenForm "LoanEvaluation"
End SubPrivate Sub cmdSubmit_Click()
If Not IsDate(txtDateAllocated) Then
MsgBox "Please enter a valid allocation date, such as the date the loan was approed.", _
vbOKOnly, "Watts' A Loan - New Loan Allocation"
Exit Sub
End If
If IsNull(txtEmployeeNumber) Then
MsgBox "Please enter the employee number of the clerk who processed or approved the loan.", _
vbOKOnly, "Watts' A Loan - New Loan Allocation"
Exit Sub
End If
If IsNull(cbxLoansTypes) Then
MsgBox "Please specify the type of the loan that was processed.", _
vbOKOnly, "Watts' A Loan - New Store Item"
Exit Sub
End If
Dim emplId As Long
Dim LoanTypeID As Long
Dim dbWattsALoan As Database
Dim rsEmployees As Recordset
Dim rsLoansTypes As Recordset
If IsNull(txtEmployeeNumber) Then
Exit Sub
End If
Set dbWattsALoan = CurrentDb
Set rsEmployees = dbWattsALoan.OpenRecordset("SELECT EmployeeID FROM Employees " & _
"WHERE EmployeeNumber LIKE '" & Me.txtEmployeeNumber & "';")
If rsEmployees.RecordCount > 0 Then
emplId = rsEmployees!EmployeeID
End If
Set rsLoansTypes = dbWattsALoan.OpenRecordset("SELECT LoanTypeID FROM LoansTypes " & _
"WHERE LoanType LIKE '" & Me.cbxLoansTypes & "';")
If rsEmployees.RecordCount > 0 Then
LoanTypeID = rsLoansTypes!LoanTypeID
End If
DoCmd.RunSQL "INSERT INTO LoansContracts(LoanNumber, DateAllocated, EmployeeID, CustomerFirstName, CustomerLastName, " & _
" LoanTypeID, LoanAmount, InterestRate, Periods, " & _
" InterestAmount, MonthlyPayment, FutureValue, PaymentStartDate) " & _
"VALUES('" & txtLoanNumber & "', #" & CDate(txtDateAllocated) & "#, '" & emplId & "', '" & txtCustomerFirstName & _
"', '" & txtCustomerLastName & "', '" & LoanTypeID & "', " & CDbl(Nz(txtLoanAmount)) & ", " & _
CDbl(Nz(txtInterestRate)) & ", " & CDbl(Nz(txtPeriods)) & ", " & CDbl(Nz(txtInterestAmount)) & ", " & _
CDbl(Nz(txtMonthlyPayment)) & ", " & CDbl(Nz(txtFutureValue)) & ", #" & CDate(txtPaymentStartDate) & "#);"
DoCmd.Close
End SubPrivate Sub cmdClose_Click()
DoCmd.Close
End Sub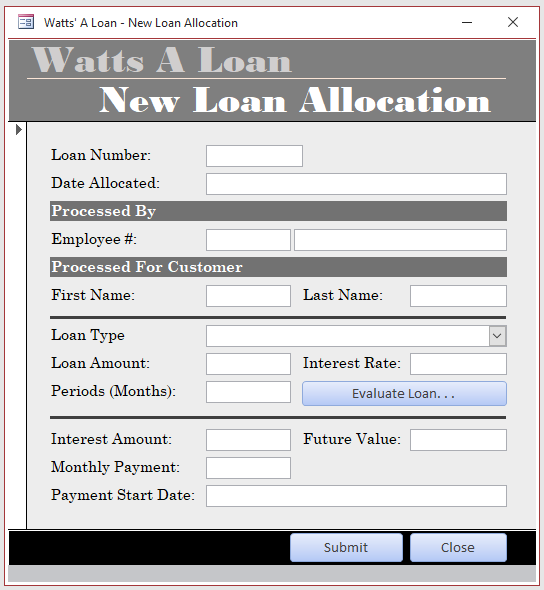
Loans Payments
When a loan has been issued, a customer must make monthly payments. To take care of this, we will create a table and related objects.
![]() Practical Learning: Making Loans Payments
Practical Learning: Making Loans Payments
| Field Name | Data Type | Field Size | Format | Input Mask | Caption |
| PaymentID | AutoNumber | Payment ID | |||
| ReceiptNumber | Short Text | 10 | Receipt # | ||
| PaymentDate | Date/Time | Long Date | Short Date | Payment Date | |
| EmployeeID | Employee | ||||
| LoanContractID | Number | Loan Contract | |||
| PaymentAmount | Number | Double | Currency | Payment Amount | |
| Balance | Number | Double | Currency |
Column Heads:  Yes
Column Widths: 0";0.85";0.85";0.85";2.5"
List Width:    5.05"
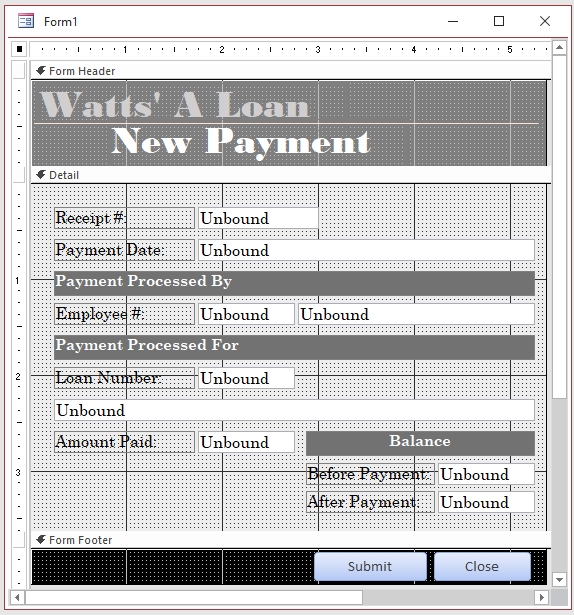
| Control | Caption | Name | Other Properties |
| Label: | Watts' A Loan | Fore Color: Background 2, Darker 10% | |
| Line | Border Color: Accent 2, Lighter 80% | ||
| Label | New Payment | Fore Color: Background 2, Darker 10% | |
| Label/Text Box: | Receipt #: | txtReceiptNumber | |
| Label/Text Box: | Payment Date: | txtPaymentDate | |
| Label | Payment Processed By | Back Color: #727272 | |
| Label/Text Box | Employee #: | txtEmployeeNumber | |
| Text Box | txtEmployeeName | ||
| Label | Payment Processed For | Back Color: #727272 | |
| Label/Text Box | Loan Number | txtLoanNumber | |
| Text Box | txtLoanDetails | ||
| Label/Text Box | Amount Paid: | txtAmountPaid | |
| Label | Balance | Back Color: #727272 | |
| Label/Text Box | Before Payment: | txtBalanceBeforePayment | |
| Label/Text Box | After Payment: | txtBalanceAfterPayment | |
| Button | Submit | cmdSubmit | |
| Button |
Private Sub txtEmployeeNumber_LostFocus()
    Dim dbWattsALoan As Database
    Dim rsEmployees As Recordset

    If IsNull(txtEmployeeNumber) Then
        Exit Sub
    End If

    Set dbWattsALoan = CurrentDb
    Set rsEmployees = dbWattsALoan.OpenRecordset("SELECT FirstName, LastName " & _
                                                 "FROM Employees " & _
                                                 "WHERE EmployeeNumber LIKE '" & Me.txtEmployeeNumber & "';")

    If rsEmployees.RecordCount > 0 Then
        txtEmployeeName = rsEmployees!LastName & ", " & rsEmployees!FirstName
    End If

    rsEmployees.Close
    dbWattsALoan.Close
End SubPrivate Sub txtLoanNumber_LostFocus()
Dim loanId As Long
Dim balance As Double
Dim rsPayments As Recordset
Dim dbWattsALoan As Database
Dim rsLoansAllocations As Recordset
If IsNull(txtLoanNumber) Then
Exit Sub
End If
balance = 0
Set dbWattsALoan = CurrentDb
Set rsLoansAllocations = dbWattsALoan.OpenRecordset("SELECT LoanContractID, " & _
" LoanNumber, " & _
" CustomerFirstName, " & _
" CustomerLastName, " & _
" LoanAmount, " & _
" MonthlyPayment, " & _
" FutureValue " & _
"FROM LoansContracts " & _
"WHERE LoanNumber = '" & txtLoanNumber & "';")
If rsLoansAllocations.RecordCount > 0 Then
txtLoanDetails = "Loan granted to " & rsLoansAllocations!CustomerFirstName & ", " & _
rsLoansAllocations!CustomerLastName & " for " & _
rsLoansAllocations!LoanAmount & " paid at " & _
rsLoansAllocations!MonthlyPayment & "/Month"
loanId = rsLoansAllocations!LoanContractID
balance = rsLoansAllocations!FutureValue
Set rsPayments = dbWattsALoan.OpenRecordset("SELECT Balance " & _
"FROM Payments " & _
"WHERE LoanContractID = " & loanId & ";")
If rsPayments.RecordCount > 0 Then
rsPayments.MoveLast
balance = rsPayments!balance
End If
txtBalanceBeforePayment = balance
txtAmountPaid = rsLoansAllocations.Fields("MonthlyPayment").Value
txtBalanceAfterPayment = FormatNumber(CDbl(Nz(txtBalanceBeforePayment)) - CDbl(Nz(txtAmountPaid)))
End If
rsLoansAllocations.Close
dbWattsALoan.Close
End SubPrivate Sub cmdSubmit_Click()
If Not IsDate(txtPaymentDate) Then
MsgBox "Please enter a valid payment date.", _
vbOKOnly, "Watts' A Loan - New Payment"
Exit Sub
End If
If IsNull(txtEmployeeNumber) Then
MsgBox "Please enter the employee number of the clerk who processed the Payment.", _
vbOKOnly, "Watts' A Loan - New Loan Allocation"
Exit Sub
End If
Dim emplId As Long
Dim loanId As Long
Dim dbWattsALoan As Database
Dim rsEmployees As Recordset
Dim rsLoansContracts As Recordset
If IsNull(txtEmployeeNumber) Then
Exit Sub
End If
Set dbWattsALoan = CurrentDb
Set rsEmployees = dbWattsALoan.OpenRecordset("SELECT EmployeeID FROM Employees " & _
"WHERE EmployeeNumber LIKE '" & txtEmployeeNumber & "';")
If rsEmployees.RecordCount > 0 Then
emplId = rsEmployees!EmployeeID
End If
Set rsLoansContracts = dbWattsALoan.OpenRecordset("SELECT LoanContractID FROM LoansContracts " & _
"WHERE LoanNumber LIKE '" & txtLoanNumber & "';")
If rsLoansContracts.RecordCount > 0 Then
loanId = rsLoansContracts!LoanContractID
End If
DoCmd.RunSQL "INSERT INTO Payments(ReceiptNumber, PaymentDate, EmployeeID, " & _
" LoanContractID, PaymentAmount, Balance) " & _
"VALUES('" & txtReceiptNumber & "', #" & CDate(txtPaymentDate) & "#, " & _
emplId & ", " & loanId & ", " & CDbl(Nz(txtAmountPaid)) & ", " & _
CDbl(Nz(Me.txtBalanceAfterPayment)) & ");"
DoCmd.Close
End SubPrivate Sub cmdClose_Click()
DoCmd.Close
End SubData Entry
We will now test the database
![]() Practical Learning: Testing the Database
Practical Learning: Testing the Database
Personal Loan
Car Financing
Boat Financing
Furniture Purchase
Musical Instrument
| Employee # | First Name | Last Name | Employee Title |
| 293-747 | Catherine | Watts | Owner - General Manager |
| 836-486 | Thomas | Felton | Accounts Representative |
| 492-947 | Caroline | Wernick | Assistant Manager |
| 240-750 | Catherine | Donato | Accounts Representative |
| 804-685 | Melissa | Browns | Customer Accounts Representative |
| 429-374 | Denise | Leighton | Accounts Manager |

Loan Amount:   2500
Interest Rate: 15.63
Periods:       36

Loan Number:        100001
Date Allocated:     01/18/2021
Employee #:         429-374
First Name:         Joanne
Last Name:          Kennan
Loan Type:          Personal Loan
Loan Amount:        2500
Interest Rate:      15.63
Periods:            36
Interest Amount:    1,483.51
Future Value:       3,983.51
Monthly Payment:    87.44
Payment Start Date: 03/01/2021
Loan Number:        100002
Date Allocated:     01/22/2021
Employee #:         492-947
First Name:         Stephen
Last Name:          Haller
Loan Type:          Boat Financing
Loan Amount:        46500
Interest Rate:      4.95
Periods:            60
Interest Amount:    13,027.79
Future Value:       59,527.79
Monthly Payment:    876.45
Payment Start Date: 03/01/2021
Loan Number:        100003
Date Allocated:     03/12/2021
Employee #:         429-374
First Name:         Annette
Last Name:          Vargas
Loan Type:          Furniture Purchase
Loan Amount:        2258.75
Interest Rate:      17.35
Periods:            36
Interest Amount:    1,528.29
Future Value:       3,787.04
Monthly Payment:    80.92
Payment Start Date: 05/01/2021
Loan Number:        100004
Date Allocated:     03/12/2021
Employee #:         836-486
First Name:         Gérard
Last Name:          Maloney
Loan Type:          Car Financing
Loan Amount:        22748
Interest Rate:      10.25
Periods:            60
Interest Amount:    15,146.30
Future Value:       37,894.30
Monthly Payment:    486.13
Payment Start Date: 05/01/2021
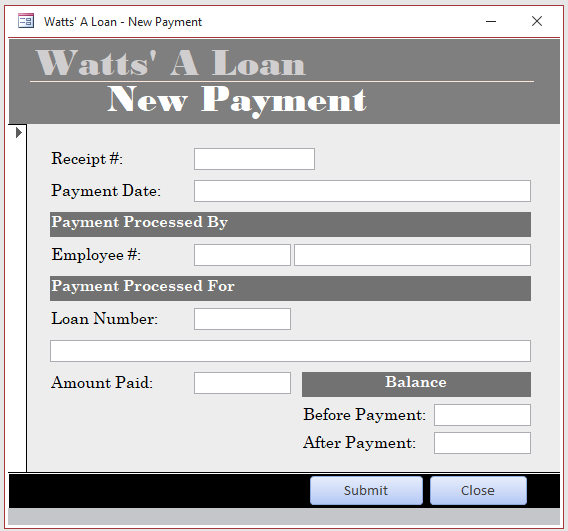
Receipt #:      385970
Payment Date:   03/03/2021
Employee #:     429-374
Loan Number:    100001
Amount Paid:    87.44
Before Payment: 3,869.52
After Payment:  3783.28
Receipt #:      953746
Payment Date:   03/30/2021
Employee #:     492-947
Loan Number:    100002
Amount Paid:    369.12
Before Payment: 30,348.75
After Payment:  29,979.63
Receipt #:      503940
Payment Date:   04/30/2021
Employee #:     836-486
Loan Number:    100002
Amount Paid:    369.12
Before Payment: 29,979.63
After Payment:  29,610.51
Receipt #:      522840
Payment Date:   05/22/2021
Employee #:     836-486
Loan Number:    100003
Amount Paid:    486.13
Before Payment: 37,894.30
After Payment:  37,408.17
Receipt #:      184603
Payment Date:   05/28/2021
Employee #:     429-374
Loan Number:    100001
Amount Paid:    79.58
Before Payment: 3,654.94
After Payment:  3,575.36
Receipt #:      620381
Payment Date:   05/28/2021
Employee #:     429-374
Loan Number:    100002
Amount Paid:    369.12
Before Payment: 29,610.51
After Payment:  29,241.39
|
|
|||
| Home | Copyright © 2001-2025, FunctionX | Tuesday 12 December 2024, 10:36 | Home |
|
|
|||