Home

Introduction to Classes


Fundamentals of Classes


Introduction

A class is a technique of using one variable or combining some variables to get a composite data type. 


Creating a Class

To create a class, you start with the class keyword followed by a name and its body delimited by curly brackets. Here is an example of a class called House:

class House
{
}

To create a class, if you are working on a text editor, you can include its code in the head section, using a script. Here is an example:

<%@ Page Language="C#" %>
<html>
<head>

<script runat="server">
class House
{
}
</script>

<title>Exercise</title>
</head>
<body>

</body>
</html>

In the same way, if you are working in Microsoft Visual Studio or Microsoft Visual Web Developer, you can create a script section in the head side of a page and create your class in it. Here is an example:

<%@ Page Language="C#"
    AutoEventWireup="true"
    CodeFile="index.aspx.cs"
    Inherits="_Default" %>

<!DOCTYPE html PUBLIC "-//W3C//DTD XHTML 1.0 Transitional//EN"
     "http://www.w3.org/TR/xhtml1/DTD/xhtml1-transitional.dtd">

<html xmlns="http://www.w3.org/1999/xhtml">
<head runat="server">

<script runat="server">
class House
{

}
</script>

<title>Exercise</title>
</head>
<body>

</body>
</html>

If you are working in Microsoft Visual Studio or Microsoft Visual Web Developer, to visually create a class:

  • On the main menu, you can click Website -> Add New Item...
  • In the Solution Explorer, right-click the name of the project and click Add New Item...

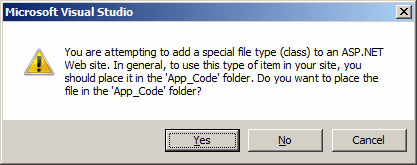
In the Templates list, click Class. Accept the suggested name or specify your own. Then click Add. A message box will ask you to add the class to the App_Code folder:

Message Box

After reading the message box, click Yes. A folder named App_Code would be automatically created and the new class would be added to it. The file that contains the class would have the same name as the class and would have the .cs extension.

When a project is made of various files, each file is represented by a tab in the top section of the Code Editor. To access a file, you can click its tab.

HomePractical Learning: Introducing Classes

  1. Start Microsoft Visual Studio or Microsoft Visual Web Developer
  2. Create a Web Site named DepartmentStore1
  3. To create a new class, on the main menu, click Website -> Add New Item...
  4. In the Add New Item dialog box, click Class
  5. Change the name to DepartmentStore
  6. Make sure the Language is set to Visual C# and click Add
  7. Read the message box and click Yes

Visually Managing Classes

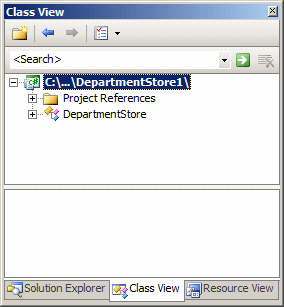
If you are working in Microsoft Visual Studio or Microsoft Visual Web Developer, to assist you with managing the various classes of a web site, one of the windows you can use is called the Class View. To display it, on the main menu, you can click View -> Class View:

Class View

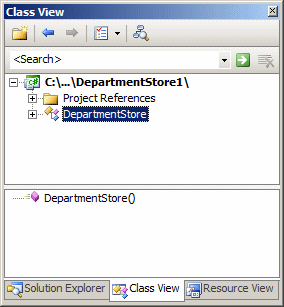
To see the members of a class, you can click it in the top window:

Class View

Declaring a Variable of a Class Type

To use a class for a web page, you can first declare a variable for it. If you are working in a text editor such as Notepad, to declare the variable, type the name of the class where you want to use the variable. This would be done as follows:

<%@ Page Language="C#" %>
<html>
<head>

<script runat="server">
class House
{
}
</script>

<title>Exercise</title>
</head>
<body>

<%
    House property;
%>

</body>
</html>

If you are using Microsoft Visual Studio or Microsoft Visual Web Developer, you can use either the name of the class or the var keyword. Here is an example:

<%@ Page Language="C#"
    AutoEventWireup="true"
    CodeFile="index.aspx.cs"
    Inherits="_Default" %>

<!DOCTYPE html PUBLIC "-//W3C//DTD XHTML 1.0 Transitional//EN"
     "http://www.w3.org/TR/xhtml1/DTD/xhtml1-transitional.dtd">

<html xmlns="http://www.w3.org/1999/xhtml">
<head runat="server">

<script runat="server">
class House
{

}
</script>

<title>Exercise</title>
</head>
<body>

<%
    var property ...  
%>

</body>
</html>

Or the following:

<%@ Page Language="C#"
    AutoEventWireup="true"
    CodeFile="index.aspx.cs"
    Inherits="_Default" %>

<!DOCTYPE html PUBLIC "-//W3C//DTD XHTML 1.0 Transitional//EN"
     "http://www.w3.org/TR/xhtml1/DTD/xhtml1-transitional.dtd">

<html xmlns="http://www.w3.org/1999/xhtml">
<head runat="server">

<script runat="server">
class House
{

}
</script>

<title>Exercise</title>
</head>
<body>

<%
    House property;  
%>

</body>
</html>

Before using a class, you must get a reference to it. To do this, you must initialize it using an operator called new. Here is an example:

<%@ Page Language="C#"
    AutoEventWireup="true"
    CodeFile="index.aspx.cs"
    Inherits="_Default" %>

<!DOCTYPE html PUBLIC "-//W3C//DTD XHTML 1.0 Transitional//EN"
     "http://www.w3.org/TR/xhtml1/DTD/xhtml1-transitional.dtd">

<html xmlns="http://www.w3.org/1999/xhtml">
<head runat="server">

<script runat="server">
class House
{
}
</script>

<title>Exercise</title>
</head>
<body>

<%
    var property = new House();  
%>

</body>
</html>

If you are using the name of the class instead of var to declare the variable, you can first declare it. Then, on another line, you can allocate memory for it using the new operator. Here is an example:

<%@ Page Language="C#" %>
<html>
<head>

<script runat="server">
class House
{
}
</script>

<title>Exercise</title>
</head>
<body>

<%
    House property;
        
    // You can do something here

    property = new House();
%>

</body>
</html>

If you create a class in any of the files that belong to the same project, the class is made available to all other files of the same project.

Sharing a Class

If you want your class to be accessible to code written in other languages, precede the class keyword with public when creating it. Here is an example:

<%@ Page Language="C#" %>
<html>
<head>

<script runat="server">
public class House
{
}
</script>

<title>Exercise</title>
</head>
<body>

<%
    House property = new House();
%>

</body>
</html>

Garbage Collection

When you initialize a variable using the new operator, you are in fact reserving some space in the heap memory. The memory is "allocated" for the variable. When that variable is no longer needed, such as when your program closes, it (the variable) must be removed from memory and the space it was using can be made available to other variables or other programs. This is referred to as garbage collection.

The .NET Framework solves the problem of garbage collection by "cleaning" the memory after you. This is done automatically when necessary so that the programmer doesn't need to worry about this issue.

Class' Fields


Introduction

In the code of a class, the section between the curly brackets, { and }, is referred to as its body. In the body of a class, you can create the member variable(s) of the class. Each member has a name and a data type. Here is an example:

<script runat="server">
class House
{
    string PropertyNumber;
    char PropertyType;
    byte Stories;
    uint bedrooms;
    decimal Value;
}
</script>

Each member variable is referred to as a field. A field can be of any regular data type or another class.


HomePractical Learning: Introducing Class Members

  1. Change the DepartmentStore class as follows:
     
    using System;
    using System.Collections.Generic;
    using System.Linq;
    using System.Web;
    
    /// <summary>
    /// Summary description for DepartmentStore
    /// </summary>
    public class DepartmentStore
    {
        long StockNumber;
        char Category;
        string ItemName;
        decimal UnitPrice;
    }
  2. Save the file

Accessing Class Members


Private Members

A class member can be hidden from other classes. Such a member is referred to as private. Such a member must be preceded by the private keyword. If you declare a member variable and want to make it available to other classes, you must start its name with the public keyword. The public and private keywords are referred to as access level.

By default, if you declare a member variable (or anything else) in a class but don't specify its access level, the member is considered private and cannot be accessed from outside. Therefore, to make a member accessible by other classes, you must declare it as public.

You can use a mix of public and private members in a class and there is no rule on which access level should be listed first or last. Here are examples:

<script runat="server">
public class House
{
    string PropertyNumber;
    public char PropertyType;
    byte Stories;
    public uint bedrooms;
    private decimal Value;
}
</script>

Just keep in mind that if you omit or forget the access level of a member of a class, the member is automatically made private. To reduce confusion as to what member is public or private, you should always specify the access level of a member variable.

<script runat="server">
public class House
{
    public string PropertyNumber;
    public char PropertyType;
    public byte Stories;
    public uint Bedrooms;
    public decimal Value;
}
</script>

Accessing a Class's Member

After creating a member of a class, to access it from another class, first declare a variable from its class. To actually access the member, use the period operator ".". This would be done as follows:

<%@ Page Language="C#" %>
<html>
<head>

<script runat="server">
public class House
{
    public string PropertyNumber;
    public char PropertyType;
    public byte Stories;
    public uint Bedrooms;
    public decimal Value;
}
</script>

<title>Exercise</title>
</head>
<body>

<%
    House property = new House();

    property.PropertyNumber
%>

</body>
</html>

Internal Members

We have seen that the public keyword is used to let objects of the same project and objects of other projects access the public member. The private keyword is used to let only members of a class access the (private) member of the class. If you want to create a member of a class so that only objects of the same program can access that member, you can mark it with the internal keyword. The differences between these keywords can be resumed as follows:

  If a class member is marked as
  public internal private
Members of its class can access this member Yes Yes Yes
Members of this program, including outside of the class, can access this member Yes Yes No
Objects outside of this program can access this member Yes No No


Initializing an Object


Introduction

 After declaring an instance of a class, you can access each of its members and assign it the desired value. Here is an example:

<%@ Page Language="C#" %>
<html>
<head>

<script runat="server">
public class House
{
    public string PropertyNumber;
    public char PropertyType;
    public byte Stories;
    public uint Bedrooms;
    public decimal Value;
}
</script>

<title>Exercise</title>
</head>
<body>

<%
    House property = new House();

    property.PropertyNumber = 283795;
    property.PropertyType = "Single Family";
    property.Bedrooms = 4;
    property.Value = 652880;
%>

</body>
</html>

Once a member variable has been initialized, you can use the period operator to access it and retrieve its value:

<%@ Page Language="C#" %>
<html>
<head>

<script runat="server">
public class House
{
    internal long PropertyNumber;
    internal string PropertyType;
    internal uint Bedrooms;
    internal double Value;
}
</script>

<title>Exercise</title>
</head>
<body>

<%
    House property = new House();

    property.PropertyNumber = 283795;
    property.PropertyType = "Single Family";
    property.Bedrooms = 4;
    property.Value = 652880;
%>

<%
    Response.Write("<pre>=//= Altair Realty =//=<br />");
    Response.Write("Properties Inventory<br />"); ;
    Response.Write("Property #:     " + property.PropertyNumber + "<br />");
    Response.Write("Property Type:  " + property.PropertyType + "<br />");
    Response.Write("Bedrooms:       " + property.Bedrooms + "<br />");
    Response.Write("Market Value:   " + property.Value + "</pre>");
%>

</body>
</html>

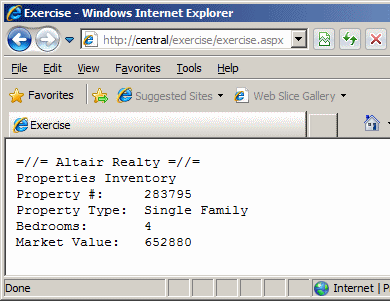
This would produce:

House

Practical LearningPractical Learning: Using a Class' Fields

  1. To make public the members of the DepartmentStore class, type the public keyword to their left:
     
    using System;
    using System.Collections.Generic;
    using System.Linq;
    using System.Web;
    
    /// <summary>
    /// Summary description for DepartmentStore
    /// </summary>
    public class DepartmentStore
    {
        public long StockNumber;
        public char Category;
        public string ItemName;
        public decimal UnitPrice;
    }
  2. In the Solution Explorer, right-click Default.aspx and click Rename
  3. Type index.aspx and press Enter
  4. Double-click index.aspx and change the file as follows:
     
    <%@ Page Language="C#"
             AutoEventWireup="true"  
             CodeFile="index.aspx.cs" 
             Inherits="_Default" %>
    
    <!DOCTYPE html PUBLIC "-//W3C//DTD XHTML 1.0 Transitional//EN" 
    "http://www.w3.org/TR/xhtml1/DTD/xhtml1-transitional.dtd">
    
    <html xmlns="http://www.w3.org/1999/xhtml">
    <head runat="server">
    <title>Department Store - Inventory</title>
    </head>
    <body>
    
    <%
        DepartmentStore dptStore = new DepartmentStore();
    
        dptStore.StockNumber = 437876;
        dptStore.Category = 'W';
        dptStore.ItemName = "Scoop Neck Dress";
        dptStore.UnitPrice = 148.00M;
    
        Response.Write("<pre>Department Store" + "<br />");
        Response.Write("Item #:     " + dptStore.StockNumber + "<br />");
        Response.Write("Category:   " + dptStore.Category + "<br />");
        Response.Write("Name:       " + dptStore.ItemName + "<br />");
        Response.Write("Unit Price: " + dptStore.UnitPrice + "</pre>");
    %>
    
    </body>
    </html>
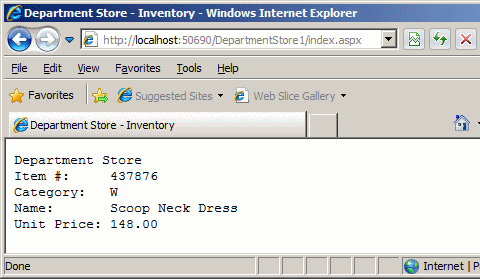
  5. Press Ctrl + F5 to preview the page. This would produce:
     
    Department Store
  6. Return to your programming environment

Using an Anonymous Type

You can declare a variable that resembles an instance of a class and initialize it as you see fit. This is referred to as an anonymous type. To use it, if you are working in Microsoft Visual Studio or Microsoft Visual Web Developer, declare the variable using the var keyword and use the new operator to allocate memory for it. Instead of using the name of a class, type an opening and a closing curly brackets after the new operator. In the curly brackets, state a name for each member as if it were the member of the class and initialize each member variable with the desired value. After the closing curly bracket, end the declaration with a semi-colon. Here is an example:

<%@ Page Language="C#"
    AutoEventWireup="true"
    CodeFile="index.aspx.cs"
    Inherits="_Default" %>

<!DOCTYPE html PUBLIC "-//W3C//DTD XHTML 1.0 Transitional//EN"
     "http://www.w3.org/TR/xhtml1/DTD/xhtml1-transitional.dtd">

<html xmlns="http://www.w3.org/1999/xhtml">

<title>Exercise</title>
</head>
<body>

<%
    var BookInformation = new
    {
        Title = "Calculus 6e Edition",
        Pages = 1074,
        Cover = "Hard Back"
    };
%>

</body>
</html>

After initializing the anonymous type, you can access each one of its members using the name of the variable followed by the period operator, and followed by the member variable. Here is an example:

<%@ Page Language="C#"
    AutoEventWireup="true"
    CodeFile="index.aspx.cs"
    Inherits="_Default" %>

<!DOCTYPE html PUBLIC "-//W3C//DTD XHTML 1.0 Transitional//EN"
     "http://www.w3.org/TR/xhtml1/DTD/xhtml1-transitional.dtd">

<html xmlns="http://www.w3.org/1999/xhtml">

<title>Exercise</title>
</head>
<body>

<%
    var BookInformation = new
    {
        Title = "Calculus 6e Edition",
        Pages = 1074,
        Cover = "Hard Back"
    };

    Response.Write("=//= BookInformation =//=");
    Response.Write("<br />Title:         " + BookInformation.Title);
    Response.Write("<br />Nbr of Pages:  " + BookInformation.Pages);
    Response.Write("<br />Type of Cover: " + BookInformation.Cover);
%>

</body>
</html>

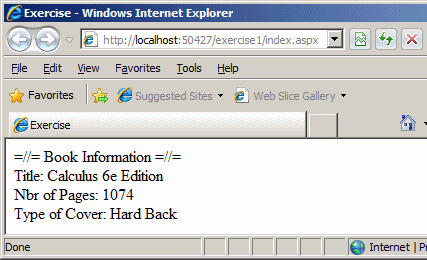
This would produce:

Book Information

Remember that spreading the declaration on many lines only makes it easy to read. Otherwise, you can as well include everything on the same line.

<%@ Page Language="C#"
    AutoEventWireup="true"
    CodeFile="index.aspx.cs"
    Inherits="_Default" %>

<!DOCTYPE html PUBLIC "-//W3C//DTD XHTML 1.0 Transitional//EN"
     "http://www.w3.org/TR/xhtml1/DTD/xhtml1-transitional.dtd">

<html xmlns="http://www.w3.org/1999/xhtml">

<title>Exercise</title>
</head>
<body>

<%
 var BookInformation = new { Title = "Picking Fights", Pages = 226, Cover = "N/A" };

    Response.Write("=//= BookInformation =//=");
    Response.Write("<br />Title:         " + BookInformation.Title);
    Response.Write("<br />Nbr of Pages:  " + BookInformation.Pages);
    Response.Write("<br />Type of Cover: " + BookInformation.Cover);
%>

</body>
</html>


Previous Copyright © 2009-2016, FunctionX, Inc. Next