|
Since the TStrings class does not lead to a specific Windows control, the control that needs it has to call it. Put it in reverse order, the
TStrings class is declared in each class that needs to create a list based on a
TStrings class. For this reason, it is free to be named anyway a class wants it. For example, in the
TMemo class, the TStrings variable is declared as Lines because a memo is just a list of paragraphs. On the other hand, the
TStrings class is called Items in the
TListBox and the TComboBox classes. For a TStringGrid
object, the TStrings variable is called Cells.
To implement a list based on the TStrings class from any of these objects, call the
TStrings property which in turn would give access to its properties and methods.
|
Working With Individual Strings |
|
The operations performed using the TStrings class consist of creating a list of items, inserting new ones, deleting others, counting the items, changing their positions, or switching the items to another list.
The primary operation you as the programmer will perform on a new list is to fill it with the items the user can use. At design time, this is usually easy to do because most list-based controls provide a dialog box used to create an initial list. If you have to programmatically create the list, depending on the control, you would be interested to know not only whether the item was added to the list but also what position the item is occupying in the list. To create such a list, call the
TStrings::Add() method. Its syntax is:
int __fastcall Add(const AnsiString Source);
|
This function takes one argument as an AnsiString object and adds it to the end of the target list. If the list is empty, the
Add() method would initiate the list with the new item. The Source argument could be a locally defined string. For example, the following would add the “Borland C++ Builder is Fun!!!” string to a
Memo control when the user clicks Button1:
//---------------------------------------------------------------------------
void __fastcall TForm1::Button1Click(TObject *Sender)
{
    Memo1->Lines->Add("Borland C++ Builder is fun!!!");
}
//---------------------------------------------------------------------------
|
You can also use a string held by another control. In this case you would call the control field that holds the string. For example, the following would add the content of the Edit1 edit box, or the
Text property of the Edit control, to a Memo control when the user clicks Button1:
//---------------------------------------------------------------------------
void __fastcall TForm1::Button1Click(TObject *Sender)
{
    Memo1->Lines->Add(Edit1->Text);
}
//---------------------------------------------------------------------------
|
You could also use the name of a string variable to add its value to a TStrings variable:
//---------------------------------------------------------------------------
void __fastcall TForm1::Button1Click(TObject *Sender)
{
    String Address = "4812 Lockwood Drive #D12";
    Memo1->Lines->Add(Address);
}
//---------------------------------------------------------------------------
|
If the addition of the Source string to the TStrings variable was successful,
Add() returns the position where the
Source string was added. The position is zero-based. If Source was set as the first item of the list, its position would be 0. If it were added as the 2nd item of the list, it would assume position 1, etc. If you need to, you can find out the position the argument is occupying after being added. Here is an example:
//---------------------------------------------------------------------------
void __fastcall TForm1::Button1Click(TObject *Sender)
{
    String Address = "4812 Lockwood Drive #D12";
    int Success = Memo1->Lines->Add(Address);

    if( Success != -1)
        ShowMessage(Address + " was added at position " +
                    String(Success + 1));
}
//---------------------------------------------------------------------------
|
If you are not interested in the position that Source occupied once it was added, you can use the
TStrings:: Append() method. Its syntax is:
void __fastcall Append(const AnsiString Source);
|
For a text-based control such as Memo or Rich Edit, the only thing you want to know is whether the item was added to the
list. This makes the TStrings:: Append() method useful. This method also takes one argument as the
AnsiString object to be added. Here is an example:
//---------------------------------------------------------------------------
void __fastcall TForm1::Button1Click(TObject *Sender)
{
    Memo1->Lines->Append("The magazine is on the table");
}
//---------------------------------------------------------------------------
|
|
 Practical Learning: Using Individual Strings
|
|

- Start a new project with the default form
- To save the project, on the Standard toolbar, click the Save All button
- By clicking the Create new Folder button, create a new folder called List Filler and display it in the Save combo box
- Save the unit as Main and the project as ListFiller
- Change the form’s caption to Travel Plans
- Add a label on the top left section of the form. Set the caption to
Select a Continent:
- Add a ComboBox control under the existing label. Change its name to cbxCountries
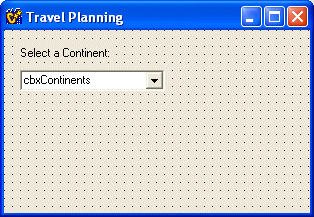
- To create a list of continents, double-click in the middle of the form to access its OnCreate event.
- Implement the even as follows:
//---------------------------------------------------------------------------
void __fastcall TForm1::FormCreate(TObject *Sender)
{
    cbxContinents->Items->Append("Asia");
    cbxContinents->Items->Append("Europe");
    cbxContinents->Items->Append("America");
    cbxContinents->Text = "Asia";
}
//---------------------------------------------------------------------------
|
- To test the project, on the main menu, click Run -> Run
- Test the combobox by selecting different items. Close the form
- If the form is not displaying, press F12. Add a label under the combo box with a caption of
Select a Country:
- Add a ListBox under the new label. Change its name to lstCountries
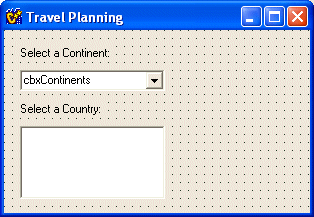
- To fill out the new control, we will do this depending on the item selected on the top
ComboBox. Therefore, double-click the Select A Continent combo box to access its
OnChange event.
- Set the default list for the Countries combo box in the OnCreate event of the form to synchronize with the default selection of the Continent
ComboBox. Then implement the OnChange event of the Countries ComboBox
as follows:
//---------------------------------------------------------------------------
void __fastcall TForm1::FormCreate(TObject *Sender)
{
    cbxContinents->Items->Append("Asia");
    cbxContinents->Items->Append("Europe");
    cbxContinents->Items->Append("America");
    cbxContinents->Text = "Asia";

    lstCountries->Items->Append("Sri Lanka");
    lstCountries->Items->Append("Indonesia");
    lstCountries->Items->Append("Yemen");
    lstCountries->Items->Append("Iraq");
}
//---------------------------------------------------------------------------
void __fastcall TForm1::cbxContinentsChange(TObject *Sender)
{
    if(cbxContinents->Text == "Asia")
    {
        lstCountries->Clear();
        lstCountries->Items->Append("Sri Lanka");
        lstCountries->Items->Append("Indonesia");
        lstCountries->Items->Append("Yemen");
        lstCountries->Items->Append("Iraq");
    }
    else if(cbxContinents->Text == "Europe")
    {
        lstCountries->Clear();
        lstCountries->Items->Clear();
        lstCountries->Items->Append("Sweden");
        lstCountries->Items->Append("Greece");
        lstCountries->Items->Append("Portugal");
        lstCountries->Items->Append("Spain");
    }
    else
        lstCountries->Clear();
}
//---------------------------------------------------------------------------
|
- To test the project, on the Debug toolbar, click the Run button
- On the Select A Continent ComboBox, select different continents and make sure the list of countries changes accordingly. After testing the
ComboBox, close the form.
|
Strings and Their Positions in a List |
|
While the Add() and the Append() methods are used to add a string to the end of a list, the
Insert() method allows you to add a string to a position of your choice in the target list. The syntax of the
Insert() method is:
void __fastcall Insert(int Index, const AnsiString Source)
|
This function needs two pieces of information. The Index argument specifies the intended position to insert the item. The positions are zero-based. If you want to add the new item on top of the list, set the Index to 0, for the second place, set the
Index to 1, etc. The string to be added is the Source argument. In the following example, the “Easy Listening” string is added to the 3rd position on a list:
//---------------------------------------------------------------------------
void __fastcall TForm1::Button1Click(TObject *Sender)
{
    ListBox1->Items->Insert(2, "Easy Listening");
}
//---------------------------------------------------------------------------
|
The Index value applies whether the list is sorted or not. If you would like to add a new string to a sorted list and insert it to the right alphabetical sequence, use the
Add() or the Append() methods.
Besides adding, appending, or inserting, you can delete an item from a list. This is performed using the
Delete() method whose syntax is:
void __fastcall Delete(int Index)
|
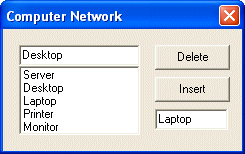 |
To delete an item, the Delete() method needs to know its position. Once again, the list is zero-based: the 1st item is at position 0, the 2nd at 1, etc. If the
Index argument points to an item that does not exist, for example either you set it to a value greater than the number of items or all items have been deleted, nothing would happen (no error would be thrown). In the following example, the 3rd item of a combo box is deleted: |
//---------------------------------------------------------------------------
void __fastcall TForm1::btnDeleteClick(TObject *Sender)
{
    cbxNetwork->Items->Delete(2);
}
//---------------------------------------------------------------------------
|
To (effectively) use the Delete() method, you should supply the position of the item you want to delete. Sometimes such a position would be invalid. The best thing to do is to first inquire whether the item you want to delete exists in the list. For this and many other reasons, you can ask the compiler to check the existence of a certain item in a list. This operation is performed using the
IndexOf() method. Its syntax is:
int __fastcall IndexOf(const AnsiString Source);
|
To use this function, provide the string you are looking for. This string is an AnsiString object. If the string exists in the list, the
IndexOf() method returns its position in the list. The following event is used to examine the items of a combo box looking for a Printer string:
//---------------------------------------------------------------------------
void __fastcall TForm1::btnFindClick(TObject *Sender)
{
    cbxNetwork->Items->IndexOf("Printer");
}
//---------------------------------------------------------------------------
|
If the IndexOf() method finds that the Source string exists in the target list, it returns the position of
Source. You can then use this information as you see fit. For example you can insert a new string on top of the found string. Here is example:
//---------------------------------------------------------------------------
void __fastcall TForm1::btnInsertClick(TObject *Sender)
{
    int Found = cbxNetwork->Items->IndexOf("Printer");

    if( Found )
        cbxNetwork->Items->Insert(Found, "Digital Camera");
}
//---------------------------------------------------------------------------
|
You could also look for Source in a target list and delete it if it exists. Here is an example:
//---------------------------------------------------------------------------
void __fastcall TForm1::btnDeleteClick(TObject *Sender)
{
    int Found = cbxNetwork->Items->IndexOf("Printer");

    if( Found )
        cbxNetwork->Items->Delete(Found);
}
//---------------------------------------------------------------------------
|
Another type of operation you will perform in a list is to retrieve the text of a particular string in the group; this usually happens when you want to transfer an item to another control or display a message about the item. The
Strings property allows you to get an item based on its position in the list. This property is an array that represents the items of the list. To locate a string, use the square brackets to specify its position. Because the list is zero-based, the first item is 0 and would be represented by Strings[0], the second is 1 and would be called with Strings[1], etc.
For the following example, when the user clicks the list box,
regardless of the item selected, a label on the form would retrieve the third item of the
list, provided the list has at least 3 items:
//---------------------------------------------------------------------------
void __fastcall TForm1::ListBox1Click(TObject *Sender)
{
    Label1->Caption = ListBox1->Items->Strings[2];
}
//---------------------------------------------------------------------------
|
One of the most effective ways to use the Strings property is to find out the item that the user would have selected in a list and act accordingly. In the following example, when the user selects a radio button from a
RadioGroup control, the caption of the button selected displays on a label:
//---------------------------------------------------------------------------
void __fastcall TForm1::RadioGroup1Click(TObject *Sender)
{
    // Find the position of the item selected
    int ItemPos = RadioGroup1->ItemIndex;
    // Get the text of the item selected
    String strSelected = RadioGroup1->Items->Strings[ItemPos];
    // Using a label, display a message associated with the item selected
    Label1->Caption = "You selected " + strSelected;
}
//---------------------------------------------------------------------------
|
One of the most regular reasons for this operation is to make sure that a string is not
duplicated and added to a list that already has the Source argument. In the following example, when the user types a string in an edit box and clicks somewhere else (that is, when the Edit control looses focus), the compiler checks to see if the string in the edit box already exists in the list. If the list of the combo box does not have the string in the edit box, then this string is added to the list:
//---------------------------------------------------------------------------
void __fastcall TForm1::edtLaptopExit(TObject *Sender)
{
    String Laptop = edtLaptop->Text;
    int Exists = cbxNetwork->Items->IndexOf(Laptop);

    if( Exists == -1 )
        cbxNetwork->Items->Append(Laptop);
}
//---------------------------------------------------------------------------
|
Some operating system configuration files contain lines with the = symbol as part of a string. There is no strict rule on what those files are or what they do. The
company or the person who creates such a file also decides what the file is used for and when. For example, a music program would use such a file to configure the keyboard keys as related to the associated software. A communication program could use another type of those files as a list or table of ports. Programmers have to deal with those files for various reasons. Some of those files have strings made of three parts: Left=Right. The value called Right has to be assigned to the value on the left. Sometimes the Left value is called a Key; sometimes it is called a Name. The value on the right of equal is also called a Value. Therefore, a string on this file would have the form Name=Value. Some of these files have the .INI extension but can perfectly have any extension the programmer wanted.
Depending on how the file is structured, programmers have to find a certain key or name in the list. The
TStrings class is equipped with a function that helps with this operation. The method is the
IndexOfName() and its syntax is:
int __fastcall IndexOfName(const AnsiString Name);
|
This method takes an AnsiString object as argument. The compiler scans the list looking for a string that has the form Name=Value. If the left part of a string matches the
Name argument, the IndexOfName() method returns the first position where such a string was found. The following dialog box is equipped with an edit box and a memo. To add a new key to the list of keys in the memo, the user types the key in the edit box and clicks the Add Key button (the Edit control is named edtNewKey, the Memo control is named mmoConfigure, the button is named
btnAddKey, the bottom Edit control is named
edtFound):
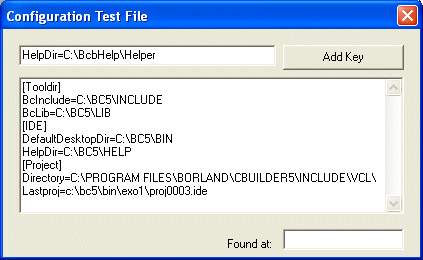
Here is an example of implementing the IndexOfName() method from the
OnClick event of the Add Key button:
//---------------------------------------------------------------------------
void __fastcall TForm1::btnAddKeyClick(TObject *Sender)
{
    AnsiString NewKey = edtNewKey->Text;
    int LookFor = mmoConfigure->Lines->IndexOfName("HelpDir");

    if(LookFor == -1)
        mmoConfigure->Lines->Append(NewKey);
    else
        edtFound->Text = LookFor;
}
//---------------------------------------------------------------------------
|
When the user clicks the Add Key button, the Name part, which is the string on the left of the = symbol of the edit box, is checked for each string in the memo. If no name matches the
Name part of the edit box, the new key is added to the memo. If that Name part is already in the list, the bottom edit box displays the position of the first string that contains
Name.
Probably the best way to do this, “Live”, is to retrieve the Name part from the string that the user has typed in the top edit box. The following commented code would accomplish that:
//---------------------------------------------------------------------------
void __fastcall TForm1::btnAddKeyClick(TObject *Sender)
{
    // Get the content of the edit box
    AnsiString NewKey = edtNewKey->Text;
    // Find the position of the first occurrence in the edit box int
    EqualPos = NewKey.AnsiPos("=");
    // Create a string from the beginning to the first occurrence of =
    AnsiString NamePart = NewKey.Delete(EqualPos, NewKey.Length());
    // Find out if the Name part of the key is already in the list
    int LookFor = mmoConfigure->Lines->IndexOfName(NamePart);
    // if it is not, add the new key to the file
    if(LookFor == -1)
        mmoConfigure->Lines->Append(edtNewKey->Text);
}
//---------------------------------------------------------------------------
|
Again, depending on how the list is structured, you can ask the compiler to retrieve the name part of a string provided its position. This operation is performed using the Names property. This property is an array of the strings of this type of file. When needed, you can ask the compiler to give you the name part of a certain line. For example, to retrieve the name part of the 5th line, you could write Names[4]. If the item at that position does not have = as part of the string, the compiler would consider that the line is not a valid
IndexOfName string and would avoid it. In the following example, the 2nd line of mmoConfigure is examined. If that line is a valid
IndexOfName, its Name part displays in the Found At edit box:
//---------------------------------------------------------------------------
void __fastcall TForm1::btnGetNameClick(TObject *Sender)
{
    edtFound->Text = mmoConfigure->Lines->Names[1];
}
//---------------------------------------------------------------------------
|
By contrast, to retrieve the Value part of an IndexOfName string, use the
Values property. This also is an array of the valid = strings of the list. It uses the following syntax:
AnsiString Values[AnsiString NamePart];
|
This time, you must (or should) provide the string you are looking for as if it were the position of the string. This string, which is an
AnsiString object, should be the Name part of a string you are looking for. The compiler would scan the list of strings looking for valid
IndexOfName strings. If it finds a string that encloses an = symbol, then the compiler would check its Name part. If this Name matches the
NamePart of the Values property, then it would return the Value. This is useful if you want to know whether a certain key has already been defined in the file.
 |
When providing the NamePart as the string to look for, make sure you do not include = as part of the string |
Here is an example:
//---------------------------------------------------------------------------
void __fastcall TForm1::btnGetValueClick(TObject *Sender)
{
    edtFound->Text = mmoConfigure->Lines->Values["Directory"];
}
//---------------------------------------------------------------------------
|
Another usefulness of items of a list is to switch their positions as related to each other. The primary method used to swap items is the
Move() method. Its syntax is:
void __fastcall Move(int CurrentPos, int NewPos);
|
This function takes two strings. The first string is considered for its position. When executing, the function moves the first item from the
CurrentPos position to the position specified by NewPos. The following event would move the 2nd item of a
CheckListBox control to the 5th position:
//---------------------------------------------------------------------------
void __fastcall TForm1::btnMoveClick(TObject *Sender)
{
    CheckListBox1->Items->Move(1, 4);
}
//---------------------------------------------------------------------------
|
After the move, the item at CurrentPos is moved to NewPos. If the item is moved just one position, all of the items whose positions are between
CurrentPos and NewPos are affected. If the item moved up, the items that were above it would be moved down. The opposite occurs if the item has moved down.
While the Move() method is used to move an item from one position to another, the
Exchange() method is used to switch two items. Its syntax is:
void __fastcall Exchange(int Index1, int Index2);
|
The compiler takes the item at Index1, moves it to Index2, takes the item that was at Index2 and moves it to Index1. In the following example, the items at the 4th and the 1st positions are switched:
//---------------------------------------------------------------------------
void __fastcall TForm1::btnExchangeClick(TObject *Sender)
{
    CheckListBox1->Items->Exchange(3, 0);
}
//---------------------------------------------------------------------------
|
|
 Practical Learning: Using Strings Positions
|
|
- To continue with our list project, add a label to the right side of the Select a Continent label. Set its caption to Countries Selected
- Add a ListBox control under the Countries Selected label. Change its name to lstCities
//---------------------------------------------------------------------------
void __fastcall TForm1::lstCountriesClick(TObject *Sender)
{
    // When a new country is selected, empty the list of cities
    lstCities->Clear();

    // If a country is selected, get its name, instead of its position
    int i = lstCountries->ItemIndex;
    AnsiString Selected = lstCountries->Items->Strings[i].c_str();

    if(Selected == "Portugal")
    {
        lstCities->Clear();
        lstCities->Items->Append("Braga");
        lstCities->Items->Append("Coimbra");
        lstCities->Items->Append("Viana do Castelo");
        lstCities->Items->Append("Aveiro");
    }
    else if(Selected == "Indonesia")
    {
        lstCities->Clear();
        lstCities->Items->Append("Makassar");
        lstCities->Items->Append("Ambon");
        lstCities->Items->Append("Kupang");
        lstCities->Items->Append("Jakarta");
        lstCities->Items->Append("Surabaya");
    }
    else if(Selected == "Sweden")
    {
        lstCities->Clear();
        lstCities->Items->Append("Upsala");
        lstCities->Items->Append("Kalmar");
        lstCities->Items->Append("Sundsvall");
        lstCities->Items->Append("Tärnaby");
        lstCities->Items->Append("Kiruna");
        lstCities->Items->Append("Göteborg");
    }
    else
        lstCities->Clear();
}
//---------------------------------------------------------------------------
|
- To test the project, on the Debug button, click the Run button.
- Save your project
|
Working With a Group of Strings |
|
Instead of adding one item at a time to a string, there are various techniques available for filling out a list with all of the needed items. If you want to fill out a Memo or a RichEdit controls with a file, which is just a list of strings, use the TStrings::LoadFromFile() method. Its syntax is:
void __fastcall LoadFromFile(const AnsiString FileName);
|
This function takes an AnsiString object as argument, which is the FileName. If you want to open a file whose path you know, you can provide this path as the argument. Here is an example that fills out a Memo control of a form with the contents of a text file:
//---------------------------------------------------------------------------
void __fastcall TForm1::Button1Click(TObject *Sender)
{
    Memo1->Lines->LoadFromFile("C:\\Windows\\WINHELP.INI");
}
//---------------------------------------------------------------------------
|
If you provide the path of a file but the file does not exist, when the user clicks the button, the application would throw an uncomfortable error. The best alternative is to let the user select a file using an appropriate
object such the Open dialog box. In this case, the
FileName argument would be matched to the content of the dialog box. Following this code, a Memo control named Memo1 would be filled with the content of a file opened from an OpenDialog1 and a Button1 controls placed on the form:
//---------------------------------------------------------------------------
void __fastcall TForm1::btnOpenFileClick(TObject *Sender)
{
    if(OpenDialog1->Execute())
        Memo1->Lines->LoadFromFile(OpenDialog1->FileName);
}
//---------------------------------------------------------------------------
|
On the other hand, the TStrings class is also equipped with a special method that can be used to save a file from a Memo or a
RichEdit controls. Its syntax is:
void __fastcall SaveToFile(const AnsiString FileName);
|
This method takes an AnsiString object as the argument, called FileName. This argument specifies the default name of the file being saved by the user. Here is an
example:
//---------------------------------------------------------------------------
void __fastcall TForm1::btnSaveClick(TObject *Sender)
{
    if( SaveDialog1->Execute() )
        Memo1->Lines->SaveToFile(SaveDialog1->FileName);
}
//---------------------------------------------------------------------------
|
Besides the Memo and RichEdit controls, you can also fill out a list of a control from the strings of another list. This is mainly performed using the
AddStrings() method whose syntax is:
void __fastcall AddStrings(TStrings* Str);
|
The argument provided to this string must be a valid string object. Therefore, you should make sure that the list originates from another list-based control or from another valid source. The
Str argument could come from a known control. Here is an example:
//---------------------------------------------------------------------------
void __fastcall TForm1::btnTransferFileClick(TObject *Sender)
{
    Memo2->Lines->AddStrings(Memo1->Lines);
}
//---------------------------------------------------------------------------
|
Since the TStrings class is a descendent of the TPersistent class, you can also use the
Assign() method. Its syntax is:
void __fastcall Assign(TPersistent* Source);
|
The above event could also be written as:
//---------------------------------------------------------------------------
void __fastcall TForm1::btnTransferFileClick(TObject *Sender)
{
    Memo2->Lines->Assign(Memo1->Lines);
}
//---------------------------------------------------------------------------
|
At any time you can find out how many items compose a list using the Count property. Not only
does this property provide an integral count of the members of the list but also
you can use it when scanning the list using a for loop. The fundamental way of using the Count property is to get the number of items of a list. In the following example, when the user clicks the
Count button, the number of strings in the RadioGroup1 control displays in the
Count edit box:
//---------------------------------------------------------------------------
void __fastcall TForm1::btnCountClick(TObject *Sender)
{
    edtCount->Text = RadioGroup1->Items->Count;
}
//---------------------------------------------------------------------------
|
An alternative is to use the Capacity property which fundamentally also provides the number of items of a list. Its main role is to deal with memory allocation especially when writing a component that uses a list of items.
If you have two lists and want to compare them, use the Equals() method whose syntax is:
bool __fastcall Equals(TStrings* Strings);
|
|
This function requires a TStrings list of strings. The conversion is performed on two fronts. First, both lists should have the same number of strings. If both lists have different number of items, the function returns false. If they have the same number of strings, then the compiler examines the strings one line at a time, for each list. If two strings of the same position are not the same, the function returns false. This means that even if both lists have the same strings, the comparison can still render negative. |
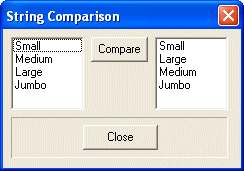 |
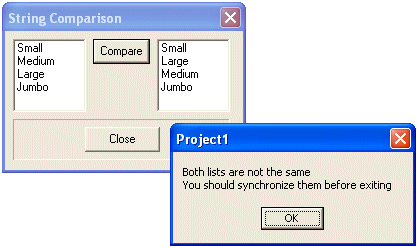
Here is an example of implementing this method:
//---------------------------------------------------------------------------
void __fastcall TForm1::btnCompareListsClick(TObject *Sender)
{
    if( !ListBox1->Items->Equals(ListBox2->Items) )
        ShowMessage("Both lists are not the same\n"
                    "You should synchronize them before exiting");
}
//---------------------------------------------------------------------------
|
The items of a TStrings list are usually text-based although they can also be of different kinds of objects. When the items are made of strings, sometimes you will need to convert them to a single text. Such is the case when transferring the items of a
ListBox or a ComboBox to a text document or a rich text file. To convert a TStrings list of strings to text, you should translate the list to a C-based string of objects. This can be done using the
GetText() method whose syntax is:
char * __fastcall GetText(void);
|
When this method is called by a TStrings variable, it returns a null-terminated string that represents all of the items of the text.
To assign a C-based string to a TStrings list of strings, use the
SetText() method. Its syntax is:
void __fastcall SetText(char * Text);
|
This method takes one argument as a C string and converts it to TStrings.
You can use these two methods to perform the same transfer or transaction we used to pass a list of strings from one list to another. Here is an example:
//---------------------------------------------------------------------------
void __fastcall TForm1::btnGetTextClick(TObject *Sender)
{
    char *WholeList = Memo1->Lines->GetText();
    Memo2->Lines->SetText(WholeList);
}
//---------------------------------------------------------------------------
|
Even if the controls are of different kinds, you can use the same transaction. For example, the following event transfers the contents of a
ListBox to a memo:
//---------------------------------------------------------------------------
void __fastcall TForm1::btnTransToLBXClick(TObject *Sender)
{
    char *WholeList = ListBox1->Items->GetText();
    Memo3->Lines->SetText(WholeList);
}
//---------------------------------------------------------------------------
|
This transfer of a list of strings from a ListBox, a ComboBox, a CheckListBox or a
RadioGroup controls to a text-based control such as a memo, a RichEdit or a label can also effectively be accomplished using the Text property. When you ask it to use the
Text property to perform a transfer, the compiler scans the list of items. At the end of each item, the compiler adds a carriage return (this is equivalent to the Enter key) and add the next string to the next line. This allows the compiler to create an
AnsiString object made of all of the strings. Here is an example:
//---------------------------------------------------------------------------
void __fastcall TForm2::btnTransferClick(TObject *Sender)
{
    Memo1->Lines->Add(ListBox1->Items->Text);
    Edit1->Text = ListBox1->Items->Text;
    Label1->Caption = ListBox1->Items->Text;
}
//---------------------------------------------------------------------------
|
As you can see, this transfer is not properly interpreted by the Edit control because this control does not have a multiple line capability while the
WordWrap property helps to manage the Label control.
Another technique used to most effectively transfer a list from a strictly list-based control, such as a
ListBox, a ComboBox or a RadioGroup control to a text-based control such as a memo or a
RichText control, is to use the CommaText property. When called to use this property, the compiler would scan the list of items. If an item is a one-word string, the compiler would write a comma “,” on its right and start adding the next item. If the item is a string made of more than one word, to delimit it, the compiler would enclose it with double-quotes. This is done until the last
string

In the following example, when the user clicks the Transfer button, the list of items from the
ListBox is transferred to both a memo and an edit box using the CommaText property:
//---------------------------------------------------------------------------
void __fastcall TForm1::btnTransferClick(TObject *Sender)
{
    Memo1->Lines->Add(ListBox1->Items->CommaText);
    Edit1->Text = ListBox1->Items->CommaText;
}
//---------------------------------------------------------------------------
|
If you decide to dismiss a whole list, use the Clear() method. Its syntax is:
Unlike the Delete() method, the Clear() function completely empties the list of items. Here is an example:
//---------------------------------------------------------------------------
void __fastcall TForm1::btnEmptyTheListClick(TObject *Sender)
{
    Memo1->Lines->Clear();
}
//---------------------------------------------------------------------------
|
The TStrings class appears to provide enough methods to perform any operation on any list of strings. Unfortunately, because
TStrings is an abstract class, you cannot declare an instance of it, which means that you cannot create a dynamic list of strings using the
TStrings class. That is one of the reasons you will use alternate classes to accomplish such a task.
The TStringList is derived from the TStrings class and adds new properties and methods for operations not possible on its parent. This is because the TStrings class can only fill out a list. It cannot independently manage the items of its own list; it relies on the control that uses it.
One of the strengths of the TStringList class is that, unlike the TStrings class, it is not associated with any control, not even a control that creates a list. Therefore, you are in charge of using it as you see fit. This also allows a
TStringList object to accommodate almost any control that uses a list. It also provides the primary means of exchanging items among controls of various kinds.
|
Creating a TStringList Object |
|
Because the TStringList class is not a property of any control, whenever you need it, you must create it dynamically. And because it is not a control, you only need the
new operator to declare an instance of a
TStringList class. The compiler does not need to know the parent or owner of the list. For the same reason, you have the responsibility of deleting the list when you do not need it anymore. Although lists are usually difficult to create and maintain, Borland did a lot of work behind the scenes so that the compiler can tremendously help you with your list.
To dynamically create a list, you must declare an instance of a TStringList class using the new operator. If you are planning to use the list inside of only one function or event, you can initiate the object as follows:
//---------------------------------------------------------------------------
void __fastcall TForm1::CreateAlist()
{
    TStringList *Categories = new TStringList;
}
//---------------------------------------------------------------------------
|
Such a list cannot be accessed outside of the event or function in which you created it. If you want the list to be available to more than one event or function, create it globally. This could be done on top of the source file. Here is an example:
//---------------------------------------------------------------------------
#include <vcl.h>
#pragma hdrstop
#include "Unit1.h"
//---------------------------------------------------------------------------
#pragma package(smart_init)
#pragma resource "*.dfm"
TForm1 *Form1;
TStringList *Categories = new TStringList;
//---------------------------------------------------------------------------
__fastcall TForm1::TForm1(TComponent* Owner)
    : TForm(Owner)
{
}
//---------------------------------------------------------------------------
|
This time, the list would be available to any event or function of the same source file. Other objects, events, or functions that are part
of other units (for example if you call this form from another form) other than this one cannot access the list. The alternative, sometimes the best one, is to declare the list variable in the header file of the primary unit that would manipulate or use it. This is done in the private, public or protected sections of the unit. If only one unit will use this list, declare the variable in the private section. By contrast, if more than one unit will need it, then declare it in the public section. This time, since you cannot initialize a variable in a class, only declare a pointer to a
TStringList class. Here is an example:
//---------------------------------------------------------------------------
#ifndef Unit1H
#define Unit1H
//---------------------------------------------------------------------------
#include <Classes.hpp>
#include <Controls.hpp>
#include <StdCtrls.hpp>
#include <Forms.hpp>
//---------------------------------------------------------------------------
class TForm1 : public TForm
{
__published: // IDE-managed Components
private:
    TStringList * Categories; // User declarations
public: // User declarations
    __fastcall TForm1(TComponent* Owner);
};
//---------------------------------------------------------------------------
extern PACKAGE TForm1 *Form1;
//---------------------------------------------------------------------------
#endif
|
After declaring such a variable, you should initialize it in a function or event that would be called prior to any other event or function using the list. Although this can be done in the
OnCreate() event of a form, probably the safest place to initialize the list is the constructor of the form. You will use the
new operator to initialize the variable. Here is an example:
//---------------------------------------------------------------------------
__fastcall TForm1::TForm1(TComponent* Owner) : TForm(Owner)
{
    Categories = new TStringList;
}
//---------------------------------------------------------------------------
|
Once you have created the list locally or globally, you can call any of its properties or methods to manipulate it.
|
Using a TStringList Object |
|
The fundamental difference between the TStrings and the TStringList
classes is that, besides the first being the parent of the second, you cannot create an instance of a TStrings class. Using the properties of inheritance, you can perform any operation on a
TStringList variable that you would perform on a TStrings object.
Like a TStrings list, the primary means of filling out a TStringList
object is by using either the Add() or the Append() methods. The
Append() method is only inherited. The syntax of the
TStringList::Add() method is:
int __fastcall Add(const AnsiString Source);
|
Once again, each item is added to the list as an AnsiString object. If the addition is successful, the method returns the position occupied by the
Source argument in the list. If the list was empty, Source would occupy the first position, which is 0 because the list is zero-based. If the list already had at least one item, the
Source argument would be added to the end of the existing items.
|
 Practical Learning: Creating a Dynamic List
|
|
- Start a new project with the default form
- Change the caption of the form to Date and Time and its name to Main
- To save the project, on the Standard toolbar, click the Save All button
- Create a new folder called DateAndTime
- Save the unit as Main
- Save the project as DateTimeDlg
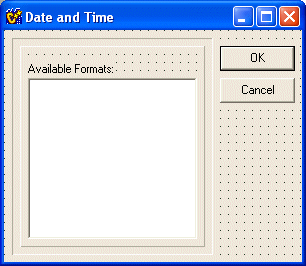
- Change the caption of the form to Date and Time and set its BorderStyle property to bsDialog
- Change the name of the form to DateAndTime
- Set the Height property of the form to approximately 266 and its Width to 306
- Add a Bevel control to the form. Set its Height to approximately 217 and set its Width to approximately 201
- Add another Bevel control inside the first one. Set its Style to bsRaised
- Add a label inside the interior bevel and set its caption to Available Formats:
- Add a ListBox control under the label but completely inside the interior bevel. Change the name of the listbox to lstFormats
- Add a button to the top right section of the form. Set its name to btnOK and its Default property to true. Change its Caption to OK
- Add another button under the OK buton. Change its name to btnCancel and set its Cancel property to true. Change its Caption to Cancel
- Because the date and time values must be set by the computer at the exact time the user needs a date or time value for a document, the list of dates and times of our dialog must be created dynamically.
Double-click an unoccupied area on the form to access its OnCreate event.
- Implement it as follows:
//---------------------------------------------------------------------------
void __fastcall TDateAndTime::FormCreate(TObject *Sender)
{
    TDateTime TodayDate = Date();
    TDateTime RightNow = Time();
    TStringList* DateList = new TStringList;

    try {
        DateList->Add(TodayDate);
        ShortDateFormat = "m/d/yy";
        DateList->Add(TodayDate);
        ShortDateFormat = "m/dd/yy";
        DateList->Add(TodayDate);
        ShortDateFormat = "m/dd/yyyy";
        DateList->Add(TodayDate);
        ShortDateFormat = "yy/m/dd";
        DateList->Add(TodayDate);
        DateSeparator = '-';
        ShortDateFormat = "yyyy/m/dd";
        DateList->Add(TodayDate);
        ShortDateFormat = "dd/mmm/yy";
        DateList->Add(TodayDate);
        LongDateFormat = "dddd";
        DateSeparator = ',';
        ShortDateFormat = "dddd/ mmmm dd/ yyyy";
        DateList->Add(TodayDate);
        ShortDateFormat = "mmmm dd/ yyyy";
        DateList->Add(TodayDate);
        ShortDateFormat = "dddd/ dd mmmm/ yyyy";
        DateList->Add(TodayDate);
        ShortDateFormat = "dd mmmm/ yyyy";
        DateList->Add(TodayDate);
        ShortTimeFormat = "h:n:s";
        DateList->Add(RightNow);
        ShortTimeFormat = "hh:nn:ss";
        DateList->Add(RightNow);
        LongTimeFormat = "HH:nn:ss";
        DateList->Add(RightNow);
        lstFormats->Items->AddStrings(DateList);
    }
    __finally
    {
        delete DateList;
        DateList = NULL;
    }
}
//---------------------------------------------------------------------------
|
- Save your project.
- To test the dialog box, on the Debug toolbar, click the Run button
Save your project.
- To test the dialog box, on the Debug toolbar, click the Run button
When it comes to creating a list, everything depends on what the list would be used for, what you want the list to accomplish, how much, and what kind of interaction the users would have with the list. As we saw already, there are three main categories of lists. The easiest lists tend to be those that only display items; the only options to the user could be to change how the list displays. The 2nd categories in difficulty are those the user would use to perform selections; these types are common in (desktop) database applications. Probably the most difficult of the lists are those that, either the users would create or the user would be allowed to edit the items or the list itself. The same advice would be given here: only provide the necessary tools to the user, not more not less.
|
TStrings and TStringList Based Lists |
|
As you know already, the VCL provides various classes for creating lists. It is very likely that one class would not be enough to handle all of the functionality you expect from your application. Therefore, you should know how and when to combine classes to assign the needed actions the user would need to perform.
The TStrings and the TStringList classes exchange information fairly easily. It is likely that you will have to use the TStringList class whenever you need a dynamic list. Then use the TStrings class to actually fill a list on a control.
|
 Practical Learning: String Lists Handling
|
|
- Start a new project with the default form
- To save the project, on the main menu, click File -> Save All
- Create a new folder named Travel Planning
- Save the unit as Main and save the project as TravelPlaning
- Change the caption of the form to Travel Planning and its name to
frmMain
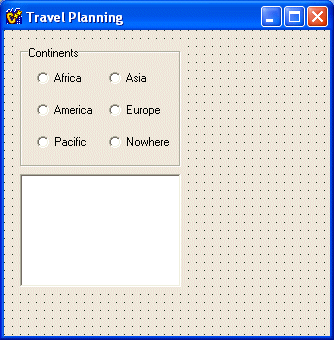
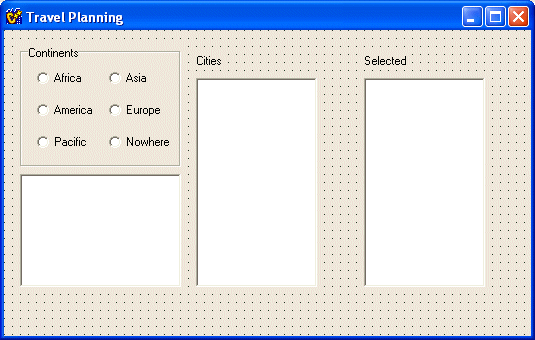
- To create a list of continents, add a GroupBox control to the top left section of the form. Change its caption to Continents
- Add six RadioButton controls named rdoAfrica, rdoAmerica, rdoPacific, rdoAsia, rdoEurope, and rdoNowhere as follows:

- Set each radio button’s caption by removing rdo from its name
- Save the project and test the functionality of the radio buttons by running the project. Return to Bcb
- To add our first list control, add a ListBox control under the GroupBox control.
- Change its name to lstCountries
- To create five lists variables, on the Class Explorer, expand the Classes folder. Double-click TfrmMain to access its header file.
- Declare the following TStringList variables:
//---------------------------------------------------------------------------
#ifndef MainH
#define MainH
//---------------------------------------------------------------------------
#include <Classes.hpp>
#include <Controls.hpp>
#include <StdCtrls.hpp>
#include <Forms.hpp>
//---------------------------------------------------------------------------
class TfrmMain : public TForm
{
__published: // IDE-managed Components
    TGroupBox *GroupBox1;
    TRadioButton *rdoAfrica;
    TRadioButton *rdoAmerica;
    TRadioButton *rdoAsia;
    TRadioButton *rdoEurope;
    TRadioButton *rdoPacific;
    TRadioButton *rdoNowhere;
    TListBox *lstCountries;
private: // User declarations
public:
    TStringList* Africa;
    TStringList* America;
    TStringList* Asia;
    TStringList* Europe;
    TStringList* Pacific; // User declarations
    __fastcall TfrmMain(TComponent* Owner);
};
//---------------------------------------------------------------------------
extern PACKAGE TfrmMain *frmMain;
//---------------------------------------------------------------------------
#endif
|
- On the Code Editor, click the Main.cpp tab. In the form’s constructor, initialize the variables as follows:
//---------------------------------------------------------------------------
#include <vcl.h>
#pragma hdrstop
#include "Main.h"
//---------------------------------------------------------------------------
#pragma package(smart_init)
#pragma resource "*.dfm"
TfrmMain *frmMain;
//---------------------------------------------------------------------------
__fastcall TfrmMain::TfrmMain(TComponent* Owner)
    : TForm(Owner)
{
    Africa = new TStringList;
    America = new TStringList;
    Asia = new TStringList;
    Europe = new TStringList;
    Pacific = new TStringList;
}
//---------------------------------------------------------------------------
|
- Press F12 to access the form. Double-click an empty area on the form to access its OnCreate event. Implement it as follows:
//---------------------------------------------------------------------------
void __fastcall TfrmMain::FormCreate(TObject *Sender
{
    // Create a list of countries for each continent
    Africa->Add("Cameroon");
    Africa->Add("Lybia");
    Africa->Add("Botswana");
    Africa->Add("Morocco");

    America->Add("Argentina");
    America->Add("Haiti");
    America->Add("USA");
    America->Add("Uruguay");

    Asia->Add("Thailand");
    Asia->Add("Sri Lanka");
    Asia->Add("Iraq");
    Asia->Add("Japan");
    Asia->Add("Bangla Desh");

    Europe->Add("Denmark");
    Europe->Add("Italy");
    Europe->Add("Greece");
    Pacific->Add("New Zealand");
    Pacific->Add("Australia");

    // Select or at least make sure that one radio button is selected
    rdoAfrica->Checked = True;
}
//---------------------------------------------------------------------------
|
- With each continent filled with a few countries, we need to fill out the list of countries depending on the continent that is selected in the GroupBox.
Press F12 to display the form. On the form, double-click the Africa radio button to access its OnClick event.
- Access the form again. Double-click each one of the other radio buttons and implement them as follows:
//---------------------------------------------------------------------------
void __fastcall TfrmMain::rdoAfricaClick(TObject *Sender)
{
    lstCountries->Items->AddStrings(Africa);
    lstCountries->ItemIndex = 0;
}
//---------------------------------------------------------------------------
void __fastcall TfrmMain::rdoAmericaClick(TObject *Sender)
{
    lstCountries->Items->AddStrings(America);
    lstCountries->ItemIndex = 0;
}
//---------------------------------------------------------------------------
void __fastcall TfrmMain::rdoPacificClick(TObject *Sender)
{
    lstCountries->Items->AddStrings(Pacific);
    lstCountries->ItemIndex = 0;
}
//---------------------------------------------------------------------------
void __fastcall TfrmMain::rdoAsiaClick(TObject *Sender)
{
    lstCountries->Items->AddStrings(Asia);
    lstCountries->ItemIndex = 0;
}
//---------------------------------------------------------------------------
void __fastcall TfrmMain::rdoEuropeClick(TObject *Sender)
{
    lstCountries->Items->AddStrings(Europe);
    lstCountries->ItemIndex = 0;
}
//---------------------------------------------------------------------------
|
- Save your project.
- To test the project, on the main menu, click Run ª Run.
- Click various radio buttons and verify that the list of countries changes everytime a new continent is selected. Actually, we have a small problem. When a continent is selected, we need to display only the countries that are part of that continent. Close the form to return to Bcb
- In the Code Editor, add the highlighted line on top of the OnClick event for each radio button:
//---------------------------------------------------------------------------
void __fastcall TfrmMain::rdoAfricaClick(TObject *Sender)
{
    // When a new continent is selected, empty the list of countries
    // to make sure that countries are not mixed
    lstCountries->Clear();
    lstCountries->Items->AddStrings(Africa);
    lstCountries->ItemIndex = 0;
}
//---------------------------------------------------------------------------
|
- On the form, double-click the Nowhere radio button to access its OnClick event and implement it as follows:
//---------------------------------------------------------------------------
void __fastcall TfrmMain::rdoNowhereClick(TObject *Sender)
{
    lstCountries->Clear();
}
//---------------------------------------------------------------------------
|
- Save your project.
- Test the project. This time, each radio button controls its list of countries. Close the form.
- Now we need to display the countries associated with each continent.
Add a label on the right side of the GroupBox. Set its caption to Cities
- Add ListBox control to the form. Change its name to lstCities

- To fill out the list of cities, we will rely on the country that was selected in the Countries
listbox.
On the form, double-click the Countries listbox to access its OnClick event. Implement it as follows:
//---------------------------------------------------------------------------
void __fastcall TfrmMain::lstCountriesClick(TObject *Sender)
{
    // Since a new country has been selected, empty the list of cities
    lstCities->Clear();
    // If a country is selected, get its name, instead of its position
    AnsiString Selected =
        lstCountries->Items->Strings[lstCountries->ItemIndex].c_str();
    // Create a list of cities for each country
    // and fill out the Cities list with this list
    if(Selected == "Cameroon")
    {
        lstCities->Items->Add("Ebolowa");
        lstCities->Items->Add("Ngaoundere");
        lstCities->Items->Add("Batouri");
        lstCities->Items->Add("Bamenda");
    }
    else if(Selected == "Senegal")
    {
        lstCities->Items->Add("Thiès");
        lstCities->Items->Add("Kaolack");
        lstCities->Items->Add("Dakar");
    }
    else if(Selected == "USA")
    {
        lstCities->Items->Add("Atlanta");
        lstCities->Items->Add("Boston");
        lstCities->Items->Add("Miami");
        lstCities->Items->Add("San Diego");
        lstCities->Items->Add("Chicago");
    }
    else if(Selected == "Haiti")
    {
        lstCities->Items->Add("Port-de-Paix");
        lstCities->Items->Add("Les Cayes");
        lstCities->Items->Add("Jérémie");
        lstCities->Items->Add("Port-Au-Prince");
        lstCities->Items->Add("Jacmel");
    }

    // Select the first city in the list of cities
    // This reduces the possibility of an error due to no selected city
    lstCities->ItemIndex = 0;
}
//---------------------------------------------------------------------------
|
- Test the project. Select different radio buttons and different countries. Make sure that the lists change correcty. The problem we have at this time is that, although we have configured the list of Cities to display Cameroonian cities when that country is selected, When the form opens, even though Cameroon is selected, its cities are not displaying in the Cities list.
- Close the form.
- If the form is not displaying, press F12. Click an unoccupied area of the form to select the form. On the Object inspector, click the Events tab. Double-click the empty area on the right side of OnActivate and implement it as follows:
//---------------------------------------------------------------------------
void __fastcall TfrmMain::FormActivate(TObject *Sender)
{
    // Behave as if the Countries list had been clicked
    lstCountriesClick(Sender);
}
//---------------------------------------------------------------------------
|
- Test the program again. This time, the cities of the country selected always display in the Cities listbox. Click different countries.
- Close the form and return to Bcb.
- Now, we will allow the user to select cities from the Cities listbox and create a list of cities to visit.
Add a new label to the right side of the Cities label. Set its caption to Selected
- Add a new ListBox control under the Selected: label. Change its name to lstSelected
- Fundamentally, the user can use a button to select a city and put it in a new list. If the list is empty, the item will be the first in the list. If the list already contains a city, the new city will be added to the end of the existing one(s). To make our application more useful, we will let the user decide whether to add the new item on top or under a selected item already in the list.
Add a new button between the right list boxes. Change its name to btnAddAbove and set its Caption to >
- Double-click the new button and implement its OnClick event as follows:
//---------------------------------------------------------------------------
void __fastcall TfrmMain::btnAddAboveClick(TObject *Sender)
{
    // Since a city was selected, get its string (its name)
    AnsiString NewCity = lstCities->Items->Strings[lstCities->ItemIndex];
    // add the new item to the end of the list
    lstSelected->Items->Add(NewCity);
}
//---------------------------------------------------------------------------
|
- To make our program more user friendly, besides clicking an item from the Cities list, we will also allow the user to double-click an item to add it to the Selected list. Instead of writing code to implement this, we can just use code that has already been written.
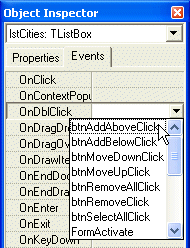
Press F12 to access the form. On the form, click the Cities listbox to select it. On the Object Inspector, click the Events tab.
- Click the OnDblClick field to reveal its combo box. Click the arrow of the
combo box and select btnAddAboveClick:
- Test the program. Select different continents, different countries, and different cities. Also, click the button just added. Observe that, although the button can create a list of cities effectively, the problem is that it duplicates them. The application we are creating allows the user to select cities to travel. There is no reason a city should be added twice: we need to prevent a city from being added if it exists in the Selected list already.
- Close the form and return to Bcb.
- To check whether a city exists already in the Selected list, we will call the
TStrings::IndexOf() by providing the name of the city we are looking for. If
IndexOf() does not find the string, then we will add it.
Change the OnClick event of the AddAbove button as follows:
//---------------------------------------------------------------------------
void __fastcall TfrmMain::btnAddAboveClick(TObject *Sender)
{
    // Since a city was selected, get its string (its name)
    AnsiString NewCity =
        lstCities->Items->Strings[lstCities->ItemIndex].c_str();

    // find out whether the new string already exists in the Selected list
    // If if does, we will not add it
    if(lstSelected->Items->IndexOf(NewCity) == -1)
    {
        // add the new item to the end of the list
        lstSelected->Items->Add(NewCity);
    }
}
//---------------------------------------------------------------------------
|
- Test the project again. After making sure that no city gets duplicated in the Selected list, close the form and return to Bcb.
- By the way, we had decided to let the user add a city above another city in the Selected list. This allows the user to prioritize the places to travel. In order to control this order, the user should first select a city. Using the Add Above button, we will insert the new city above the selected one, of course provided the new city is not already in the Selected list.
Change the OnClick event of the AddAbove button as follows:
//---------------------------------------------------------------------------
void __fastcall TfrmMain::btnAddAboveClick(TObject *Sender)
{
    // Find out if a city is selected in the Cities list
    if(lstCities->ItemIndex != -1)
    {
        // Since a city was selected, get its string (its name)
        AnsiString NewCity =
            lstCities->Items->Strings[lstCities->ItemIndex].c_str();
        // Find out whether the new string already exists in the Selected list
        // If if does, we will not add it
        if(lstSelected->Items->IndexOf(NewCity) == -1)
        {
            // Now find out if a city was chosen in the Selected list,
            if(lstSelected->ItemIndex != -1)
            {
                // then, allow the user to insert the new item
                // on top of the selected one
                lstSelected->Items->Insert(lstSelected->ItemIndex, NewCity);
                // Select the newly added city
                lstSelected->ItemIndex = lstSelected->ItemIndex - 1;
            }
            else // Since no city was selected, add the new one at the end
            {
                // add the new item to the end of the list
                lstSelected->Items->Add(NewCity);
            }
        }
    }
}
//---------------------------------------------------------------------------
|
- Test the project to make sure it works fine. Test that the user can select an already added city in the Selected list and then insert a city above it. Close the form to Bcb.
- Save your project.
- In the same way, we will allow the user to insert a city under a selected one in the Selected listbox.
Add a new button under the AddAbove button. Change its name to btnAddBelow and set its caption to _

- Double-click the new button and implement it as follows:
//---------------------------------------------------------------------------
void __fastcall TfrmMain::btnAddBelowClick(TObject *Sender)
{
    if(lstCities->ItemIndex != -1) // find out if a city is selected
    {
        // Since a city was selected, get its string (its name)
        AnsiString NewCity =
            lstCities->Items->Strings[lstCities->ItemIndex].c_str();
        // find out whether the new string already exists in the Selected list
        // If if does, we will not add it
        if(lstSelected->Items->IndexOf(NewCity) == -1)
        {
            if(lstSelected->ItemIndex != -1)
            {
                // If a city was chosen in the Selected list,
                // allow the user to insert the new item on top of
                // the selected one
                lstSelected->Items->Insert(lstSelected->ItemIndex + 1,
                                           NewCity);

                // Select the newly added city
                lstSelected->ItemIndex = lstSelected->ItemIndex + 1;
            }
            else
            {
                // add the new item to the end of the list
                lstSelected->Items->Add(NewCity);
            }
        }
    }
}
//---------------------------------------------------------------------------
|
- Since we have allowed the user to add one item at a time, if the user wants to visit all cities of a certain country, we will let the user select all cities and add them to the Selected list.
Add a new button under the AddBelow button. Change its name to btnSelectAll and its caption to >>
- When the user decides to add all cities to the Selected listbox, although we can just call the
TStrings::AddStrings() method to perform this job, it is possible that the Selected listbox already contains a certain city the user wants to add. For example, if a user selects a city X from a country A, then selects another city from country B, and then comes back to country A, since country A would display all of its cities, the user would have selected city A already. Once again, we need to prevent a certain city from being added twice to the Selected list.
Double-click the new button and implement its OnClick event as follows:
//---------------------------------------------------------------------------
void __fastcall TfrmMain::btnSelectAllClick(TObject *Sender)
{
    // We need to prevent the same city from being added twice
    // to the Selected list.
    // Initiate a scanning of all items of the Cities list
    for(int i = 0; i < lstCities->Items->Count; i++)
    {
        // Give the name City to each item of the Cities list
        AnsiString City = lstCities->Items->Strings[i].c_str();

        // Find out if the Selected list is empty
        if(lstSelected->Items->Count == 0) // then fill it with the cities
            lstSelected->Items->AddStrings(lstCities->Items);
        else // Since there is at least one item in the Selected list,
        {
            // Initiate the process of scanning each item of the Selected list
            for(int j = 0; j < lstSelected->Items->Count; j++)
            {
                // If an item of the Cities list is not in the Selected list,
                if(lstSelected->Items->IndexOf(City) == -1 )
                {
                    // then add it to the Selected list, ignoring any match
                    lstSelected->Items->Add(City);
                }
            }
        }
    }

    // Select the last item of the Selected list
    lstSelected->ItemIndex = lstSelected->Items->Count - 1;
}
//---------------------------------------------------------------------------
|
- The buttons we just added are used to add items to the Selected listbox. For example, the AddBelow button is used to insert a city under a selected one in the Selected listbox. If no item exists or no city is selected in the Selected listbox, we do not need this button. Therefore, we are going to disable it whenever we do not need this button. While we are at it, we will also disable the AddAbove and SelectAll buttons whenever we do not need them. This makes our program more professional and lets the user know what actions are available at a certain time.
On the form, click the AddBelow button to select it. In the Object Inspector, set its Enabled property to false.
- Here is the current situation with our buttons. We our list system to display no countries when the Nowhere button is selected. When a new continent is selected using its radio button, if we do not have cities for the selected country in the Countries
listbox, we empty the Cities listbox; otherwise, we fill it out with the cities of the selected country. To avoid exception errors from the Cities
listbox, we need to disable the unneeded buttons. Finally, whenver a new country is selected, before displaying its cities, we should empty the Cities
listbox. Since every radio button needs to check these values, we will just create a function that the needed controls can call to check what they want.
On the Class Explorer, right-click the TfrmMain class and click New Method…
- Set the name to ControlTheLists and make sure the Class Name is TfrmMain. Set the Function Result to void and click the
__fastcall
check box. Click OK.
- Implement the function as follows:
//---------------------------------------------------------------------------
void __fastcall TfrmMain::ControlTheLists()
{
    // When a new continent is selected, empty the list of countries
    // to make sure that countries are not mixed
    lstCountries->Clear();
    // Since a new item country has been selected, empty the list of cities
    lstCities->Clear();

    // If a city is selected, whose prerequisite is that
    // the Cities list not be empty in the first place
    if(lstCities->ItemIndex != -1)
    {
        // enable the selection buttons
        btnAddAbove->Enabled = True;
        btnSelectAll->Enabled = True;
    }
    else // Otherwise, either no city is selected or the list is empty
    {
        // disable the selection buttons
        btnAddAbove->Enabled = False;
        btnSelectAll->Enabled = False;
    }
}
//---------------------------------------------------------------------------
|
- To make this function available to needing events, call it on top of the OnClick event of each radio as follows:
//---------------------------------------------------------------------------
void __fastcall TfrmMain::rdoAfricaClick(TObject *Sender)
{
    ControlTheLists();
    lstCountries->Items->AddStrings(Africa);
    lstCountries->ItemIndex = 0;
}
//---------------------------------------------------------------------------
void __fastcall TfrmMain::rdoAmericaClick(TObject *Sender)
{
    ControlTheLists();
    lstCountries->Items->AddStrings(America);
    lstCountries->ItemIndex = 0;
}
//---------------------------------------------------------------------------
void __fastcall TfrmMain::rdoPacificClick(TObject *Sender)
{
    ControlTheLists();
    lstCountries->Items->AddStrings(Pacific);
    lstCountries->ItemIndex = 0;
}
//---------------------------------------------------------------------------
void __fastcall TfrmMain::rdoAsiaClick(TObject *Sender)
{
    ControlTheLists();

    lstCountries->Items->AddStrings(Asia);
    lstCountries->ItemIndex = 0;
}
//---------------------------------------------------------------------------
void __fastcall TfrmMain::rdoEuropeClick(TObject *Sender)
{
    ControlTheLists();

    lstCountries->Items->AddStrings(Europe);
    lstCountries->ItemIndex = 0;
}
//---------------------------------------------------------------------------
void __fastcall TfrmMain::rdoNowhereClick(TObject *Sender)
{
    ControlTheLists();
    lstCountries->Clear();

    // When the user clicks this button, both the Countries and the Cities
    // lists are emptied. Therefore, we don't need the AddBelow button
    btnAddBelow->Enabled = False;
}
//---------------------------------------------------------------------------
|
- At this time, the buttons have been disabled, we need to find out when and where they should be enabled and disabled.
At the bottom of the OnCreate event of the form, add the following commented code:
// Select or at least make sure that one radio button is selected
    rdoAfrica->Checked = True;
    // Since the list of cities is empty at this time,
    // disable the selection buttons
    btnAddAbove->Enabled = False;
    btnSelectAll->Enabled = False;
}
//---------------------------------------------------------------------------
|
- At the bottom of the OnClick event of the Countries list box, add the following self-explanatory code:
// Select the first city in the list of cities
    // This reduces the possibility of an error due to no selected city
    lstCities->ItemIndex = 0;

    // If there is something in the list of cities,
    // which is equivalent to the list not being empty
    if(lstCities->Items->Count > 0)
    {
        // enable the selection buttons
        btnAddAbove->Enabled = True;
        btnSelectAll->Enabled = True;
    }
    else // When the list of cities is empty
    {
        // disable the add and selection buttons
        btnAddAbove->Enabled = False;
        btnAddBelow->Enabled = False;
        btnSelectAll->Enabled = False;
    }
}
//---------------------------------------------------------------------------
|
- On the form, double-click the Selected list to access its OnClick event. Implement it as follows (the comments have been added to explain why):
//---------------------------------------------------------------------------
void __fastcall TfrmMain::lstSelectedClick(TObject *Sender)
{
    // Apparently the user has made a selection in the Selected list
    // Maybe the user did not select anything. Well, find out
    if(lstSelected->ItemIndex != -1)
    {
        // Since the user made a selection,
        // change the caption of the AddAbove button
        btnAddAbove->Caption = "^";
        // Enable the AddBelow button btnAddBelow->Enabled = True;
    }
}
//---------------------------------------------------------------------------
|
- Save your project and test it. Make sure you can add cities. Also make sure that the selection button are enabled and disabled when necessary. Close the form
just as we had allowed the user to add cities to the Selected list, we need to let the user removed the unneeded cities to create a better list.
- Add a new button under the SelectAll button. Change its name to btnRemove and its caption to R
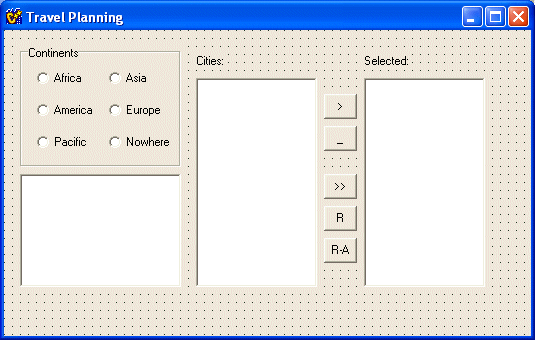
- In order to remove a city, the user must have selected one. Therefore, this would be the first condition to check. Then, since a selected item will have been removed, we need to select another, just in case the user would like to remove more than one.
Double-click the R button to access its OnClick event and implement it as follows:
//---------------------------------------------------------------------------
void __fastcall TForm1::btnRemoveClick(TObject *Sender)
{
    // Get the position of the currently selected item
    int Selected = lstSelected->ItemIndex;
    // Since an item is selected already due to previous code
    // remove it from the list
    lstSelected->Items->Delete(lstSelected->ItemIndex);
    // After an item has been removed, get the position of
    // the item that was under it int Sel = Selected - 1;
    // Whenever an item has been removed from the Selected list,
    // select the item that was under it
    // Before making this selection, make sure that there is at least
    // one item in the Selected list
    if(Selected == lstSelected->Items->Count)
    {
        lstSelected->ItemIndex = Sel;
    }
    else
    {
        // Since the top item was selected, select the first item now
        lstSelected->ItemIndex = 0;
    }
    // If there are no more items in the Selected list,
    // then disable the Remove button
    if(lstSelected->Items->Count == 0)
    {
        btnRemove->Enabled = False;
    }
}
//---------------------------------------------------------------------------
|
- To allow the user to remove all selected cities, add another button under the R button. Change its name to btnRemoveAll and its caption to R-A
- Double-click the R-A button to access its OnClick event and implement it as follows:
//---------------------------------------------------------------------------
void __fastcall TfrmMain::btnRemoveAllClick(TObject *Sender)
{
    // Remove everything from the Selected list
    lstSelected->Clear();
    // Since the Selected listbox has become empty,
    // we don't need the removing buttons anymore
    btnRemove->Enabled = False;
    btnRemoveAll->Enabled = False;
}
//---------------------------------------------------------------------------
|
- Once again, we need to know when the new buttons should be available or not. To start, when the form loads, the Selected list is empty. Since there is nothing to remove, we do not need these buttons. Therefore, change the bottom section of the form’s OnCreate event as follows:
    // Select or at least make sure that one radio button is selected
    rdoAfrica->Checked = True;
    // Since the list of cities is empty at this time,
    // disable the selection buttons
    btnAddAbove->Enabled = False;
    btnSelectAll->Enabled = False;
    btnRemove->Enabled = False;
    btnRemoveAll->Enabled = False;
}
//---------------------------------------------------------------------------
|
- When using the AddAbove button, whenever an item is added to the Selected list, we can enable the remove buttons in case the user wants to remove the selected city.
//---------------------------------------------------------------------------
void __fastcall TfrmMain::btnAddAboveClick(TObject *Sender)
{
    // Find out if a city is selected in the Cities list
    if(lstCities->ItemIndex != -1)
    {
        // Since a city was selected, get its string (its name)
        AnsiString NewCity =
            lstCities->Items->Strings[lstCities->ItemIndex].c_str();

        // find out whether the new string already exists in the Selected list
        // If if does, we will not add it
        if(lstSelected->Items->IndexOf(NewCity) == -1)
        {
            // Now find out if a city was chosen in the Selected list,
            if(lstSelected->ItemIndex != -1)
            {
                // then, allow the user to insert the new item
                // on top of the selected one
                lstSelected->Items->Insert(lstSelected->ItemIndex, NewCity);
                // Select the newly added city
                lstSelected->ItemIndex = lstSelected->ItemIndex - 1;
            }
            else // Since no city was selected, add the new one at the end
            {
                // add the new item to the end of the list
                lstSelected->Items->Add(NewCity);
            }

            // Since at least one item has been added to the Selected list,
            // enable the buttons used to remove items from the Selected list
            btnRemove->Enabled = True; btnRemoveAll->Enabled = True;
        }
    }
}
//---------------------------------------------------------------------------
|
- In the same way, when the SelectAll button has been used to add items to the Selected
clist, we can enable the remove button. At the bottom section of the OnClick event of the SelectAll button, add the following:
    // Select the last item of the Selected list
    lstSelected->ItemIndex = lstSelected->Items->Count - 1;
    // Since some items have been added to the Selected list,
    // enable the buttons used to remove items from the Selected list
    btnRemove->Enabled = True;
    btnRemoveAll->Enabled = True;
}
//---------------------------------------------------------------------------
|
- We know that the user keeps removing items one by one using the R button, after all items have been removed, we do not need the R-A button. Therefore, we can disable it as follows:
    // If there are no more items in the Selected list,
    // then disable the Remove buttons
    if(lstSelected->Items->Count == 0)
    {
        btnRemove->Enabled = False;
        btnRemoveAll->Enabled = False;
    }
}
//---------------------------------------------------------------------------
|
- Test your project. Perform a few selections and removals. Close the form.
- Save your project.
- This time, we will allow the user to move cities and down in the Selected listbox, event the user could do it indirectly by playing with the add and remove buttons.
Add a new button on the right side of the Selected button. Change its name to btnMoveUp and its caption to /\
- Add one more button to the form, this time position it below the /\ button. Change its name to btnMoveDown and its caption to \/
- Set the Enabled property of both buttons to false (when the form opens, we cannot move items; which means we do not need them).
- Double-click the MoveUp button and implement its OnClick event as follows (the comments give necessary explanations):
//---------------------------------------------------------------------------
void __fastcall TfrmMain::btnMoveUpClick(TObject *Sender)
{
    // Get the position of the currently selected item int
    CurItem = lstSelected->ItemIndex;

    // To make sure the application does not throw a nasty error,
    // alsways make sure that, either the moveUp button is disabled
    // Or an item under the first one is selected
    if(CurItem == 1)
    {
        btnMoveUp->Enabled = False;
        lstSelected->ItemIndex = 0;
    }
    else
    {
        // Swap the selected item to tye one above it
        lstSelected->Items->Move(CurItem, CurItem - 1);

        // Follow the item that was selected
        lstSelected->ItemIndex = CurItem - 1;
    }

    // Just in case the MoveDown button was disabled, if the selected item
    // is not at the bottom of the list, then enable the MoveDown button
    if(CurItem < lstSelected->Items->Count)
        btnMoveDown->Enabled = True;
}
//---------------------------------------------------------------------------
|
- Access the form and double-click the MoveDown button. Implement its OnClick event as follows:
//---------------------------------------------------------------------------
void __fastcall TfrmMain::btnMoveDownClick(TObject *Sender)
{
    // Get the position of the currently selected item
    int CurItem = lstSelected->ItemIndex;
    // If the user successfully clicked this button, this means the
    // MoveUp button can work. Still, if the selected item is not
    // the most top item, then enable the MoveUp button
    if(CurItem >= 0)
        btnMoveUp->Enabled = True;

    int HowMany = lstSelected->Items->Count - 1;
    if(CurItem == HowMany - 1)
    {
        btnMoveDown->Enabled = False;
        lstSelected->ItemIndex = HowMany;
    }
    else
    {
        // Swap the selected item to tye one above it
        lstSelected->Items->Move(CurItem, CurItem + 1);
        // Follow the item that was selected
        lstSelected->ItemIndex = CurItem + 1;
    }
}
//---------------------------------------------------------------------------
|
- Again, we need to decide when and where these buttons should be enabled or not. Remember that when the user has selected all cities and added them to the Selected list, a city should be selected. Therefore, it becomes time to enable the move buttons.
At the bottom of the OnClick event of the SelectAll button, add the following:
// Since some items have been added to the Selected list,
    // enable the buttons used to remove items from the Selected list
    btnRemove->Enabled = True;
    btnRemoveAll->Enabled = True;

    // Also enable the buttons used to move items of the Selected list
    btnMoveUp->Enabled = True;
    btnMoveDown->Enabled = True;
}
//---------------------------------------------------------------------------
|
- Save your project and test it.
|
|


