|
while Considering a Condition
|
|
|
while a Condition is True
|
|
The C++ language provides a set of control
statements that allows you to conditionally control data input and
output. These controls are referred to as loops.
The while statement examines or evaluates a
condition. The syntax of the while statement is:
while(Condition) Statement;
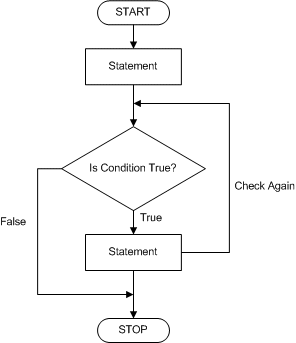
To execute this expression, the compiler first
examines the Condition. If the Condition is true, then it
executes the Statement. After executing the Statement, the Condition is
checked again. AS LONG AS the Condition is true, it will keep
executing the Statement. When or once the Condition
becomes false, it exits the loop:

Here is an example:
int Number;

while( Number <= 12 )
{
	cout << "Number " << Number << endl;
	Number++;
}
To effectively execute a while condition, you
should make sure you provide a mechanism for the compiler to use a get a
reference value for the condition, variable, or expression being
checked. This is sometimes in the form of a variable being initialized
although it could be some other expression. Such a while
condition could be illustrated as follows:

An example would be:
//---------------------------------------------------------------------------
#include <iostream>
#include <conio>
using namespace std;
#pragma hdrstop

//---------------------------------------------------------------------------

#pragma argsused
int main(int argc, char* argv[])
{
    int Number;

    while( Number <= 12 )
    {
	cout << "Number " << Number << endl;
	Number++;
    }

    cout << "\nPress any key to continue...";
    getch();
    return 0;
}
//---------------------------------------------------------------------------
|
 Practical Learning: Using the while Statement
|
| |
- Change the file as follows:
//---------------------------------------------------------------------------
#include <iostream>
#include <conio>
using namespace std;
#pragma hdrstop

//---------------------------------------------------------------------------

#pragma argsused
int main(int argc, char* argv[])
{
    int Timer = 0;

    while(Timer <= 5)
    {
	cout << Timer << ". Yellow Light - Be Careful!\n";
	Timer++;
    }
    cout << "\nYellow light ended. Please Stop!!!\n";

    cout << "\nPress any key to continue...";
    getch();
    return 0;
}
//---------------------------------------------------------------------------
|
- Test the program and return to your programming environment.
|
|
do This while a Condition is True
|
| |
The do…while statement uses the following
syntax:
do Statement while (Condition);
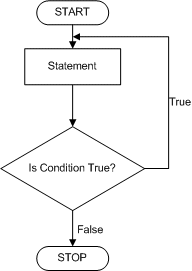
The do…while condition executes a Statement
first. After the first execution of the Statement, it examines
the Condition. If the Condition is true, then it executes
the Statement again. It will keep executing the Statement
AS LONG AS the Condition is true. Once the Condition
becomes false, the looping (the execution of the Statement) would
stop.
If the Statement is a short one, such as made
of one line, simply write it after the do keyword. Like the if
and the while statements, the Condition being checked must
be included between parentheses. The whole do…while statement
must end with a semicolon.

Another version of the counting program seen
previously would be:
//---------------------------------------------------------------------------
#include <iostream>
#include <conio>
using namespace std;
#pragma hdrstop

//---------------------------------------------------------------------------

#pragma argsused
int main(int argc, char* argv[])
{
    int Number = 0;

    do
	cout << "Number " << Number++ << endl;
    while( Number <= 12 );

    cout << "\nPress any key to continue...";
    getch();
    return 0;
}
//---------------------------------------------------------------------------
If the Statement is long and should span more than
one line, start it with an opening curly braket and end it with a
closing curly bracket.
The do…while statement can be used to
insist on getting a specific value from the user. For example, since our
ergonomic program would like the user to sit down for the subsequent
exercise, you can modify your program to continue only once she is
sitting down. Here is an example on how you would accomplish that:
//---------------------------------------------------------------------------
#include <iostream>
#include <conio>
using namespace std;
#pragma hdrstop

//---------------------------------------------------------------------------

#pragma argsused
int main(int argc, char* argv[])
{
    char SittingDown;

    cout << "For the next exercise, you need to be sitting down\n";
    do {
	cout << "Are you sitting down now(y/n)? ";
	cin >> SittingDown;
    }
    while( !(SittingDown == 'y') );

    cout << "\nWonderful!!!";
    cout << "\nPress any key to continue...";
    getch();
    return 0;
}
//---------------------------------------------------------------------------
|
 Practical Learning: Using The do…while Statement
|
| |
- To apply a do…while statement to our traffic program,
change the file as follows:
//---------------------------------------------------------------------------
#include <iostream>
#include <conio>
using namespace std;
#pragma hdrstop

//---------------------------------------------------------------------------

#pragma argsused
int main(int argc, char* argv[])
{
    char Answer;

    do {
	cout << "Check the light: is it green yet(1=Yes/0=No)? ";
	cin >> Answer;
    } while(Answer != '1');

	cout << "\nNow, you can proceed and drive through!\n";
    cout << "\nPress any key to continue...";
    getch();
    return 0;
}
//---------------------------------------------------------------------------
|
- Test the program. Here is an example:
Check the light: is it green yet(1=Yes/0=No)? 5
Check the light: is it green yet(1=Yes/0=No)? b
Check the light: is it green yet(1=Yes/0=No)? y
Check the light: is it green yet(1=Yes/0=No)? s
Check the light: is it green yet(1=Yes/0=No)? 0
Check the light: is it green yet(1=Yes/0=No)? 1

Now, you can proceed and drive through!
Press any key continue...
|
- Return to your programming environment.
- Save your project.
|
The for statement is typically used to count
a number of items. At its regular structure, it is divided in three
parts. The first section specifies the starting point for the count. The
second section sets the counting limit. The last section determines the
counting frequency. The syntax of the for statement is:
for( Start; End; Frequency) Statement;
The Start expression is a variable assigned the
starting value. This could be Count = 0;
The End expression sets the criteria for ending the counting. An example
would be Count < 24; this means the counting would continue as long
as the Count variable is less than 24. When the count is about to rich
24, because in this case 24 is excluded, the counting would stop. To
include the counting limit, use the <= or >= comparison operators
depending on how you are counting. The Frequency expression would let
the compiler know how many numbers to add or subtract before continuing
with the loop. This expression could be an increment operation such as
++Count.
Here is an example that applies the for statement:
|
//---------------------------------------------------------------------------
#include <iostream>
#include <conio>
using namespace std;
#pragma hdrstop

//---------------------------------------------------------------------------

#pragma argsused
int main(int argc, char* argv[])
{
    for(int Count = 0; Count <= 12; Count++)
	cout << "Number " << Count << endl;

    cout << "\nPress any key to continue...";
    getch();
    return 0;
}
//---------------------------------------------------------------------------
|
|
The C++ compiler recognizes that a variable declared
as the counter of a for loop is available only in that for loop. This
means the scope of the counting variable is confined only to the for
loop. This allows different for loops to use the same counter variable.
Here is an example:
|
|
//---------------------------------------------------------------------------
#include <iostream>
#include <conio>
using namespace std;
#pragma hdrstop

//---------------------------------------------------------------------------

#pragma argsused
int main(int argc, char* argv[])
{
    for(int Count = 0; Count <= 12; Count++)
	cout << "Number " << Count << endl;
    cout << endl;

    for(int Count = 10; Count >= 2; Count--)
	cout << "Number " << Count << endl;

    cout << "\nPress any key to continue...";
    getch();
    return 0;
}
//---------------------------------------------------------------------------
|
|
Some compilers do not allow the same counter
variable in more than one for loop. The counter variable’s scope spans
beyond the for loop. With such a compiler, you must use a different
counter variable for each for loop. An alternative to using the same
counter variable in different for loops is to declare the counter
variable outside of the first for loop and call the variable in the
needed for loops. Here is an example:
|
|
//---------------------------------------------------------------------------
#include <iostream>
#include <conio>
using namespace std;
#pragma hdrstop

//---------------------------------------------------------------------------

#pragma argsused
int main(int argc, char* argv[])
{
    int Count;

    for(Count = 0; Count <= 12; Count++)
	cout << "Number " << Count << endl;
    cout << endl;

    for(Count = 10; Count >= 2; Count--)
	cout << "Number " << Count << endl;

    cout << "\nPress any key to continue...";
    getch();
    return 0;
}
//---------------------------------------------------------------------------
|
|
 Practical Learning: Using the for Statement Practical Learning: Using the for Statement
|
| |
- To apply the for statement to our traffic program, change
the file as follows:
//---------------------------------------------------------------------------
#include <iostream>
#include <conio>
using namespace std;
#pragma hdrstop

//---------------------------------------------------------------------------

#pragma argsused
int main(int argc, char* argv[])
{
    int Timer;

    for( Timer = 0; Timer <= 5; ++Timer)
	cout << Timer << ". Yellow Light - Be Careful!\n";
    cout << "\nYellow light ended. Please Stop!!!\n";

    cout << "\nPress any key to continue...";
    getch();
    return 0;
}
//---------------------------------------------------------------------------
|
- Test the program:
0. Yellow Light - Be Careful!
1. Yellow Light - Be Careful!
2. Yellow Light - Be Careful!
3. Yellow Light - Be Careful!
4. Yellow Light - Be Careful!
5. Yellow Light - Be Careful!

Yellow light ended. Please Stop!!!

Press any key to continue...
|
- Return to your programming environment.
- Save your project.
|
|

