Serialization
Serialization
Object Serialization and De-Serialization
Introduction
Consider the following program:
using System;
using System.IO;

public class Exercise
{
    static int Main(string[] args)
    {
        var Make  = "Ford";
        var Model = "Escort";
        var Year  = 1998;
        var Color = 1;

        var stmCar   = new FileStream("Car1.car", FileMode.Create);
        var bnwCar = new BinaryWriter(stmCar);

        try
        {
            bnwCar.Write(Make);
            bnwCar.Write(Model);
            bnwCar.Write(Year);
            bnwCar.Write(Color);
        }
        finally
        {
            bnwCar.Close();
            stmCar.Close();
        }

        return 0;
    }
}
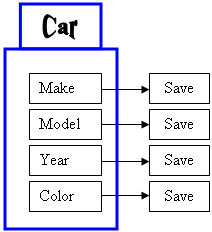
This is an example of the techniques we have used in previous lessons to save individual data of primitive types:

The values can be retrieved with the following code:
using System;
using System.IO;

public class Exercise
{
    static int Main(string[] args)
    {
        var stmCar   = new FileStream("Car1.car", FileMode.Open);
        var bnrCar = new BinaryReader(stmCar);

        try
        {
            Console.WriteLine("Make:  {0}", bnrCar.ReadString());
            Console.WriteLine("Model: {0}", bnrCar.ReadString());
            Console.WriteLine("Year:  {0}", bnrCar.ReadUInt32());
            Console.Write("Color: ");
            byte  clr = bnrCar.ReadByte();
            switch (clr)
            {
                case 1:
                    Console.WriteLine("Black");
                    break;
                case 2:
                    Console.WriteLine("Gray");
                    break;
                case 3:
                    Console.WriteLine("White");
                    break;
                case 4:
                    Console.WriteLine("Red");
                    break;
                case 5:
                    Console.WriteLine("Blue");
                    break;
            }
        }
        finally
        {
            bnrCar.Close();
            stmCar.Close();
        }

        return 0;
    }
}
This would produce:
Make:  Ford
Model: Escort
Year:  1998
Color: Black
Press any key to continue . . .
In the same way, we learned to save the individual fields of a class:

Here is an example:
using System;
using System.IO;

public class Car
{
    public string Make  = "Toyota";
    public string Model = "Corolla";
    public uint   Year  = 2002;
    public byte   Color = 2;
}

public class Exercise
{
    static int Main(string[] args)
    {
        var vehicle = new Car();

        var stmCar   = File.Create("Car2.car");
        var bnwCar = new BinaryWriter(stmCar);

        try
        {
            bnwCar.Write(vehicle.Model);
            bnwCar.Write(vehicle.Year);
            bnwCar.Write(vehicle.Color);
        }
        finally
        {
            bnwCar.Close();
            stmCar.Close();
        }

        return 0;
    }
}
When it comes to a class, the problem with saving individual fields is that you could forget to save one of the fields. For example, considering a Car class, if you don't save the Make information of a Car object and retrieve or open the saved object on another computer, the receiving user would miss some information and the car cannot be completely identifiable. An alternative is to save the whole Car object.
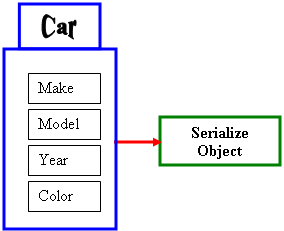
Object serialization consists of saving a whole object as one instead of its individual fields:

In other words, a variable declared from a class can be saved to a stream and then the saved object can be retrieved later or on another computer. The .NET Framework supports two types of object serialization: binary and SOAP.
Serialization
Binary serialization works by processing an object rather than streaming its individual member variables. This means that, to use it, you define an object and initialize it, or "fill" it, with the necessary values and any information you judge necessary. This creates a "state" of the object. It is this state that you prepare to serialize. When you save the object, it is converted into a stream.
To perform binary serialization, there are a few steps you must follow. When creating the class whose objects would be serialized, start it with the [Serializable] attribute. Here is an example:
[Serializable]
public class Car
{
    public string Make;
    public string Model;
    public uint   Year;
    public byte   Color;
}
Before serializing an object, you should reference the System.Runtime.Serialization.Formatters.Binary namespace. The class responsible for binary serialization is called BinaryFormatter. This class is equipped with two constructors. The default constructor is used to simply create an object. After declaring the variable, to actually serialize an object, call the Serialize() method of the BinaryFormatter class. The method is overloaded with two versions. One of the versions of this method uses the following syntax:
public void Serialize(Stream serializationStream, object graph);
The first argument to this method must be an object of a Stream-based class. In the previous lessons, we saw how to create Stream objects (for example using the FileStream class).
The second argument must be the object to serialize. This means that, before calling this method, you should have built the object.
Here is an example:
using System;
using System.IO;
using System.Runtime.Serialization.Formatters.Binary;

[Serializable]
public class Car
{
    public string Make;
    public string Model;
    public uint   Year;
    public byte   Color;
}

public class Exercise
{
    static int Main(string[] args)
    {
        var vehicle = new Car();

        vehicle.Make  = "Lexus";
        vehicle.Model = "LS";
        vehicle.Year  = 2007;
        vehicle.Color = 4;

        var stmCar   = new FileStream("Car3.car", FileMode.Create);
        var bfmCar = new BinaryFormatter();

        bfmCar.Serialize(stmCar, vehicle);

        return 0;
    }
}
De-Serialization
As serialization is the process of storing an object to a medium, the opposite, serialization is used to retrieve an object from a stream. To support this, the BinaryFormatter class is equipped with the Deserialize() method. Like Serialize(), the Deserialize() method is overloaded with two versions. One of them uses the following syntax:
public object Deserialize(Stream serializationStream);
This method takes as argument a Stream-based object, such as a FileStream variable, that indicates where the file is located. The Deserialize() method returns an Object object. As a goal, you want the Deserialize() method to produce the type of object that was saved so you can retrieve the values that the returned object holds. Because the method returns an Object value, you must cast the returned value to the type of your class.
Once the Deserialize() method has returned the desired object, you can access its values. Here is an example:
using System;
using System.IO;
using System.Runtime.Serialization.Formatters.Binary;

[Serializable]
public class Car
{
    public string Make;
    public string Model;
    public uint Year;
    public byte Color;
}

class Program
{
    static int Main(string[] args)
    {
        var stmCar   = new FileStream("Car3.car", FileMode.Open);
        var bfmCar = new BinaryFormatter();
        var vehicle = (Car)bfmCar.Deserialize(stmCar);

        Console.WriteLine("Make:  {0}", vehicle.Make);
        Console.WriteLine("Model: {0}", vehicle.Model);
        Console.WriteLine("Year:  {0}", vehicle.Year);
        Console.Write("Color: ");
        byte clr = vehicle.Color;

        switch (clr)
        {
        case 1:
            Console.WriteLine("Black");
            break;
        case 2:
            Console.WriteLine("Gray");
            break;
        case 3:
            Console.WriteLine("White");
            break;
        case 4:
            Console.WriteLine("Red");
            break;
        case 5:
            Console.WriteLine("Blue");
            break;
        }

        stmCar.Close();

        return 0;
    }
}
Details on Serialization
Partial Serialization
In the examples we have used so far, we were saving the whole object. You can make it possible to save only some parts of the class. When creating a class, you can specify what fields would be serialized and which ones would not be. To specify that a member cannot be saved, you can mark it with the [NonSerialized] attribute. Here is an example:
[Serializable]
public class Car
{
    public string Make;
    public string Model;

    // Because the value of a car can change,
    // there is no reason to save it
    [NonSerialized]
    public decimal Value;
    public uint Year;
    public byte Color;
}
After creating the class, you can declare a variable of it and serialize it, using either the binary or the SOAP approach. Here is an example:
using System;
using System.IO;
using System.Runtime.Serialization.Formatters.Binary;

[Serializable]
public class Car
{
    public string Make;
    public string Model;

    // Because the value of a car can change,
    // there is no reason to save it
    [NonSerialized]
    public decimal Value;
    public uint Year;
    public byte Color;
}

public class Exercise
{
    static int Main(string[] args)
    {
        var vehicle = new Car();

        vehicle.Make = "Lexus";
        vehicle.Model = "LS";
        vehicle.Year = 2007;
        vehicle.Color = 4;
        vehicle.Value = 28640M;

        var stmCar = new FileStream("Car1.car", FileMode.Create);
        var bfmCar = new BinaryFormatter();

        bfmCar.Serialize(stmCar, vehicle);


        return 0;
    }
}
You can then retrieve the object and its values, using any of the techniques we learned earlier. Here is an example:
using System;
using System.IO;
using System.Runtime.Serialization.Formatters.Binary;

[Serializable]
public class Car
{
    public string Make;
    public string Model;

    // Because the value of a car can change,
    // there is no reason to save it
    [NonSerialized]
    public decimal Value;
    public uint Year;
    public byte Color;
}

public class Exercise
{
    static int Main(string[] args)
    {
        var stmCar = new FileStream("Car1.car", FileMode.Open);
        var bfmCar = new BinaryFormatter();
        var vehicle = (Car)bfmCar.Deserialize(stmCar);

        Console.WriteLine("Car Information");
        Console.WriteLine("Make: {0}", vehicle.Make);
        Console.WriteLine("Model: {0}", vehicle.Model);
        Console.WriteLine("Year: {0}", vehicle.Year);
        Console.Write("Color: ");
        switch (vehicle.Color)
        {
            case 1:
                Console.WriteLine("Black");
                break;
            case 2:
                Console.WriteLine("Gray");
                break;
            case 3:
                Console.WriteLine("White");
                break;
            case 4:
                Console.WriteLine("Red");
                break;
            case 5:
                Console.WriteLine("Blue");
                break;
        }
        Console.WriteLine("Value:  {0}\n", vehicle.Value);

        return 0;
    }
}
This would produce:
Car Information
Make: Lexus
Model: LS
Year: 2007
Color: Red
Value:  0

Press any key to continue . . .
Notice that the value of the Value field was not saved: it holds the default value of its data type. This indicates that, you can assign a value a [NonSerialized] field and save the object. The value of that field would not be saved but the compiler would not throw an exception.
Implementing a Custom Serialized Class
To support serialization, the .NET Framework provides the ISerializable interface. You can create a class that implements this interface to customize the serialization process. Even if you plan to use this interface, the class you create must be marked with the [Serializable] attribute.
.NET Built-In Serialized Classes
The .NET Framework is filled with many classes ready for serialization. To know that a class is ready for serialization, when viewing its documentation either in the MSDN web site or in the help documentation, check that it is marked with the [SerializableAttribute]. Here is an example of such as class:

Some of these classes provide the properties and methods to create an object and directly save it. For some other classes, you must first create a class, mark it with the [SerializableAttribute] attribute, build an object of it, and then pass it to the .NET class.
|
|
||
| Previous | Copyright © 2008-2019, FunctionX | Home |
|
|
||