C# Tutorials - Lesson 1: Introduction to C#
 
Home

Introduction to C#


Introduction


Overview of C#

C#, pronounced c sharp, is a computer language used to give instructions that tell the computer what to do, how to do it, and when to do it. This is a universal language that, although currently mostly used on the Microsoft Windows operating system, will be also used on other operating systems like Linux, BeOS, Macintosh, etc. C# is one of the languages used in the Microsoft .NET Framework. The Microsoft .NET Framework is a library of objects that create or draw things on the computer. On this site, we will learn what the C# language looks like and how we can use it.

The C# language is used to create applications that display on a black window referred to as the DOS prompt or DOS window. Therefore, on this site, we will create only such types of applications.


Introduction to Objects

An object, any object, is made of different parts. For example, a car is made of tires, doors, wires, belts, etc:

Car

In computer languages, such an object is called a class.

In the C# language, everything is built as a class. Therefore, a program starts with the class keyword followed by a name. Here is an example:

class Car

The actual building of a class starts with an opening curly bracket "{" and ends with a closing curly bracket "}". Therefore, a class can be created as follows:

class Car { }

Because a class can be made of numerous parts, such as tires, doors, seats, etc, listed as sub-objects of a class, one line could become (too) crowded. Therefore, each curly bracket should be displayed on its own line:

class Car
{
}

The assignments of a program written in C# are carried in entities called methods. A method is simply a section of code that takes care of a particular detail for the functionality of the program. To create a method, you must specify its name, which starts with a letter or an underscore and can be followed by letters, digits, or underscores. The name of a method is followed by an opening and a closing parentheses. Here is an example:

class Car
{
Drive()
}

A method's job is to carry a specific assignment within a program. As such, it could provide a value once the assignment has been carried. In Lesson 8, we will review the types of values that a method can provide. If on the other hand a method doesn't give back a value, then it is considered void. The type of value that a method can provide (or return) is written on the left side of the method name. An example would be:

class Car
{
void Drive()
}

The assignment that a method carries is included between an opening curly bracket "{" and a closing curly bracket "}". Therefore, a method can be written as follows:

class Car
{
void Drive()
{
}
}

Indentation is a technique of specifying where a line of code starts and where it ends. Although indentation is not part of the C# language, it makes the program easier to read. Therefore, the above lines of code can be written as follows:

class Car
{
	void Drive()
	{
	}
}

Note that this time, it is easier to know where the class starts and ends, and where the method starts and ends. In some occasions (we will see when and why), we will need to write a method as "static".

The most regularly used method of a C# program is called Main. Therefore, the minimum you can write a program with, is as follows:

class Car
{
	static void Main()
	{
	}
}

A computer program is started in a regular computer file. A file for a C# program has the extension .cs. To make your programming fast, the C# language ships with many primary files that allow you to lay a foundation for your program.

Author Note   C++ Note

In C++, a variable  can be declared almost anywhere. For example, C++ has the concept of global variable. In C#, a variable can only be a member of a class. This means that, in C#, there is no global variable.
This is why we must introduce the concept of class in our first lesson.


Command Line Fundamentals


Introduction

When the computer starts, there is no primary visual or graphical effect. The programs must first be loaded to memory. In fact, in the beginning, the Microsoft operating system started as text-based with DOS 2.2, 3.3, 5.0, and 6.2 (6.2 was never a big hit like 5.0 because Windows 3.1, Windows 3.2, and Windows 3.3 was released at the same time, bringing the now attractive "Windows" display). To create a program, a programmer entered the source code using a text editor (there was a text editor called EDIT; it was very cute, very basic, and very wonderful; in fact, up to Windows 3.3, it was still the text editor of choice of most programmers and it was used as the editor for QBasic, the parent of Visual Basic). After creating the source file, the programmer had to use a black (or "amber") screen that displayed a blinking caret whose role was to let the user know that it was waiting for a command. A command was a word or a group of words that the programmer typed and pressed Enter (or Return). This caused the computer to produce an action. The command was typed on a line. For this reason, the area that displayed the caret was called the Command Line. Most low-level (low-level doesn't mean weak, to the contrary) programs are still using this concept. This means that, behind the scenes, computer languages such as C/C++, Pascal, Java, C#, etc, are still created and executed as if everything were done at the Command Line. In fact, if you use Visual Studio .NET to create and compile your program, everything you see is done at the level of Command Line and transported to the front so you can work "visually".


Command Line Understanding

To be an effective programmer, it is important to know how the Command Line works because, as mentioned already, C# programs are compiled at the Command Prompt. If you know how the Command Line works, you can have a better understanding of things that are going on behind the scenes.

As its name indicates, the Command Line is a blank line with a blinking caret that expects you to type a command:

There are various types of commands used on the command prompt. Some of them are as old as the operating system. Such is the case for commands used to create files or folders, copy files or folders, delete files or folders, format a drive, etc. Some other commands are created by a person like you who needs it for a particular application. For example, the C# language provides a command called csc to compile a program at the command line, as we have done so far. In the same way, when you create a program, particularly when you create a source file, you can use some options that would be used at the command prompt.

The Compiler

You may have realized that all of the words we have used so far, such as class, void, or static, are regular English words that you can read and whose meaning you can find in a dictionary. Computer languages are created with meaningful words like that to make them easier to read and understand. Unfortunately, the computer doesn't understand those words and cannot execute the instructions those words represent. Like most other languages, C# is just a language that is used to give instructions to the computer. To make the computer understand these instructions, you need another, somehow more powerful, program. This program would receive the language's instructions in plain English and "translate" them in another language that the computer can understand. This program is called a compiler.

A compiler is a computer program made of internal other sub-programs. One of the sub-programs, in fact probably the first, of a compiler is called a parser. A parser "scans" a file that contains (part of) the program. It checks for syntax, keywords, unknown words, and some other routines. If the parser finds a problem, which could be anything, either it stops or it continues making a list of the mistakes it found. Then it displays this list to you to fix. Sometimes it would point to the exact line where the/a problem was found. Sometimes it would point to the line where the problem showed its impact although the problem may be found somewhere else. With experience, you will know how to fix the programs or troubleshoot these problems. On this site, we will address as many issues as possible.

If the parser doesn't find any problem, or after you have fixed the problems, it (the parser) passes its result(s) to the compiler. The compiler calls another program called a linker. If the program contains just one file, the linker considers it. If the program contains more than one file (because a program can contain as many files as necessary), the linker considers them. The linker gathers some of the files that the C# compiler shipped with (those files that your program needs in order to work, since your program doesn't need all possible files that C# ships with), puts them together ("links" them) with your file(s) to get your instructions in a manner that can produce a suitable result. If there is no significant problem, the compiler creates the program. This doesn't mean that everything is alright, it only means that the compiler thinks that everything is alright: it is still possible that the result may not be what you would expect. To make your life easier, all of the sub-programs (parser, linker, debugger, etc) that ship with C# are grouped in one large program: the compiler. Therefore, from now on, we will use the word "compiler" to refer to the program you use to "translate" your English-based instructions into a computer-based language.

The compiler that ships with the C# version we will use, that is, the compiler of the .NET Framework is a program called csc. Like most other programs, it has the extension .exe. This csc name is not standard. This means that another C# compiler may have another name; csc.exe is just the name of the compiler we will use.

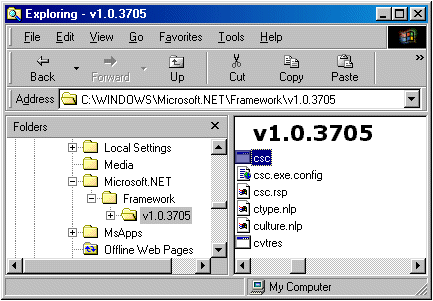
To use csc.exe, you should first find it in your computer. By default, it is installed in a folder like C:\WINDOWS\Microsoft.NET\Framework. The one I am using is located in C:\WINDOWS\Microsoft.NET\Framework\v2.0.40607. To use this free compiler in all of your programs, you should include it in your system path.

In the following exercise, we will see how to add the csc.exe compiler to your path. This exercise is optional, meaning you don't have to do it. But, for the rest of the lessons, we will assume that you can create and execute your programs (however you do it and whatever compiler you use, we don't care).


Practical LearningPractical Learning: Adding the Compiler to the Path: Windows 9X

  1. Start Windows Explorer and locate the folder where your csc application is installed. Here is an example:
     
  2. Right-click the path in the Address combo box and click Copy 
  3. Start Notepad and open the C:\Autoexec.bat file
  4. Find the line that starts with path. If you don't see it, then on a new line, type path and press the Space bar
  5. If you already have a path line, type ; at the end, and paste the above path. Mine appears as:


    If you were creating your own new path, type he copied directory to the right side of path
  6. Close Notepad. When asked whether you want to save the file, click Yes
  7. Restart the computer
 

Practical LearningPractical Learning: Adding the Compiler: Windows 2000/XP/2003

  1. Click Start -> Control Panel
  2. In Windows 2000 and XP (Home Edition or Professional), double-click System
    In Windows Server 2003, click System
  3. In the System Properties dialog box, click the Advanced tab and click Environment Variables
  4. In the System Variables section, click Path and click Edit
  5. Press Home and press the right arrow key. Check if you have an entry that appears as Microsoft.NET\Framework\vXXXX where XXXX represents some numbers.
    If you don't see that entry, press End or get to the end of the string

    Type ; followed by the complete path to the compiler. Mine appears as:
     
    %SystemRoot%\system32;%SystemRoot%;%SystemRoot%\System32\Wbem;C:\WINDOWS\Microsoft.NET\Framework\v2.0.40607
  6. Click OK on each dialog box
 

Creating a Program

On this site, we will use the free csc.exe compiler that Microsoft provides. Using it, all of our programs will be created using a text editor, in this case Notepad. All of our programs will be compiled from the command prompt.


Practical LearningPractical Learning: Creating a Program

  1. Start Notepad
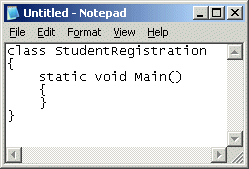
  2. In the empty file, type the following:
     
    class StudentRegistration
    {
    	static void Main()
    	{
    	}
    }
    Source Code in Notepad
  3. To save the file, on the main menu, click File -> Save
  4. Select and display the C: (or the D:) drive in the Save In combo box
  5. Click the Create New Folder button Create New Folder
  6. Type CSharp Lessons (if you are using Windows 9X, type CSharpLessons (in one word))
  7. Press Enter twice or display the new folder in the Save In combo box
  8. Click the Create New Folder button Create New Folder again
  9. Type Exercise1 and press Enter twice or display the new folder in the Save In combo box
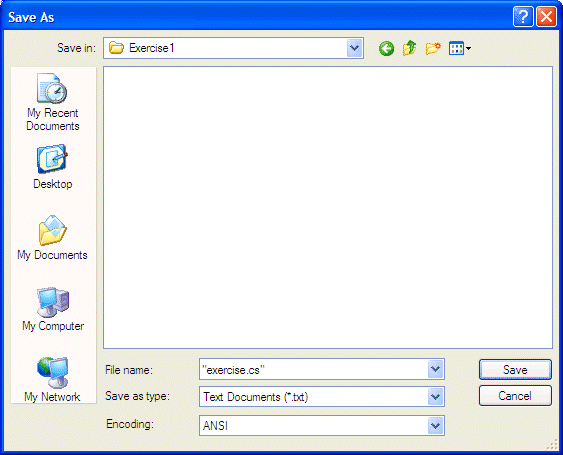
  10. Save the file as exercise.cs
     
    Save As
  11. Click Save
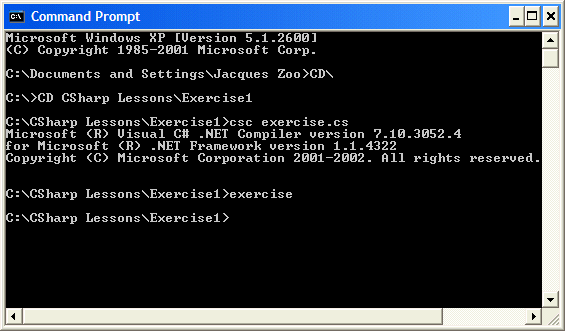
  12. To test the application, open the Command Prompt and change to the folder in which you created the C# file:
     
    Command Prompt
  13. Type csc exercise.cs and press Enter
  14. When the program has finished compiling, type exercise and press Enter


    The program doesn't display anything since we didn't ask it to.
  15. Return to Notepad
 

Namespaces


Introduction

When many people work in creating the same program, it could be difficult to keep track of the names of various classes. If more than one programmer creates a class with the same name in the same program, there would be conflict and the program would not work. The solution to avoid this situation is to delimit sections of code with names.

A namespace is a section of code that is identified by a specific name. The name could be anything such as somebody's name, the name of the company's department, or a city. To create a namespace, you start with the namespace keyword followed by the name of the section.

Like a class, the section that is part of a namespace starts with an opening curly bracket "{" and ends with a closing curly bracket "}". Here is an example:

namespace Jason
{
}

Between the curly brackets, you can type anything that is part of the namespace. For example, you can create a class inside of a namespace. Here is an example:

namespace Jason
{
	class Airport
	{
	}
}
 

Practical LearningPractical Learning: Creating a Namespace

  1. To create a namespace, change the file as follows:
     
    namespace RedOakHighSchool
    {
        class StudentRegistration
        {
            static void Main()
            {
            }
        }
    }
  2. Save the file
 

Accessing Members of a Namespace

After creating the necessary items in a namespace, you can use the period operator to access an item that is part of the namespace. To do this, in the desired location, type the name of the namespace, followed by a period, followed by the desired member of the namespace. Here is an example:

namespace Accounting
{
	class Departure
	{
	}
}

class MainClass
{
	static void Main()
	{
		Accounting.Departure
	}
}
 

Namespace Nesting

Imagine that you create a namespace called Accounting and many people from the Accounting department are asked to create their methods and objects only in the Accounting namespace and you may have asked the Accounting programmers not to create their methods and objects outside of the Accounting namespace. One thing you can do is to create other namespaces inside of the existing namespace.

Creating a namespace inside of an existing namespace is referred to as nesting the namespace. The namespace inside of another namespace is nested.

To create a namespace inside of another, simply type it as you would create another namespace. Here is an example:

namespace Accounting
{
	namespace Jason
	{
	}
}

In the example above, the Jason namespace is nested inside of the Accounting namespace.

After creating the needed namespaces, nested or not, you can create the necessary methods and objects inside of the desired namespace. To access anything that is included in a nested namespace, you use the period operator before calling a member of a namespace or before calling the next nested namespace. Here is an example:

namespace Accounting
{
	class Payroll
	{
	}
}
namespace Personnel
{
	namespace EmployeesRecords
	{
		class TimeSheet
		{
		}
	}
	namespace Benefits
	{
		class MedicalInsurance
		{
		}
	}
}

class MainClass
{
	static void Main()
	{
		Accounting.Payroll
		Personnel.Benefits.MedicalInsurance
		Personnel.EmployeesRecords.TimeSheet
	}
}

A line of code such as Accounting.Payroll is called a statement. Every statement must be terminated with a colon. Therefore, this statement may be written as:

Accounting.Payroll;
 

The System Namespace


Introduction

To make programming in C# a little easier, many classes have already been created and stored in various namespaces. Each namespace in C# is used to provide a specify set of classes. The most regularly used namespace in the C# language is called System. Inside of the System namespace is a class called Console. The Console class is used to display things on the console screen also called the DOS window.

The Console class contains assignments (called methods) to display information on the screen or to retrieve information from the user who types it in the DOS window. The method that is used to display text on the screen is called Write. To use the Write() method, inside of the parentheses, type the sentence between double-quotes. Here is an example:

class Program
{
	static void Main()
	{
		System.Console.Write("The Wonderful World of C# Programming");
	}
}

Besides the Write() method, the Console class also provides a method called WriteLine(). The difference is that, after displaying something on the screen, the Write() method keeps the caret on the same line but WriteLine() transfers the caret the next line. We will see various examples of this behavior throughout our lessons.


Practical LearningPractical Learning: Introducing Console Methods

  1. To use the System namespace, return to Notepad and change the contents of the file as follows:
     
    namespace RedOakHighSchool
    {
        class StudentRegistration
        {
            static void Main()
            {
    	System.Console.WriteLine("Welcome to Red Oak High School");
            }
        }
    }
  2. Save the file and return to the Command Prompt
  3. To compile the program again, type csc exercise.cs and press Enter
  4. To test the new result, type exercise and press Enter. This would produce:
     
    Welcome to Red Oak High School
  5. Notice that, this time, the program displays 12
 

The Using Keyword

We saw that, to call an object or a method that is part of a namespace, you must "qualify" that method or object using the period operator. Instead of using this approach, if you already know the name of a namespace that exists or has been created in another file, you can use a special keyword to indicate that you are using a namespace that is defined somewhere. This is done with the using keyword. To do this, on top of the file (preferably), type using followed by the name of the namespace.

With the using keyword, you can include as many external namespaces as necessary.


Practical LearningPractical Learning: Using the Keyword

  1. Return to Notepad and change the program as follows:
     
    using System;
    
    namespace RedOakHighSchool
    {
        class StudentRegistration
        {
            static void Main()
            {
    	Console.WriteLine("Welcome to Red Oak High School");
            }
        }
    }
  2. Save, compile, and test the program
  3. Return to Notepad
 

Accessories for Coding


Comments

A comment is a line or paragraph of text that the compiler would not consider when examining the code of a program. There are two types of comments recognized by C#.

To display a comment on a line of text, start the line with two forward slashes //. Anything on the right side of // would be ignored. Here is an example:

// This line will be ignored. I can write in it anything I want

The above type of comment is used on only one line. You can also start a comment with /*. This type of comment ends with */. Anything between this combination of /* and */ would not be read by the compiler. Therefore, you can use this technique to span a comment on more than one line.


Practical LearningPractical Learning: Creating Comments

  1. To create comments, change the file as follows:
     
    // Project Name: Exercise
    // Purpose:      Used to process registration for new students
    //	        and keep records of existing students
    using System;
    
    // The whole school will use this namespace
    namespace RedOakHighSchool
    {
        class StudentRegistration
        {
            static void Main()
            {
    	Console.WriteLine("Welcome to Red Oak High School");
            }
        }
    }
  2. Save, compile, and test the application
 

Command Line Options

If you open Windows Explorer or My Computer and display the contents of the CSharp Lessons\Exercise1 folder, you would find a program called exercise

The exercise application in Windows Explorer
 

If you compile a project by typing csc followed by the name of the file that contains the code, the compiler creates an executable application that has the same name as the file. If you want, you can ask the compile to produce an executable using the name of your choice. To do this, you would compile the project using the following formula:

csc /out:DesiredNameOfExecutable.exe FileName.cs

The DesiredNameOfExecutable factor in our formula represents the name you want the executable to have. If the name you want is in one word, you can just type it. If you want a name made of various words, you can include those words in double-quotes

The FileName factor is one we are familiar with.


Practical LearningPractical Learning: Specifying the Name of the Executable

  1. To compile and produce a custom name, type csc /out:ROSH.exe exercise.cs and press Enter
  2. To execute the application, type ROSH and press Enter
  3. To compile and produce a multi-word name, type csc /out:"Red Oak High School".exe exercise.cs and press Enter
  4. To execute the application, type "Red Oak High School" and press Enter

Unsafe Code

When C# was invented, one of its biggest goals was to avoid some of the difficulties of C/C++. Among them was the use of pointers for people who couldn't stand them or those who don't like or can't stand their intricacies. C/C++ uses pointers to refer to the area in memory where a value is located. C# highly avoids pointers and takes over memory management as opposed to letting the programmer take care of that aspect of an application. You can still use pointers in C# in extreme cases you judge them necessary.

Because the C# compiler is in charge of managing the memory used by the values of an application, pointers are said to be unsafe. If you want to use a pointer in your application, you must precede the name of every method that uses unsafe code with the unsafe keyword. To compile the application, you must indicate that you are using unsafe code. To do that, use the /unsafe modifier.


Practical LearningPractical Learning: Using Unsafe Code

  1. To start a new file, on the main menu of Notepad, click File -> New and type the following code:
     
    using System;
    
    class Exercise
    {
    	unsafe static void Main()
    	{
    		int Length = 224;
    		// The Len variable is a pointer
    		int *Len = &Length;
    		
    		Console.Write("Length ");
    		Console.WriteLine(Length);
    		Console.Write("Length ");
    		Console.WriteLine(*Len);
    		Console.WriteLine();
    
    		Length = 804;
    		Console.Write("Length ");
    		Console.WriteLine(Length);
    		Console.Write("Length ");
    		Console.WriteLine(*Len);
    	}
    }
  2. Save the file in a new folder named SaveMe1 inside of the CSharp Lessons folder
  3. Save the file itself as Exercise.cs
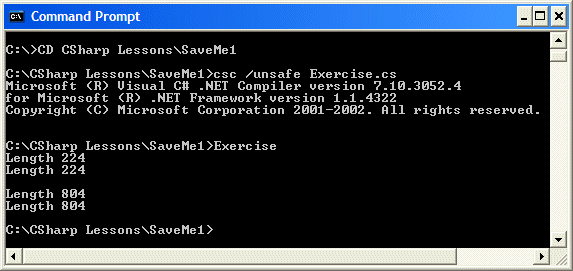
  4. To compile, type csc /unsafe Exercise.cs and press Enter
  5. To execute the application, type Exercise and press Enter:
     
    Using Unsafe Code
  6. Type Exit to close the Command Prompt
 

Copyright © 2005-2016, FunctionX Next