Characteristics of Windows Controls
|
Characteristics of Windows Controls |
Most of the controls you will use to create your applications are defined in the .NET Framework and, each is based on a particular class. To provide them with basic and common characteristics, all visual Windows controls of the .NET Framework are based on a class called Control which is defined in the System.Windows.Forms namespace of the System.Windows.Forms.dll assembly. Based on this, the characteristics common to .NET Framework graphical controls are accessed and managed from one point, then inherited by those controls.
Up to 2002, Microsoft Windows programmers relied on a library called Win32 to create applications for the operating system. The Win32 library was the only resource of classes (in fact structures), functions, etc, that gave functional instructions to the operating system. The other languages such as Pascal, Visual Basic, etc, used directly or indirectly these resources in their own "dialect" to communicate with Microsoft Windows. The Win32 library is still around (it can never disappear unless the operating system changes completely) and serves as the platform for Microsoft Windows programming. To harmonize programming for this platform, Microsoft created the .NET Framework as a substitute library. This is the library used in Microsoft Visual Studio .NET programming environment. Most of the functionality of Win32 has been redefined in the .NET Framework. The operations were implemented in various libraries or assemblies. Some other operations, such as those related to the Registry, were kept in the Microsoft.Win32 namespace. The Win32 library uses a concept called handle to represent each object of an application. A handle in Win32 is simply an unsigned integer used in place of a control. The new .NET Framework also uses handles to internally represent controls but defines a handle as a pointer to an integer. Based on this, every control has a handle. You have a choice of using it or not but it exists. The handle is created by the operating system when the application comes up. This means that you don't need to create it but you can access it to retrieve its value. To access the handle to a control, you can call its Handle property. In the .NET Framework, the Handle property is defined as an IntPtr value. To retrieve the handle of a control, you can access its Handle property. Some controls, as we will see, are text-based, meaning they are meant to display or sometimes request text from the user. For such controls, this text is referred to as caption while it is simply called text for some other controls. This property is not available for all controls. If a control displays text, it then has a Text property. To specify the text of a control, assign a string to its Text property. Alternatively, if you want, you can format it to display a more complex string such as the current date or time, the current username, etc.
To create a control, the primary piece of information you must provide is its name. This allows you and the compiler to know what control you are referring to when the program is running. You specify the name of a control when declaring it, the same way you must provide a name to every variable you declare in your program. You can also change the name of a control programmatically but you should avoid doing that unless you have a good reason to. To programmatically change the name of a control, access its Name property and assign a string, using the C# rules of variable names. Here is an example: this.checkBox1.Name = "chkPepperoni"; To retrieve the name of a control, access its Name property.
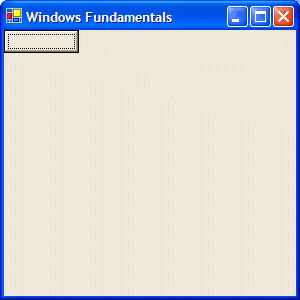
The controls added to a parent window are confined to the area of the body offered by that parent window. When you create a new control and add it to the parent, the control is positioned in the top-left corner of its parent as seen above. The position, also called location, of the control in the body of the parent uses a Cartesian coordinate system whose origin is located on the top-left corner of the parent window. If the parent is a form, the origin is located just under the title bar to the left. The horizontal measurements move from the origin to the right. The vertical measurements move from the origin to the bottom:  The distance from the control’s left border to the parent’s left border is represented with the Left property. The distance from the control’s top border to the parent’s top border is referred to as the Top property. The Left and Top values are known as the control’s location. This can be illustrated as follows:  Instead of using the default location, to specify the desired location, you have two options. You can assign an integer to the Top property of the control and/or another integer to the Left property of the control. Alternatively, you can assign a Point value to the control's Location property.
As mentioned already, a control is confined to the area made available by its parent. This section is called the client area. For a form, the client area is the body of the form without the title bar, its borders and other sections we have not mentioned yet such as the menu, scroll bars, etc: 
Besides the form, every control also has a client area. The role of the client area is to specify the bounding section where the control can be accessed by other controls positioned on it. Based on this, a control can be visible only within the client area of its parent. The client area is programmatically represented by a property called ClientRectangle.
The distance from the left border to the right border of a control is referred to as its Width property. In the same way, the distance from the top to the bottom borders of a control is its Height property. This can be illustrated as follows:  When you add a control to a form, the control assumes some default dimensions in the body of the parent. To set or change the size of a control, you can assign a Size value to its Size property.
When a control has been added to a container, it occupies a Rectangle represented by the Bounds property. The syntax of this property is: public Rectangle Bounds {get; set};
At any time, to get the location and the dimensions of a control, you can call its Bounds property, which produces a Rectangle value.
If you position a (visual) control on a form, if the control is positioned on the top left section of the form, when the user resizes the form, the control’s position would appear static, it would not move. This could be a concern if the control is positioned on the right, the bottom or the lower right sections of the form. When the user resizes the form, the control’s position would not be updated. Sometimes you will want the control to have the same location and/or distance with regard to the bottom, the right, and/or the lower right corners of the form. The ability to manage a control or a group of controls' location and size when the use resizes it is done using the Anchor property. The Anchor property is created from the AnchorStyles enumerator. By default, when you add a control to a form, it is “glued” to the top left corner of its container. You can also set the control’s position with regards to its container’s right and bottom borders. The Anchor property can be used to "glue" one border of a control to its parent using one of the following values: Bottom: The control bottom border will be the same even if the parent is heighten or shrunk btnSend.Anchor = AnchorStyles.Bottom;
Left: The control left border will be the same even if the parent is widened or narrowed btnSend.Anchor = AnchorStyles.Left;
btnSend.Anchor = AnchorStyles.None;
Right: The control right border will be the same even if the parent is widened or narrowed btnSend.Anchor = AnchorStyles.Right;
btnSend.Anchor = AnchorStyles.Top;
When a control is added to a form, you will want the control to be attached to a border or to a corner of its parent. This can be done using the Dock property. The Dock property is managed through the DockStyle enumerator. To use this property, assign the qualified name of a member of the DockStyle enumerator to the control's Dock property. The members of this enumerator are: Bottom: The control will be attached to the bottom border of its parent: btnSend.Dock = Dock.Bottom;
Fill: The control will use the whole client area of its parent: btnSend.Dock = Dock.Fill; Left: The control will be attached to the left border of its parent: btnSend.Dock = Dock.Left;
None: The control will be kept where it was positioned on the parent: btnSend.Dock = Dock.None;
Right: The control will be attached to the right border of its parent: btnSend.Dock = Dock.Right;
Top: The control will be attached to the top border of its parent: btnSend.Dock = Dock.Top;
Controls used on Microsoft Windows are painted using a color known as Control. If you don't like the default color that paints the background of a control, you can assign a color to the control's BackColor property.
Instead of a color, you may want to fill the control with a picture. To do this, you can assign a picture file to the control's BackgroundImage property.
Some controls display a border when they are drawn and some others don't. Consider the following:
Some of these controls allow you to specify a type of border you want to show surrounding the control. This characteristic is controlled by the BorderStyle property, which is based on BorderStyle enumerator. Its members are:
A user can navigate through controls using the Tab key. When that key has been pressed, the focus moves from one control to the next. By their designs, not all controls can receive focus and not all controls can participate in tab navigation. Even controls that can receive focus must be primarily included in the tab sequence. The participation of a control to the tab sequence is controlled by its TabStop property. By default, every visual control that can receive focus is already configured to have this property set to true. If you want to remove a control from this sequence, set its TabStop value to False. If a control has the TabStop property set to true, to arrange the navigation order of controls, change the value of its TabIndex field. The value must be a positive short integer.
Microsoft Windows XP added a new feature to the way some controls display or behave when the mouse passes over them, making the controls significantly attractive and enhanced. This feature is neither automatically applied on controls nor available to all controls. Therefore, before using it, you must first find out if the control you want to use it on support it. A control that supports this feature should have the FlatStyle property. This property provides the following values:
If the application will be run on Windows XP, you can use the System value of the FlatStyle property. To make this style work, call the Application.EnableVisualStyles() method in the Main() method as follows: static void Main()
{
Application.EnableVisualStyles();
Application.Run(new Form1());
}
A control is referred to as visible if it can be visually located on the screen. A user can use a control only if he or she can see it. As a programmer, you have the role of deciding whether a control must be seen or not and when. The visibility of an object is controlled by the its Boolean Visible property. At design time, when you add a control to a form, it is visible by default. This is because its Visible property is set to true. In the same way, by default, it is made visible once you add it to its parent's Controls property. If you don't want a control to primarily appear when the form comes up, you can either set its Visible property to false or set its parent’s visible property to false. Keep in mind that when a parent gets hidden, it also hides its children. On the other hand, a parent can be made visible but hide one or some of its children. To check whether a control is visible at one time, apply a conditional statement (if or while) to its Visible property and check whether its value is true or false. Here is example: this.textBox1.Visible = false;
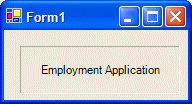
For the user to use a control, it must allow operations on it. For example, if a control is supposed to receive text, the user can enter characters in it only if this is made possible. To make a control available to the user, the object must be enabled. The availability of an object is controlled by the Boolean Enabled property. By default, after adding a control to a form, it is enabled and its Enabled property is set to true. An enabled control displays its text or other characteristics in their normal settings. If you want to disable a control, set its Enabled property to false. In the following picture, a text box and a button are disabled:  To find out whether a control is enabled or not, check its Enabled property state.
|
|
|
||
| Previous | Copyright © 2004-2012, FunctionX | Next |
|
|
||