Introduction to Controls Containers
Introduction to Controls Containers
Hosting a Windows Control
Introduction to Controls
A Windows control, or an application's control, or simply a control, is an object in a computer control. That object allows the user of an application to interact with the computer, to tell the computer what the user wants, or what the user wishes to see happening. Computers, or operating systems, support various types of controls, and the controls perform various roles. This means that there are various types of controls with different goals. We have already seen that every control has a class that holds the characteristics (properties), the actions that the control can perform (its methods), and the occurrences (events) related to it.
To make a control available and useable to your application, you can select that control from the Toolbox and add it to your project. As an alternative, you can create a control programmatically. Almost all the controls you will need are created in the System.Windows.Forms namespace that belongs to the System.Windows.Forms.dll assembly. Therefore, you must add a reference to that assembly in your project and you can/should include that namespace to your code. If you create a Windows Forms App (.NET Framework) or a Windows Forms App (.NET Core) project, the reference is automatically created and the namespace appropriately added. After performing any of those actions, you can declare a variable using the class of the control. Here are two examples:
using System;
using System.Windows.Forms;

namespace ControlsFundamentals
{
    public partial class Form1 : Form
    {
        public Form1() => InitializeComponent();

        private void btnControls_Click(object sender, EventArgs e)
        {
            RadioButton rdoMedium = new RadioButton();
            GroupBox gbxPizzaSize = new GroupBox();
        }
    }
}
Of course, you can programmatically access other properties of a control. Here are examples:
using System;
using System.Drawing;
using System.Windows.Forms;

namespace ControlsFundamentals
{
    public partial class Form1 : Form
    {
        public Form1() => InitializeComponent();

        private void btnControls_Click(object sender, EventArgs e)
        {
            RadioButton rdoMedium = new RadioButton();

            rdoMedium.Location = new Point(24, 58);
            rdoMedium.Width    = 61;
            rdoMedium.Text     = "Medium";

            GroupBox gbxPizzaSize = new GroupBox();

            gbxPizzaSize.Location = new Point(12, 12);
            gbxPizzaSize.Size     = new Size(109, 126);
            gbxPizzaSize.Text     = "Pizza Size";
        }
    }
}
When it comes to adding objects to your application, there are two broad categories of controls.
A Control's Container
When you pick up a control from the Toolbox, you must drop that control somewhere so your application can use it. A control container is a special control that can receive or host other controls. Microsoft Windows (and other operating systems) support various types of controls containers.
As mentionned already, a control container is used to hold or carry controls placed on it. When a container moves, it does so with the controls placed on it. When a control container is visible, the controls placed on it can be visible too, unless they have their own visibility removed. When a container is hidden, its child controls are hidden too, regardless of their own visibility status.
A Control's Container is a Collection
To make it possible for an object to host other objects, the class of every container is equipped with a read-only property named Controls. This property is based on a class named ControlCollection which, as its name implies, is a collection class:
[System.ComponentModel.Browsable(false)]
public System.Windows.Forms.Control.ControlCollection Controls { get; }
The ControlCollection class is equipped with all the basic operations of colleection class, including the ability to add, delete, or count the items in the list.
To support the ability to add a control to a container, the ControlCollection class is equipped with a method named Add. Its syntax is:
public virtual void Add (System.Windows.Forms.Control value);
This method takes as argument an object that derives from the Control class, which is the case for all Windows controls. Therefore, to programmatically add a control to a container, access the Control property of the container and call the Add() method on it. Pass the variable name of the control you want. Here is an example:
using System;
using System.Drawing;
using System.Windows.Forms;

namespace ControlsFundamentals
{
    public partial class Form1 : Form
    {
        public Form1() => InitializeComponent();

        private void btnControls_Click(object sender, EventArgs e)
        {
            RadioButton rdoMedium = new RadioButton();

            rdoMedium.Location = new Point(24, 58);
            rdoMedium.Width    = 61;
            rdoMedium.Text     = "Medium";

            GroupBox gbxPizzaSize = new GroupBox();

            gbxPizzaSize.Location = new Point(12, 12);
            gbxPizzaSize.Size     = new Size(109, 126);
            gbxPizzaSize.Text     = "Pizza Size";

            gbxPizzaSize.Controls.Add(rdoMedium);
        }
    }
}
A Form or Dialog Box as a Container
As seen so far, a form is the most fundamental container of an application. All the controls of an application are placed directly or indirectly on a form. Therefore, to programmatically position a control on a form, access the Controls property of the form, call the Add() method on that property, and pass the variable of the control to it. Here is an example:
using System.Drawing;
using System.Windows.Forms;

public class Exercise
{
    public static void Main()
    {
        Form frmExercise = new Form();

        RadioButton rdoMedium = new RadioButton();

        rdoMedium.Location = new Point(24, 58);
        rdoMedium.AutoSize = true;
        rdoMedium.Text = "Medium";

        GroupBox gbxPizzaSize = new GroupBox();

        gbxPizzaSize.Location = new Point(12, 12);
        gbxPizzaSize.Size = new Size(109, 126);
        gbxPizzaSize.Text = "Pizza Size";

        gbxPizzaSize.Controls.Add(rdoMedium);

        frmExercise.Controls.Add(gbxPizzaSize);
        frmExercise.ShowDialog();
    }
}
Introduction to the Panel Control
Description
The panel is a rectangular object that can provide various valuable services for application design. For example, a panel can be used as control delimiter for objects that behave as a group. An example would be a set of radio buttons.
A panel is a complete control with properties, methods, and events. For example, its background color can be changed.
![]() Practical Learning: Introducing Panels
Practical Learning: Introducing Panels
 |
 |
 |
 |
Creating a Panel
To support panels, the .NET Framework provides a class named Panel. You can use it to programmatically create a panel.
Unlike a form, during design, a panel must primarily be positioned on another container which would be a form or another panel. To add a panel to your project, on the Toolbox, expand the Containers section. Click the Panel button ![]() and click the form or another container.
and click the form or another container.
To programmatically create a panel, declare a variable of type Panel, allocate memory for it using the new operator, and add it to its parent. Here is an example:
using System;
using System.Drawing;
using System.Windows.Forms;

public class Exercise : System.Windows.Forms.Form
{
    Panel pnlContainer;

    public Exercise()
    {
        InitializeComponent();
    }

    private void InitializeComponent()
    {
        Text     = "Domain Configuration";
        Width    = 320;
        Height   = 210;
        Location = System.Drawing.Point(140, 100);
        StartPosition = FormStartPosition.CenterScreen;

        pnlContainer = new Panel();
        pnlContainer.Location = Point(20, 20);
        pnlContainer.Size = System.Drawing.Size(100, 60);
        Controls.Add(pnlContainer);
    }
}

public class Program
{
    static int Main()
    {
        System.Windows.Forms.Application.Run(new Exercise());
        return 0;
    }
}
![]() Practical Learning: Creating Panels
Practical Learning: Creating Panels

| Control | (Name) | Text | Other Properties |
| Panel | pnlCategories | ||
| Label | Select the Category of Known Values | Font: Times New Roman, 9.75pt, style=Bold | |
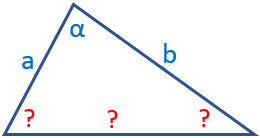
| RadioButton | rdoAAS | AAS - Known Values: Two angles and a side opposite one of them | |
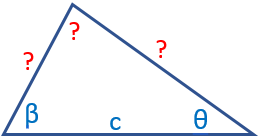
| RadioButton | rdoASA | ASA - Known Values: Two angles and the side between them | |
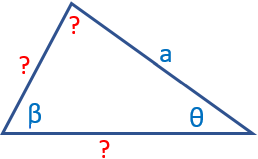
| RadioButton | rdoSAS | SAS - Known Values: Two sides and the angle between them | |
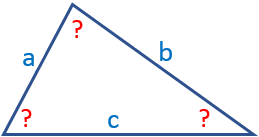
| RadioButton | rdoSSS | SSS - Known Values: All three sides | |
| Panel | pnlAAS |

| Control | (Name) | Text | Other Properties |
| PictureBox | pbxAAS | SizeMode: AutoSize | |
| Label | Known Values | Font: Times New Roman, 12pt, style=Bold | |
| Label | Angle 1: | ||
| TextBox | txtAASAngle1 | TextAlign: Right | |
| Label | Angle 2: | ||
| TextBox | txtAASAngle2 | TextAlign: Right | |
| Label | Side 1 | ||
| TextBox | txtAASSide1 | TextAlign: Right | |
| Button | btnAASCalculate | Calculate | |
| Label | Unknown Values | Font: Times New Roman, 12pt, style=Bold | |
| Label | Angle 3: | ||
| TextBox | txtAASAngle3 | TextAlign: Right | |
| Label | Side 2: | ||
| TextBox | txtAASSide2 | TextAlign: Right | |
| Label | Side 3 | ||
| TextBox | txtAASSide3 | TextAlign: Right | |
| Button | btnClose | Close |

| Control | (Name) | Text | Other Properties |
| Panel | pnlASA | ||
| PictureBox | pbxASA | Image: asa SizeMode: AutoSize |
|
| Label | Known Values | Font: Times New Roman, 12pt, style=Bold | |
| Label | Angle 1: | ||
| TextBox | txtASAAngle1 | TextAlign: Right | |
| Label | Angle 2: | ||
| TextBox | txtASAAngle2 | TextAlign: Right | |
| Label | Side 1: | ||
| TextBox | txtASASide1 | TextAlign: Right | |
| Button | btnASACalculate | Calculate | |
| Label | Unknown Values | Font: Times New Roman, 12pt, style=Bold | |
| Label | Angle 3: | ||
| TextBox | txtASAAngle3 | TextAlign: Right | |
| Label | Side 2: | ||
| TextBox | txtASASide2 | TextAlign: Right | |
| Label | Side 3: | ||
| TextBox | txtASASide3 | TextAlign: Right | |
| Panel | pnlSAS | ||
| PictureBox | pbxSAS | Image: sas SizeMode: AutoSize |
|
| Label | Known Values | Font: Times New Roman, 12pt, style=Bold | |
| Label | Side 1: | ||
| TextBox | txtSASSide1 | TextAlign: Right | |
| Label | Angle 1: | ||
| TextBox | txtSASAngle1 | TextAlign: Right | |
| Label | Side 2: | ||
| TextBox | txtSASSide2 | TextAlign: Right | |
| Button | btnSASCalculate | Calculate | |
| Label | Unknown Values | Font: Times New Roman, 12pt, style=Bold | |
| Label | Side 3: | ||
| TextBox | txtSASSide3 | TextAlign: Right | |
| Label | Angle 2: | ||
| TextBox | txtSASAngle2 | TextAlign: Right | |
| Label | Angle 3: | ||
| TextBox | txtSASAngle3 | TextAlign: Right | |
| Panel | pnlSSS | ||
| PictureBox | pbxSSS | Image: sss SizeMode: AutoSize |
|
| Label | Known Values | Font: Times New Roman, 12pt, style=Bold | |
| Label | Side 1: | ||
| TextBox | txtSSSSide1 | TextAlign: Right | |
| Label | Side 2: | ||
| TextBox | txtSSSSide2 | TextAlign: Right | |
| Label | Side 3: | ||
| TextBox | txtSSSSide3 | TextAlign: Right | |
| Button | btnSSSCalculate | Calculate | |
| Label | Unknown Values | Font: Times New Roman, 12pt, style=Bold | |
| Label | Angle 1: | ||
| TextBox | txtSSSAngle1 | TextAlign: Right | |
| Label | Angle 2: | ||
| TextBox | txtSSSAngle2 | TextAlign: Right | |
| Label | Angle 3: | ||
| TextBox | txtSSSAngle3 | TextAlign: Right |
Characteristics of a Panel Control
Introduction
As stated already, a panel is an object created from the Panel class. This class is derived from the ScrollableControl class where it gets its primary characteristics. The ScrollableControl class itself is derived from the Control class. Based on this, a property that is highly used on panels (and forms) is the Color. If you change the BackColor property, the new color would cover the face of the panel.
The Visibility of a Container
As mentioned in our introduction, controls container partly control some of the characteristics of the controls they are hosting, including the availability. For example, when a container is visiable, its controls are visible too. When a container is hidden, its controls are hidden too.
![]() Practical Learning: Controlling the Visibility of a Container
Practical Learning: Controlling the Visibility of a Container
using System;
using System.Windows.Forms;

namespace ObliqueTriangles10
{
    public partial class ObliqueTriangles : Form
    {
        public ObliqueTriangles()
        {
            InitializeComponent();
        }

        private void rdoAAS_CheckedChanged(object sender, EventArgs e)
        {
            pnlAAS.Visible = true;
            pnlASA.Visible = false;
            pnlSAS.Visible = false;
            pnlSSS.Visible = false;
        }

        private void rdoASA_CheckedChanged(object sender, EventArgs e)
        {
            pnlASA.Visible = true;
            pnlAAS.Visible = false;
            pnlSAS.Visible = false;
            pnlSSS.Visible = false;
        }

        private void rdoSAS_CheckedChanged(object sender, EventArgs e)
        {
            pnlSAS.Visible = true;
            pnlASA.Visible = false;
            pnlAAS.Visible = false;
            pnlSSS.Visible = false;
        }

        private void rdoSSS_CheckedChanged(object sender, EventArgs e)
        {
            pnlSSS.Visible = true;
            pnlSAS.Visible = false;
            pnlASA.Visible = false;
            pnlAAS.Visible = false;
        }

        private void ObliqueTriangles_Load(object sender, EventArgs e)
        {
            pnlSSS.Location = pnlSAS.Location = pnlASA.Location = pnlAAS.Location;
            rdoAAS.Checked = true;
            rdoAAS_CheckedChanged(sender, e);
        }
    }
}The Border Style
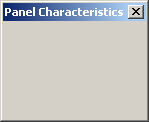
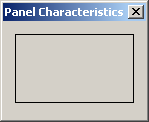
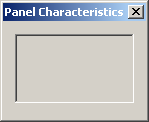
By default, a panel is drawn without borders. If you want to add borders to it, use the BorderStyle property. It provides three values that you can set in the Properties window: None, FixedSingle, and Fixed3D and their effects are as follows:
| None | FixedSingle | Fixed3D | |
| Design |
 |
 |
 |
| Run |
 |
 |
 |
To programmatically specify the border style, assign the desired value to the Panel.BorderStyle property. Here is an example:
private void InitializeComponent()
{
        Text     = "Domain Configuration";
        Width    = 320;
        Height   = 210;
        Location = System.Drawing.Point(140, 100);
        StartPosition = FormStartPosition.CenterScreen;

        pnlContainer = new Panel();
        pnlContainer.Location = Point(20, 20);
        pnlContainer.Size = System.Drawing.Size(100, 60);
        pnlContainer.BorderStyle = BorderStyle.Fixed3D;

        Controls.Add(pnlContainer);
}
A panel can be used as a button, in which case the user would click it to initiate an action.
![]() Practical Learning: Setting the Border of a Control
Practical Learning: Setting the Border of a Control


using System;
using System.Windows.Forms;

namespace ObliqueTriangles10
{
    public partial class ObliqueTriangles : Form
    {
        public ObliqueTriangles()
        {
            InitializeComponent();
        }

        private void rdoAAS_CheckedChanged(object sender, EventArgs e)
        {
            pnlAAS.Visible = true;
            pnlASA.Visible = false;
            pnlSAS.Visible = false;
            pnlSSS.Visible = false;
        }

        private void rdoASA_CheckedChanged(object sender, EventArgs e)
        {
            pnlASA.Visible = true;
            pnlAAS.Visible = false;
            pnlSAS.Visible = false;
            pnlSSS.Visible = false;
        }

        private void rdoSAS_CheckedChanged(object sender, EventArgs e)
        {
            pnlSAS.Visible = true;
            pnlASA.Visible = false;
            pnlAAS.Visible = false;
            pnlSSS.Visible = false;
        }

        private void rdoSSS_CheckedChanged(object sender, EventArgs e)
        {
            pnlSSS.Visible = true;
            pnlSAS.Visible = false;
            pnlASA.Visible = false;
            pnlAAS.Visible = false;
        }

        private void ObliqueTriangles_Load(object sender, EventArgs e)
        {
            pnlSSS.Location = pnlSAS.Location = pnlASA.Location = pnlAAS.Location;
            rdoAAS.Checked = true;
            rdoAAS_CheckedChanged(sender, e);
        }

        private void btnAASCalculate_Click(object sender, EventArgs e)
        {
            double angle1 = 0.00, angle2 = 0.00, side1 = 0.00;

            try
            {
                angle1 = double.Parse(txtAASAngle1.Text);
            }
            catch (FormatException)
            {
                MessageBox.Show("You must type a value for the lower left angle of the AAS shape.", "Obliques Triangles");
            }

            try
            {
                angle2 = double.Parse(txtAASAngle2.Text);
            }
            catch (FormatException)
            {
                MessageBox.Show("You must type a value for the lower right angle of the AAS shape.", "Obliques Triangles");
            }

            try
            {
                side1 = double.Parse(txtAASSide1.Text);
            }
            catch (FormatException)
            {
                MessageBox.Show("You must type a value for the right side of the AAS shape.", "Obliques Triangles");
            }

            // Here, we use the law of sines
            double angle3 = 180 - (angle1 + angle2);
            double side2 = side1 * Math.Sin(angle2 * Math.PI / 180) / Math.Sin(angle1 * Math.PI / 180);
            double side3 = side1 * Math.Sin(angle3 * Math.PI / 180) / Math.Sin(angle1 * Math.PI / 180);

            txtAASAngle3.Text = angle3.ToString();
            txtAASSide2.Text = side2.ToString();
            txtAASSide3.Text = side3.ToString();
        }

        private void btnASACalculate_Click(object sender, EventArgs e)
        {
            double angle1 = 0.00, side1 = 0.00, angle2 = 0.00;

            try
            {
                angle1 = double.Parse(txtASAAngle1.Text);
            }
            catch (FormatException)
            {
                MessageBox.Show("You must type a value for the lower left angle of the ASA shape.", "Obliques Triangles");
            }

            try
            {
                side1 = double.Parse(txtASASide1.Text);
            }
            catch (FormatException)
            {
                MessageBox.Show("You must type a value for the bottom side of the AAS shape.", "Obliques Triangles");
            }

            try
            {
                angle2 = double.Parse(txtASAAngle2.Text);
            }
            catch (FormatException)
            {
                MessageBox.Show("You must type a value for the lower right angle of the ASA shape.", "Obliques Triangles");
            }

            double angle3 = 180 - (angle1 + angle2);
            double side2 = side1 * Math.Sin(angle2 * Math.PI / 180) / Math.Sin(angle1 * Math.PI / 180);
            double side3 = side1 * Math.Sin(angle3 * Math.PI / 180) / Math.Sin(angle1 * Math.PI / 180);

            txtASAAngle3.Text = angle3.ToString();
            txtASASide2.Text = side3.ToString();
            txtASASide3.Text = side2.ToString();
        }

        private void btnSASCalculate_Click(object sender, EventArgs e)
        {
            double side1 = 0.00, angle1 = 0.00, side2 = 0.00;

            try
            {
                side1 = double.Parse(txtSASSide1.Text);
            }
            catch (FormatException)
            {
                MessageBox.Show("You must type a value for the left side of the SAS shape.", "Obliques Triangles");
            }

            try
            {
                angle1 = double.Parse(txtSASAngle1.Text);
            }
            catch (FormatException)
            {
                MessageBox.Show("You must type a value for the top angle of the SAS shape.", "Obliques Triangles");
            }

            try
            {
                side2 = double.Parse(txtSASSide2.Text);
            }
            catch (FormatException)
            {
                MessageBox.Show("You must type a value for the right side of the SAS shape.", "Obliques Triangles");
            }

            // Here, we use the law of cosines
            double side3 = Math.Sqrt((side1 * side1) +
                          (side2 * side2) -
                          (2 * side1 * side2 * Math.Cos(angle1 * Math.PI / 180)));
            double angle2 = Math.Acos(((side3 * side3) +
                          (side2 * side2) -
                          (side1 * side1)) /
                         (2 * side3 * side2)) * 180 / Math.PI;
            double angle3 = 180 - (angle1 + angle2);


            txtSASSide3.Text = side3.ToString();
            txtSASAngle2.Text = angle2.ToString();
            txtSASAngle3.Text = angle3.ToString();
        }

        private void btnSSSCalculate_Click(object sender, EventArgs e)
        {
            double side1 = 0.00, side2 = 0.00, side3 = 0.00;

            try
            {
                side1 = double.Parse(txtSSSSide1.Text);
            }
            catch (FormatException)
            {
                MessageBox.Show("You must type a value for the left side of the SSS shape.", "Obliques Triangles");
            }

            try
            {
                side2 = double.Parse(txtSSSSide2.Text);
            }
            catch (FormatException)
            {
                MessageBox.Show("You must type a value for the right side of the SSS shape.", "Obliques Triangles");
            }

            try
            {
                side3 = double.Parse(txtSSSSide3.Text);
            }
            catch (FormatException)
            {
                MessageBox.Show("You must type a value for the bottom side of the SSS shape.", "Obliques Triangles");
            }

            // Here, we use the law of cosines
            double angle1 = Math.Acos(((side3 * side3) +
                           (side2 * side2) -
                           (side1 * side1)) /
                         (2 * side3 * side2)) * 180 / Math.PI;
            double angle2 = Math.Acos(((side3 * side3) +
                           (side1 * side1) -
                           (side2 * side2)) /
                         (2 * side3 * side1)) * 180 / Math.PI;
            double angle3 = 180 - (angle1 + angle2);


            txtSSSAngle1.Text = angle1.ToString();
            txtSSSAngle2.Text = angle2.ToString();
            txtSSSAngle3.Text = angle3.ToString();
        }

        private void btnClose_Click(object sender, EventArgs e)
        {
            Close();
        }
    }
}Angle 1: 58 Angle 2: 28 Side 1: 6.2

Angle 1: 43
Side 1:  4.56
Angle 2: 57


Side 1:  15
Angle 1: 28
Angle 2: 43.6


Side 1:  210
Side 2: 75
Side 3: 172

Scrolling a Panel
Besides aesthetic characteristics, a panel provides the ability to scroll, vertically and/or horizontally on its body. Scrolling makes it possible to give the user access to hidden parts that go beyond the (visible) client area of the panel. Here is an example:

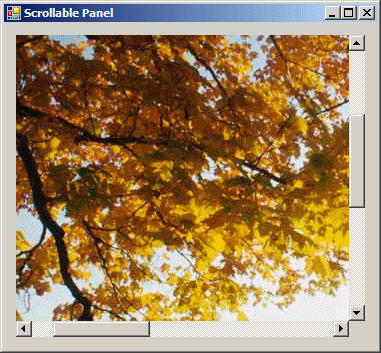
To assist you with scroll bars, the Panel class is equipped with a property named AutoScroll. In reality, this property is inherited from the ScrollableControl class. If you want a ScrollableControl-based control to display the scroll bars, set this property to true. The steps to have the scroll bars on a panel are:
One of the properties that influences the behavior of scroll bars is AutoScrollMargin. This property controls the area inside of which the scrolling can occur. This property is of type Size, which means it holds the width and the height of the scrollable area. Its default value is (0, 0), which means the whole client area of the parent will be used. If you to limit the area, change the value of this property.
|
|
||
| Previous | Copyright © 2008-2021, FunctionX | Next |
|
|
||