Introduction to the .NET Built-In Classes
Introduction to the .NET Built-In Classes
Introduction to Built-In Classes and Types
Overview
For many of the classes you will use in developping your applications, you will create them yourself, but to assist you in working on your projects, the .NET Framework provides a very rich collection of classes. A class is referred to as built-in if it is already available in the .NET Framework.
Introduction to the Object
In the .NET Framework, an object is any type of value. To support objects, the .NET Framework provides a class named Object. To support objects, the C# language uses a data type named object. You can use it to declare a variable of any kind. After declaring the variable, Initialize with a value of your choice. Here are examples:
class Program
{
    static void Main()
    {
        object employeeName = "Philippe Blayne";
        object hourlySalary = 26.95;
        object yearsOfExperience = 5;
    }
}
To present the value to the console window, pass the name of the variable in the parentheses of System.Console.Write() or System.Console.WriteLine(). Here are examples:
class Program
{
    static void Main()
    {
        object employeeName = "Philippe Blayne";
        object hourlySalary = 26.95;
        object yearsOfExperience = 5;

        System.Console.WriteLine("=//= Employee Record =//=");
        System.Console.Write("Employee Name: ");
        System.Console.WriteLine(employeeName);
        System.Console.Write("Hourly Salary: ");
        System.Console.WriteLine(hourlySalary);
        System.Console.Write("Length of Experience: ");
        System.Console.Write(yearsOfExperience);
        System.Console.WriteLine(" years");
    }
}
You can also use object as a parameter to a method. Here is an example:
class Program
{
    private void PresentEmployeeSummary(object something)
    {
    }
}
Remember that, in the body of the method, you can use or ignore the parameter. Still, when calling the method, you must provide a value for the parameter. Here is an example:
class Exercise
{
    private void PresentEmployeeSummary(object something)
    {
        object employeeName = "Philippe Blayne";
        object hourlySalary = 26.95;
        object yearsOfExperience = 5;

        System.Console.WriteLine("=//= Employee Record =//=");
        System.Console.Write("Employee Name: ");
        System.Console.WriteLine(employeeName);
        System.Console.Write("Hourly Salary: ");
        System.Console.WriteLine(hourlySalary);
        System.Console.Write("Length of Experience: ");
        System.Console.Write(yearsOfExperience);
        System.Console.WriteLine(" years");
    }

    static void Main()
    {
        object noNeed = "";

        Exercise exo = new Exercise();

        exo.PresentEmployeeSummary(noNeed);
    }
}
In the same way, you can create a method that uses various parameters that are of type object or some are objects while others are not. Here is an example:
class Exercise
{
    private void PresentEmployeeSummary(object something, int other)
    {
    }

    static void Main()
    {
        object noNeed = "";

        Exercise exo = new Exercise();

        exo.PresentEmployeeSummary(noNeed, 0);
    }
}
Random Numbers
Introduction to Random Numbers
A number is referred to as random if it has been selected from a pool without a specific pattern to follow. In reality, it is difficult for a number to qualify as random. For this reason, most random numbers are referred to as pseudo-random.
Getting a Random Number
To support the ability to create or choose a random number, the .NET Framework provides a class named Random. This is defined in the System namespace of the System.dll library. Therefore, if you are planning to use this class, you can first add its namespace in the top of the document.
To start using the Random class, you can declare a variable of that class. The class has two constructors. Here is an example that uses the default constructor:
using System;

namespace Exercises
{
    public class Exercise
    {
        public static void Main()
        {
            Random rand = new Random();
        }
    }
}
After declaring the variable, you can start getting numbers from it. To help you do this, the Random class is equipped with a method named Next. This method is overloaded with three versions. One of the versions of this method takes no argument. Here is an example of calling it:
using System;

namespace Exercises
{
    public class Exercise
    {
        public static void Main()
        {
            Random rand = new Random();

            int number = rand.Next();
        }
    }
}
The System.Next() method generates a randomly selected integer between 0 and a constant named MinValue. ou can call this version of the Next() method repeatedly to get random numbers. Here is an example:
using System;

namespace Exercises
{
    public class Exercise
    {
        public static void Main()
        {
            Random rand = new Random();

            int rndNumber1 = rand.Next();
            int rndNumber2 = rand.Next();
            int rndNumber3 = rand.Next();
            int rndNumber4 = rand.Next();
            int rndNumber5 = rand.Next();

            Console.Write("Random Number: ");
            Console.WriteLine(rndNumber1);
            Console.Write("Random Number: ");
            Console.WriteLine(rndNumber2);
            Console.Write("Random Number: ");
            Console.WriteLine(rndNumber3);
            Console.Write("Random Number: ");
            Console.WriteLine(rndNumber4);
            Console.Write("Random Number: ");
            Console.WriteLine(rndNumber5);
            Console.WriteLine("=================================");
        }
    }
}
Here is an example of what this could produce:
Random Number: 831242334
Random Number: 782179338
Random Number: 1962809432
Random Number: 216011046
Random Number: 124514999
=================================
Press any key to continue . . .
The Seed of a Random Number
When creating a program that repeatedly gets a series of random numbers, you may (or may not) want the Random class to generate the same number over and over again. A seed is a constant value that controls whether a random generation would produce the same result every time it occurs. For example, using a seed, you can impose it upon the Random class to generate the same number every time the Next() method is called. To support the ability to use a seed, the Random class is equipped with a second constructor. Its syntax is:
public Random(int Seed);
Based on this, to specify a seed, when declaring a Random variable, pass a constant integer to the constructor.
Generating Random Numbers in a Range of Numbers
So far, we have been using any number that would fit an integer. In some assignments, you may want to restrict the range of numbers that can be extracted. Fortunately, the Random class allows this. Using the Random class, you can generate random positive numbers up to a maximum of your choice. To support this, the Random class is equipped with another version of the Next() method. It takes as argument an integer. The argument to pass to the method determines the highest integer that can be generated by the Next() method. The method returns an integer. Here is an example that generates 5 random numbers between 0 and 100:
using System;

namespace Exercises
{
    public class Exercise
    {
        public static void Main()
        {
            Random rand = new Random();

            int rndNumber1 = rand.Next(100);
            int rndNumber2 = rand.Next(100);
            int rndNumber3 = rand.Next(100);
            int rndNumber4 = rand.Next(100);
            int rndNumber5 = rand.Next(100);

            Console.Write("Random Number: ");
            Console.WriteLine(rndNumber1);
            Console.Write("Random Number: ");
            Console.WriteLine(rndNumber2);
            Console.Write("Random Number: ");
            Console.WriteLine(rndNumber3);
            Console.Write("Random Number: ");
            Console.WriteLine(rndNumber4);
            Console.Write("Random Number: ");
            Console.WriteLine(rndNumber5);
            Console.WriteLine("=================================");
        }
    }
}
Here is an example of what this could produce:
Random Number: 8
Random Number: 17
Random Number: 69
Random Number: 59
Random Number: 84
=================================
Press any key to continue . . .
The above version of the Next() method generates numbers starting at 0. If you want, you can specify the minimum and the maximum range of numbers that the Next() method must work with. To support this, the Random class is equipped with one more versions of this method and that takes two arguments. The first argument specifies the lowest value that can come from the range. The second argument holds the highest value that the Next() method can generate. Therefore, the method would operate between both values. Here is an example that generates random numbers from 6 to 18:
using System;

namespace Exercises
{
    public class Exercise
    {
        public static void Main()
        {
            Random rand = new Random();

            int rndNumber1 = rand.Next(6, 18);
            int rndNumber2 = rand.Next(6, 18);
            int rndNumber3 = rand.Next(6, 18);
            int rndNumber4 = rand.Next(6, 18);
            int rndNumber5 = rand.Next(6, 18);

            Console.Write("Random Number: ");
            Console.WriteLine(rndNumber1);
            Console.Write("Random Number: ");
            Console.WriteLine(rndNumber2);
            Console.Write("Random Number: ");
            Console.WriteLine(rndNumber3);
            Console.Write("Random Number: ");
            Console.WriteLine(rndNumber4);
            Console.Write("Random Number: ");
            Console.WriteLine(rndNumber5);
            Console.WriteLine("=================================");
        }
    }
}
Here is an example of what this could produce:
Random Number: 11
Random Number: 9
Random Number: 7
Random Number: 15
Random Number: 10
=================================
Press any key to continue . . .
Introduction to the Built-In Math Class
Introduction
To help you perform some of the basic algebraic and geometric operations in a website, the .NET Framework provides a static class named Math. Besides the Math class, you can also take advantage of Visual Basic's very powerful library of functions. This library is one of the most extended set of functions of various area of business mathematics.
The Sign of a Number
When initializing a numeric variable using a constant, you decide whether it is negative, 0 or positive. This is referred to as its sign. To help you determine the sign of a variable or of a number, the Math static class provides a method named Sign(). It is overloaded in various versions, for for each type. When calling this method, pass the value or the variable you want to consider, as argument. The method returns:
The Integral Side of a Floating-Point Number
We already know that a decimal number consists of an integral side and a precision side; both are separated by the decimal symbol which, in US English, is the period. To let you get the integral side of a decimal value, the Math static class provides a method named Truncate. It is overloaded in two versions whose syntaxes are:
public static double Truncate(double d);
public static double Truncate(double d);
When calling this method, pass it a number or a variable of numeric type. The method returns the int side of the value.
The Minimum of Two Values
If you have two numbers, you can find the minimum of both without writing your own code. To assist you with this, the Math class is equipped with a method named Min. This method is overloaded in various versions with each version adapted to each integral or decimal type.
The Maximum of Two Values
As opposed to the minimum of two numbers, you may be interested in the higher of both. To help you find the maximum of two numbers, you can call the Max() method of the Math class. It is overloaded in various versions with one of each type of numeric data.
Value Conversions
Implicit Conversions
If you have code with mixed types of variables, you may need to convert a value from one type to another. Implicit conversion is the ability to convert a value of one type into a value of another type. This is possible when the amount of memory that one type is using is lower than the amount necessary for another type. For example, a value of an integer can be directly converted into a double type. Here is an example:
int iNumber = 2445;

double dNumber = iNumber;
In the same way, as saw in our introduction to the double type, you can assign an integral value to a variable of type double. Here is an example:
double number = 927084;
This characteristic is referred to as implicit conversion.
Explicit Conversions
Because of memory requirements, the direct reverse of implicit conversion is not possible. Since the memory reserved for an int variable is smaller than that of a decimal, you cannot assign a value of type decimal to a variable of type int. As a result, the following code produces an error:
int hourlySalary = 24.75;
In the same way, you cannot assign a variable of types double or decimal to a variable of type int. This means that the following code produces an error:
double nbr = 9270.84;

int number = nbr;
Value Casting
Value casting consists of converting a value of one type into a value of another type. Value casting is also referred to as explicit conversion.
To cast a value or a variable, precede it with the desired data type in parentheses. Here is an example:
double number = 9270.84;

int nbr = (int)number;
When performing explicit conversion, that is, when casting, you should pay close attention to the value that is being cast. If a value cannot fit in the memory of the other, you may get an unpredictable result.
We already know that, to convert a numeric value to text, you can call a method named ToString applied to the value or its variable. To support the conversion of a value from one type to another, the .NET Framework provides a static class named Convert. This class is equipped with various static methods; they are so numerous that we cannot review all of them.
To adapt the Convert class to each C# data type, the class is equipped with a static method whose name starts with To, ends with the .NET Framework name of its type, and takes as argument the type that needs to be converted. Based on this, to convert a value to a double type, you can call the ToDouble() method and pass the value as argument. Its syntax is:
public static int ToDouble(value);
![]() Practical Learning: Converting a Value from One Type to Another
Practical Learning: Converting a Value from One Type to Another
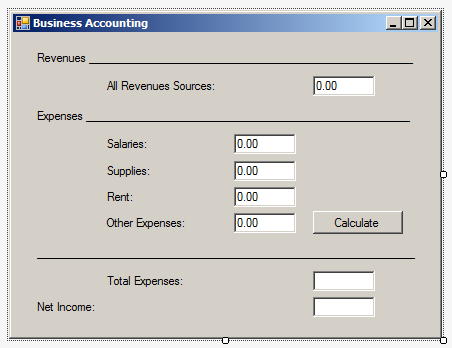
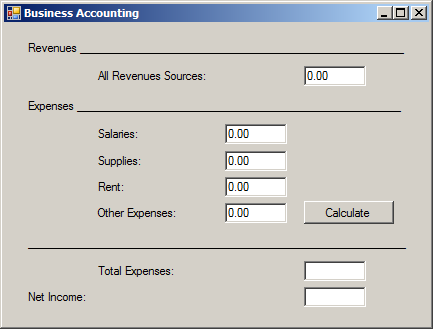
| Control | (Name) | Text |
| Label | Revenues ____________ | |
| Label | All Revenues Sources: | |
| TextBox | txtRevenuesSources | 0.00 |
| Label | Expenses ____________ | |
| Label | Salaries: | |
| TextBox | txtSalaries | 0.00 |
| Label | Supplies: | |
| TextBox | txtSupplies | 0.00 |
| Label | Rent: | |
| TextBox | txtRent | 0.00 |
| Label | txtOtherExpenses: | |
| TextBox | txtOtherExpenses | 0.00 |
| Button | btnCalculate | Calculate |
| Label | ______________________ | |
| Label | txtTotalExpenses: | |
| TextBox | txtTotalExpenses | |
| Label | txtNetIncome: | |
| TextBox | txtNetIncome |
using System;
using System.Windows.Forms;

namespace BusinessAccounting2
{
    public partial class BusinessAccounting : Form
    {
        public BusinessAccounting()
        {
            InitializeComponent();
        }

        private void btnCalculate_Click(object sender, EventArgs e)
        {
            double rent = Convert.ToDouble(txtRent.Text);
            double supplies = Convert.ToDouble(txtSupplies.Text);
            double salaries = Convert.ToDouble(txtSalaries.Text);
            double revenues = Convert.ToDouble(txtRevenuesSources.Text);
            double otherExpenses = Convert.ToDouble(txtOtherExpenses.Text);

            double totalExpenses = salaries + supplies + rent + otherExpenses;
            double netIncome = revenues - totalExpenses;

            txtTotalExpenses.Text = totalExpenses.ToString("F");
            txtNetIncome.Text = netIncome.ToString("F");
        }
    }
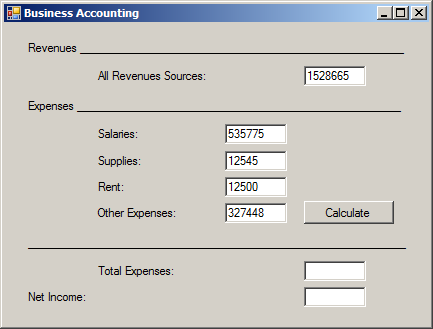
}
All Revenues Sources: 1528665
Salaries:              535775
Supplies:               12545
Rent:                   12500
Other Expenses:        327448
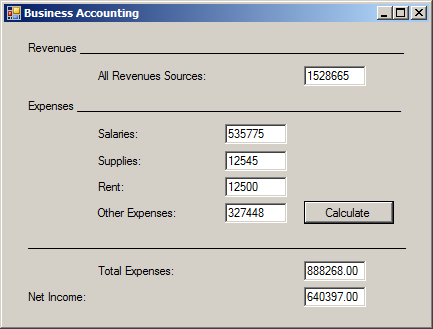
using System;
using System.Windows.Forms;

namespace BusinessAccounting2
{
    public partial class BusinessAccounting : Form
    {
        public BusinessAccounting()
        {
            InitializeComponent();
        }

        private void btnCalculate_Click(object sender, EventArgs e)
        {
            double revenues       = Convert.ToDouble(txtRevenuesSources.Text);
            double totalExpenses  = Convert.ToDouble(txtSalaries.Text) +
                                    Convert.ToDouble(txtSupplies.Text) +
                                    Convert.ToDouble(txtRent.Text) +
                                    Convert.ToDouble(txtOtherExpenses.Text);

            txtTotalExpenses.Text = totalExpenses.ToString("F");
            txtNetIncome.Text     = (revenues - totalExpenses).ToString("F");
        }
    }
}using System;
using System.Windows.Forms;
namespace BusinessAccounting2
{
public partial class BusinessAccounting : Form
{
public BusinessAccounting()
{
InitializeComponent();
}
private void btnCalculate_Click(object sender, EventArgs e)
{
AccountingReport ar = new AccountingReport();
ar.Rent = Convert.ToDouble(txtRent.Text);
ar.Supplies = Convert.ToDouble(txtSupplies.Text);
ar.Salaries = Convert.ToDouble(txtSalaries.Text);
ar.RevenuesSources = Convert.ToDouble(txtRevenuesSources.Text);
ar.OtherExpenses = Convert.ToDouble(txtOtherExpenses.Text);
txtTotalExpenses.Text = ar.CalculateTotalExpenses().ToString("F");
txtNetIncome.Text = ar.CalculateNetIncome().ToString("F");
}
}
public class AccountingReport
{
public double RevenuesSources { get; set; }
public double Salaries { get; set; }
public double Supplies { get; set; }
public double Rent { get; set; }
public double OtherExpenses { get; set; }
public double CalculateTotalExpenses() => Supplies + Salaries + Rent + OtherExpenses;
public double CalculateNetIncome() => RevenuesSources - CalculateTotalExpenses();
}
}Arithmetic
Absolute Values
The absolute value of a number x is x if the number is (already) positive. If the number is negative, its absolute value is its positive equivalent. To let you get the absolute value of a number, the Math static class is equipped with a method named Abs, which is overloaded in various versions. The syntax for the int and the double types are:
public static int Abs(int value);
public static double Abs(double value);
This method takes the argument whose absolute value must be found.
The Ceiling of a Number
Consider a floating-point number such as 12.155. This number is between integer 12 and integer 13:

In the same way, consider a number such as -24.06. As this number is negative, it is between -24 and -25, with -24 being greater.
In arithmetic, the ceiling of a number is the closest integer that is greater or higher than the number considered. In the first case, the ceiling of 12.155 is 13 because 13 is the closest integer greater than or equal to 12.155. The ceiling of -24.06 is 24.
To support the finding of a ceiling, the Math static class is equipped with a method named Ceiling that is overloaded with two versions. The syntax for a double value is:
public static double Ceiling(double a);
This method takes as argument a number or variable whose ceiling needs to be found. Here is an example:
double value1 = 155.55;
double value2 = -24.06;

double nbr1 = Math.Ceiling(value1));
double nbr2 = Math.Ceiling(value2));
The Floor of a Number
Consider two floating numbers such as 128.44 and -36.72. The number 128.44 is between 128 and 129 with 128 being the lower. The number -36.72 is between -37 and -36 with -37 being the lower. The lowest but closest integer value of a number is referred to as its floor.
To assist you with finding the floor of a number, the Math static class provides the Floor() method. It is overloaded with two versions. The syntax for a double is:
public static double Floor(double d);
The Math.Floor() method takes the considered value as the argument and returns the integer that is less than or equal to the argument. Here is an example:
double value1 = 1540.25;
double value2 = -360.04;

double nbr1 = Math.Floor(value1);
double nbr2 = Math.Floor(value2);
The Power of a Number
The power is the value of one number or expression raised to another number. This follows the formula:
value = xy
To support this operation, the Math static class is equipped with a method named Pow. Its syntax is:
public static double Pow(double x, double y);
This method takes two arguments. The first argument, x, is used as the base number to be evaluated. The second argument, y, also called the exponent, will raise x to this value.
![]() Practical Learning: Getting the Power of a Number
Practical Learning: Getting the Power of a Number
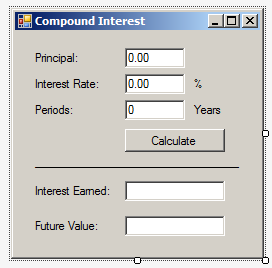
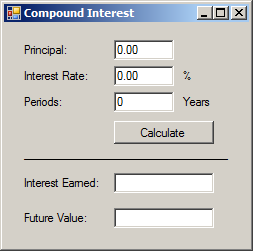
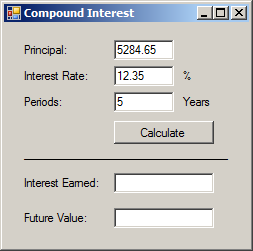
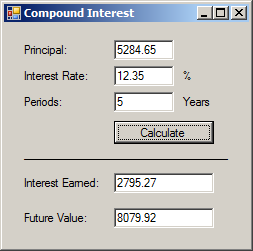
| Control | (Name) | Text |
| Label | Principal: | |
| TextBox | txtPrincipal | 0.00 |
| Label | Interest Rate: | |
| TextBox | txtInterest Rate | 0.00 |
| Label | % | |
| Label | Periods: | |
| TextBox | txtPeriods | 0 |
| Label | Years: | |
| Button | btnCalculate | Calculate |
| Label | ______________________ | |
| Label | Interest Earned: | |
| TextBox | txtInterestEarned | TextAlign: Right |
| Label | Future Value: | |
| TextBox | txtFutureValue | TextAlign: Right |
using System;
using System.Windows.Forms;

namespace CompoundInterest1
{
    public partial class Calculations : Form
    {
        public Calculations()
        {
            InitializeComponent();
        }

        private void btnCalculate_Click(object sender, EventArgs e)
        {
            double frequency = 12.00;

            double principal = Convert.ToDouble(txtPrincipal.Text);
            double interestRate = Convert.ToDouble(txtInterestRate.Text);
            double periods = Convert.ToDouble(txtPeriods.Text);
            double per = periods / 100;

            double futureValue = principal * Math.Pow((1.00 + (interestRate / frequency)), frequency * per);
            double interestEarned = futureValue - principal;

            txtFutureValue.Text = futureValue.ToString("F");
            txtInterestEarned.Text = interestEarned.ToString("F");
        }
    }
}
using System;
using System.Windows.Forms;

namespace CompoundInterest1
{
    public partial class Calculations : Form
    {
        public Calculations()
        {
            InitializeComponent();
        }

        private void btnCalculate_Click(object sender, EventArgs e)
        {
            CompoundInterest ci = new CompoundInterest();

            ci.Principal = Convert.ToDouble(txtPrincipal.Text);
            ci.InterestRate = Convert.ToDouble(txtInterestRate.Text);
            ci.Periods = Convert.ToDouble(txtPeriods.Text);

            txtFutureValue.Text = ci.FutureValue.ToString("F");
            txtInterestEarned.Text = ci.CalculateInterestEarned().ToString("F");
        }
    }

    public class CompoundInterest
    {
        const double FREQUENCY = 12.00;

        internal double Principal { get; set; }
        internal double InterestRate { get; set; }
        internal double Periods { get; set; }

        public double FutureValue
        {
            get
            {
                double per = Periods / 100;

                return Principal * Math.Pow((1.00 + (InterestRate / FREQUENCY)), FREQUENCY * per);
            }
        }
        public double CalculateInterestEarned() => FutureValue - Principal;
    }
}The Exponential
To let you calculate the exponential value of a number, the Math static class provides the Exp() method. Its syntax is:
public static double Exp(double d);
If the value of of the argument x is less than -708.395996093 (approximately), the result is reset to 0 and qualifies as underflow. If the value of the argument x is greater than 709.78222656 (approximately), the result qualifies as overflow.
Here is an example of calling this method:
using System;

class Program
{
    static int Main()
    {
        Console.Write("The exponential of ");
        Console.Write(709.78222656);
        Console.Write(" is ");
        Console.WriteLine(Math.Exp(709.78222656));

        return 0;
    }
}
This would produce:
The exponential of 709.78222656 is 1.79681906923757E+308
Press any key to continue . . .
The Natural Logarithm
To calculate the natural logarithm of a number, you can call the Math.Log() method. It is provides in two versions. The syntax of one is:
public static double Log(double d);
Here is an example:
using System;

class Program
{
    static int Main()
    {
        double log = 12.48;

        Console.Write("Log of ");
        Console.Write(log);
        Console.Write(" is ");
        Console.WriteLine(Math.Log(log));

        return 0;
    }
}
This would produce:
Log of 12.48 is 2.52412736294128
Press any key to continue . . .
The Base 10 Logarithm
The Math.Log10() method calculates the base 10 logarithm of a number. The syntax of this method is:
public static double Log10(double d);
The number to be evaluated is passed as the argument. The method returns the logarithm on base 10 using the formula:
y = log10x
which is equivalent to
x = 10y
Here is an example:
using System;

class Program
{
    static int Main()
    {
        double log10 = 12.48;

        Console.Write("Log of ");
        Console.Write(log10);
        Console.Write(" is ");
        Console.WriteLine(Math.Log10(log10));

        return 0;
    }
}
This would produce:
Log of 12.48 is 1.09621458534641
Press any key to continue . . .
The Logarithm of Any Base
The Math.Log() method provides another version whose syntax is:
public static double Log(double a, double newBase);
The variable whose logarithmic value will be calculated is passed as the first argument to the method. The second argument allows you to specify a base of your choice. The method uses the formula:
Y = logNewBasex
This is the same as
x = NewBasey
Here is an example of calling this method:
using System;

class Program
{
    static int Main()
    {
        double logN = 12.48D;

        Console.Write("Log of ");
        Console.Write(logN);
        Console.Write(" is ");
        Console.WriteLine(Math.Log(logN, 4));

        return 0;
    }
}
This would produce:
Log of 12.48 is 1.82077301454376
Press any key to continue . . .
The Square Root
You can calculate the square root of a decimal positive number. To support this, the Math static class is equipped with a method named Sqrt whose syntax is:
public static double Sqrt(double d);
This method takes one argument as a positive floating-point number. After the calculation, the method returns the square root of x:
using System;

class Program
{
    static int Main()
    {
        double sqrt = 8025.73;

        double number = Math.Sqrt(sqrt));

        return 0;
    }
}
![]() Practical Learning:
Finding the Square Root of a Number
Practical Learning:
Finding the Square Root of a Number
using System;

namespace Geometry07
{
    public class EquilateralTriangle
    {
        private double s;
        const double NumberOfSides = 3;

        public EquilateralTriangle(double side) => s = side;

        public double Side { get; set; }
        public double Perimeter => s * NumberOfSides;
        public double Height => s * Math.Sqrt(3) / 2;
        public double Area => s * s * Math.Sqrt(3) / 4;
        public double Inradius => s * Math.Sqrt(3) / 6;
        public double Circumradius => s / Math.Sqrt(3);
    }
}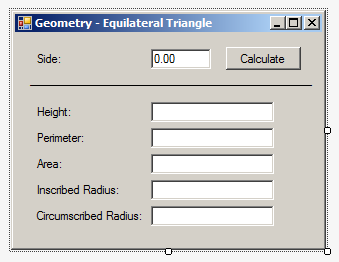
| Control | (Name) | Text |
| Label | Side: | |
| TextBox | txtSide | 0.00 |
| Button | btnCalculate | Calculate |
| Label | Height: | |
| TextBox | txtHeight | |
| Label | Perimeter: | |
| TextBox | txtPerimeter | |
| Label | Area: | |
| TextBox | txtArea | |
| Label | Inscribed Radius: | |
| TextBox | txtInscribedRadius | |
| Label | Circumscribed Radius: | |
| TextBox | txtBottomArea |
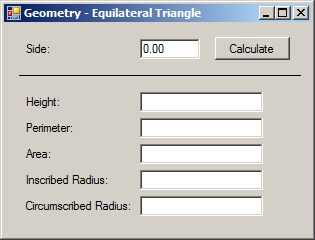
using System;
using System.Windows.Forms;

namespace Geometry07
{
    public partial class Geometry : Form
    {
        public Geometry()
        {
            InitializeComponent();
        }

        private void btnCalculate_Click(object sender, EventArgs e)
        {
            double side = Convert.ToDouble(txtSide.Text);

            EquilateralTriangle et = new EquilateralTriangle(side);

            txtHeight.Text = et.Height.ToString();
            txtPerimeter.Text = et.Perimeter.ToString();
            txtArea.Text = et.Area.ToString();
            txtInscribedRadius.Text = et.Inradius.ToString();
            txtBottomArea.Text = et.Circumradius.ToString();
        }
    }
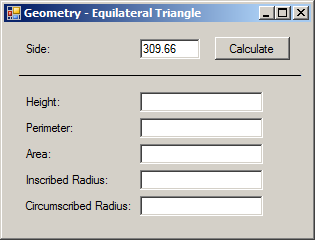
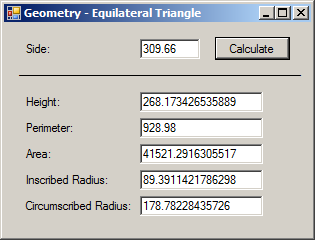
}
Trigonometry
Introduction
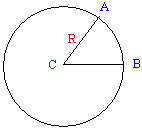
A circle is a group or series of distinct points drawn at an exact same distance from another point referred to as the center. The distance from the center C to one of these equidistant points is called the radius, R. The line that connects all of the points that are equidistant to the center is called the circumference of the circle. The diameter is the distance between two points of the circumference to the center; in other words, a diameter is double the radius.
To manage the measurements and other related operations, the circumference is divided into 360 portions. Each of these portions is called a degree. The unit used to represent the degree is the degree, written as ˚. Therefore, a circle contains 360 degrees, that is 360˚. The measurement of two points A and D of the circumference could have 15 portions of the circumference. In this case, this measurement would be represents as 15˚.
The distance between two equidistant points A and B is a round shape geometrically defined as an arc. An angle is the ratio of the distance between two points A and B of the circumference divided by the radius R. This can be written as:
Therefore, an angle is the ratio of an arc over the radius. Because an angle is a ratio and not a "physical"� measurement, which means an angle is not a dimension, it is independent of the size of a circle. Obviously this angle represents the number of portions included by the three points. A better unit used to measure an angle is the radian or rad.
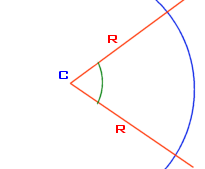
A cycle is a measurement of the rotation around the circle. Since the rotation is not necessarily complete, depending on the scenario, a measure is made based on the angle that was covered during the rotation. A cycle could cover part of the circle in which case the rotation would not have been completed. A cycle could also cover the whole 360˚ of the circle and continue there after. A cycle is equivalent to the radian divided by 2 * Pi.
The PI Constant
The letter п, also written as Pi, is a constant number used in various mathematical calculations. Its approximate value is 3.1415926535897932. The calculator of MicrosoftWindows represents it as 3.1415926535897932384626433832795.
To support the Pi constant, the Math class is equipped with a constant named PI.
A diameter is two times the radius. In geometry, it is written as 2R. In C++, it is written as 2 * R or R * 2 (because the multiplication is symmetric). The circumference of a circle is calculated by multiplying the diameter to Pi, which is 2Rп, or 2 * R * п or 2 * R * Pi.
A radian is 2Rп/R radians or 2Rп/R rad, which is the same as 2п rad or 2 * Pi.
To perform conversions between the degree and the radian, you can use the formula:
360˚ = 2п rad which is equivalent to 1 rad = 360˚ / 2п = 57.3˚.
The Cosine of a Value
Consider the following geometric figure:
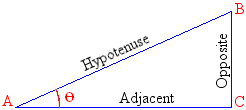
Consider AB the length of A to B, also referred to as the hypotenuse. Also consider AC the length of A to C which is the side adjacent to point A. The cosine of the angle at point A is the ratio AC/AB. That is, the ratio of the adjacent length, AC, over the length of the hypotenuse, AB:
The returned value, the ratio, is a double-precision number between -1 and 1.
To calculate the cosine of an angle, the Math class provides the Cos() method. Its syntax is:
public static double Cos(double d);
Here is an example:
int number = 82;

double nbr = Math.Cos(number);
The Sine of a Value
Consider AB the length of A to B, also called the hypotenuse to point A. Also consider CB the length of C to B, which is the opposite side to point A. The sine represents the ratio of CB/AB; that is, the ratio of the opposite side, CB over the hypotenuse AB.
To calculate the sine of a value, you can call the Sin() method of the Math class. Its syntax is:
public static double Sin(double a);
Here is an example:
double number = 82.55;

double nbr = Math.Sin(number);
Tangents
Consider AC the length of A to C. Also consider BC the length of B to C. The tangent is the result of BC/AC; that is, the ratio of BC over AC. To assist you with calculating the tangent of of a number, the Math class is equipped with a method named Tan whose syntax is:
public static double Tan(double a);
The Arc Tangent
Consider BC the length of B to C. Also consider AC the length of A to C. The arc tangent is the ratio of BC/AC. To calculate the arc tangent of a value, you can use the Math.Atan()method. Its syntax is
public static double Atan(double d);
Here is an example:
using System;

class Program
{
    static int Main()
    {
        short number = 225;

        Console.Write("The arc tangent of "};
        Console.Write(number};
        Console.Write(" is "};
        Console.WriteLine(Math.Atan(number));

        return 0;
    }
}
This would produce:
The arc tangent of 225 is 1.56635191161394
Press any key to continue . . .
Introduction to Windows Controls
![]() Practical Learning: Ending the Lesson
Practical Learning: Ending the Lesson
|
|
||
| Previous | Copyright © 2001-2021, FunctionX | Next |
|
|
||