Introduction to Class Inheritance
Introduction to Class Inheritance
Fundamentals of Inheritance
Introduction
We already know that a field or a property of a class can be of a class-type. This gives you the benefits of an existing object that you can just add to a new class instead of starting everything from scratch.
![]() Practical Learning: Introducing Inheritance
Practical Learning: Introducing Inheritance
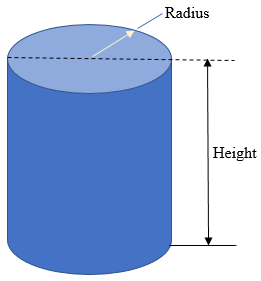
namespace Geometry09
{
    public class Rectangle
    {
        public Rectangle()
        {
            Width = 0.00;
            Height = 0.00;
        }

        public Rectangle(double wide, double high)
        {
            Width = wide;
            Height = high;
        }

        public double Width { get; set; }
        public double Height { get; set; }
        public double Area { get { return Width * Height; } }
        public double Perimeter { get { return (Width + Height) * 2; } }
    }
}using System;
namespace Geometry09
{
public class Circle
{
public Circle()
{
Radius = 0.00;
}
public Circle(double radius)
{
Radius = radius;
}
public double Radius { get; set; }
public double Area { get { return Radius * Radius * Math.PI; } }
public double Diameter { get { return Radius * 2; } }
public double Circumferemce
{
get { return Diameter * Math.PI; }
}
}
}namespace Geometry09
{
public class Cylinder
{
public Cylinder(double radius, double height)
{
Base = new Circle(radius);
Lateral = new Rectangle(Base.Circumferemce, height);
}
public Circle Base { get; set; }
public Rectangle Lateral { get; set; }
public double BaseArea { get { return Base.Area; } }
public double LateralArea { get { return Lateral.Area; } }
public double Volume { get { return BaseArea * Lateral.Height; } }
}
}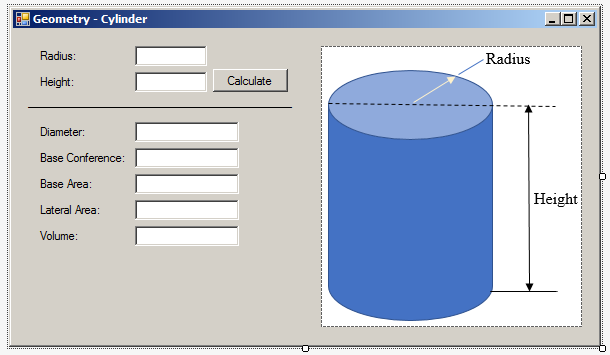
| Control | (Name) | Text | Other Properties |
| Label | Radius: | ||
| TextBox | txtRadius | TextAlign: Right | |
| Label | Height: | ||
| TextBox | txtHeight | TextAlign: Right | |
| Button | btnCalculate | Calculate | |
| Label | _____________________ | ||
| Label | Diameter: | ||
| TextBox | txtDiameter | TextAlign: Right | |
| Label | Base Conference: | ||
| TextBox | txtBaseConference | TextAlign: Right | |
| Label | Base Area: | ||
| TextBox | txtBaseArea | TextAlign: Right | |
| Label | Lateral Area: | ||
| TextBox | txtLateralArea | TextAlign: Right | |
| Label | Volume: | ||
| TextBox | txtVolume | TextAlign: Right | |
| PictureBox | Image: Cylinder |
using System;
using System.Windows.Forms;

namespace Geometry09
{
    public partial class Form1 : Form
    {
        public Form1()
        {
            InitializeComponent();
        }

        private void BtnCalculate_Click(object sender, EventArgs e)
        {
            double radius = Convert.ToDouble(txtRadius.Text);
            double height = Convert.ToDouble(txtHeight.Text);

            Cylinder cyl = new Cylinder(radius, height);

            txtDiameter.Text = cyl.Base.Diameter.ToString();
            txtBaseConference.Text = cyl.Base.Circumferemce.ToString();
            txtBaseArea.Text = cyl.Base.Area.ToString();
            txtLateralArea.Text = cyl.Lateral.Area.ToString();
            txtVolume.Text = cyl.Volume.ToString();
        }
    }
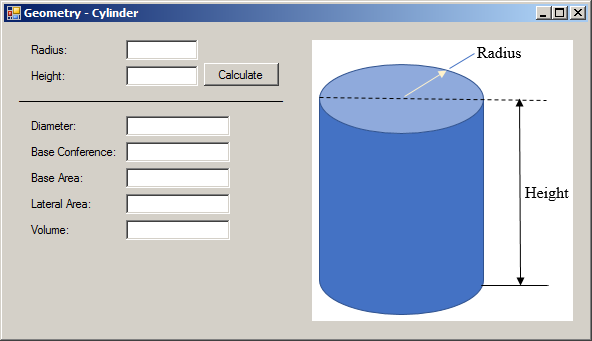
}
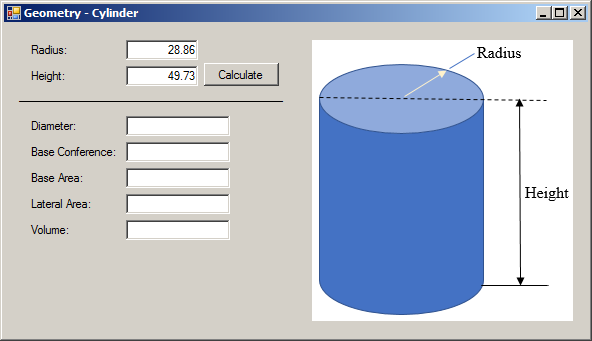
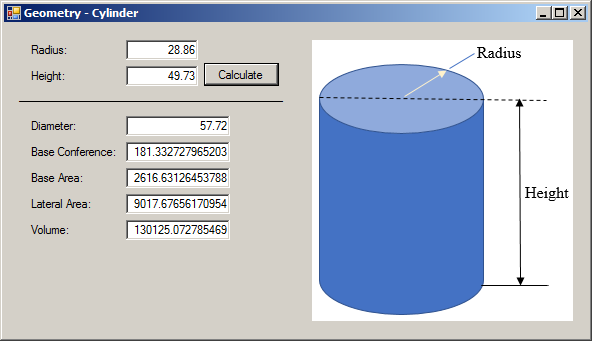
namespace Geometry09
{
    public class Rectangle
    {
        public Rectangle()
        {
            Width  = 0.00;
            Height = 0.00;
        }

        public Rectangle(double wide, double high)
        {
            Width  = wide;
            Height = high;
        }

        public double Width         { get; set; }
        public double Height        { get; set; }
        public double Area      =>  Width * Height;
        public double Perimeter => (Width + Height) * 2;
    }
}using System;
namespace Geometry09
{
public class Circle
{
public Circle() => Radius = 0.00;
public Circle(double radius) => Radius = radius;
public double Radius { get; set; }
public double Area => Radius * Radius * Math.PI;
public double Diameter => Radius * 2;
public double Circumferemce => Diameter * Math.PI;
}
}namespace Geometry09
{
public class Cylinder
{
public Cylinder(double radius, double height)
{
Base = new Circle(radius);
Lateral = new Rectangle(Base.Circumferemce, height);
}
public Circle Base { get; set; }
public Rectangle Lateral { get; set; }
public double BaseArea => Base.Area;
public double LateralArea => Lateral.Area;
public double Volume => BaseArea * Lateral.Height;
}
}using System;
using System.Windows.Forms;
namespace Geometry09
{
public partial class Form1 : Form
{
public Form1()
{
InitializeComponent();
}
Cylinder Prepare()
{
if (txtRadius.Text == "")
{
MessageBox.Show("You must specify the radius of the cylinder", "Geometry");
return null;
}
if (txtHeight.Text == "")
{
MessageBox.Show("You must specify the height of the cylinder", "Geometry");
return null;
}
double radius = Convert.ToDouble(txtRadius.Text);
double height = Convert.ToDouble(txtHeight.Text);
return new Cylinder(radius, height);
}
void Present(object obj)
{
if (obj is Cylinder)
{
Cylinder cup = (Cylinder)obj;
txtDiameter.Text = cup.Base.Diameter.ToString();
txtBaseConference.Text = cup.Base.Circumferemce.ToString();
txtBaseArea.Text = cup.Base.Area.ToString();
txtLateralArea.Text = cup.Lateral.Area.ToString();
txtVolume.Text = cup.Volume.ToString();
}
}
private void BtnCalculate_Click(object sender, EventArgs e)
{
Cylinder cyl = Prepare();
Present(cyl);
}
}
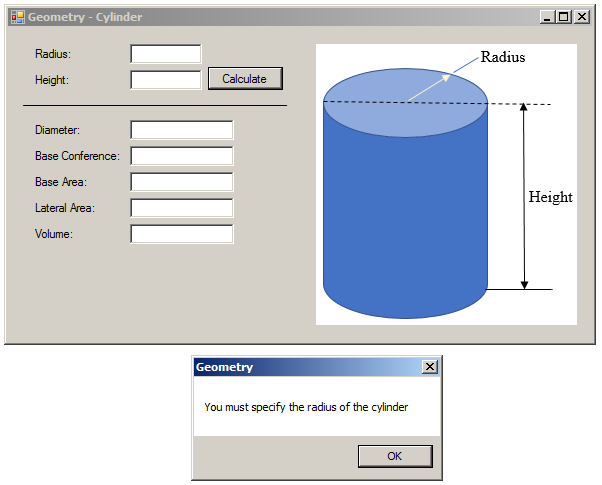
}
using System;

namespace Geometry10
{
    class Circle
    {

    }
}namespace Geometry10
{
class Cylinder
{
}
}Instead of creating a member of a class so that the member is of a class type, you can create a class that gets its foundation from another class. Class inheritance consists of creating a class that gets its foundation from another class. To create inheritance, you must have a class that provides the fundamental definition or behavior that another class would need.
Creating a class that is based on another class is also referred to as deriving a class from another. The first class serves as parent or base. The class that is based on another class is also referred to as child or derived. To create a class based on another, use the following formula:
options class child-class : parent-class
{
    Body of the new class
}
Among the available options, you can start with an access level (public or internal). This is followed by the class keyword and a name for the new class. To indicate that the new class is based on another class, type a colon followed by the name of the base class. For a parent class, you can use one of the .NET Framework built-in classes (but not all classes can be used in inheritance) or you can first create your own class. This means that you must use a class that exists aleady. Here is an example of starting a class inheritance:
public class Circle
{
}

class Cylinder : Circle
{

}
If you want to be able to access the class from other languages, you can (should) precede its name with the public keyword. Here is an example:
public class Circle
{
}

public class Cylinder : Circle
{

}
After deriving a class, it becomes available and you can use it just as you would any other class. Of course, you must first declare a variable for it.
![]() Practical Learning: Deriving From a Class
Practical Learning: Deriving From a Class
namespace Geometry10
{
    public class Cylinder : Circle
    {

    }
}
The Object Class
The most fundamental class in the .NET Framework is called Object. The C# language provides a data type named object that represents the Object class. The Object class holds the most basic features of any object of an application. These include the ability to have/declare variables or to store their values in the computer memory, the ability to compare two simple objects, and the ability to convert a value to a string.
As the most fundamental class in the .NET Framework, the Object class acts as the ultimate parent to all classes of your application. Whenever you create a new class in your application, it is automatically derived from the Object class. Therefore, every new class automatically inherits the members of the Object class. If you want, you can create a class and explicitly indicate that it is based on the Object class. Here is an example:
class Song : object
{
}
Inheritance and the Access to Class Members
Private Members
When creating a class and when dealing with inheritance, you can control what members can be accessed from outside the class and/or from only inherited members.
As introduced and used in previous lessons, a member of a class is referred to as private if it can be accessed only from within the class. To create a private member, type the private keyword to its left. A member without an access level or marked with the private keyword can be accessed only within the class, that is, only by members of the same class.
Internal and Public Members
A member of a class is internal if it can be accessed by any class of the same project. To create such a member variable, precede it with the internal keyword.
A member variable is referred to as public if it can be accessed by the classes of the same file. To create a public member variable of a class, precede it with the public keyword.
The Protected Members of a Class
Besides being made private, a member of a class can be protected to restrict its access. As seen for a private member, a protected member can be accessed by members of the same class. To let you protect a member of a class from non-deriving classes, the C# language provides a keyword named protected. Therefore, to indicate that a member is protected, set its access type to the protected keyword.
The main difference between a private and a protected member is that a protected member can be accessed by the members of its class but also the members of (a) derived class(es). Outside of those two environments, the access to a protected member would produce an error. Both the properties and the methods of a class can be protected.
If you create a member of a class and mark it as protected, the classes derived from its parent class, created in the current project or outside the current project, can access it. If you want the member to be accessed only by derived classes implemented in the same project but not the derived classes outside of the current project, mark the member as protected internal. Here are examples:
public class Person
{
    private string _name;
    private string _gdr;

    public Person(string name = "Not Available",
	              string gender = "Unknown")
    {
    	_name = name;
	    _gdr  = gender;
    }

    protected internal string FullName
    {
    	get { return _name; }
	    set { _name = value; }
    }

    protected internal string Gender
    {
    	get { return _gdr; }
    	set { _gdr = value; }
    }
}
![]() Practical Learning: Protecting a Member of a Class
Practical Learning: Protecting a Member of a Class
using System;

namespace Geometry10
{
    public class Circle
    {
        /* This protected field can be accessed by members of this class
         * (constructors, methods, and properties) and members of a derived class. */
        protected double radius;

        /* These public members can be accessed by all types of objects. */
        public Circle()           => Radius = 0.00;
        public Circle(double rad) => radius = rad;

        public double Radius
        {
            get
            {
                return radius;
            }

            set
            {
                radius = value;
            }
        }

        public double Area          => radius * radius * Math.PI;
        public double Diameter      => radius * 2;
        public double Circumferemce => Diameter * Math.PI;
    }
}namespace Geometry10
{
public class Cylinder : Circle
{
public double Height { get; set; }
public Cylinder(double baseRadius = 0.00, double height = 0.00)
{
radius = baseRadius;
Height = height;
}
public double LateralArea
{
get
{
return Circumferemce * Height;
}
}
public double Volume
{
get
{
return Area * Height;
}
}
}
}
| Control | (Name) | Text | Other Properties |
| Label | Radius: | ||
| TextBox | txtRadius | TextAlign: Right | |
| Label | Height: | ||
| TextBox | txtHeight | TextAlign: Right | |
| Button | btnCalculate | Calculate | |
| Label | _____________________ | ||
| Label | Diameter: | ||
| TextBox | txtDiameter | TextAlign: Right | |
| Label | Base Conference: | ||
| TextBox | txtBaseConference | TextAlign: Right | |
| Label | Base Area: | ||
| TextBox | txtBaseArea | TextAlign: Right | |
| Label | Lateral Area: | ||
| TextBox | txtLateralArea | TextAlign: Right | |
| Label | Volume: | ||
| TextBox | txtVolume | TextAlign: Right | |
| PictureBox | Image: Cylinder |
using System;
using System.Windows.Forms;

namespace Geometry10
{
    public partial class Form1 : Form
    {
        public Form1()
        {
            InitializeComponent();
        }

        private void btnCalculate_Click(object sender, EventArgs e)
        {
            double radius = Convert.ToDouble(txtRadius.Text);
            double height = Convert.ToDouble(txtHeight.Text);

            Cylinder cyl = new Cylinder(radius, height);

            /* The Diameter property is not a member of the cylinder.
             * The diameter is inherited from the Circle class. */
            txtDiameter.Text = cyl.Diameter.ToString();
            /* The Circumferemce property is not a member of the cylinder.
             * The circumferemce is inherited from the Circle class. */
            txtBaseConference.Text = cyl.Circumferemce.ToString();
            /* The Area property is not a member of the cylinder.
             * The area of the base is inherited from the Circle class. */
            txtBaseArea.Text = cyl.Area.ToString();
            txtLateralArea.Text = cyl.LateralArea.ToString();
            txtVolume.Text = cyl.Volume.ToString();
        }
    }
}
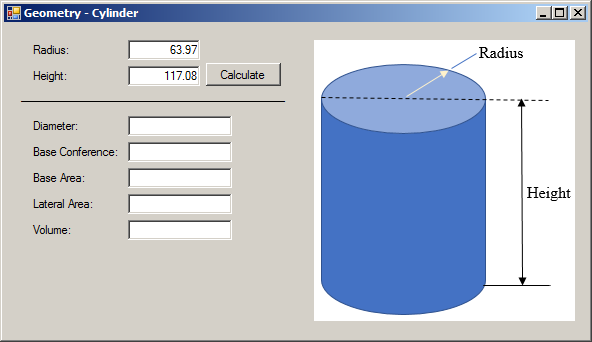
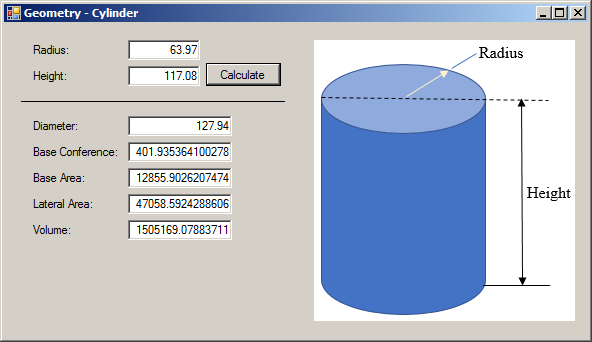
Primary Characteristics of Inheritance
Initializing an Object of a Derived Class
If you declare a variable of a class that is derived, the variable has access to the public and internal member of its direct class. The variable has direct access also to the public and internal member of the parent(s) of its class. You can initialize the variable by access each member individually. As an alternative, you use the curly brackets to initialize the object.
![]() Practical Learning: Initializing an Object of a Derived Class
Practical Learning: Initializing an Object of a Derived Class
using System;
using System.Windows.Forms;

namespace Geometry08
{
    public partial class Form1 : Form
    {
        public Form1()
        {
            InitializeComponent();
        }

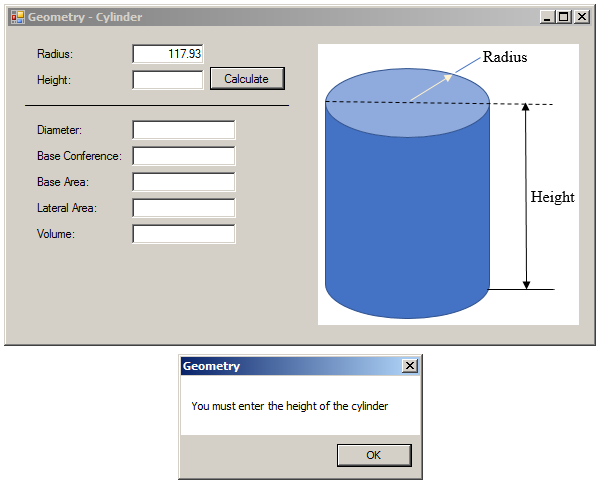
        Cylinder Initialize()
        {
            if (txtRadius.Text == "")
            {
                MessageBox.Show("You must type the radius of the cylinder", "Geometry");
                return null;
            }
            if (txtHeight.Text == "")
            {
                MessageBox.Show("You must enter the height of the cylinder", "Geometry");
                return null;
            }

            double radius = Convert.ToDouble(txtRadius.Text);
            double height = Convert.ToDouble(txtHeight.Text);

            Cylinder read = new Cylinder()
            {
                Radius = radius,
                Height = height
            };

            return read;
        }

        void Present(object obj)
        {
            if (obj is Cylinder)
            {
                Cylinder cup = (Cylinder)obj;

                /* The Diameter property is not a member of the cylinder.
             * The diameter is inherited from the Circle class. */
                txtDiameter.Text = cup.Diameter.ToString();
                /* The Circumferemce property is not a member of the cylinder.
                 * The circumferemce is inherited from the Circle class. */
                txtBaseConference.Text = cup.Circumferemce.ToString();
                /* The Area property is not a member of the cylinder.
                * The area of the base is inherited from the Circle class. */
                txtBaseArea.Text = cup.Area.ToString();
                txtLateralArea.Text = cup.LateralArea.ToString();
                txtVolume.Text = cup.Volume.ToString();
            }
        }

        private void btnCalculate_Click(object sender, EventArgs e)
        {
            Present(Initialize());
        }
    }
}
We have already learned that in C#, you can create a class in different files, through a partial implementation. This feature also applies to inheritance. To use it, create your class and mark it with the partial keyword. Then indicate its base class as we have done above. Here is an example:
Source File: Primary.cs
public partialpublic class Language
{
    private string _name;
    private bool _speak;

    public string Name
    {
        get { return _name;  }
        set { _name = value; }
    }

    protected bool Spoken
    {
        get { return _speak;  }
        set { _speak = value; }
    }
}

public partial class Philology : Language
{
    private string _loc;

    public string Location
    {
        get { return _loc; }
        set { _loc = value; }
    }
}
After creating the class in one file, you can use it like any of the classes as we have done so far. Here is an example:
Source File: Exercise.cs
using System;

public class Exercise
{
    static void Main()
    {
        Philology phll = new Philology();

        phll.Name = "Swahili";
        phll.Location = "African Great Lakes";

        Console.WriteLine("Philology");
        Console.WriteLine("---------------------------------------");
        Console.Write("Language: ");
        Console.WriteLine(phll.Name);
        Console.Write("Location  ");
        Console.WriteLine(phll.Location);
        Console.WriteLine("=======================================");
    }
}
Otherwise, if you want to extend the class, you can create another file. In that file, create the same derived and mark it with the partial keyword. You can also indicate its parent class. Here is an example:
Source File: Secondary.cs
public partial class Philology : Language
{
    private string _src;

    public string Source
    {
        get { return _src;  }
        set { _src = value; }
    }
}
In the second file, you don't have to indicate that the class is derived:
Source File: Secondary.cs
public partial class Philology
{

}
Other than that, you can use the class any way you want. Here is an example:
Source File: Exercise.cs
using System;

public class Exercise
{

    static void Main()
    {
        Philology phll = new Philology();

        phll.Name = "Swahili";
        phll.Source = "Bantu";
        phll.Location = "African Great Lakes";

        Console.WriteLine("Philology");
        Console.WriteLine("---------------------------------------");
        Console.Write("Language: ");
        Console.WriteLine(phll.Name);
        Console.Write("Source  ");
        Console.WriteLine(phll.Source);
        Console.Write("Location  ");
        Console.WriteLine(phll.Location);
        Console.WriteLine("=======================================");
    }
}
Namespaces and Inheritance
Imagine you had created a class named Element in a namespace named Chemistry as follows:
namespace Chemistry
{
    public class Element
    {
    }
}
To derive a class from a class that belongs to a namespace, type the name of the namespace, followed by the period operator ".", and followed by the name of the base namespace. Here is an example:
namespace Chemistry
{
    public class Element
    {
    }
}

public class Isotope : Chemistry.Element
{
    public int NeutronNumber { get; set; }
}
If you need to call the class that was defined in a different namespace, you can qualify its name with the period operator. Here is an example:
namespace Chemistry
{
    public class Element
    {
    }
}

public class Isotope : Chemistry.Element
{
    public int NeutronNumber { get; set; }
}

public class Exercise
{
    public void Create()
    {
	    Chemistry.Element h = new Chemistry.Element();
    }
}
Alternatively, to use the contents of a namespace, prior to calling a member of that namespace, you can type the using keyword followed by the name of the namespace. Here is an example:
using Chemistry;

public class Isotope : Element
{
    public int NeutronNumber { get; set; }
}

public class Exercise
{
    public void Create()
    {
	    Element h = new Element();
    }
}
Consider the following class named Matter and that is created in a nested namespace:
namespace Chemistry
{
    public class Element
    {
    }

    namespace Atoms
    {
        namespace Nucleons
        {
            public class Proton
            {
                public string Symbol { get; set; }
            }

            public class Neutron
            {
            }
        }

        public class Matter
        {
            public double Mass { get; set; }
        }
    }
}
If you want to create a class that is based on a class in a nested namespace, you can qualify its name. Here is an example:
public class Atom : Chemistry.Atoms.Matter
{
    public Chemistry.Element Element { get; set; }
    public Nucleus Nucleus { get; set; }
}
![]() Practical Learning:
Ending the Lesson
Practical Learning:
Ending the Lesson
|
|
||
| Previous | Copyright © 2001-2020, FunctionX | Next |
|
|
||