
Introduction to Counting and Looping
 |
Introduction to Counting and Looping |
Fundamentals of Counting in Looping
Introduction
A loop is a statement that keeps checking a condition as being true and keeps executing a statement until the condition becomes false. In other words, a loop consists of performing a repeating action. The following three requirements should (must) be met. You must indicate:
![]() Practical Learning: Introducing Looping
Practical Learning: Introducing Looping
using System;
using static System.Console;

namespace StraightLineMethod1
{
    public class Program
    {
        public static int Main(string[] args)
        {
            int    estimatedLife = 0;
            double machineCost   = 0.00;
            double salvageValue  = 0.00;

            Title = "Depreciation: Straight-Line Method";
            WriteLine("Enter the values for the machine depreciation");

            try
            {
                Write("Machine Cost:              ");
                machineCost = double.Parse(ReadLine());
            }
            catch (FormatException)
            {
                WriteLine("You must have typed a valid value that represents the " +
                          "cost of the machine. Since you did not provide a " +
                          "valid value, we will set the machine cost to 0.00.");
            }

            try
            {
                Write("Salvage Value:             ");
                salvageValue = double.Parse(ReadLine());
            }
            catch (FormatException)
            {
                WriteLine("You must have provided that value you estimate the machine  " +
                          "will have at the end of the cycle (or the end of its " +
                          "life). Since you didn't enter a valid value, we will " +
                          "consider the estimated end value to 0.00.");
            }

            try
            {
                Write("Estimated Life (in Years): ");
                estimatedLife = int.Parse(ReadLine());
            }
            catch (FormatException)
            {
                WriteLine("You didn't enter a valid number of years for the life of " +
                          "the machine. Instead, we will consider that this machine " +
                          "has no life, or a life of 0 years.");
            }

            double depreciatiableAmount = machineCost - salvageValue;

            if (estimatedLife == 0)
                throw new DivideByZeroException("The value for the length of the estimated life of the machine must always be greater than 0.");

            double depreciationRate = 100 / estimatedLife;
            double yearlyDepreciation = depreciatiableAmount / estimatedLife;

            Clear();

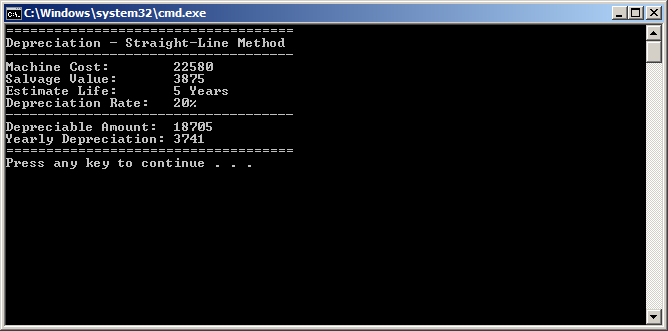
            WriteLine("====================================");
            WriteLine("Depreciation - Straight-Line Method");
            WriteLine("------------------------------------");
            WriteLine("Machine Cost:        {0}", machineCost);

            WriteLine("Salvage Value:       {0}", salvageValue);
            WriteLine("Estimate Life:       {0} Years", estimatedLife);
            WriteLine("Depreciation Rate:   {0}%", depreciationRate);
            WriteLine("------------------------------------");
            WriteLine("Depreciable Amount:  {0}", depreciatiableAmount);
            WriteLine("Yearly Depreciation: {0}", yearlyDepreciation);
            WriteLine("====================================");

            return 0;
        }
    }
}
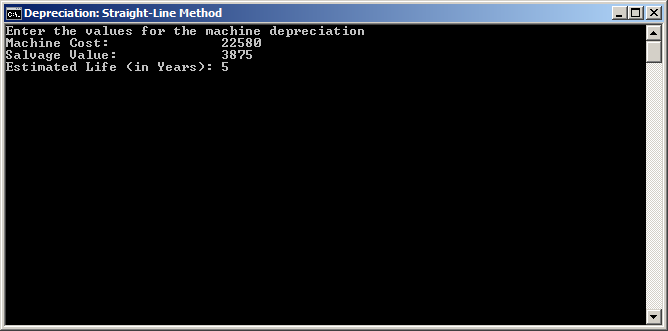
Machine Cost:   22580
Salvage Cost:   3875
Estimated Life: 5
while a Condition is True
One of the techniques used to use a loop is to first perform an operation, then check a condition to repeat a statement. To support this, the C-based languages, including C#, provide an operator named while. The formula to use it is:
while(condition) statement;
If you are using Microsoft Visual Studio, to create a while loop, right-click the section where you want to add it and click Insert Snippet... Double-click Visual C#. In the list, double-click while.
To perform a while loop, the compiler first examines the condition. If the condition is true, then it executes the statement. After executing the statement, the condition is checked again. As long as the condition is true, the compiler will keep executing the statement. When or once the condition becomes false, the compiler exits the loop.
Most of the time, the statement goes along with a way to move forward or backwards. As a result, the section that has the statement is usually delimited by curly brackets that show the body of the while condition. As a result, the formula for the while condition becomes:
while(condition)
{
	. . .
	statement
    . . .
};
The while loop can be illustrated as follows:

Most of the time, before entering in a while loop, you should have an object or a variable that has been initialized or the variable provides a starting value. From there, you can ask the compiler to check another condition and keep doing something as long as that condition is true. Here is an example:
using System;

public class Exercise
{
    static void Main(string[] args)
    {
        // Consider a starting value as 0
        int number = 0;

        while(number <= 5)
        {
            // As long as the above value is lower than 5, ...
            // ... display that number
            Console.WriteLine("Make sure you review the time sheet before submitting it.");

            // Increase the number (or counter)
            number++;
            // Check the number (or counter again. Is it still less than 4?
        }
    }
}
This would produce:
Make sure you review the time sheet before submitting it.
Make sure you review the time sheet before submitting it.
Make sure you review the time sheet before submitting it.
Make sure you review the time sheet before submitting it.
Make sure you review the time sheet before submitting it.
Make sure you review the time sheet before submitting it.
Press any key to continue . . .
The while loop is used to first check a condition and then execute a statement. If the condition is false, the statement would never execute. Consider the following code:
using System;

public class Exercise
{
    static void Main(string[] args)
    {
        int number = 5;

        while(number <= 4)
        {
            Console.WriteLine("Make sure you review the time sheet before submitting it.");

            number++;
        }
    }
}
When this code executes, nothing from the while loop would execute because, as the condition is checked in the beginning, it is false and the compiler would not get to the statement.
Introduction to Loops and Lists
As you may know already, a list is a group of items. Here is an example:
public class Exercise
{
    public static int Main(string[] args)
    {
        double number1 = 12.44;
        double number2 = 525.38;
        double number3 = 6.28;
        double number4 = 2448.32;
        double number5 = 632.04;

        return 1000;
    }
}
The items are grouped from a starting to an ending points. The list can created as an array. Here is an example:
public class Exercise
{
    public static int Main(string[] args)
    {
        double[] numbers = new double[] { 12.44, 525.38, 6.28, 2448.32, 632.04 };

        return 524;
    }
}
The list has a number of items. We saw that you can specify the number of items when creating the array. Here is an example:
public class Exercise
{
    public static int Main(string[] args)
    {
        double[] numbers = new double[5] { 12.44, 525.38, 6.28, 2448.32, 632.04 };

        return 100_220;
    }
}
Or, to get the number of items of an array, the array variable is equipped with a property named Length that it gets from the Array class. Here is an example of accessing it:
using static System.Console;

public class Exercise
{
    public static int Main(string[] args)
    {
        double[] numbers = new double[] { 12.44, 525.38, 6.28, 2448.32, 632.04 };

        WriteLine("Number of Items in the array: {0}", numbers.Length);
        WriteLine("=================================");

        return 32_500_862;
    }
}
This would produce:
Number of Items in the array: 5
=================================
Press any key to continue . . .
Each item can be located by its index from 0 to Number of Items - 1. Here is an example that accesses each of the items:
using static System.Console;

public class Exercise
{
    public static int Main(string[] args)
    {
        double[] numbers = new double[] { 12.44, 525.38, 6.28, 2448.32, 632.04 };

        WriteLine("Number: {0}", numbers[0]);
        WriteLine("Number: {0}", numbers[1]);
        WriteLine("Number: {0}", numbers[2]);
        WriteLine("Number: {0}", numbers[3]);
        WriteLine("Number: {0}", numbers[4]);
        WriteLine("============================");

        return 1_000_000;
    }
}
This would produce:
Number: 12.44
Number: 525.38
Number: 6.28
Number: 2448.32
Number: 632.04
============================
Press any key to continue . . .
As opposed to accessing one item at a time, a loop allows you to access the items as a group. Each item can still be accessed by its index. You can first declare a variable that would hold the index for an item. Here is an example:
public class Exercise
{
    public static void Main(string[] args)
    {
        int counter = 0;
    	double[] numbers = new double[] { 12.44, 525.38, 6.28, 2448.32, 632.04 };
    }
}
To access an item in a loop, use the name of the array but pass the index in the square brackets of the variable. Here is an example:
using static System.Console;

public class Exercise
{
    public static int Main(string[] args)
    {
        int counter = 0;
        double[] numbers = new double[] { 12.44, 525.38, 6.28, 2448.32, 632.04 };

        while (counter <= 4)
        {
            WriteLine("Number: {0}", numbers[counter]);

            counter++;
        }

        WriteLine("=================================");

        return 6_505_117;
    }
}
In the same way, to change the value of an item, access it by its index and assign the desired value to it. Here is an example:
using System;
using static System.Console;

public class Exercise
{
    public static int Main(string[] args)
    {
        int counter = 0;
        Random rndNumber = new Random();
        int[] numbers = new int[] { 203, 81, 7495, 40, 9580 };

        WriteLine("====================================");
        WriteLine("Original List");

        while (counter <= 4)
        {
            WriteLine("Number: {0}", numbers[counter]);

            counter++;
        }

        WriteLine("-------------------------------------");
        WriteLine("Updating the numbers of the list...");
        counter = 0;

        while (counter <= 4)
        {
            numbers[counter] = rndNumber.Next(1001, 9999);

            counter++;
        }

        WriteLine("-------------------------------------");

        counter = 0;

        WriteLine("Updated Numbers");

        while (counter <= 4)
        {
            WriteLine("Number: {0}", numbers[counter]);

            counter++;
        }

        WriteLine("====================================");

        return 28_465;
    }
}
This would produde:
====================================
Original List
Number: 203
Number: 81
Number: 7495
Number: 40
Number: 9580
-------------------------------------
Updating the numbers of the list...
-------------------------------------
Updated Numbers
Number: 9822
Number: 6086
Number: 8411
Number: 5176
Number: 4202
====================================
Press any key to continue . . .
![]() Practical Learning: Introducing Loops in Lists
Practical Learning: Introducing Loops in Lists
using System;
using static System.Console;

namespace StraightLineMethod1
{
    public class Program
    {
        public static int Main(string[] args)
        {
            int    estimatedLife = 0;
            double machineCost   = 0.00;
            double salvageValue  = 0.00;

            Title = "Depreciation: Straight-Line Method";
            WriteLine("Enter the values for the machine depreciation");

            try
            {
                Write("Machine Cost:              ");
                machineCost = double.Parse(ReadLine());
            }
            catch (FormatException)
            {
                WriteLine("You must have typed a valid value that represents the " +
                          "cost of the machine. Since you did not provide a " +
                          "valid value, we will set the machine cost to 0.00.");
            }

            try
            {
                Write("Salvage Value:             ");
                salvageValue = double.Parse(ReadLine());
            }
            catch (FormatException)
            {
                WriteLine("You must have provided that value you estimate the machine  " +
                          "will have at the end of the cycle (or the end of its " +
                          "life). Since you didn't enter a valid value, we will " +
                          "consider the estimated end value to 0.00.");
            }

            try
            {
                Write("Estimated Life (in Years): ");
                estimatedLife = int.Parse(ReadLine());
            }
            catch (FormatException)
            {
                WriteLine("You didn't enter a valid number of years for the life of " +
                          "the machine. Instead, we will consider that this machine " +
                          "has no life, or a life of 0 years.");
            }

            double depreciatiableAmount = machineCost - salvageValue;

            if (estimatedLife == 0)
                throw new DivideByZeroException("The value for the length of the estimated life of the machine must always be greater than 0.");

            double depreciationRate = 100 / estimatedLife;
            double yearlyDepreciation = depreciatiableAmount / estimatedLife;

            Clear();

            WriteLine("====================================");
            WriteLine("Depreciation - Straight-Line Method");
            WriteLine("------------------------------------");
            WriteLine("Machine Cost:        {0}", machineCost);
            WriteLine("Salvage Value:       {0}", salvageValue);
            WriteLine("Estimate Life:       {0} Years", estimatedLife);
            WriteLine("Depreciation Rate:   {0}%", depreciationRate);
            WriteLine("------------------------------------");
            WriteLine("Depreciable Amount:  {0}", depreciatiableAmount);
            WriteLine("Yearly Depreciation: {0:F}", yearlyDepreciation);
            WriteLine("====================================");

            int i = 1;
            int year = 1;
            double[] bookValues = new double[estimatedLife + 1];
            bookValues[0] = machineCost;

            while (i <= @estimatedLife - 1)
            {
                bookValues[i] = bookValues[i - 1] - yearlyDepreciation;
                i++;
            }

            i = 0;
            bookValues[estimatedLife] = salvageValue;

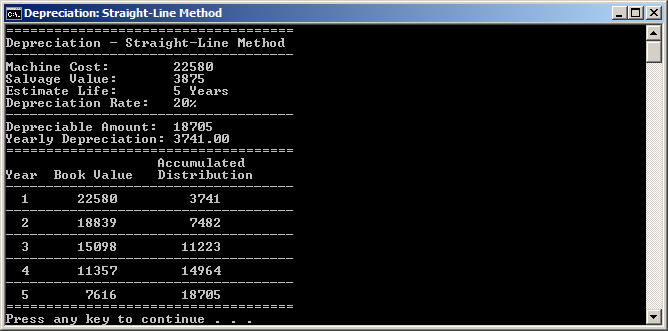
            WriteLine("                   Accumulated");
            WriteLine("Year  Book Value   Distribution");

            while (i <= estimatedLife - 1)
            {
                double accumulatedDepreciation = yearlyDepreciation * year;

                WriteLine("------------------------------------");
                WriteLine("  {0} {1, 10} {2, 12}", year, bookValues[i], accumulatedDepreciation);

                i++;
                year++;
            }

            WriteLine("====================================");

            return 0;
        }
    }
}Machine Cost: 22580 Salvage Value: 3875 Estimated Life: 5

Introduction to List-Based Controls
Introduction
Lists are probably the most regular types of objects of an application. Lists are at the core of files, databases, graphics, communication, etc. To assist you in displaying lists in an application, both Microsoft Windows and the .NET Framework provide various controls.
Categories of Lists
As there are various types of lists, both Microsoft Windows and the .NET Framework provide three broad categories of controls to support lists.
A one-dimensional list is a group of items that are of the same and unique type. For example, it can be a list of numbers, or a list of graphics, or a list of strings (such as a list of names, a list of files, etc). Both Microsoft Windows and the .NET Framework provide controls such as the combo box, the list box, the spin control, etc, that can be used to show a simple list of items.
A composite list is one where each item of the list is made of one or more items. An item in this list resembles an object of a class where a typical class has one or more properties. For example, in a composite list, an item can be a combination of a number, a string, another string, etc. Both Microsoft Windows and the .NET Framework provide view-based controls such as the list view.
Extended controls are variants of one-dimensional and two dimensional list-based controls. These controls can display a simple list where each item is accompanied by additional information such as a graphic on one side of the item, or the string of an item can be accompanied by a check box that validates or rejects an item. Another variant is the ability to reorganize the items in the list or to change/edit them.
All of the controls we will use in our lessons are available in the .NET Framework. As we have mentioned previously, every control is represented by a class. You can programmatically create a control using its class. To make things easier, we will create all our controls visually.
A Review o List-Based Controls: A Combo Box
Introduction to the Combo Box
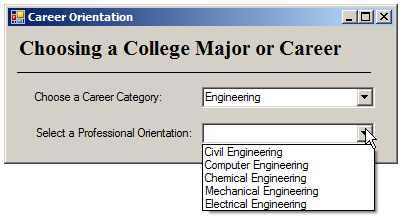
A combo box is a one-dimensional list of items. A combo box is primarily made of two sections: a text box and a down-pointing arrow. The list of items is primarily hidden. To display the list of items of a combo box, the user can click the down-pointing arrow button. Then, on the list, the user can click the desired item, which is equivalent to a selection. After making that select, the list would retract and be hidden again. A than time, the text box side of the combo box would display the item that was selected.
Creating a Combo Box
In the .NET Framework, a combo box is represented by a class named ComboBox. This can provides all the information you need about a combo box. All the operation that can be performed on the combo box are also available in that class. To visually add a combo box to an application, in the Toolbox, click ComboBox and click the form.
![]() Practical Learning: Introducing Combo Box
Practical Learning: Introducing Combo Box
Visually Adding Items to a Combo Box
To support the items of a combo box, the ComboBox class is equipped with a property named Items. To visually add items to a combo box:
This action would display the String Collection Editor that allows you to create the desired strings for the combo box.
![]() Practical Learning: Visually Adding Items to a Combo Box
Practical Learning: Visually Adding Items to a Combo Box
Computers
Engineering
Business and Management
Behavioral and Social Sciences

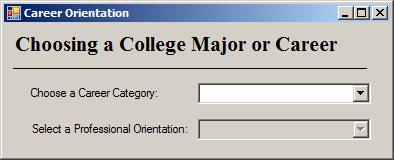
| Control | (Name) | Text | Other Properties |
| Label | Choosing a College Major or Career | ||
| Label | ______________________ | ||
| Label | Choose a Career Category: | ||
| ComboBox | cbxCareerCategories | Items:
Computers Engineering Business and Management Behavioral and Social Sciences |
|
| Label | Select a Professional Orientation: | ||
| ComboBox | cbxProfessionalOrientations | Enabled: False |
Programatically Adding Items to a Combo Box
In reality, this property is used to create a list. This property is equipped with a method named Add. To add an item to a combo box, call the Add method as ComboBox.Items.Add(). In the parentheses, pass the string you want to add to the combo box. Normally, the ComboBox.Items.Add() method expects a stirng (actually, it expects an object object) as argument. Therefore, if you are passing a value other than a string (such as a number, a Boolean value, a member of an enumeration, etc), you should convert that value to a string. You can keep calling the ComboBox.Items.Add() method and passing the desired string to increase the list.
To help you identify the value held by a combo box, the ComboBox class is equipped with a property named Text.
The Events of a Combo Box
When a user has made a selection on a combo box, the combo box control fires an event named SelectedIndexChanged. You can use that event to take an action after the user has made a selection.
![]() Practical Learning: Adding Items to a Combo Box
Practical Learning: Adding Items to a Combo Box
using System;
using System.Windows.Forms;

namespace CareerOrientation1
{
    public partial class Form1 : Form
    {
        public Form1()
        {
            InitializeComponent();
        }

        private void cbxCareerCategories_SelectedIndexChanged(object sender, EventArgs e)
        {
            cbxProfessionalOrientations.Items.Clear();

            switch(cbxCareerCategories.Text)
            {
                case "Business and Management":
                    cbxProfessionalOrientations.Items.Clear();
                    cbxProfessionalOrientations.Items.Add("Finance");
                    cbxProfessionalOrientations.Items.Add("Business");
                    cbxProfessionalOrientations.Items.Add("Economics");
                    cbxProfessionalOrientations.Items.Add("Marketing");
                    cbxProfessionalOrientations.Items.Add("Human Resources");
                    cbxProfessionalOrientations.Enabled = true;
                    break;
                case "Behavioral and Social Sciences":
                    cbxProfessionalOrientations.Items.Clear();
                    cbxProfessionalOrientations.Enabled = true;
                    cbxProfessionalOrientations.Items.Add("Sociology");
                    cbxProfessionalOrientations.Items.Add("Psychology");
                    cbxProfessionalOrientations.Items.Add("Philosophy");
                    cbxProfessionalOrientations.Items.Add("Linguistics");
                    break;
                case "Engineering":
                    cbxProfessionalOrientations.Items.Clear();
                    cbxProfessionalOrientations.Items.Add("Civil Engineering");
                    cbxProfessionalOrientations.Items.Add("Computer Engineering");
                    cbxProfessionalOrientations.Items.Add("Chemical Engineering");
                    cbxProfessionalOrientations.Items.Add("Mechanical Engineering");
                    cbxProfessionalOrientations.Items.Add("Electrical Engineering");
                    cbxProfessionalOrientations.Enabled = true;
                    break;
                case "Computers":
                    cbxProfessionalOrientations.Items.Clear();
                    cbxProfessionalOrientations.Enabled = true;
                    cbxProfessionalOrientations.Items.Add("Cybersecurity");
                    cbxProfessionalOrientations.Items.Add("Computer Science");
                    break;
                default:
                    cbxProfessionalOrientations.Items.Clear();
                    break;
            }
        }
    }
}
List Boxes
Introduction
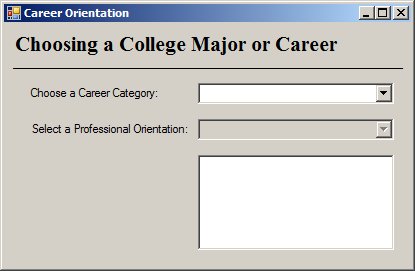
A list box is a rectangular control that displays a list of strings, like a combo box. Unlike the combo box that hides its list sometimes, a list box shows its list all the time.
Creating and Using a List Box
To support list boxes, the .NET Framework provides a class named ListBox. This class is represented in the Toolbox by a control of the same name. As done with any control, to add a combo box to an application, in the Toolbox, click ListBox and click a form or another container. You can visually create a list box using its class. To visually or programmatically add items to a list box, use the exact same approaches we reviewed for the combo box.
![]() Practical Learning: Introducing List Boxes
Practical Learning: Introducing List Boxes

| Control | (Name) |
| ListBox | lbxCareers |
using System;
using System.Windows.Forms;

namespace CareerOrientation1
{
    public partial class Form1 : Form
    {
        public Form1()
        {
            InitializeComponent();
        }

        private void cbxCareerCategories_SelectedIndexChanged(object sender, EventArgs e)
        {
            lbxCareers.Items.Clear();
            lbxCareers.Enabled = false;
            cbxProfessionalOrientations.Text = "";
            cbxProfessionalOrientations.Items.Clear();

            switch(cbxCareerCategories.Text)
            {
                case "Business and Management":
                    cbxProfessionalOrientations.Items.Clear();
                    cbxProfessionalOrientations.Items.Add("Finance");
                    cbxProfessionalOrientations.Items.Add("Business");
                    cbxProfessionalOrientations.Items.Add("Marketing");
                    cbxProfessionalOrientations.Items.Add("Economics");
                    cbxProfessionalOrientations.Items.Add("Human Resources");
                    cbxProfessionalOrientations.Enabled = true;
                    break;
                case "Behavioral and Social Sciences":
                    cbxProfessionalOrientations.Items.Clear();
                    cbxProfessionalOrientations.Enabled = true;
                    cbxProfessionalOrientations.Items.Add("Sociology");
                    cbxProfessionalOrientations.Items.Add("Linguistics");
                    cbxProfessionalOrientations.Items.Add("Philosophy");
                    cbxProfessionalOrientations.Items.Add("Psychology");
                    break;
                case "Engineering":
                    cbxProfessionalOrientations.Items.Clear();
                    cbxProfessionalOrientations.Items.Add("Civil Engineering");
                    cbxProfessionalOrientations.Items.Add("Chemical Engineering");
                    cbxProfessionalOrientations.Items.Add("Electrical Engineering");
                    cbxProfessionalOrientations.Items.Add("Computer Engineering");
                    cbxProfessionalOrientations.Items.Add("Mechanical Engineering");
                    cbxProfessionalOrientations.Enabled = true;
                    break;
                case "Computers":
                    cbxProfessionalOrientations.Items.Clear();
                    cbxProfessionalOrientations.Enabled = true;
                    cbxProfessionalOrientations.Items.Add("Cybersecurity");
                    cbxProfessionalOrientations.Items.Add("Computer Science");
                    break;
                default:
                    cbxProfessionalOrientations.Items.Clear();
                    break;
            }
        }

        private void cbxProfessionalOrientations_SelectedIndexChanged(object sender, EventArgs e)
        {
            lbxCareers.Items.Clear();
            lbxCareers.Enabled = false;

            switch (cbxProfessionalOrientations.Text)
            {
                case "Sociology":
                    lbxCareers.Items.Clear();
                    lbxCareers.Items.Add("Social Services"); lbxCareers.Items.Add("Government Policy Analyst");
                    lbxCareers.Items.Add("Business Marketing Management"); lbxCareers.Items.Add("Research (Marketing, School program)");
                    lbxCareers.Enabled = true;
                    break;
                case "Psychology":
                    lbxCareers.Items.Clear();
                    lbxCareers.Enabled = true;
                    lbxCareers.Items.Add("Research"); lbxCareers.Items.Add("Counselor"); lbxCareers.Items.Add("Government Advisor");
                    break;
                case "Philosophy":
                    lbxCareers.Items.Clear();
                    lbxCareers.Items.Add("Law"); lbxCareers.Items.Add("Religion"); lbxCareers.Items.Add("Teaching");
                    lbxCareers.Enabled = true;
                    break;
                case "Linguistics":
                    lbxCareers.Items.Clear();
                    lbxCareers.Enabled = true;
                    lbxCareers.Items.Add("Teaching"); lbxCareers.Items.Add("Military Advisor"); lbxCareers.Items.Add("Computer Science");
                    break;
                case "Computer Engineering":
                    lbxCareers.Items.Clear();
                    lbxCareers.Enabled = true;
                    lbxCareers.Items.Add("Robotics"); lbxCareers.Items.Add("Health Care"); lbxCareers.Items.Add("Law Enforcement");
                    break;
                case "Chemical Engineering":
                    lbxCareers.Items.Clear();
                    lbxCareers.Enabled = true;
                    lbxCareers.Items.Add("Research"); lbxCareers.Items.Add("Machine Design"); lbxCareers.Items.Add("Chemical Products Development");
                    break;
                case "Civil Engineering":
                    lbxCareers.Items.Clear();
                    lbxCareers.Enabled = true;
                    lbxCareers.Items.Add("Dams"); lbxCareers.Items.Add("Airports");
                    lbxCareers.Items.Add("Roads(Design and Construction)"); lbxCareers.Items.Add("Bridges(Design and Construction)");
                    break;
                case "Mechanical Engineering":
                    lbxCareers.Items.Clear();
                    lbxCareers.Enabled = true;
                    lbxCareers.Items.Add("Machine Design"); lbxCareers.Items.Add("Mechanical Systems");
                    break;
                case "Electrical Engineering":
                    lbxCareers.Items.Clear();
                    lbxCareers.Enabled = true;
                    lbxCareers.Items.Add("Machine Energy"); lbxCareers.Items.Add("Inductrial Energy");
                    break;
                case "Computer Science":
                    lbxCareers.Items.Clear();
                    lbxCareers.Enabled = true;
                    lbxCareers.Items.Add("Computer Programmer"); lbxCareers.Items.Add("Computer System Design");
                    break;
                case "Cybersecurity":
                    lbxCareers.Items.Clear();
                    lbxCareers.Enabled = true;
                    lbxCareers.Items.Add("Government"); lbxCareers.Items.Add("Business Advisor"); lbxCareers.Items.Add("Law Enforcement");
                    break;
                case "Business":
                    lbxCareers.Items.Clear();
                    lbxCareers.Enabled = true;
                    lbxCareers.Items.Add("Consulting"); lbxCareers.Items.Add("Management"); lbxCareers.Items.Add("Entertainment");
                    break;
                case "Economics":
                    lbxCareers.Items.Clear();
                    lbxCareers.Enabled = true;
                    lbxCareers.Items.Add("Government"); lbxCareers.Items.Add("Corporate Advisor");
                    break;
                case "Finance":
                    lbxCareers.Items.Clear();
                    lbxCareers.Enabled = true;
                    lbxCareers.Items.Add("Entertainment"); lbxCareers.Items.Add("Finance Manager");
                    break;
                case "Marketing":
                    lbxCareers.Items.Clear();
                    lbxCareers.Enabled = true;
                    lbxCareers.Items.Add("Sales"); lbxCareers.Items.Add("Counseling");
                    break;
                case "Human Resources":
                    lbxCareers.Items.Clear();
                    lbxCareers.Enabled = true;
                    lbxCareers.Items.Add("Counseling"); lbxCareers.Items.Add("Personnel Management");
                    break;
                default:
                    lbxCareers.Items.Clear();
                    break;
            }
        }
    }
}


Introduction to the List View
Introduction
A list view is a control that displays a two-dimensioanl list of items. To show its two-dimensional aspect, the control can display one or many columns. Each column displays one sub-item of the whole item.
Creating a List View
To support list views, the .NET Framework provides a class named ListView. This class holds all the functionality you need from a list view. To visually add a list view to your application, in the Toolbox, click ListView and click the form or another container.
![]() Practical Learning: Introducing List Views
Practical Learning: Introducing List Views
Characteristics of a List View
A list view displays in one of four ways. To let you control how a list view should appear to the user, the ListView class is equipped with a property named View. This property is from an enumeration of the same name. The options of the list view display and the members of the enumeration are LargeIcon, Details, SmallIcon, List, and Tile.
If you decide to display a list view with the Detail option, each item would display its sub-items on a line. If you want, you can separate the items with horizontal lines. To support this, the ListView class is equipped with a Boolean property named GridLines.
To make a selection on a list view, the user can click an item or a line. If the control is displaying with the View.Details option, by default, if the user clicks an item, only the left side of the line would be sslected. To make it possible for the user to select a whole line of an item, the ListView class is equipped with a Boolean property named FullRowSelect.
![]() Practical Learning: Introducing the Characteristics of a List View
Practical Learning: Introducing the Characteristics of a List View
View:          Details
GridLines:     True
FullRowSelect: True
The Columns of a List View
If you make a list view display in view mode, it would show some columns. You can create the columns visually or programmatically. To create the columns visually, after selecting the list view on a form, in the Properties window, click Columns. This would display the ColumnHeader Collection Editor dialog box:
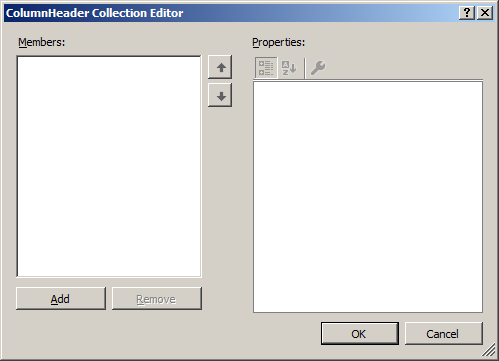
Use it to create the columns.
![]() Practical Learning: Adding Columns to a List View
Practical Learning: Adding Columns to a List View
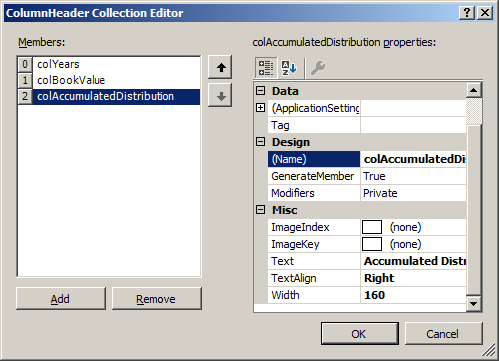
(Name): colYears
Text:	Year
(Name):      colBookValue
Text:	       Book Value
TextAlign:   Right:
Width:	   100
(Name):      colAccumulatedDistribution
Text:	       Accumulated Distribution
TextAlign:   Right:
Width:	   160
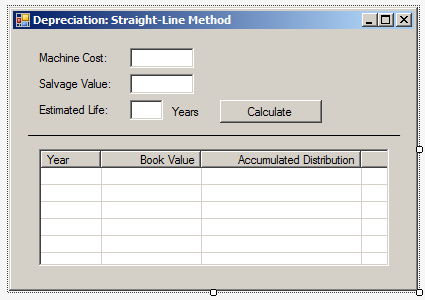
| Control | (Name) | Text | TextAlign |
| Label | Machine Cost: | ||
| TextBox | txtMachineCost | Right | |
| Label | Salvage Value: | ||
| TextBox | txtSalvageValue | Right | |
| Label | Estimated Life: | ||
| TextBox | txtEstimatedLife | Right | |
| Label | Years | ||
| Button | btnCalculate | Calculate | |
| Label | _____________________ | ||
| ListView | lvwDepreciation |
The Items of a List View
A list view is a list of items. You can create the items visually or programmatically. To create the items visually, after selecting the list view on a form, in the Properties window, click Items. This would display the ListViewItem Collection Editor dialog box. Use it to create the items of the list view.
To support the items of a list view, the .NET Framework provides a class named ListViewItem. The ListViewItem class is equipped with various constructors. One of the constructors takes a string as argument. You can use that constructor to create each item of a one-dimensional list view.
After creating an item for a list view using a ListViewItem object, you can add that item to a list view. To let you add a list view item to a list view, the Items property of the ListView class is equipped with an overloaded method named Add. One of the versions of this method takes a ListViewItem object. Therefore, to add an item to a list view, create a ListViewItem object and pass it to the ListView.Items.Add() method.
Most of the time, you create a list view because you want a list of items where each item uses a combination of values. After creating the first part of an item as seen in the previous section, to let you create the sub-items that are under an item, the ListViewItem class is equipped with a property named SubItems. This property holds the sub-items of an item. To let you add a sub-item, the SubItems property is equipped with an overloaded method named Add. One of the versions of this method takes a string as argument. Therefore, to add a sub-item to an item of a list view, you can pass a string to the ListViewItem.SubItems.Add() method. As stated in the previous section, after creating a ListViewItem object, call the ListView.Items.Add() methiod and pass a ListViewItem object to it.
![]() Practical Learning: Using a List View
Practical Learning: Using a List View
using System;
using System.Windows.Forms;

namespace StraightLineMethod2
{
    public partial class Form1 : Form
    {
        public Form1()
        {
            InitializeComponent();
        }

        private void btnCalculate_Click(object sender, EventArgs e)
        {
            int    estimatedLife = 0;
            double machineCost   = 0.00;
            double salvageValue  = 0.00;

            try
            {
                machineCost = double.Parse(txtMachineCost.Text);
            }
            catch (FormatException)
            {
                MessageBox.Show("You must type a valid value that represents the " +
                                "cost of the machine. Since you don't provide a " +
                                "valid value, we will set the machine cost to 0.00.",
                                "Depreciation: Straight-Line Method");

                txtMachineCost.Text = "0.00";
            }

            try
            {
                salvageValue = double.Parse(txtSalvageValue.Text);
            }
            catch (FormatException)
            {
                MessageBox.Show("You must provide a value you estimate the machine  " +
                                "will have at the end of the cycle (or the end of its " +
                                "life cycle). If you don't enter a valid value, we will " +
                                "consider the estimated end value to 0.00.",
                                "Depreciation: Straight-Line Method");

               txtSalvageValue.Text = "0.00";
            }

            try
            {
                estimatedLife = int.Parse(txtEstimatedLife.Text);
            }
            catch (FormatException)
            {
                MessageBox.Show("You didn't enter a valid number of years for the life of " +
                                "the machine. Please correct it, otherwize, we will consider that this machine " +
                                "has no life, or a life of 0 years.",
                                "Depreciation: Straight-Line Method");

                estimatedLife = 1;
            }

            double depreciatiableAmount = machineCost - salvageValue;

            if (estimatedLife == 0)
                throw new DivideByZeroException("The value for the length of the estimated life of the machine must always be greater than 0.");

            double depreciationRate = 100 / estimatedLife;
            double yearlyDepreciation = depreciatiableAmount / estimatedLife;

            int i = 1;
            int year = 1;
            double[] bookValues = new double[estimatedLife + 1];
            bookValues[0] = machineCost;

            while (i <= estimatedLife - 1)
            {
                bookValues[i] = bookValues[i - 1] - yearlyDepreciation;
                i++;
            }

            i = 0;
            bookValues[estimatedLife] = salvageValue;

            ListViewItem lviDepreciation = null;

            lvwDepreciation.Items.Clear();

            while (i <= estimatedLife - 1)
            {
                double accumulatedDepreciation = yearlyDepreciation * year;

                lviDepreciation = new ListViewItem(year.ToString());

                lviDepreciation.SubItems.Add(bookValues[i].ToString());
                lviDepreciation.SubItems.Add(accumulatedDepreciation.ToString());

                lvwDepreciation.Items.Add(lviDepreciation);

                i++;
                year++;
            }
        }
    }
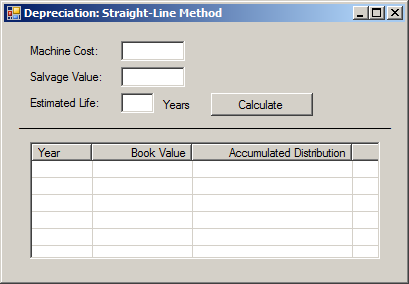
}
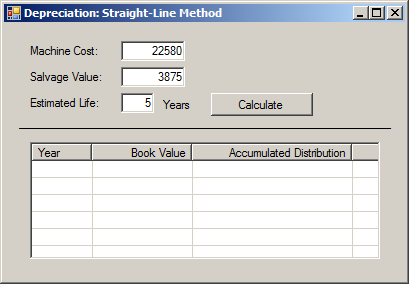
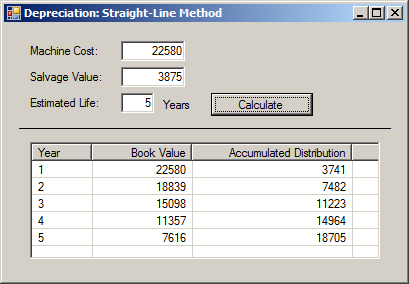
Machine Cost:   22580
Salvage Cost:   3875
Estimated Life: 5
|
|
||
| Previous | Copyright © 2001-2020, FunctionX | Next |
|
|
||