|
|
You can protect a workbook to make sure that not just
anybody can modify it. You can protect a workbook when saving it for the first
time or you can protect an existing workbook. You have many options.
When protecting a workbook, you give it a password. Anybody
who wants to use that workbook would need the password. You can also control
whether people would be allowed to open and only view the workbook, or be able
to open and modify its contents.
|
To protect a workbook when you save it for the first time,
click the Office Button and click Save. In the lower section of the dialog box,
click Tools and click General Options...

This
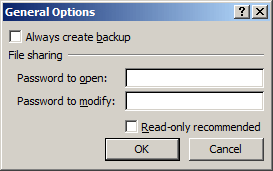
would display the General Options dialog box with two text boxes:
If
you want to allow only a person with a valid password to open the workbook, type
that password in the Password to open text box. If you click OK, a Confirm
Password text box would come up. If you want a person who opens the workbook to
be able to change its content, click the Password to modify text box, type a
password (the same or another) and click OK. A Confirm Password would come up.
In the Confirm Password dialog box(es), you must type the same password you had
provided in the corresponding first text boxes.
When a workbook has been protected with one or two
passwords, a user can open it to view or change. If you give only the Open
password, when opening the workbook, a user can enter that password and click
Read Only. When a workbook is open with this option, its title bar would display
Read-Only on the right side of the name:

|
 Practical
Learning: Protecting a Workbook Practical
Learning: Protecting a Workbook
|
|
- Start Microsoft Excel
- In cell C2, type College Park Auto Repair
- Click cell B4 and type Year
- Complete the worksheet with the following values
| Year |
Make |
Model |
Part Name |
Unit Price |
| 2006 |
Dodge |
Caravan SE L4 2.4 |
Radiator Cap |
6.65 |
| 2000 |
Toyota |
Rav4 2WD/4-Door |
Thermostat Gasket |
4.95 |
| 2006 |
Kia |
Rio 1.6DOHC16V 4-DR |
Thermostat |
14.45 |
- To save the workbook, click the Office Button and click Save
- Change the name to cpar1
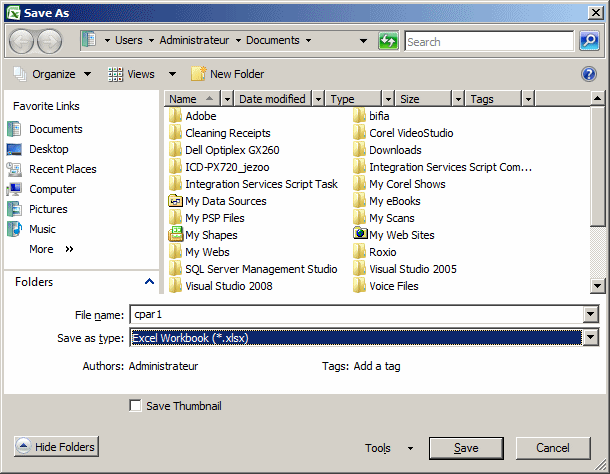
- Click the Tools button and click General Options...
- In the Password to Open text box, type P@ssword1 and press
Tab
- In the Password to modify text box, type Passw0rd1
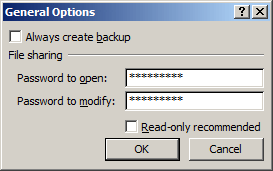
- Click OK
- In the Confirm Password dialog box, type P@ssword1
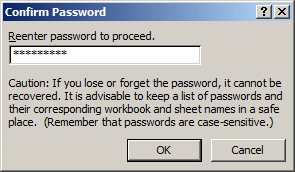
- Click OK
- In the second Confirm Password dialog box, type Passw0rd1 and
press Enter
- Click Save
- To close the workbook, click the Office Button and click Close
- To open the workbook, click Office Button and click cpar1.xlsx
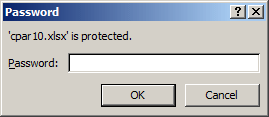
- In the Password dialog box, type P@ssword1
- Click OK
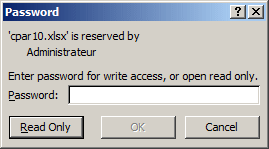
- In the second dialog box, click Read Only
- Click Year and type Car Year
- To save, press Ctrl + S
- Read the message box and click OK
- On the Save As dialog box, click Cancel
- To close the workbook, click the Office Button and click Close
- When asked whether you want to save, click No
- To re-open the workbook, click Office Button and click cpar1.xlsx
- In the Password dialog box, type P@ssword1 and click OK
- In the second Password dialog box, type Passw0rd1
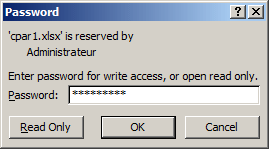
- Click OK
- Click Year and type Car Year
- To save the workbook, press Ctrl + S
If you don't need to workbook protected anymore, you can
remove its password. To do this, start saving the workbook. You can click the
Office Button, position the mouse on Save As, and click Save Excel Workbook.
Click Tools and click General Options. Delete the password and click OK. After
deleting the password, click Save. You would be asked whether you want to
overwrite the file. Click Yes.
|
 Practical
Learning: Removing a Password Practical
Learning: Removing a Password
|
|
- Click the Office Button -> Save As -> Excel Workbook
- In the lower section of the dialog box, click Options -> General
Options...
- As the password is selected, press Delete
- Press Tab
- Press Delete
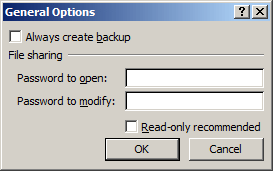
- Click OK
- Click Save
- When asked whether you want to replace the file, click Yes
If you protect a workbook, all of its worksheets are
protected and would follow the rules of workbook protecting. An alternative is
to protect the worksheets individually. You can protect all worksheets, some
worksheets, or just one worksheet.
To protect a worksheet, after displaying it, on the Ribbon,
click the Home tab. In the Cells section, click Format -> Protect Sheet...
This would display the Protect Sheet dialog box:
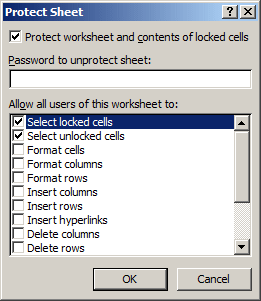
To protect a worksheet, you must provide a password. After
typing it in the Protect Sheet dialog box, click OK. A Confirm Password dialog
box would come up. You must type the same password. After opening the workbook,
to change anything on the worksheet, the user would be presented with a message
box.
|
Un-Protecting a Worksheet
|
|
If you don't need to keep protecting a worksheet, you can
remove its password. To do this, on the Ribbon, click Home. In the Cells
section, click Format and click Unprotect Sheet...

In the Unprotect Sheet dialog box, enter a valid password
and click OK.