Transactions
Transactions
Transactions Fundamentals
Introduction
A transaction is an operation or a series of operations that must be performed as a group with the idea of accountability, which is to find out whether the operation(s) was(were) carried. If so, or if not so, what to do. Because of this involvement of accountability, there are rules that must be respected, and suggestions that should be followed to effectively implement the idea of a transaction.
The rules to follow are grouped under the acronym ACID:
Before creating a transaction, you must define the operations that will be performed. To specify the beginning of the transaction, before the first operation, type BEGIN TRAN or BEGIN TRANSACTION with the following formula:
BEGIN { TRAN | TRANSACTION }
    [ { transaction_name | @tran_name_variable }
      [ WITH MARK [ 'description' ] ]
    ]
[ ; ]
Start with either BEGIN TRAN or BEGIN TRANSACTION. After this, a transaction_name is optional. If you had previously declared a text-based variable (char, nchar, varchar, or nvarchar), and assigned the transaction name to it, you can omit the transaction_name and use the name of that variable instead. If you want the transaction to be described in a log file, type WITH MARK and provide a description that will be written to the file.
The code between the BEGIN TRAN or BEGIN TRANSACTION line is part of the transaction.
|
Ending a Transaction |
After defining the operations that are part of the transaction, the database engine would execute them in the sequence they are written. You must indicate where this series of transactions ends. To do this, type the COMMIT TRAN or COMMIT TRANSACTION expression:
BEGIN TRAN Name or BEGIN TRANSACTION Name
    Operations
COMMIT TRAN Name or COMMIT TRANSACTION Name
Consider the following example:
USE Exercise;
Go

CREATE TABLE Administration.Employees
(
    EmployeeNumber nvarchar(10),
    EmployeeName nvarchar(50),
    DateHired date,
    HourlySalary money
);
GO

INSERT INTO Administration.Employees
VALUES(N'593705', N'Frank Somah', N'20061004', 26.15),
      (N'720947', N'Paul Handsome', N'20000802', 36.05);
GO

INSERT INTO Administration.Employees(EmployeeName, EmployeeNumber, DateHired)
VALUES(N'Clarice Simms', N'971403', N'20011112');
GO

BEGIN TRANSACTION AddEmployees

INSERT INTO Administration.Employees
VALUES(N'595002', N'John Meah', N'20000212', 32.25);
GO
INSERT INTO Administration.Employees
VALUES(N'928375', N'Chuck Stansil', N'20080628');
GO
INSERT INTO Administration.Employees
VALUES(N'792764', N'Orlando Perez', N'20000616', 12.95);
GO

COMMIT TRANSACTION AddEmployees;
GO

INSERT INTO Administration.Employees(EmployeeName, EmployeeNumber,
            HourlySalary, DateHired)
VALUES(N'Gina Palau', N'247903', 18.85, N'20080612');
GO
This code asks the database engine to create a table named Employees in the Administration schema of the Exercise database. After creating the table, it must first create one, followed by two records. Then it must process a transaction that consists of creating three records. After that transaction, data entry continues with the addition of a record. For illustration purposes, we included an error in the code for the transaction. The above code would produce:
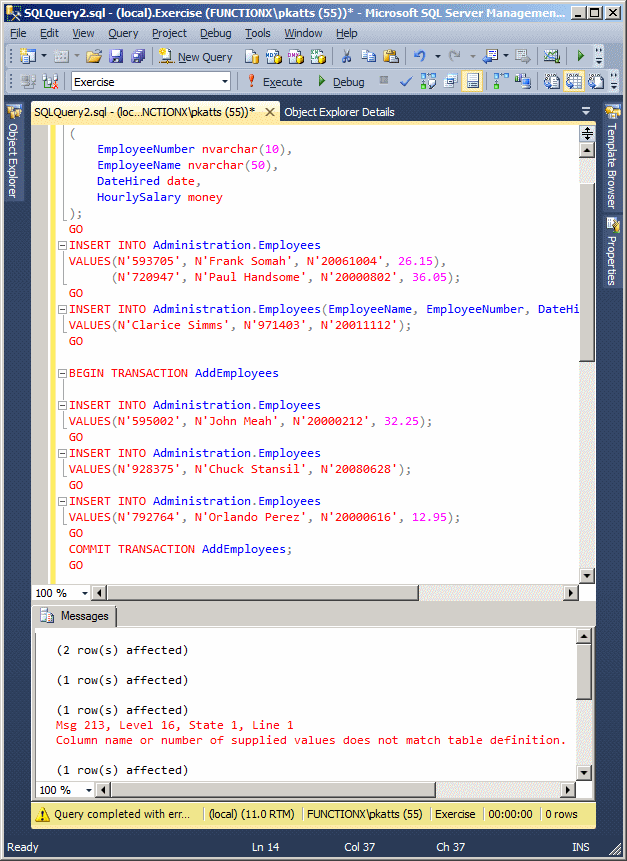
The resulting table is:
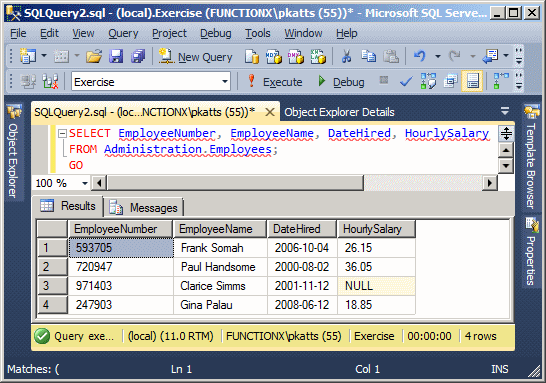
Notice that the code where the transaction was held did not complete and its records were not created.
Rolling Back a Transaction
Consider the following code:
USE Exercise;
GO
DROP TABLE Administration.Employees
GO
CREATE TABLE Administration.Employees
(
    EmployeeNumber nvarchar(10),
    EmployeeName nvarchar(50),
    DateHired date,
    HourlySalary money
);
GO

BEGIN TRANSACTION AddEmployees

INSERT INTO Administration.Employees
VALUES(N'593705', N'Frank Somah', N'20061004', 26.15),
      (N'720947', N'Paul Handsome', N'20000802', 36.05),
      (N'595002', N'John Meah', N'20000212', 32.25);
GO
INSERT INTO Administration.Employees(EmployeeName, EmployeeNumber, DateHired)
VALUES(N'Clarice Simms', N'971403', N'20011112');
GO
INSERT INTO Administration.Employees
VALUES(N'928375', N'Chuck Stansil', N'20080628');
GO
INSERT INTO Administration.Employees
VALUES(N'792764', N'Orlando Perez', N'20000616', 12.95);
GO
INSERT INTO Administration.Employees(EmployeeName, EmployeeNumber,
                                     HourlySalary, DateHired)
VALUES(N'Gina Palau', N'247903', 18.85, N'20080612');
GO

COMMIT TRANSACTION AddEmployees;
GO
When executed, the Query Editor would produce:
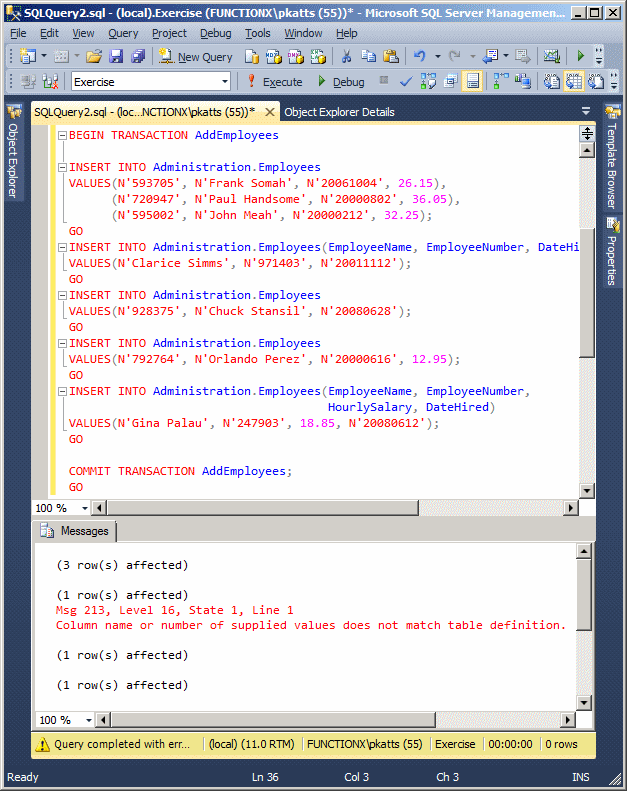
Notice that there is an error in the transaction code. The created records are:
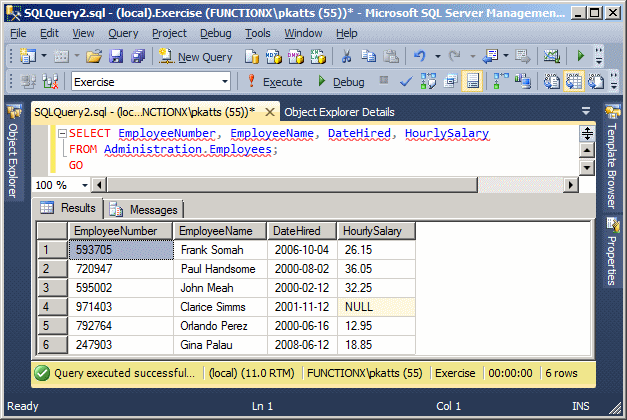
Notice that, despite the error, the transaction was performed and the section with error was ignored.
In some cases, to apply the rules or atomicity, you may want to dismiss the whole transaction if a section in it fails. In other words, you would want either the whole transaction to be successful or nothing. To ask the database engine to either validate the whole transaction or to dismiss it, you would ask it to roll back the (whole) transaction. To support this, instead of committing, you would use the ROLLBACK TRANSACTION expression. Its formula is:
ROLLBACK { TRAN | TRANSACTION }
     [ transaction_name | @tran_name_variable
     | savepoint_name | @savepoint_variable ]
[ ; ]
You start with a ROLLBACK TRAN or ROLLBACK TRANSACTION. If the transaction has a name, type it or the variable that holds its name. If you plan to save this operation, use the savepoint_name or the @savepoint_variable factor.
Here is an example of indicating that the transaction should be rolled back if it is not wholly successful:
USE Exercise;
GO
DROP TABLE Administration.Employees
GO
CREATE TABLE Administration.Employees
(
    EmployeeNumber nchar(10),
    EmployeeName nvarchar(50),
    DateHired date,
    HourlySalary money
);
GO

BEGIN TRANSACTION AddEmployees

INSERT INTO Administration.Employees
VALUES(N'593705', N'Frank Somah', N'20061004', 26.15),
      (N'720947', N'Paul Handsome', N'20000802', 36.05),
      (N'595002', N'John Meah', N'20000212', 32.25);
GO
INSERT INTO Administration.Employees(EmployeeName, EmployeeNumber, DateHired)
VALUES(N'Clarice Simms', N'971403', N'20011112');
GO
INSERT INTO Administration.Employees
VALUES(N'928375', N'Chuck Stansil', N'20080628');
GO
INSERT INTO Administration.Employees
VALUES(N'792764', N'Orlando Perez', N'20000616', 12.95);
GO
INSERT INTO Administration.Employees(EmployeeName, EmployeeNumber,
            HourlySalary, DateHired)
VALUES(N'Gina Palau', N'247903', 18.85, N'20080612');
GO

ROLLBACK TRANSACTION AddEmployees;
GO
This code starts by creating a table named Employees. After creating the table, the database engine is asked to add some records to it. The creation of records is included in a transaction with the roll back option.
Notice that there is an error inside the transaction:
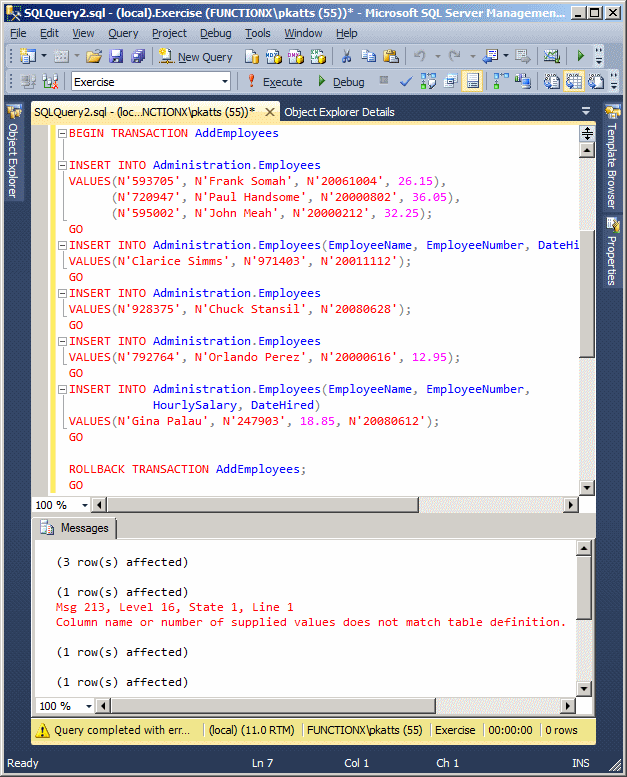
When the above code is executed, the table has been created because it is outside the transaction; but the resulting table is empty:
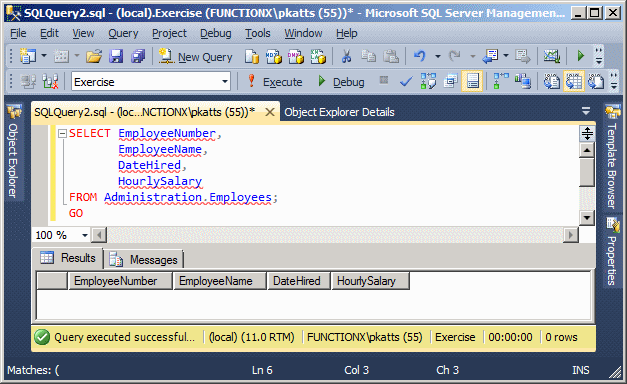
Notice that, because of an (one) error inside the transaction, the whole transaction was dismissed.
|
Controlling a Transaction's Isolation Level |
In a database, a record is referred to as dirty if it has changed (modified) since the last time its table (or view) was opened. When creating a transaction, you can give instructions to the database engine about how to commit, or whether to dismiss, a transaction with regards to a dirty record. To support this, you start with the following formula:
SET TRANSACTION ISOLATION LEVEL
    { READ UNCOMMITTED
    | READ COMMITTED
    | REPEATABLE READ
    | SNAPSHOT
    | SERIALIZABLE
    }
[ ; ]
You start with the SET TRANSACTION ISOLATION LEVEL expression and follow it with a value:
|
|
||
| Previous | Copyright © 2011-2022, FunctionX, Inc. | Next |
|
|
||