Copying and Merging Records
Copying and Merging Records
Copying Records
Introduction
Imagine you have two tables that are supposed to hold the same values. Maybe the tables were created by different people for the same goal. Maybe there is an old table that holds the records from previous business transactions and there is a new table with the new records. At one time, you may want to merge these records. You have various options.
Consider the following tables:
USE Exercise1;
GO
CREATE SCHEMA HumanResources;
GO
CREATE TABLE HumanResources.Seasonals
(
	ContractorCode nchar(6),
	FirstName nvarchar(20),
	LastName nvarchar(20),
	Wage money
);
GO
INSERT INTO HumanResources.Seasonals
VALUES(N'86824', N'Julie', N'Chance', 12.84),
      (N'84005', N'Ayinda', N'Kaihibu', 9.52);
GO

CREATE TABLE HumanResources.Employees
(
	EmplNbr nchar(6),
	FirstName nvarchar(20),
	LastName nvarchar(20),
	HourlySalary money
);
GO
INSERT INTO HumanResources.Employees
VALUES(N'22-684', N'Ann', N'Keans', 20.52),
      (N'48-157', N'Godwin', N'Harrison', 18.75),
      (N'82-476', N'Timothy', N'Journ', 28.04),
      (N'15-007', N'Ralph', N'Sunny', 22.64);
GO
We continue with the apartments application we started in Lesson 11.
This time, the management of the business has created a new company named Lambda Properties Management. The company has acquired some apartments from another company. The apartments are located in Alexandria, Virginia and stored in a database that was provided to Lambda Properties Management. The company will also be in charge of managing rent, on behalf of various people who own some properties (single families, townhouses, and condominiums). We must create a database for the Lambda Properties Management company.
The properties (apartments and houses) will have the following information:
![]() Practical
Learning: Introducing Records Copying
Practical
Learning: Introducing Records Copying
USE LPM1;
GO

SELECT aparts.[Address],
       aparts.UnitNumber [Apart #],
       aparts.City,
       aparts.[State],
       aparts.ZIPCode    [ZIP Code],
       aparts.Bedrooms   [Beds],
       aparts.Bathrooms  [Baths],
       aparts.Price,
       aparts.Deposit,
       aparts.Available
FROM Presentation.Units aparts;
GO
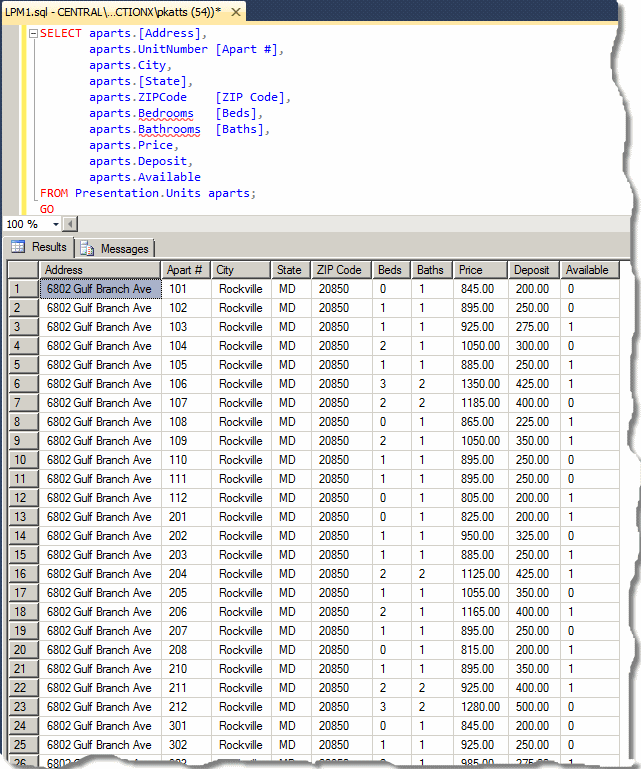
USE LPM1;
GO

SELECT ALL * FROM Listing.Properties;
GO
|
Copying All Records From a Table |
Copying the records consists of transferring them from one table, the source, to another table, the target. You can copy all records from the source to the target. You can select what columns to copy. Or you can specify under what conditions some records would be copied.
To copy all records from one table to another, the source and the target must have the same number of columns and the same sequence of columns with regards to their data types. To copy the records, Start an INSERT or INSERT INTO statement. Instead of the VALUES keyword, create a SELECT statement that involves the source table. Here is an example:
USE Exercise1;
GO

INSERT INTO HumanResources.Employees SELECT * FROM HumanResources.Seasonals;
GO
Once this statement has been executed, all records from the source table are copied to the target table:
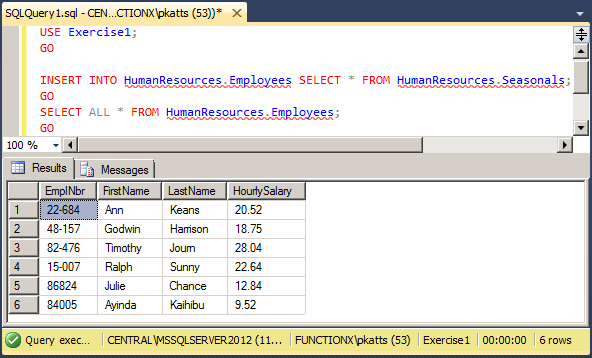
If you use the above formula, the records of a column from the source table would be copied to the corresponding column of the target table. Sometimes, you will want to merge tables that neither share the same sequence of columns nor have the same number of columns. Consider the following tables:
USE Exercise1;
GO

DROP TABLE HumanResources.Seasonals;
GO
DROP TABLE HumanResources.Employees;
GO

CREATE TABLE HumanResources.Seasonals
(
	SeasonalCode nchar(6),
	Wage money,
	LastName nvarchar(20),
	FirstName nvarchar(20)
);
GO
INSERT INTO HumanResources.Seasonals
VALUES(N'86-824', 12.84, N'Julie', N'Chance'),
      (N'84-005', 9.52, N'Ayinda', N'Kaihibu');
GO

CREATE TABLE HumanResources.Employees
(
	EmplNbr nchar(6),
	EmployeeName nvarchar(50),
	HourlySalary money
);
GO
INSERT INTO HumanResources.Employees
VALUES(N'22-684', N'Ann Keans', 20.52),
      (N'48-157', N'Godwin Harrison', 18.75),
      (N'82-476', N'Timothy Journ', 21.05),
      (N'15-007', N'Ralph Sunny', 15.55);
GO
In such a case, before copying the records, you must analyze the table to figure out a way to converge the records. Here is an example:
USE Exercise1;
GO

INSERT INTO HumanResources.Employees
SELECT SeasonalCode, FirstName + N' ' + Lastname, Wage
FROM HumanResources.Seasonals;
GO

|
|
USE LPM1;
GO

INSERT INTO Listing.Properties([Address],
                                UnitNumber,
                                City,
			       [State],
				ZIPCode,
			        Bedrooms,
			        Bathrooms,
			        MonthlyRate,
		                SecurityDeposit,
			        OccupancyStatus)
SELECT [Address],
        UnitNumber,
        City,
       [State],
        ZIPCode,
	Bedrooms,
	Bathrooms,
	Price,
	Deposit,
	Available
FROM    Presentation.Units
GO
USE LPM1;
GO

SELECT * FROM Listing.Properties;
GO
USE LPM1;
GO

UPDATE Listing.Properties
SET PropertyType = N'Apartment';
GO
USE LPM1;
GO

SELECT * FROM Listing.Properties;
GO
USE LPM1;
GO

UPDATE Listing.Properties
SET   OccupancyStatus = N'Available'
WHERE OccupancyStatus = N'1';
GO
USE LPM1;
GO

SELECT * FROM Listing.Properties;
GO
USE LPM1;
GO

UPDATE Listing.Properties
SET   OccupancyStatus = N'Other'
WHERE OccupancyStatus = N'0';
GO
USE LPM1;
GO

SELECT * FROM Listing.Properties;
GO
USE LPM1;
GO

UPDATE Listing.Properties SET PropertyNumber = N'729384' WHERE UnitNumber = N'101';
GO
UPDATE Listing.Properties SET PropertyNumber = N'241600' WHERE UnitNumber = N'102';
GO
UPDATE Listing.Properties SET PropertyNumber = N'729397' WHERE UnitNumber = N'103';
GO
UPDATE Listing.Properties SET PropertyNumber = N'928364' WHERE UnitNumber = N'104';
GO
UPDATE Listing.Properties SET PropertyNumber = N'350511' WHERE UnitNumber = N'105';
GO
UPDATE Listing.Properties SET PropertyNumber = N'492739' WHERE UnitNumber = N'106';
GO
UPDATE Listing.Properties SET PropertyNumber = N'304060' WHERE UnitNumber = N'107';
GO
UPDATE Listing.Properties SET PropertyNumber = N'829475' WHERE UnitNumber = N'108';
GO
UPDATE Listing.Properties SET PropertyNumber = N'139749' WHERE UnitNumber = N'109';
GO
UPDATE Listing.Properties SET PropertyNumber = N'369294' WHERE UnitNumber = N'110';
GO
UPDATE Listing.Properties SET PropertyNumber = N'502084' WHERE UnitNumber = N'111';
GO
UPDATE Listing.Properties SET PropertyNumber = N'829397' WHERE UnitNumber = N'112';
GO
UPDATE Listing.Properties SET PropertyNumber = N'292739' WHERE UnitNumber = N'201';
GO
UPDATE Listing.Properties SET PropertyNumber = N'496055' WHERE UnitNumber = N'202';
GO
UPDATE Listing.Properties SET PropertyNumber = N'939595' WHERE UnitNumber = N'203';
GO
UPDATE Listing.Properties SET PropertyNumber = N'384068' WHERE UnitNumber = N'204';
GO
UPDATE Listing.Properties SET PropertyNumber = N'824850' WHERE UnitNumber = N'205';
GO
UPDATE Listing.Properties SET PropertyNumber = N'620485' WHERE UnitNumber = N'206';
GO
UPDATE Listing.Properties SET PropertyNumber = N'294940' WHERE UnitNumber = N'207';
GO
UPDATE Listing.Properties SET PropertyNumber = N'602048' WHERE UnitNumber = N'208';
GO
UPDATE Listing.Properties SET PropertyNumber = N'829479' WHERE UnitNumber = N'209';
GO
UPDATE Listing.Properties SET PropertyNumber = N'280484' WHERE UnitNumber = N'210';
GO
UPDATE Listing.Properties SET PropertyNumber = N'602408' WHERE UnitNumber = N'211';
GO
UPDATE Listing.Properties SET PropertyNumber = N'384086' WHERE UnitNumber = N'212';
GO
UPDATE Listing.Properties SET PropertyNumber = N'397493' WHERE UnitNumber = N'301';
GO
UPDATE Listing.Properties SET PropertyNumber = N'625941' WHERE UnitNumber = N'302';
GO
UPDATE Listing.Properties SET PropertyNumber = N'404950' WHERE UnitNumber = N'303';
GO
UPDATE Listing.Properties SET PropertyNumber = N'304806' WHERE UnitNumber = N'304';
GO
UPDATE Listing.Properties SET PropertyNumber = N'844850' WHERE UnitNumber = N'305';
GO
UPDATE Listing.Properties SET PropertyNumber = N'596305' WHERE UnitNumber = N'306';
GO
UPDATE Listing.Properties SET PropertyNumber = N'138408' WHERE UnitNumber = N'307';
GO
UPDATE Listing.Properties SET PropertyNumber = N'248664' WHERE UnitNumber = N'308';
GO
UPDATE Listing.Properties SET PropertyNumber = N'847584' WHERE UnitNumber = N'309';
GO
UPDATE Listing.Properties SET PropertyNumber = N'284957' WHERE UnitNumber = N'310';
GO
UPDATE Listing.Properties SET PropertyNumber = N'359405' WHERE UnitNumber = N'311';
GO
UPDATE Listing.Properties SET PropertyNumber = N'308505' WHERE UnitNumber = N'312';
GO
USE LPM1;
GO

SELECT ALL * FROM Listing.Properties;
GO
|
Copying Some Records From a Table |
Instead of copying all records from one table into another, you can set a condition to follow in order to copy only some records. Here is an example:
USE Exercise1;
GO
DROP TABLE HumanResources.Seasonals;
GO
DROP TABLE HumanResources.Employees;
GO

CREATE TABLE HumanResources.Employees
(
	EmployeeNumber nchar(9),
	EmployeeName nvarchar(50),
	HourlySalary money,
	[Status] nvarchar(20) null
);
GO
CREATE TABLE HumanResources.ConsideredForPromotion
(
	Number nchar(9),
	FName nvarchar(20),
	LName nvarchar(20),
	Wate money,
	[Type] nvarchar(20)
);
GO
INSERT INTO HumanResources.Employees
VALUES(N'2860-1824', N'Julie', N'Chance', 12.84, N'Full Time'),
      (N'6842-8005', N'Ayinda', N'Kaihibu', 9.52, N'Part Time'),
      (N'9226-2084', N'Ann', N'Keans', 20.52, N'Full Time'),
      (N'2480-8157', N'Godwin', N'Harrison', 18.75, N'Full Time'),
      (N'6824-7006', N'Timothy', N'Journ', 21.05, NULL),
      (N'4150-9075', N'Ralph', N'Sunny', 15.55, N'Part Time');
GO

INSERT INTO HumanResources.ConsideredForPromotion
SELECT EmployeeNumber,
       FirstName,
       LastName,
       HourlySalary,
       [Status]
FROM   HumanResources.Employees
WHERE  [Status] = N'Full Time';
GO
Copying a Set of Records
Imagine you have an existing table filled with records. Instead of copying all records from that table into another table, you may want to copy only a specific number of records. To do this, use the following formula:
INSERT TOP (Number) [INTO] TargetTable
SELECT WhatObject(s) FROM WhatObject
After the INSERT keyword, add TOP followed by parentheses. In the parentheses, enter the desired number of records. The rest of the formula follows the techniques we hase used so far. Here is an example:
USE Exercise1;
GO

DROP TABLE HumanResources.Employees;
GO
DROP TABLE HumanResources.Interns;
GO

CREATE TABLE HumanResources.Employees
(
	EmployeeNumber nchar(9),
	EmployeeName nvarchar(50),
	HourlySalary money
);
GO
INSERT INTO HumanResources.Employees
VALUES(N'2860-1824', N'Julie Chance', 12.84),
      (N'6842-8005', N'Ayinda Kaihibu', 9.52),
      (N'9226-2084', N'Ann Keans', 20.52),
      (N'2480-8157', N'Godwin Harrison', 18.75),
      (N'6824-7006', N'Timothy Journ', 21.05),
      (N'4150-9075', N'Ralph Sunny', 15.55);
GO

CREATE TABLE HumanResources.Interns
(
	InternNumber nchar(6),
	LastName nvarchar(20),
	FirstName nvarchar(20),
	Salary money
);
GO

INSERT INTO HumanResources.Interns
VALUES(N'30-848', N'Politanoff', N'Jeannette', 22.04),
      (N'81-094', N'Bragg', N'Salomon', 15.50),
      (N'20-938', N'Verne', N'Daniel', 21.24),
      (N'11-055', N'Beal', N'Sidonie', 12.85),
      (N'88-813', N'Jensen', N'Nicholas', 20.46);
GO

INSERT TOP (3) INTO HumanResources.Employees
SELECT InternNumber,
       FirstName + N' ' + Lastname,
       Salary
FROM   HumanResources.Interns;
GO

SELECT * FROM HumanResources.Employees;
GO
This would produce:
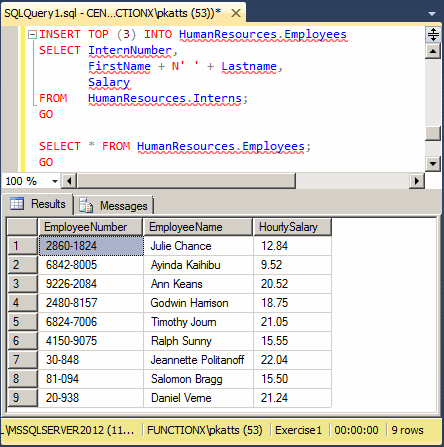
Notice that only 3 records from the source table were copied.
|
Copying a Percentage of Records |
Instead of copying a fixed number of records, you can specify a portion as a percentage. In this case, use the following formula:
INSERT TOP (Number) PERCENT [INTO] TargetTable
SELECT WhatObject(s) FROM WhatObject
The new keyword in this formula is PERCENT. You must use it to indicate that the number in the parentheses represents a percentage value. That number must be between 0.00 and 100.00 included. Here is an example:
USE Exercise1;
GO
INSERT INTO HumanResources.Interns
VALUES(N'28-440', N'Avery', N'Herbert', 13.74),
      (N'60-040', N'Lynnette', N'Douglas', 17.75),
      (N'25-558', N'Washington', N'Jacob', 20.15),
      (N'97-531', N'Colson', N'Lois', 17.05),
      (N'24-680', N'Meister', N'Victoria', 11.60);
GO

INSERT TOP (30) PERCENT INTO HumanResources.Employees
SELECT InternNumber, FirstName + N' ' + Lastname, Salary
FROM HumanResources.Interns;
GO
Notice that the source table (the Interns table) has nine records but only three (9 / (100/30) = 9 / 3.33 = 2.7 ≈ 3 (the closest higher integer to 2.7 is 3)) record from that table were copied into the Employees table.
|
Moving Records |
Consider the following two tables:
USE Exercise1;
GO
DROP TABLE HumanResources.Employees;
GO

CREATE TABLE HumanResources.Contractors
(
	ContractorCode nchar(6), Salary money,
	LastName nvarchar(20), FirstName nvarchar(20)
);
INSERT INTO HumanResources.Contractors
VALUES(N'86-824', 12.84, N'Chance', N'Julie'),
      (N'84-005', 9.52, N'Kaihibu', N'Ayinda'),
      (N'27-084', 14.26, N'Gorman', N'Alex');
GO
CREATE TABLE HumanResources.Employees
(
	FirstName nvarchar(50),	LastName nvarchar(20),
	EmplNbr nchar(10), HourlySalary money
);
INSERT INTO HumanResources.Employees
VALUES(N'Ann', N'Keans', N'22-684', 20.52),
      (N'Godwin', N'Harrison', N'48-157', 18.75),
      (N'Timothy', N'Journ', N'82-476', 21.05),
      (N'Ralph', N'Sunny', N'15-007', 15.55);
GO
SELECT ALL * FROM HumanResources.Contractors;
GO
SELECT ALL * FROM HumanResources.Employees;
GO

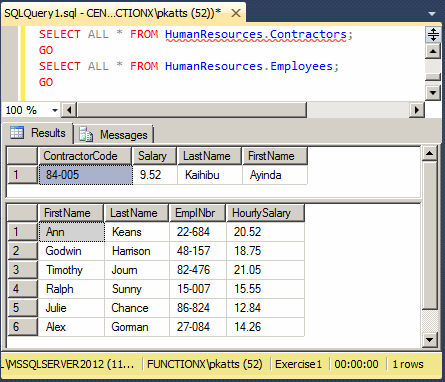
Moving records consists of transferring them from one table, the source, to another table, the target. Neither SQL nor Transact-SQL directly supports this operation, which happens to be extremely easy. You have many options. Probably the easiest way to do this consists of copying the records from the source to the target, then deleting the same records from the source. Here is an example:
USE Exercise1;
GO

INSERT INTO HumanResources.Employees
SELECT FirstName, LastName, ContractorCode, Salary
FROM HumanResources.Contractors
WHERE Contractors.Salary >= 10.00;
GO

DELETE FROM HumanResources.Contractors
WHERE Contractors.Salary >= 10.00;
GO

SELECT ALL * FROM HumanResources.Contractors;
GO
SELECT ALL * FROM HumanResources.Employees;
GO
Merging Records
Introduction
Imagine you have various tables created at different times, or by different people, or for different reasons. You may have tables that have duplicate records (the same record(s) in more than one table, for example the same employee number and same name in two tables). You may have records in different tables but some of those records share a field's value (you may have an employee A in one table and another employee B in another table but both have the same employee number with different names, perhaps when two companies merge). As an assignment, you may be asked to combine the records of those tables into one.
![]() Practical
Learning: Introducing Merging
Practical
Learning: Introducing Merging
USE LPM1;
GO

SELECT * FROM Listing.AlexandriaApartments;
GO
SELECT * FROM Listing.Condominiums condos;
GO
USE LPM1;
GO

SELECT * FROM Listing.AlexandriaApartments alex
ORDER BY alex.ApartmentCode;
GO
SELECT * FROM Listing.Condominiums condos
ORDER BY condos.CondoCode;
GO
USE LPM1;
GO

ALTER TABLE Listing.AlexandriaApartments
ADD OccupancyStatus nvarchar(20) default N'Available';
GO
USE LPM1;
GO

UPDATE Listing.AlexandriaApartments
SET OccupancyStatus =  N'Available';
GO
Record merging consists of inserting the records of one table, referred to as the source, into another table, referred to as the target. When performing this operation, you will have the option to:
The primary formula to merge two tables is:
MERGE Table1 AS Target
USING Table2 AS Source
ON Table1.CommonField = Table2.CommonField
WHEN MATCHED Matched Options
    THEN Match Operation(s)
WHEN NOT MATCHED BY TARGET
    THEN Not Matched By Target Operation(s)
WHEN NOT MATCHED BY SOURCE
    THEN Not Matched By Source Operation(s)
You start with the MERGE operator followed by the table to which the records will be added. Here is an example:
MERGE HumanResources.Contractors AS Workers
You continue with the USING operator followed by the table from which the records will be retrieved. Here is an example:
MERGE HumanResources.Contractors AS Workers
USING HumanResources.Employees AS Teachers
You must specify the condition by which the records must correspond.
To merge the records, the tables must have a common column. The columns don't have to have the same name but they should be of the same type (and size). To provide this information, type ON followed by the condition. Here is an example:
MERGE HumanResources.Contractors AS Workers
USING HumanResources.Employees AS Teachers
ON Workers.ContractorCode = Teachers.EmployeeNumber
To make the statement easier to read, you can include it in parentheses.
After specifying the tables and the records corresponding conditions, you must indicate what to do if/when a record from the source table meets a record from the target table. These conditions are set in the last part of the statement.
Consider the following tables:
USE Exercise1;
GO
DROP TABLE HumanResources.Employees;
GO
DROP TABLE HumanResources.Contractors;
GO

CREATE TABLE HumanResources.Contractors
(
    ContractorCode nvarchar(10),
    FName nvarchar(20),
    LName nvarchar(20),
    Wage decimal(6, 2)
);
GO
CREATE TABLE HumanResources.Employees
(
    EmployeeNumber nvarchar(10),
    DateHired date,
    FirstName nvarchar(20),
    LastName nvarchar(20),
    HourlySalary money,
    EmploymentStatus nvarchar(20) null
);
GO
INSERT INTO HumanResources.Contractors
VALUES(N'350-809', N'Mary', N'Shamberg', 14.20),
      (N'286-606', N'Chryssa', N'Lurie', 20.26),
      (N'415-905', N'Ralph', N'Sunny', 15.55);
GO
INSERT INTO HumanResources.Employees
VALUES(N'286-018', N'20020426', N'Julie', N'Chance', 12.84, N'Full Time'),
      (N'286-606', N'19981008', N'Ayinda', N'Kaihibu', 9.52, N'Part Time'),
      (N'922-620', N'20100815', N'Ann', N'Keans', 20.52, N'Full Time'),
      (N'415-905', N'20061222', N'Godwin', N'Harrison', 18.75, N'Full Time'),
      (N'682-470', N'20080430', N'Timothy', N'Journ', 21.05, NULL);
GO

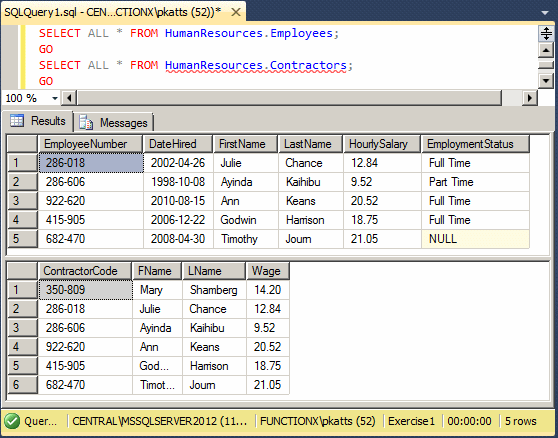
SELECT ALL * FROM HumanResources.Contractors;
GO
SELECT ALL * FROM HumanResources.Employees;
GO
This would produce:

When merging records, the first conditional operation is to decide what to do if two records match. To start, you would add a WHEN MATCHED statement:
MERGE Contractors AS Workers
USING Employees AS Teachers
ON (Workers.ContractorCode = Teachers.EmployeeNumber)
WHEN MATCHED
If two records of the tables match, one thing you can do is to delete the matching record. To do this, after the WHEN MATCHED expression, add a THEN DELETE statement. Here is an example:
MERGE HumanResources.Contractors AS Workers
USING HumanResources.Employees AS Teachers
ON (Workers.ContractorCode = Teachers.EmployeeNumber)
WHEN MATCHED
    THEN DELETE;
GO

SELECT ALL * FROM HumanResources.Employees;
GO
SELECT ALL * FROM HumanResources.Contractors;
GO

Imagine that you want to merge the records of both tables by inserting the employees in the Contractors table. Instead of deleting matching records, another option is to update the matched records. Notice that there are two employees who have the same employee number as two contractors. In this case, a simple solution we will use is to precede those employee numbers by 00. We can write the same statement as follows:
MERGE HumanResources.Contractors AS Workers
USING HumanResources.Employees AS Teachers
ON (Workers.ContractorCode = Teachers.EmployeeNumber)
WHEN MATCHED
    THEN UPDATE SET ContractorCode = N'00' + ContractorCode
The other operation is to specify what to do if the records don't match: Simple, we will simply merge them (the employees) with the others (the contractors). This can be done as follows:
MERGE HumanResources.Contractors AS Workers
USING HumanResources.Employees AS Teachers
ON (Workers.ContractorCode = Teachers.EmployeeNumber)
WHEN MATCHED
    THEN UPDATE SET ContractorCode = N'00' + ContractorCode
WHEN NOT MATCHED
    THEN INSERT(ContractorCode, FName, LName, Wage)
    VALUES(EmployeeNumber, FirstName, LastName, HourlySalary);
GO
We can then display the contents of both tables again to see what records each contains now:
SELECT ALL * FROM HumanResources.Employees;
GO
SELECT ALL * FROM HumanResources.Contractors;
GO
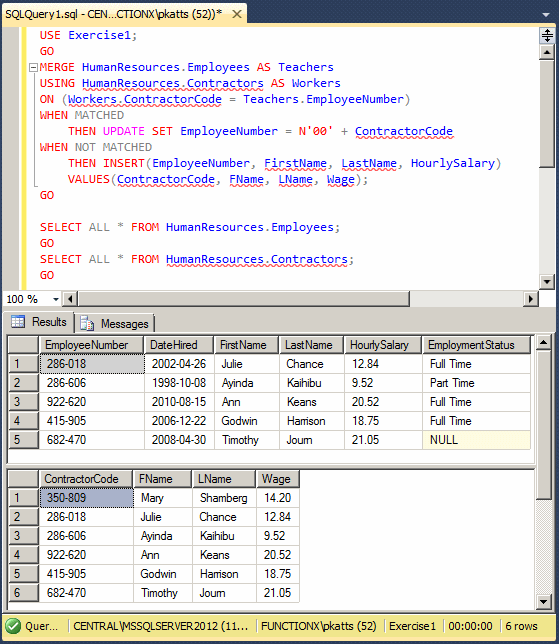
Of course, in the same way, you can merge the records of any table to those of the other table, as long as you follow the rules. For example, based on the above tables, if you want to merge the contractors with the employees, you can specify the Employees table as the target, the Contractors table as the source, and their numbers as the common column to match. Then, when the numbers match, you can specify what to do. For us, once more we can simply ask the database engine to start the number with 00. For the records that don't match, we can simply add the records from the source to the targe. Here is an example:
MERGE HumanResources.Employees AS Teachers
USING HumanResources.Contractors AS Workers
ON (Workers.ContractorCode = Teachers.EmployeeNumber)
WHEN MATCHED
    THEN UPDATE SET EmployeeNumber = N'00' + ContractorCode
WHEN NOT MATCHED
    THEN INSERT(EmployeeNumber, FirstName, LastName, HourlySalary)
    VALUES(ContractorCode, FName, LName, Wage);
GO

SELECT ALL * FROM HumanResources.Employees;
GO
SELECT ALL * FROM HumanResources.Contractors;
GO
When you write WHEN NOT MATCHED, it is assumed that you want the cases where a record of the target doesn't match a record of the source. As a result, you can also write the expression as WHEN NOT MATCHED BY TARGET:
MERGE HumanResources.Employees AS Teachers
USING HumanResources.Contractors AS Workers
ON (Workers.ContractorCode = Teachers.EmployeeNumber)
WHEN MATCHED
    THEN UPDATE SET EmployeeNumber = N'00' + ContractorCode
WHEN NOT MATCHED BY TARGET
    THEN INSERT(EmployeeNumber, FirstName, LastName, HourlySalary)
    VALUES(ContractorCode, FName, LName, Wage);
GO
To specify what to do if a record of the source doesn't match one from the target, add a WHEN NOT MATCHED BY SOURCE statement. In this case, you must use either a DELETE or an UPDATE statment.
|
|
USE LPM1;
GO

MERGE Listing.AlexandriaApartments AS Target
USING Listing.Condominiums AS Source
ON (Target.ApartmentCode = Source.CondoCode)
WHEN NOT MATCHED BY Target
    THEN INSERT(ApartmentCode, [Address], ApartNbr, City, [State], ZIP,        Bedrooms, Bathrooms, MonthRent, InitialDeposit, OccupancyStatus)
	 VALUES(CondoCode,     [Address], CondoNbr, City, [State], PostalCode, Beds,     Baths,     Rent,      SecDepot,       [Status])
WHEN MATCHED
    THEN UPDATE SET Target.ApartmentCode   = LEFT(Source.CondoCode, 3) + N'-' + RIGHT(Source.CondoCode, 3),
		    Target.[Address]       = Source.[Address],
		    Target.ApartNbr        = Source.CondoNbr,
		    Target.City            = Source.City,
		    Target.[State]         = Source.[State],
		    Target.ZIP             = Source.PostalCode,
		    Target.Bedrooms        = Source.Beds,
		    Target.Bathrooms       = Source.Baths,
		    Target.MonthRent       = Source.Rent,
		    Target.InitialDeposit  = Source.SecDepot,
		    Target.OccupancyStatus = Source.[Status];
GO
USE LPM1;
GO

SELECT * FROM Listing.AlexandriaApartments;
GO
USE LPM1;
GO

MERGE Listing.Properties AS Target
USING Listing.AlexandriaApartments AS Source
ON (Target.PropertyNumber = Source.ApartmentCode)
WHEN MATCHED
    THEN UPDATE SET Target.PropertyNumber = LEFT(Source.ApartmentCode, 2) + N'-' +
	                                        SUBSTRING(Source.ApartmentCode, 4, 2) + N'-' +
									        RIGHT(Source.ApartmentCode, 2),
		    Target.[Address] = Source.[Address],
		    Target.UnitNumber = Source.ApartNbr,
		    Target.City = Source.City,
		    Target.[State] = Source.[State],
		    Target.ZIPCode = Source.ZIP,
		    Target.Bedrooms = Source.Bedrooms,
		    Target.Bathrooms = Source.Bathrooms,
		    Target.MonthlyRate = Source.MonthRent,
		    Target.SecurityDeposit = Source.InitialDeposit,
		    Target.OccupancyStatus = Source.OccupancyStatus
WHEN NOT MATCHED BY Target
    THEN INSERT(PropertyNumber, [Address], UnitNumber, City, [State], ZIPCode, Bedrooms, Bathrooms, MonthlyRate, SecurityDeposit, OccupancyStatus)
    VALUES(ApartmentCode,       [Address], ApartNbr,   City, [State], ZIP,     Bedrooms, Bathrooms, MonthRent,   InitialDeposit,  OccupancyStatus);
GO
USE LPM1;
GO

SELECT * FROM Listing.Properties;
GO
If you do a merge using the above formula, after the merge has been performed, you would not know the results) unless you run a new query on the target table. Fortunately, you can ask the database engine to immediately display a summary of what happened. To do this, after the last THEN statement, create an OUTPUT expression. The formula to follow is:
MERGE Table1 AS Target
USING Table2 AS Source
ON Table1.CommonField = Table2.CommonField
WHEN MATCHED Matched Options
    THEN Match Operation(s)
WHEN NOT MATCHED BY TARGET Not Matched By Target Options
	THEN Not Matched By Target Operation(s)
WHEN NOT MATCHED BY SOURCE Not Matched By Source Options
	THEN Not Matched By Source Operation(s)
OUTPUT $action, DELETED | INSERTED | from_table_name.*
To get a summary of the merging operation(s):
|
|
USE LPM1;
GO

MERGE Listing.Properties AS Target
USING Listing.HousesUnderOurManagement AS Source
ON (Target.PropertyNumber = Source.HouseNbr)
WHEN MATCHED
    THEN UPDATE SET Target.PropertyNumber = LEFT(Source.HouseNbr, 1) + N'-' +
	                                    SUBSTRING(Source.HouseNbr, 5, 4) + N'-' +
					    RIGHT(Source.HouseNbr, 1),
			Target.PropertyType    = Source.HouseCategory,
		        Target.[Address]       = Source.[Address],
		        Target.City            = Source.City,
			Target.[State]         = Source.[State],
			Target.ZIPCode         = Source.ZIPCode,
			Target.Bedrooms        = Source.Beds,
			Target.Bathrooms       = Source.Baths,
			Target.MonthlyRate     = Source.RentAmount,
			Target.SecurityDeposit = Source.Deposit,
			Target.OccupancyStatus = Source.[Availability]
WHEN NOT MATCHED BY Target
    THEN INSERT(PropertyNumber, PropertyType,  [Address], City, [State], ZIPCode, Bedrooms, Bathrooms, MonthlyRate, SecurityDeposit, OccupancyStatus)
         VALUES(HouseNbr,       HouseCategory, [Address], City, [State], ZIPCode, Beds,     Baths,     RentAmount,  Deposit,         [Availability])
OUTPUT $action, inserted.*, deleted.*;
GO
USE LPM1;
GO

SELECT * FROM Listing.AlexandriaApartments;
GO
SELECT * FROM Listing.Condominiums;
GO
SELECT * FROM Listing.Properties;
GO
USE LPM1;
GO

UPDATE Listing.Properties
SET PropertyType = N'Apartment' WHERE [Address] LIKE N'%10314 Springster Rd%';
GO
UPDATE Listing.Properties
SET PropertyType = N'Apartment' WHERE [Address] LIKE N'%10316 Springster Rd%';
GO
UPDATE Listing.Properties
SET PropertyType = N'Condominium' WHERE [Address] LIKE N'%4606 Canterbury Ave%';
GO
UPDATE Listing.Properties
SET PropertyType = N'Condominium' WHERE [Address] LIKE N'%3139 Orchard Ridge%';
GO
USE LPM1;
GO

SELECT * FROM Listing.Properties;
GO
USE master;
GO
DROP DATABASE LPM1;
GO
|
|
||
| Previous | Copyright © 2009-2022, FunctionX | Next |
|
|
||