Topics on Views
Topics on Views
A View as a Virtual Table
Introduction
A view is primarily a type. As such, it uses most of the same functionalities of its parent object(s). For example, you open a view the same way you do a table from the Object Explorer. If you just want to see the records, you can right-click the view and click Select Top 1000 Rows. As we will see later, unlike tables, not all views allow data entry. For those that do, you can right-click the view and click Edit Top 200 Rows.
Once a view is opened whether in a Query Editor or in a View Designer, records navigation is performed the same way for a table: using keys or the mouse.
![]() Practical Learning: Introducing Topics on Views
Practical Learning: Introducing Topics on Views
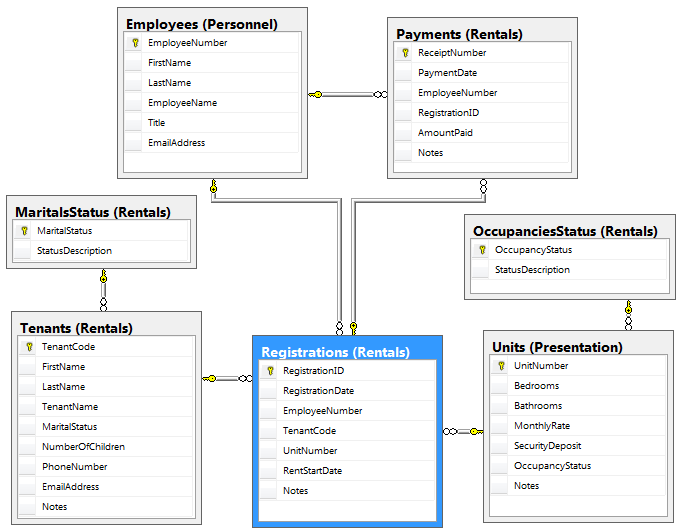
Views and Expressions
Although both use expressions, one of the fundamental differences of tables and views is in the way each deals with expressions. In a table, you can create an expression that would combine either one or more columns of the table and one ore more external constants, or the same columns of the same table. Here is an example:
USE rosh;
GO
CREATE TABLE Registration.Staff
(
	TeacherID int identity(1000, 1),
	FirstName nvarchar(20),
	LastName nvarchar(20) not null,
	YearlySalary money,
	FullName AS LastName + N', ' + FirstName,
	Constraint PK_Teachers Primary Key(TeacherID)
);
GO
INSERT INTO Registration.Teachers(FirstName, LastName, YearlySalary)
VALUES(N'Alex', N'Kingston', $42000),
      (N'Frank', N'Moons', $45000),
      (N'Justin', N'Simms', $38000),
      (N'Jeanne', N'Manson', $48000);
GO
SELECT * FROM Registration.Teachers;
GO
Among the differences is the way the expression is created for each. In a view:
If you decide to create a record using a view, you are not allowed to specify a value for the expression.
![]() Practical Learning: Creating a View
Practical Learning: Creating a View
USE LambdaSquareApartments1;
GO
CREATE VIEW Personnel.StaffMembers
AS
    SELECT EmployeeNumber,
	   LastName + N', ' + FirstName AS FullName,
           Title
    FROM Personnel.Employees;
GO
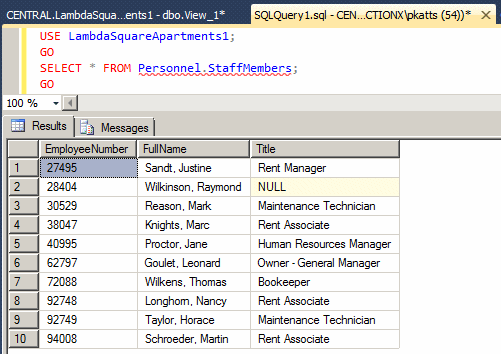
SELECT * FROM Personnel.StaffMembers;
GO
Views and Functions
To create more complex or advanced views, you can involve functions. As always, probably the easiest functions to use are those built-in.
If there is no built-in function that performs the operation you want, you can create your own.
![]() Practical Learning: Using a Function in a View
Practical Learning: Using a Function in a View
USE LambdaSquareApartments1;
GO
CREATE FUNCTION Personnel.GetFullName
(
	@FName nvarchar(20),
	@LName nvarchar(20)
)
RETURNS nvarchar(41)
AS
BEGIN
	RETURN @LName + N', ' + @FName;
END
GO
DROP VIEW Personnel.StaffMembers;
GO

CREATE VIEW Personnel.StaffMembers
AS
SELECT Personnel.GetFullName(FirstName, LastName) AS [Full Name]
FROM   Personnel.Employees;
GO
SELECT * FROM Personnel.StaffMembers;
GO

Views and Data Analysis
Introduction
The primary goal of a view is to hold a query that can be used over and over again. For this reason, a view is created from a SELECT statement.
Selecting Fields
When creating a view, you can add as many columns as you want as long as those columns were already created in the table that holds the original records. As done for data analysis of a table, when you execute a view, you can select just one column from it.
![]() Practical Learning: Selecting Fields From a View
Practical Learning: Selecting Fields From a View
USE LambdaSquareApartments1;
GO
ALTER VIEW Personnel.StaffMembers
AS
    SELECT EmployeeNumber,
	   LastName + N', ' + FirstName AS FullName,
           Title
    FROM Personnel.Employees;
GO
USE LambdaSquareApartments1;
GO

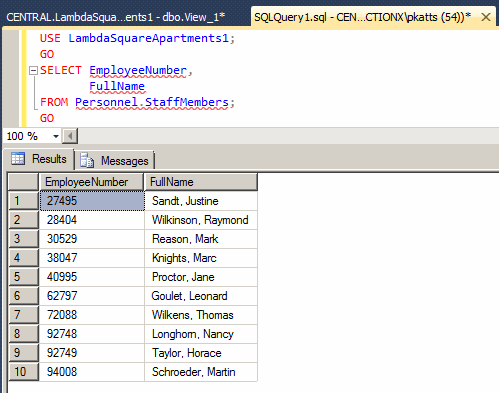
SELECT EmployeeNumber,
       FullName
FROM Personnel.StaffMembers;
GO
Introduction to Selecting Records in a View
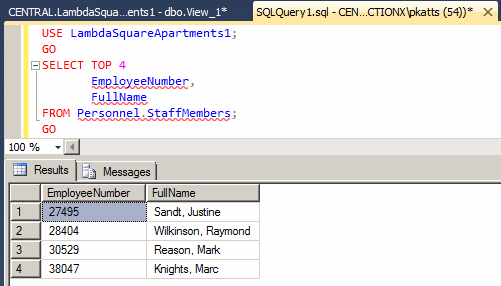
By default, when you execute a view, you would get all records. If you want, you can use TOP to specify a percentage of, or a number of, first records to select. Here is an example:
USE LambdaSquareApartments1;
GO
SELECT TOP 4
       EmployeeNumber,
       FullName
FROM Personnel.StaffMembers;
GO
This would produce:
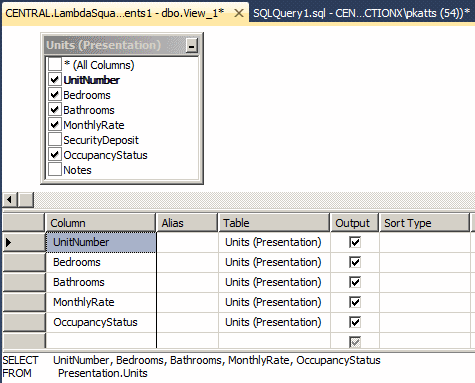
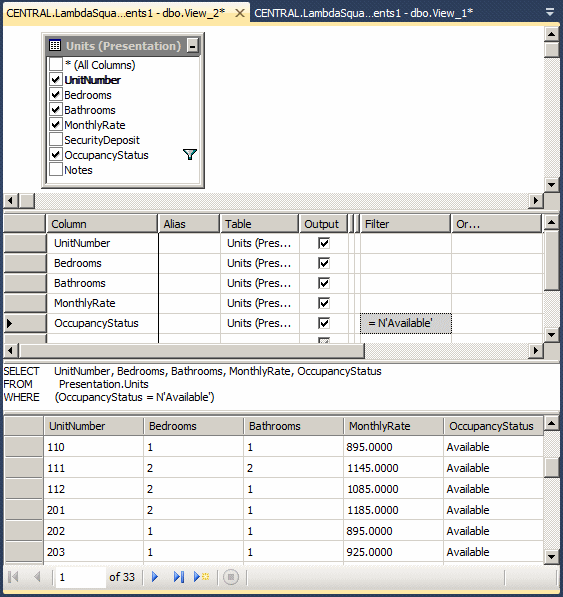
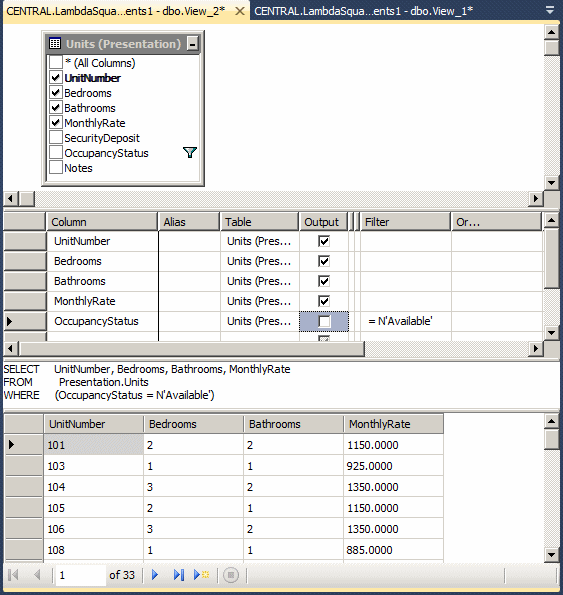
Besides adding columns to a view, you can set a condition to restrict the resulting records. Of course, a condition is set using WHERE. To visually set a condition, either start a view by right-clicking Views and New View in the Object Explorer or right-click it and click Design. In the Criteria pane, click the box at the intersection of the column and Filter, and type the conditional value.
To programmatically set a condition:
CREATE VIEW Registration.Boys
AS
SELECT FirstName,
       LastName,
       Gender,
       ParentsNames
FROM Registration.Students
WHERE Gender = N'male';
GO
CREATE VIEW FemaleStudents
AS
SELECT FirstName,
       LastName,
       ParentsNames
FROM Registration.Students
WHERE Gender = N'female';
GO
When executing a view that has a condition, you can simply apply the SELECT keyword to the name of the view. Here is an example:
SELECT * FROM FemaleStudents;
GO
This would produce:

Notice the number of records.
Just as done for tables, when SELECTing records from a view, whether it already has a condition or not, you can specify a condition to restrict the records it produces. Here is an example:
SELECT * FROM FemaleStudents
WHERE ParentsNames IS NOT NULL;
GO
This would produce:
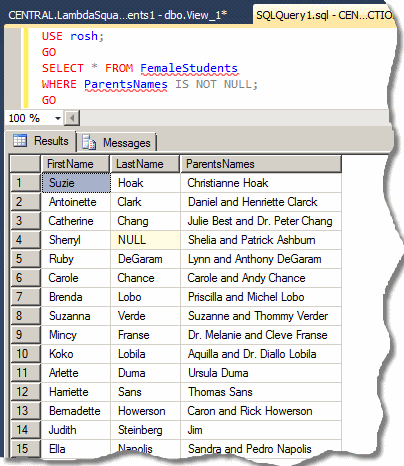
Notice a different number of records.
All the rules we reviewed for data analysis on tables are also available on views:
CREATE VIEW Registration.UnknownParents
AS
SELECT FirstName,
       LastName,
       Gender,
       ParentsNames
FROM Registration.Students
WHERE ParentsNames IS NULL;
GO
CREATE VIEW Registration.Girls
AS
SELECT FirstName,
       LastName,
       DateOfBirth,
       ParentsNames
FROM Registration.Students
WHERE Gender = N'female';
GO
CREATE VIEW Registration.StudentsInSilverSpring
AS
SELECT FirstName,
       LastName,
       Gender,
       ParentsNames
FROM Registration.Students
WHERE City = N'silver spring';
GO
USE Exercise;
GO
CREATE VIEW LastNamesThatIncludeAN
AS
SELECT [First Name],[Last Name], Salary
FROM Employees
WHERE [Last Name] LIKE N'%an%';
GO
USE Exercise;
GO
CREATE VIEW Personnel.EmployeesWhoEarnMoreThan15Dollars
AS
SELECT [Last Name], [First Name], Salary
FROM Personnel.Employees
WHERE Salary !< 15.00;
GO
CREATE VIEW Registration.StudentsInASingleParentHome
AS
SELECT FirstName,
       LastName,
       DateOfBirth,
       EmergencyName,
       EmergencyPhone
FROM Registration.Students
WHERE SingleParentHome = 1;
GO
CREATE VIEW Registration.StudentsBornIn1995
AS
SELECT FirstName,
       LastName,
       DateOfBirth,
       EmergencyName,
       EmergencyPhone
FROM Registration.Students
WHERE DateOfBirth >= N'01/01/1995';
GO
CREATE VIEW Registration.EmergencyInformation
AS
SELECT FirstName,
       LastName,
       Gender,
       DateOfBirth
FROM Registration.Students
WHERE (EmergencyName IS NOT NULL) AND (EmergencyPhone IS NOT NULL);
GO
You cannot specify an option to sort records in a view unless the SELECT statement includes a TOP.
![]() Practical Learning: Adding a Condition to a View
Practical Learning: Adding a Condition to a View
|
Selecting Distinct Records in a View |
Consider the following view:
USE Exercise;
GO
CREATE TABLE Personnel.Employees(EmployeeNumber nchar(10), [First Name] nvarchar(20),
	[Last Name] nvarchar(20), Salary money, [Full Time?] bit);
GO
INSERT INTO Personnel.Employees
VALUES(N'29730', N'Philippe', N'Horsford', 20.05, 1),
      (N'28084', N'Joan', N'Shepherd', 12.72, NULL),
      (N'44179', NULL, N'Shepherd', 10.59, 1),
      (N'27924', N'Gregory', N'Hope', 12.85, 1),
      (N'79272', N'Joshua', N'Anderson', 18.26, 2),
      (N'22803', N'Gregory', N'Swanson', 15.95, NULL),
      (N'39742', NULL, N'Anders', 8.88, 2),
      (N'83084', N'Josephine', N'Anderson', 20.02, 1),
      (N'51508', N'James', N'Anders', 18.26, 1),
      (N'92485', N'John', N'Anderson', 12.49, NULL);
GO

CREATE VIEW Personnel.Contractors
AS
    SELECT [First Name], [Last Name], Salary
    FROM Personnel.Employees;
GO
We already know how to select records from a view. Here is an example:
SELECT [Last Name] FROM Personnel.Contractors;
GO
This would produce:
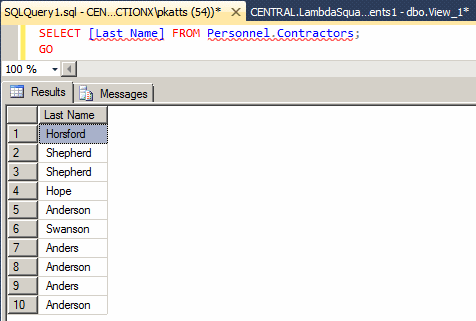
Notice the number of records. If you have records that have a repeating value in a view, when selecting those records, you can ask the database engine to select them distinctively. This is done by using the DISTINCT. Here is an example:
SELECT DISTINCT [Last Name] FROM Personnel.Contractors;
GO
This would produce:

Views and Joins
Introduction
Asides from their similarities and differences, tables and views have advantages and disadvantages each. One of the disadvantages of performing data analysis on a table is that, once you close the table, you lose the whole SQL statement you have created or written. Imagine the statement was complex or it involved many tables, and you lose it. Next time, you would have to re-create the statement. This is where one of the biggest advantages of a view is revealed. A view makes it possible to create a SELECT statement, save it, and "play" (execute) it as often as necessary. Another obvious advantages of a view is that it can be modified as many times as necessary, saved, and re-used to produced the new results.
A View With Many Tables
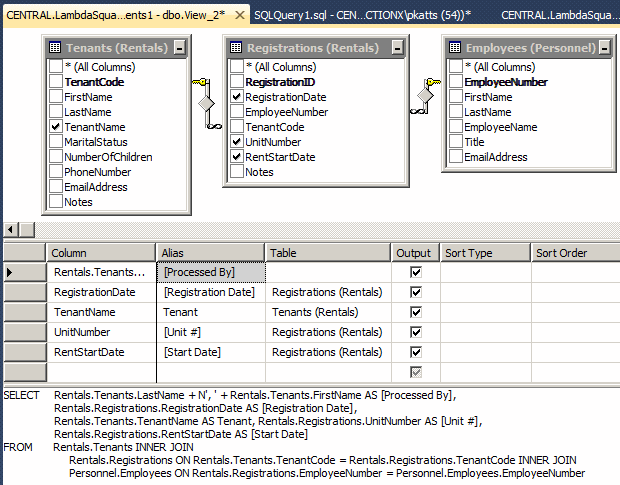
As seen in our introduction to joins, you can create a view that involves more than one table or more than one view. If you are starting a view, on the Add Table dialog box, click each table and click Add or double-click the desired tables. Then click OK.
After selecting the table, the design is done the same way we saw when studying joins:
|
|
|
Views in Joins and Data Analysis |
After adding tables to a view, you can set a criterion by which the records would be selected and kept. If you are working visually, you must first select a column in the desired table or view, then use its corresponding box in the Filter column of the Criteria pane. Of course, you can add manually write code in the SQL pane.
If you are writing code, you can also add a WHERE condition to your SELECT statement using the field(s) of your choice and/or a condition of your choice.
|
|
|
Data Maintenance Using a View |
|
Introduction |
You can use a view to perform such operations as updating records or removing records. To take care of such actions, the view must be based on only one table. Here is an example of such a view:
USE Exercise1;
GO
CREATE SCHEMA Personnel;
GO
CREATE TABLE Personnel.EmploymentStatus
(
	StatusID int identity(1, 1),
	[Status] nvarchar(30) not null,
	Constraint PK_EmploymentStatus Primary Key(StatusID)
);
GO
CREATE TABLE Personnel.Employees
(
	EmplNbr nchar(10) not null,
	FirstName nvarchar(20),
	LastName nvarchar(20),
	Salary money,
	EmplStatus int null
	Constraint FK_EmploymentStatus Foreign Key
		References Personnel.EmploymentStatus(StatusID),
	Constraint PK_Employees Primary Key(EmplNbr));
GO
INSERT Personnel.EmploymentStatus([Status])
VALUES(N'Full Time'), (N'Part Time'), (N'Contractor'), (N'Unknown');

INSERT INTO Personnel.Employees
VALUES(N'29730', N'Philippe', N'Horsford', 20.05, 1),
      (N'28084', N'Joan', N'Shepherd', 12.72, NULL),
      (N'44179', NULL, N'Shepherd', 10.59, 1),
      (N'27924', N'Gregory', N'Hope', 12.85, 1),
      (N'79272', N'Joshua', N'Anderson', 18.26, 2),
      (N'22803', N'Gregory', N'Swanson', 15.95, NULL),
      (N'39742', NULL, N'Anders', 8.95, 2),
      (N'83084', N'Josephine', N'Anderson', 20.02, 1),
      (N'51508', N'James', N'Anders', 18.26, 1),
      (N'92485', N'John', N'Anderson', 12.49, NULL);
GO

CREATE VIEW Personnel.PartTimers
AS
    SELECT FirstName, LastName, EmplStatus
    FROM   Personnel.Employees
    WHERE  EmplStatus = 2;
GO
|
Updating Records Using a View |
The operation of updating records using a view follows the same rules as those of a table. As you may know already, you can create a view that has a condition and only the records that follow that condition would be included in the result. The above view would produce:
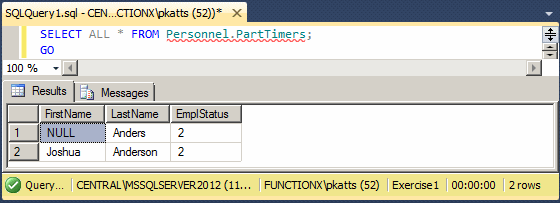
Notice the number of records. We have already seen how to update records using a table. If you use a table, after updating the records, the view would show the result. Consider the following example:
UPDATE Personnel.Employees
SET EmplStatus = 2
WHERE EmplNbr  = N'22803';
GO
SELECT * FROM Personnel.PartTimers;
GO
This would produce:
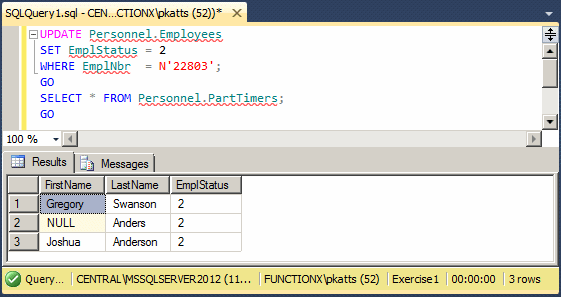
Notice that, this time, the view has a different number of records. In the same way, you can update records using a view. The advantage is that if the view already contains a condition, you can simply SET the desired value. Here is an example:
UPDATE Personnel.PartTimers
SET EmplStatus = 3;
GO
SELECT * FROM Personnel.PartTimers;
GO
This would produce:

|
Checking the Condition on a View Before Updating |
As mentioned already, if you update records using a view, the table would be updated. Consequently, based on the criteria set in the view, the view's result may not show the record(s) that was (were) lost. If you decide to update one or more records using a view, you can ask the database engine to first check whether one or more records in the view would be lost.
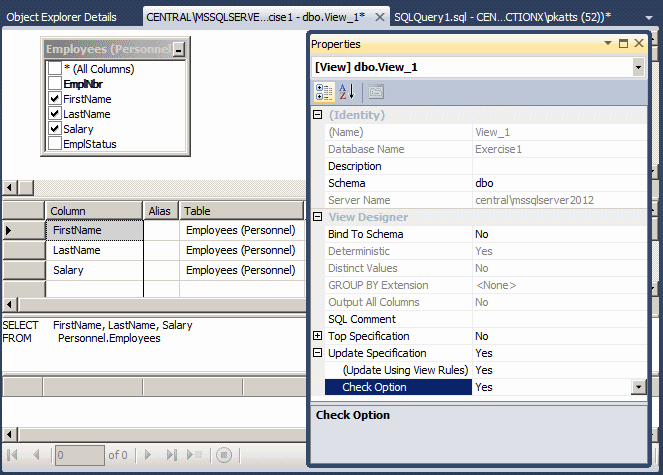
To visually specify the checking, if you are creating the view, in the Properties window, expand the Update Specification field. Set the (Update Using View Rules) field to Yes. Then set the Check Option to Yes:
To programmatically apply a check, add a WITH CHECK OPTION flag before the end of the statement. The formula to follow would be:
CREATE VIEW [SchemaName.]ViewName
AS
SELECT Statement
WITH CHECK OPTION
Here is an example:
CREATE VIEW Personnel.EarnLessThanMinimumWage
AS
    SELECT EmplNbr, FirstName, LastName, Salary
    FROM   Personnel.Employees
    WHERE  Salary !> 12.50
    WITH CHECK OPTION;
GO
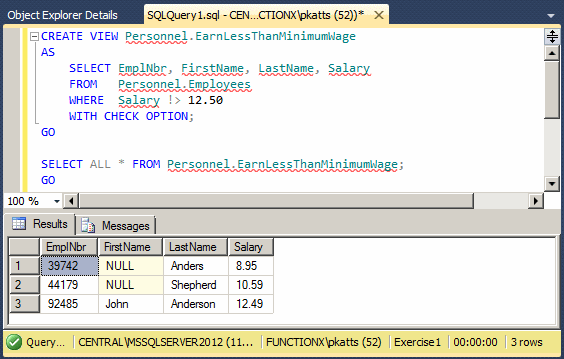
If the view was created already and you want to visually add the checking process to it, in the Object Explorer, right-click the view and click Design. In the Properties window, expand the Update Specification field. Set (Update Using View Rules) to Yes. Then set the Check Option to Yes. To do the same thing with code, ALTER the view and add a WITH CHECK OPTION flag at the end of the statement. The formula to follow would be:
ALTER VIEW [SchemaName.]ViewName
AS
SELECT Statement
WITH CHECK OPTION
Here is an example:
ALTER VIEW Personnel.PartTimers
AS
    SELECT EmplNbr, FirstName, LastName, EmplStatus
    FROM   Personnel.Employees
    WHERE  EmplStatus = 2
    WITH CHECK OPTION;
GO
After adding this flag, if you update one or more records using the view, if the updated record(s) is(are) under the condition specified in the view, the update will work just fine. Here is an example:
UPDATE Personnel.EarnLessThanMinimumWage
SET Salary = 12.25
WHERE EmplNbr = N'44179';
GO
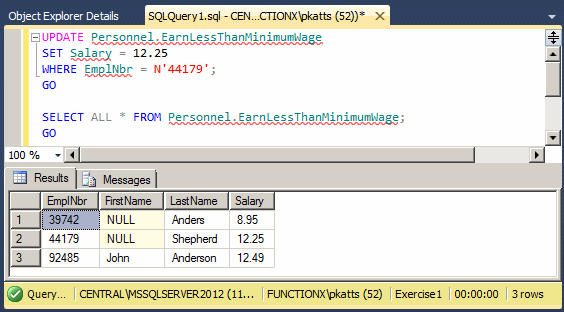
On the other hand, if you call the view to update the record(s) and if at least one record that must be changed is outside the condition specified in the condition of the view, the update will be dismissed. Here is an example:
UPDATE Personnel.EarnLessThanMinimumWage
SET Salary = 14.05
WHERE EmplNbr = N'92485';
GO
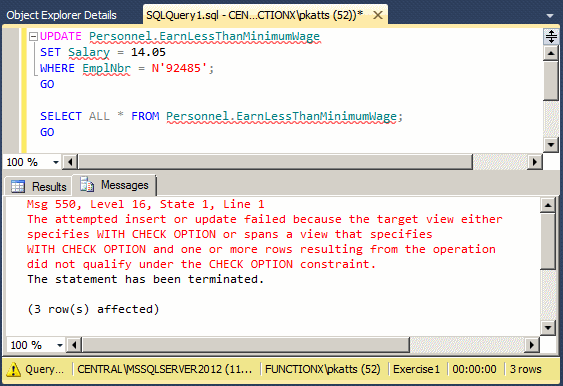
If you perform the same operation using a table, it would work fine and there would not be an error.
|
Deleting Records Using a View |
You can remove records from a database using either a table or a view. We already know how to delete records using a table. When it comes to a view, you can first create one that includes a condition that isolates one or more records.
If you delete a record using a table, a view that depends on that table would not show that record anymore. As seen for updating records, if you create a view that has a condition and you decide to delete the record(s) that follow(s) the condition(s) in that view, you can simply call DELETE on that view and all the records that view shows would be removed from the table.
All of the indexes we have created so far were using columns on a table. In reality, as you can include columns in a view, you can create an index that uses fields from a view. As you may know already, one of the advantages of a view over a table is that the former can include columns from more than one table. This makes it possible to create an index that uses columns from many tables but the columns would be retrieved a view.
When creating an index that uses columns from a view, there are rules you must follow:
|
|
USE InformationTechnologyJournal1;
GO

CREATE VIEW Publishing.AffiliatedReviewers
WITH SCHEMABINDING
AS
    SELECT rvs.ReviewerNumber rn,
	   rvs.FirstName fn,
	   rvs.LastName ln,
	   rvs.Citizenship cz,
	   pa.AffiliationName an
    FROM Authorship.ReviewersAffiliations ar
    INNER JOIN Authorship.Reviewers rvs
    ON rvs.ReviewerNumber = ar.ReviewerNumber
    INNER JOIN Publishing.Affiliations pa
    ON ar.AffiliationCode = pa.AffiliationCode;
GO
USE InformationTechnologyJournal1;
GO

CREATE UNIQUE CLUSTERED INDEX IX_AffiliatedReviews
ON Publishing.AffiliatedReviewers(rn, ln, an);
GO
|
Introduction |
To keep track of the objects in various databases, Microsoft SQL Server uses special views that hold the objects' identifiers, names, and other details. Because those views are used to present the objects, they are called catalog views. The objects in the catalog views are usually categorized by their types.
|
The SYS.DATABASES Catalog View |
One of the most regularly used catalog view in Microsoft SQL Server is sys.databases. The view is used to keep the names of all databases in a Microsoft SQL Server server. The view is equipped with a column named name. When you create a database, its named is entered in the name field of the sys.databases view. Therefore, to find out if a database exists, you can ask the database engine to look for its name in the name column of this view. This can be done using the following formula:
IF EXISTS (
   SELECT name
   FROM sys.databases
   WHERE name = N'DatabaseName'
)
In the DatabaseName placeholder, you can enter the name of the database.
If the EXISTS() function returns TRUE, it means the sys.databases catalog view contains the database you were looking for. In which case you can take appropriate action(s). If the function returns FALSE, the table was not found.
The sys.databases catalog view contains many other columns that hold different types of information such as the date (and time) the database was created, a description of how the database is currently being accessed (by one person or by many users), whether the database is encrypted or not, etc.
|
The SYS.OBJECTS Catalog View |
The sys.objects catalog view keeps track of the various objects created in databases. Examples of such objects are tables and views. To identify the objects, the sys.objects view has a column named name.This column holds the names of all objects. If an object belongs do a schema, both are represented in the appropriate formula.
Besides the name, the sys.objects view is equipped with many other columns that can provide information about an objects. The pieces of information include the type of objects, the date it was created, and the date it was last modified. The type of object can be represented with one or two letters. For example, U represents a regular table created in a database. Based on this, to find out if a table exists already, you can use the following formula:
IF OBJECT_ID('<schema_name>.<table_name>', 'U') IS NOT NULL
  Take Action(s)
In the same way, V represents a view. Therefore, to find out if a view was created already, you can use the following formula:
IF OBJECT_ID('<schema_name>.<view_name>', 'V') IS NOT NULL
  Take Action(s)
GO
P represents a regular stored procedure, SN represents a synonym, and SO represents a sequence, etc. Alternatively, a type can be represented with a string. Examples are USER_TABLE, VIEW, or SYNONYM.
The SYS.COLUMNS Catalog View
When you add a column to a table or make a column a member of a view, the database engine stores information about that column in the sys.columns catalog view. This view is equipped with many columns. One of them is named name. It holds the names of all columns. Therefore, to check the existence of a column, that is, to find out if a column has already been created, find out if the name field contains the name of that column.
Besides the name, if the column exists already, the sys.columns catalog view contains many other fields that can produce such pieces of information as the data type of the column, the length (if the column is char-based or decimal-based), the precision and scale (for decimal-based columns), and any of the characteristics we have already seen for columns (what its collation is, whether it allows null, whether its value is an expression, whether it is an identity, etc).
Besides the catalog views we have reviewed here, Microsoft SQL Server uses many others.
The SYS.INDEXES Catalog View
Transact-SQL keeps information about indexes in a catalog view named sys.indexes. As mentioned for the other catalog views, the most common field of this index is name. To assist you with checking the existence of an index, you can use the following formula:
IF EXISTS (SELECT name FROM sys.indexes
WHERE name = IndexName)
Do something here
The primary thing you need to provide in this formula is the name of the index. Once you have checked, you can take the necessary action. Here is an example:
USE Exercise;
GO

IF EXISTS (SELECT name FROM sys.indexes
		  WHERE name = N'IX_Employees')
DROP INDEX IX_Employees
ON Employees
GO
CREATE INDEX IX_Employees
ON Employees(EmployeeNumber);
GO
The sys.indexes catalog view has columns to provide more information about an index. These include the type of index (clustered, nonclustered, etc), the uniqueness, whether the index is the primary key, whether the index is disabled, etc.
|
|
||
| Previous | Copyright © 2008-2022, FunctionX, Inc. | Next |
|
|
||