Home

Graphical Applications Fundamentals


A Project


Introduction


To create a computer program, also called an application, you create a series of files and group them in an ensemble called a project. This contains various modules, files, assemblies (or libraries), and resource files.

Creating a Project

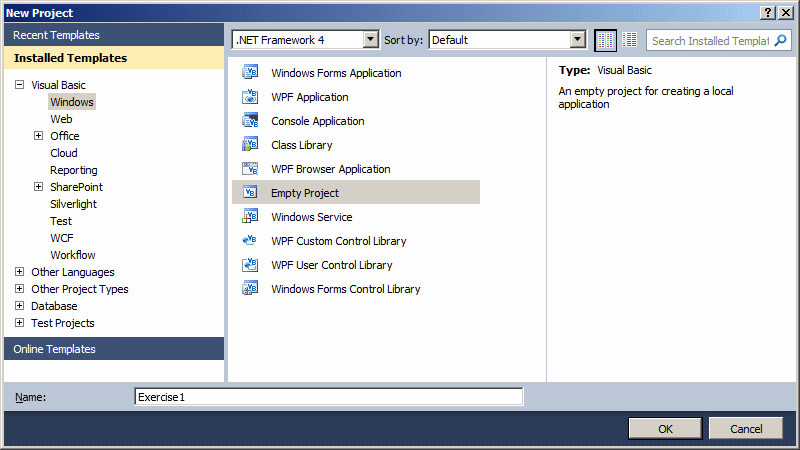
A typical application consists of more than one module and can even be as complex as you want. To make it faster and a little easier to graphically create an application, you would need a good functioning environment like Microsoft Visual Basic. Using it, you can create a new project or you can open an existing one.

To create a Visual Basic project, you can display the New Project dialog box. To open the New Project dialog box:

  • On the Start Page, on the right side of Project, click Create...
  • If you are using Microsoft Visual Basic 2008 Express Edition, on the main menu, you can click File -> New Project... If you are using Microsoft Visual Basic 2008 Professional, on the main menu, you can click File -> New -> Project...
  • On the Standard toolbar, you can click the New Project button New Project
  • You can press Ctrl + Shift + N

In the New Project dialog box, select Visual Basic Projects, select the type of project, give it a name, specify its directory, and click OK.

Practical LearningPractical Learning: Creating a Project

  1. On the main menu, click File -> New Project or File -> New Project...
  2. In the middle section, click Empty Project
  3. In the Name box, replace the name with Exercise1
    New Project
  4. Click OK
  5. On the main menu, click Project -> Add Reference...
  6. In the Add Reference dialog box, click .NET
  7. Click System
  8. Press and hold Ctrl
  9. Click System.Drawing
  10. Click System.Windows.Forms
  11. Release Ctrl
  12. Click OK
  13. On the main menu, click Project -> Exercise1 Properties...
  14. In Application Type, select Windows Forms Application
  15. Close that window

Compiling and Executing a Project

The instructions created for a Visual Basic project are written in plain English in a language easily recognizable to the human eye. After creating the file(s) of a project, you would compile the project to get an executable that becomes ready to be distributed to your users.

To compile and execute a project in one step, on the main menu, you can click Debug -> Start Without Debugging. Although there are other techniques or details in compiling (or debugging) and executing a project, for now, this is the only technique we will use until further notice.

Opening a Project

As opposed to creating a new project, you can open a project that either you or someone else created. To open an existing project:

  • On the Start Page, on the right side of Project, click Open...
  • If you are using Microsoft Visual Basic 2008 Express Edition, on the main menu, you can click File -> Open Project... If you are using Microsoft Visual Basic 2008 Professional, on the main menu, you can click File -> Open -> Project...
  • You can press Ctrl + Shift + O

This action would display the Open Project dialog box. This allows you to select a project and open it.

Using Various Projects in the Same Solution

With Microsoft Visual Studio, you can add one project to another, instead of starting one anew. To add a project to an existing one:

  • On the main menu, you can click File -> Add -> New Project...
  • If more than one project exist already, in the Solution Explorer, you can right-click the top node (the name of the first project), position the mouse on Add, and click New Project...

Any of these actions would display the Add New Project dialog box. You can then select the type of project In the middle list, give a name to the project, and click OK. In the same way, you can add as many projects as you judge necessary to your solution. When a solution possesses more than one project, the first node in the Solution Explorer becomes Solution 'ProjectName' (X Projects). The ProjectName represents the name of the first project and X represents the current number of projects.

When you are using more than one project in the same solution, one of the projects must be set as the startup. The project that is set as the startup has its name in bold characters in the Solution Explorer. You can change and use any project of your choice as the startup. To do this, in the Solution Explorer, you can right-click the desired project and click Set As StartUp Project.

When a solution possesses more than one project, you can build any project of your choice and ignore the others. To build one particular project, you can right-click it in the Solution Explorer and click Build.

The Code Editor


Introduction

There are two main ways you will manipulate an object of your application, visually or using code. In future sections, we will explore details of visually designing a control. Code of an application is ASCII text-based, written in plain English and readable to human eyes. For an application, you can use any text editor to write your code but one of Visual Studio's main strengths is the code editor. It is very intuitive.

The Code Editor is a window specially designed for code writing.

Author Note Although all languages of the Visual Studio programming environment share the Code Editor, once you have started a type of application, the Code Editor is adapted to the language you are using. Its parser (a program used internally to analyze your code) behaves according to the language of your choice. The features and behaviors of the Code Editor are also different, depending on your language.

The Code Editor is divided in 4 sections:

The Code Editor
 

Practical LearningPractical Learning: Introducing the Code Editor

  1. On the main menu, click Project -> Add Class...
  2. Change the name of the class to Exercise
    Add New Item
  3. Click Add
  4. In the empty file, type the following:
    Imports System.Windows.Forms
    
    Public Class Central
        Inherits Form
    
    End Class
    
    Public Class Exercise
        Public Shared Function main() As Integer
    
            Application.Run(New Central)
            Return 0
    
        End Function
    End Class
    
  5. To execute the application, on the main menu, click Build -> Build Exercise1

  6. To execute the application, on the Standard toolbar, click the Start Debugging button Start Debugging

  7. Close the form and return to your programming environment
  8. To create a new class, on the main menu, click Project -> Add Class...
  9. Set the Name to Circle
  10. Click Add

The Tabs Bar

The top section of the Code Editor displays tabs of property pages. Each tab represents a file. To add a new file to the project, on the main menu, you can click Project -> Add New Item...

Once in the Add New Item dialog box, in the middle section, click the type of file you want to create, type a name in the Name text box, and press Enter. After the file has been created, it is represented by a tab in the top section of the Code Editor. In the same way, you can add as many files as you judge them necessary. To access a tab:

  • You can click its name in the Tabs Bar
  • On the main menu, you can click Window and click the name of the desired tab

By default, the tabs display in the order their files were created or added to the project, from left to right. If you don't like that arrangement, click and drag its tab either left or right beyond the next tab

Practical LearningPractical Learning: Introducing the Code Editor

  1. To create a new class, on the main menu, click Project -> Add Class...
  2. Set the Name to Square and press Enter
  3. To create a new class, on the main menu, click Project -> Add Class...
  4. Set the Name to Triangle  and press Enter
  5. To access the Circle tab, on the main menu, click Window -> Circle.vb
  6. Change the file as follows:
    Public Class Circle
        Private rad As Double
    
        Public Property Radius() As Double
            Get
                Return rad
            End Get
            Set(ByVal value As Double)
                rad = value
            End Set
        End Property
    
        Public ReadOnly Property Area() As Double
            Get
                Return rad * rad * Math.PI
            End Get
        End Property
    End Class
    
    Public Class Sphere
        Inherits Circle
        Public Overloads ReadOnly Property Area() As Double
            Get
                Return 4 * Radius * Radius * Math.PI
            End Get
        End Property
    End Class
    
    Public Class Cylinder
        Inherits Circle
    
        Private hgt As Double
    
        Public Property Height() As Double
            Get
                Return hgt
            End Get
            Set(ByVal value As Double)
                hgt = value
            End Set
        End Property
    End Class
  7. To access another tab, in tabs section, click Triangle.vb
  8. Change the file as follows:
    Public Class Triangle
        Private bas As Double
        Private hgt As Double
    
        Public Property Base() As Double
            Get
                Return bas
            End Get
            Set(ByVal value As Double)
                bas = value
            End Set
        End Property
    
        Public Property Height() As Double
            Get
                Return hgt
            End Get
            Set(ByVal value As Double)
                hgt = value
            End Set
        End Property
    End Class
    
    Public Class Kite
    
    End Class

The Class Name Combo Box

The top-left section of the Code Editor displays a combo box named Class Name. As its name indicates, this combo box holds a list of the classes ( and structures) that are created in the current file. You can display the list if you click the arrow of the combo box:

Class Name

Each item of the Class Name combo box displays the name of its type associated with its parent as implemented in the code.

Practical LearningPractical Learning: Using the Types Combo Box

  1. Click the Circle tab
  2. In the Class Name combo box, select Circle

The Method Name Combo Box

The top-right section of the Code Editor displays a combo box named Members. The Members combo box holds a list of the members of classes. The content of the Members combo box depends on the item that is currently selected in the Class Name combo box. This means that, before accessing the members of a particular class, you must first select that class in the Class Name combo box. Then, when you click the arrow of the Method Name combo box, the members of only that class display:

Method Name

If you select an item from the Method Name combo box, the Code Editor jumps to that members and positions the cursor to the left of the member.

Practical LearningPractical Learning: Using the Method Name Combo Box

  1. In the Method Name combo box, select Area
  2. Press the up arrow key three times and add a Diameter property as follows:
    Public Class Circle
        Private rad As Double
    
        Public Property Radius() As Double
            Get
                Return rad
            End Get
            Set(ByVal value As Double)
                rad = value
            End Set
        End Property
    
        Public ReadOnly Property Diameter()
            Get
                Return rad * 2
            End Get
        End Property
    
        Public ReadOnly Property Area() As Double
            Get
                Return rad * rad * Math.PI
            End Get
        End Property
    End Class
    
    . . . No Change

Code Colors

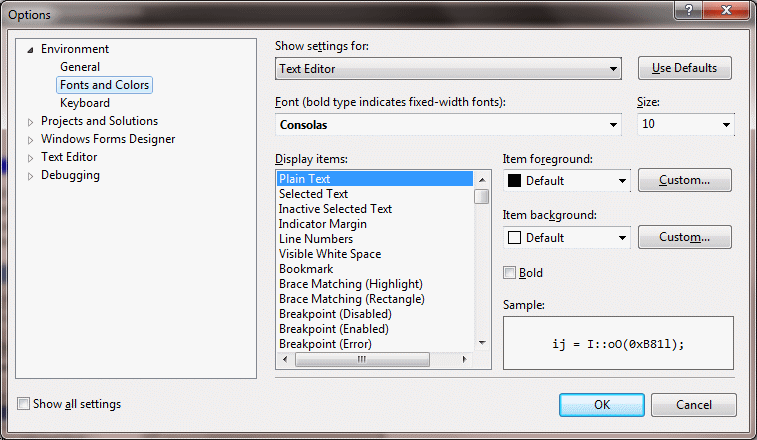
Code is written in a wide area with a white background. This is the area you use the keyboard to insert code with common readable characters. The Code Editor uses some colors to differentiate categories of words or lines of text. The colors used are highly customizable. To change the colors, on the main menu, you can click Tools -> Options... In the Options dialog box, in the Environment section, click Fonts and Colors. To set the color of a category, in the Display Items section, click the category. In the Item Foreground combo box, select the desired color. If you want the words of the category to have a colored background, click the arrow of the Item Background combo box and select one:

The Options Dialog Box

In both cases, the combo boxes display a fixed list of colors. If you want more colors, you can click a Custom button to display the Color dialog box that allows you to "create" a color.

Overview of GUI Applications


Introduction

Microsoft Visual Basic is a programming environment that allows you to create various types of applications. In our lessons, we will mostly create graphical applications, also called Windows applications or Windows Forms applications. 

A Windows application primarily appears as a rectangular object that occupies a portion of the screen. This type of object is under the management of the operating system, Microsoft Windows. Based on the functionality of Microsoft Windows, for an application to become useful, it must be opened. An application must have an entry point. On a C/C++ application, this entry point is a function called main. On a Win32 application, this entry point is a function called WinMain. In the Visual Basic language, this entry point is a function named Main.

Practical LearningPractical Learning: Starting a GUI Application

  1. To create a new application, on the main menu, click File -> New Project...
    If you are asked to save, click Discard
  2. In the Project Types list, expand Visual Basic and click Windows.
    In the middle section, click Empty Project
  3. In the Name edit box, type Exercise2
  4. Click OK
  5. On the main menu, click Project -> Add New Item...
  6. In the middle list, click Module
  7. Change the Name to Exercise
  8. Click Add
  9. Change the contents of the file as follows:
    Module Exercise
    
        Function Main() As Integer
            Return 0
        End Function
    
    End Module

Windows Application Configuration

Although you can directly create a graphical application when starting your project, if you had created a console application, you can still easily transform it into a Forms application:

  • The most required action consists of changing some characteristics of the project. To take care of this, on the main menu, you can click Project -> ProjectName Properties... and then change the value of the Project Type combo box to Windows Forms Application
  • Before or after setting the Project Type to Windows Application, you can create a form

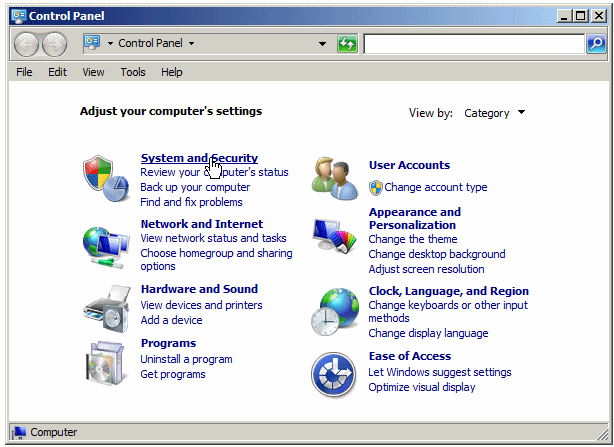
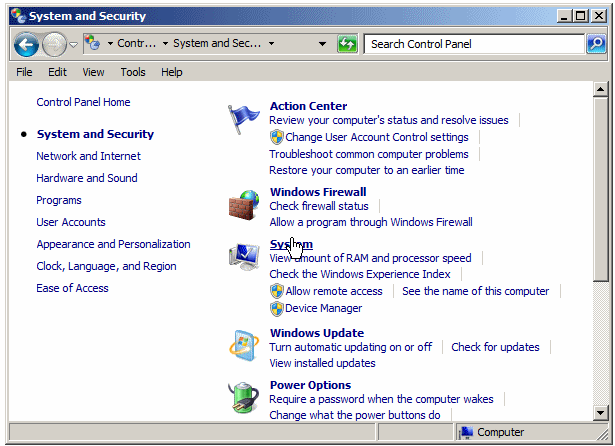
If you are working from a text editor, to compile at the Command Prompt, you use the vbc.exe compiler. The vbc compiler is free from Microsoft. You likely have it already on your computer. If not, download the .NET Framework from the Microsoft web site (there is no way you can follow these lessons if the .NET Framework is not yet installed on your computer). Find out where your .NET Framework folder is because that folder contains the vbc compiler. By default, its path is C:\Windows\Microsoft.NET\Framework\v4.0.21006

The vbc Compiler

You should add the path of the vbc.exe to the Environment Variables's Path. To start, select the path in the top combo box of the file utility and copy it (to the clipboard). Open the Control Panel. From Control Panel, click System and Security:

System

In the next window, click System:

System

In the next window, click Change Settings. In the System Properties dialog box, click the Advanced property page, then click Environment Variables:

System Properties

Under System Variables, click Path. Click Edit:

Environment Variables

First check whether the path had been added already (there is no reason to add it again). If the path doesn't exist yet, press the right arrow key, type the semi-colon, then paste the path. Click OK, OK, and OK.

Before compiling the project, open the Command Prompt and switch to the folder that contains the file. To compile, type vbc followed by the name of the file and its extension. An example would be:

vbc Exercise.vb

Then press Enter. To execute the application, type the name of the file and press Enter. Here is an example:

Command Prompt

Practical LearningPractical Learning: Configuring a Windows Application

  1. On the main menu, click Project -> Exercise2 Properties...
  2. On the left side, make sure Application is selected.
    In the right section, click the arrow of the Application Type combo box and select Windows Application
     
    Property Pages

Forms Fundamentals

Windows Forms is a technique of creating computer applications based on the common language runtime (CLR). It offers a series of objects called Windows Controls or simply, controls. These controls are already created in the .NET Framework through various classes. Application programming consists of taking advantage of these controls and customizing them for a particular application. To exploit these controls and other features of the .NET Framework, there are various types of applications you can create, including graphical applications (Windows Application), web-based applications (ASP.NET Web Application), console applications (Console Application), etc.

The objects used in a Windows application are stored in libraries also called assemblies. As normal libraries, these assemblies have the extension .dll (which stands for dynamic link library). In order to use one of these objects, you must know the name of the assembly in which it is stored. Then you must add a reference to that assembly in your application.

To add a reference to an assembly, on the main menu, you can click Project -> Add Reference... You can also right-click the name of the project in the Solution Explorer and click Add Reference... Any of these actions would display the Add Reference dialog box from where you can click the reference, click Select and click OK. If you don't see the reference you are looking for, you can locate it on another drive or directory using the Browse button.

There are two broad categories of objects used in a Windows Forms application: the forms and the controls. A form is the most fundamental object used on an application. It is a rectangular object that uses part of the computer desktop to represent an application. A form is based on the Form class that is defined in the System.Windows.Forms namespace created in the System.Windows.Forms.dll assembly. Every GUI application you will create starts with a form. There are various techniques you can use to get a form in your application:

  • You can programmatically and manually create a form
  • You can inherit a form from the Form class
  • You can create a form based on another form that either you or someone else created already, etc.

The primary means of getting a form into an application consists of deriving one from the Form class.

Practical LearningPractical Learning: Deriving a Form From the Form Class

  1. To add a reference to the assembly in which the Form class is defined, on the main menu, click Project -> Add Reference...
  2. In the Add Reference dialog box, click the .NET tab if necessary and scroll down in the list
  3. Click System
  4. Press and hold Ctrl
  5. Click System.Windows.Forms
     
    Add Reference
  6. Click OK
  7. To inherit a form from the Form class, change the file as follows:
    Imports System.Windows.Forms
    
    Module Exercise
    
        Public Class Starter
            Inherits Form
    
        End Class
    
        Function Main() As Integer
            Return 0
        End Function
    
    End Module


The Application Class

The form is the object that gives presence to an application. Once you have created the (primary) form of your application, you can get it ready to display on the screen. This is taken care of by the Application class equipped to start an application, process its messages or other related issues, and stop the application.

The Application class provides the overloaded Run() method that can be used to start a program. One of the versions of this method takes a form as argument. This form must be the first, main or primary form of your application; it will be the first to display when the application comes up.

Before building the project at the Command Prompt, switch to the folder the contains your file. To compile, type vbc followed by the name of the file and its extension. To execute, type the name of the file that contains the Main() function and press Enter.

Normally, to compile, you would type csc, followed by either /r: or /reference:, followed by the names of the DLLs that contain the objects you are using in your code, followed by the name(s) of the file(s) that contain(s) your code and its (their) extension(s). To indicate that you are creating a graphical application, after the list of DLLs but before the name(s) of the file(s), type either /t:winexe or /target:winexe.

Remember that, after compiling, to execute, type the name of the file that contains the Main() function and press Enter.

Practical LearningPractical Learning: Using the Application Class

  1. To prepare the application for starting, change the Main() method as follows:
    Imports System.Windows.Forms
    
    Module Exercise
    
        Public Class Starter
            Inherits Form
    
        End Class
    
        Function Main() As Integer
    
            'Instantiate an Program object
            Dim frmStart As Starter
    
            ' Allocate memory for the object, using the new operator
            frmStart = New Starter
    
            ' Call the Run() static method of the Application
            ' and pass it the instance of the class to display
            Application.Run(frmStart)
    
            Return 0
        End Function
    
    End Module
  2. Test the application
     
  3. Close it by clicking its system Close button and return to your programming environment

The Project Interface


Introduction

Besides the windows and functionalities we reviewed earlier, when you work on a project, there are other features that become available.

The Server Explorer

The Server Explorer is an accessory that allows you to access SQL Server databases without using the physical server and without opening Microsoft SQL Server:

Server Explorer

The items of this window display in a tree. To expand a node, you can click its + button. To collapse it, click its - button.

The Solution Explorer

The Solution Explorer is a window that displays the file names and other items used in your project:

Solution Explorer

The items of this window display in a tree. To expand a node, you can click its + button. To collapse it, click its - button. To explore an item, you can double-click it. The result depends on the item you double-clicked.

The Solution Explorer can be used to create a new class, a new folder, or a reference. To perform any of these operations, you can right-click a folder node such as the name of the project, position the mouse on Add and select the desired operation. You can also perform any of these operations from the Project category of the main menu.

Besides adding new items to the project, you can also use the Solution Explorer to build the project or change its properties. If you add one or more other project(s) to the current one, one of the projects must be set as the default. That project would be the first to come up when the user opens the application. By default, the first project created is set as the default. If you have more than one project, to set the default, right-click the name of the desired project in Solution Explorer and click Set As StartUp Project.

The Solution Explorer also allows you to rename or delete some of the items that belong to your project.

Practical LearningPractical Learning: Using the Solution Explorer

  1. To start a new project, on the main menu, click File -> New Project...
  2. In the middle list, click Empty Project and change the Name to Exercise1
  3. Click OK
  4. On the main menu, click Project -> Exercise1 Properties...
  5. In the left frame, make sure Application is selected.
    In the right frame, click the arrow of the Application Type combo box and select Windows Forms Application
  6. If the Solution Explorer is not visible, on the main menu, click View -> Solution Explorer.
    In the Solution Explorer, right-click Exercise1 and click Add -> Windows Form...
  7. In the middle list, make sure Windows Form is selected.
    Set the Name to Exercise
  8. Click Add

The Class View

The Class View displays the various classes used by your project, including their ancestry. The items of the Class View an organized as a tree list with the name of the project on top:

Class View

The Class View shares some of its functionality with the Solution Explorer. This means that you can use it to build a project or to add new class.

While the Solution Explorer displays the items that are currently being used by your project, the Class View allows you to explore the classes used in your applications, including their dependencies. For example, sometimes you will be using a control of the of the .NET Framework and you may wonder from what class that control is derived. The Class View, rather than the Solution Explorer, can quickly provide this information. To find it out, expand the class by clicking its + button.

Practical LearningPractical Learning: Using the Class View

  1. If the Class View is not visible, on the main menu, click View -> Class View.
    In the Class View, expand the Exercise3 node if necessary.
    Right-click the name of the project Exercise3 -> Add -> Class...
  2. In the middle list, make sure Class is selected. Change the Name to Central and click Add

Fundamentals of Control Addition


The Client Area

On a form, the client area is the body of the form without the title bar, its borders and other sections we have not mentioned yet such as the menu, scroll bars, etc:

Client Area


Besides the form, every control also has a client area. The role of the client area is to specify the bounding section where the control can be accessed by other controls positioned on it. Based on this, a control can be visible only within the client area of its parent. Not all controls can be parent.

Design and Run Times

Application programming primarily consists of adding objects to your project. Some of these objects are what the users of your application use to interact with the computer. As the application developer, one of your jobs will consist of selecting the necessary objects, adding them to your application, and then configuring their behavior. There are various ways you can get a control into your application. If you are using Notepad or a text editor to add the objects, you can write code. If you are using Microsoft Visual Basic, you can visually select an object and add it.

To create your applications, there are two settings you will be using. If a control is displaying on the screen and you are designing it, this is referred to as design time. This means that you have the ability to manipulate the control. You can visually set the control's appearance, its location, its size, and other necessary or available characteristics. The design view is usually the most used and the easiest because you can glance at a control, have a realistic display of it and configure its properties. The visual design is the technique that allows you to visually add a control and manipulate its display. This is the most common, the most regularly used, and the easiest technique.

The other technique you will be using to control a window is with code, writing the program. This is done by typing commands or instructions using the keyboard. This is considered, or referred to, as run time. This is the only way you can control an object's behavior while the user is interacting with the computer and your program.

The Toolbox


Introduction

A Windows control is a graphical object that allows the user to interact with the computer. The controls are as varied as the needs and goals are. Because there are so many controls for various purposes, their insertion to an application and their configuration are left to the computer programmer. The Toolbox is the accessory that provides most of the controls used in an application:

Toolbox

By default, the Toolbox is positioned on the left side of the IDE. To change that position, you can drag its title bar away and dock it to another side of the IDE. The Toolbox also uses a default width to show the items on it. If the width is too narrow or too wide, you can change it. To do this, position the mouse to its right border and drag left or right.

The Toolbox and Additional Controls

When Microsoft Visual Studio is set up, it installs in the Toolbox the most regularly used controls. If you are working in an environment that creates only a particular group of applications and there are controls you hardly use, if you want, you can remove them from the list. To remove a control, right-click it and click Delete.

Besides the objects in the Common Controls section, other controls are left out but are still available. Some of the left out controls were created with the .NET Framework but are not installed by default because they are judged hardly used. To add one or more of these left out controls, right-click anywhere in the Toolbox and click Choose Items... In the Choose Toolbox Items dialog box, click the .NET Framework Components tab, then click the check box of the desired control before clicking OK:

Choose Toolbox Items

In addition to custom .NET controls, some other objects called ActiveX controls were used in previous versions of Visual Basic or Visual Studio and are available. To take care of compatibility issues, most previous ActiveX controls were reconfigured and adapted to be used in a .NET application. To add some of these left out controls, right-click anywhere in the Toolbox and click Choose Items... In the Choose Toolbox Items dialog box, click the COM Components tab, select the desired control before clicking OK

Choose Toolbox Items

The Sections of the Toolbox

When you start a Windows Application, it provides various controls on the Toolbox so you can choose which ones are appropriate for your particular application. Controls can be set by categories based on their function or role. A container is a control whose main purpose is to host other controls. To design it, you pick up objects from the Toolbox and drop them where desired. The Toolbox organizes its items in categories and each category is represented by a button:

Toolbox

If the available list of categories is not enough, you can add a new section of your choice. By default, Visual Studio hides some categories because they are judged hardly used. To display these additional sections, you can right-click anywhere in the Toolbox and click Show All:

Toolbox

If you still want an additional tab not included in the list, you can add one (or more). To do that, right-click anywhere in the Toolbox and click Add Tab. You would be prompted to provide a name. After typing the new name, press Enter.

The Layout of a Category

To use an object of a particular category, you can first click its button. After selecting a category, it displays its items. In each category, a particular button called Pointer is selected by default. This simply indicates that no item in the group is currently selected.

By default, the items in each category are organized as horizontal wide buttons:

Toolbox

Alternatively, you can list the items of a category as buttons of a list view. To do that, you can right-click anywhere in the category and click List View to remove its check box:

Toolbox  

Arrangement of Items in the Toolbox

When Microsoft Visual Studio is installed, it adds the buttons in a somewhat random order. In the beginning, this can make it difficult to find a particular control when you need it. If you find it more convenient, you can arrange the list of controls in any order of your choice. You have two main options. To change the position of an item in the list, right-click it and click either Move Up or Move Down. Alternatively, you can arrange the items in alphabetic order. To do that, right-click anywhere in the Windows Forms section and click Sort Items Alphabetically:

Toolbox

Once you have rearranged items alphabetically, the Toolbox forgets the previous arrangement and you cannot restore it. Alternatively, you can right-click the button of a control and click either Move Up or Move Down.


Previous Copyright © 2010-2016, FunctionX Home