|
 Practical
Learning: Creating the Application Practical
Learning: Creating the Application
|
|
- Create a new Windows Application named
BethesdaCarRental3
- In the Solution Explorer, right-click Form1.vb and click Rename
- Type Central.vb and press Enter
- Right-click the middle of the form and click View Code
- Just above the Public Class line, import the System.Data.SqlClient
namespace
- In the Class Name combo box, select (Central Events)
- In the Method Name combo box, select Load and make the following changes:
Imports System.Data.SqlClient

Public Class Central
    Friend Sub CreateDatabase()
        Using Connect As SqlConnection = _
	     New SqlConnection("Data Source=(local); " & _
 		               "Integrated Security='SSPI';")

            Dim strCreateDatabase As String = "IF EXISTS ( " & _
                "SELECT name " & _
                "FROM sys.databases " & _
                "WHERE name = N'BethesdaCarRental2' " & _
                ") " & _
                "DROP DATABASE BethesdaCarRental2; " & _
                "CREATE DATABASE BethesdaCarRental2"

            Dim Command As SqlCommand = _
                New SqlCommand(strCreateDatabase, Connect)

            Connect.Open()
            Command.ExecuteNonQuery()

            msgbox("A database named " & _
              "BethesdaCarRental2 has been created")
        End Using

        Using Connect As SqlConnection = _
	     New SqlConnection("Data Source=(local); " & _
			       "Database='BethesdaCarRental2'; " & _
			       "Integrated Security='SSPI';")

            Dim strCreateTable As String = _
            	"CREATE TABLE RentalRates( " & _
             	"RentalRateID int identity(1, 1) NOT NULL, " & _
             	"Category varchar(50), " & _
             	"Daily smallmoney, Weekly smallmoney, " & _
             	"Monthly smallmoney, Weekend smallmoney, " & _
            	"CONSTRAINT PK_RentalRates PRIMARY KEY (RentalRateID));"

            Dim Command As SqlCommand = _
        	     New SqlCommand(strCreateTable, Connect)

            Connect.Open()
            Command.ExecuteNonQuery()
            MsgBox("A table named RentalRates has been " & _
                   "added to the BethesdaCarRental2 database.")
        End Using

        Using Connect As SqlConnection = _
	     New SqlConnection("Data Source=(local); " & _
		               "Database='BethesdaCarRental2'; " & _
		               "Integrated Security='SSPI';")

            Dim strCreateTable As String = _
	             "CREATE TABLE Employees( " & _
	             "EmployeeID int identity(1, 1) NOT NULL, " & _
	             "EmployeeNumber nchar(5), " & _
	             "FirstName varchar(32), " & _
	             "LastName varchar(32) NOT NULL, " & _
	             "FullName AS (([LastName]+', ')+[FirstName]), " & _
	             "Title varchar(80), " & _
	             "HourlySalary smallmoney, " & _
	             "CONSTRAINT PK_Employees PRIMARY KEY (EmployeeID))"

            Dim Command As SqlCommand = _
			New SqlCommand(strCreateTable, Connect)

            Connect.Open()
            Command.ExecuteNonQuery()
            msgbox("A table named Employees has been " & _
             "added to the BethesdaCarRental2 database.")
        End Using

        Using Connect As SqlConnection = _
	     New SqlConnection("Data Source=(local); " & _
			       "Database='BethesdaCarRental2'; " & _
			       "Integrated Security='SSPI';")

            Dim strCreateTable As String = _
	             "CREATE TABLE Customers( " & _
	             "CustomerID int identity(1, 1) NOT NULL, " & _
	             "DrvLicNumber varchar(50), " & _
	             "FullName varchar(80), " & _
	             "Address varchar(100) NOT NULL, " & _
	             "City varchar(50), " & _
	             "State varchar(50), " & _
	             "ZIPCode varchar(20), " & _
	             "CONSTRAINT PK_Customer PRIMARY KEY (CustomerID));"

            Dim Command As SqlCommand = _
		New SqlCommand(strCreateTable, Connect)

            Connect.Open()
            Command.ExecuteNonQuery()
            msgbox("A table named Customers has been " & _
              "added to the BethesdaCarRental2 database.")
        End Using

        Using Connect As SqlConnection = _
     New SqlConnection("Data Source=(local); " & _
      "Database='BethesdaCarRental2'; " & _
      "Integrated Security='SSPI';")

            Dim strCreateTable As String = _
            "CREATE TABLE Cars( " & _
             "CarID int identity(1, 1) NOT NULL, " & _
             "TagNumber varchar(20), " & _
             "Make varchar(50), " & _
             "Model varchar(50) NOT NULL, " & _
             "CarYear smallint, " & _
             "Category varchar(50), " & _
             "CDPlayer bit, " & _
             "DVDPlayer bit, " & _
             "Available bit, " & _
             "CONSTRAINT PK_Car PRIMARY KEY (CarID));"

            Dim Command As SqlCommand = _
      New SqlCommand(strCreateTable, Connect)

            Connect.Open()
            Command.ExecuteNonQuery()
            MsgBox("A table named Cars has been " & _
                 "added to the BethesdaCarRental2 database.")
        End Using

        Using Connect As SqlConnection = _
     New SqlConnection("Data Source=(local); " & _
      "Database='BethesdaCarRental2'; " & _
      "Integrated Security='SSPI';")

            Dim strCreateTable As String = _
            "CREATE TABLE RentalOrders( " & _
             "RentalOrderID int identity(1, 1) NOT NULL, " & _
             "DateProcessed datetime, " & _
             "EmployeeID int Constraint " & _
             "FK_Employees References " & _
             "Employees(EmployeeID) NOT NULL, " & _
             "EmployeeName varchar(80), " & _
             "CustomerID int Constraint " & _
             "FK_Customers References " & _
             "Customers(CustomerID) NOT NULL, " & _
             "CustomerName varchar(80), " & _
             "CustomerAddress varchar(100), " & _
             "CustomerCity varchar(50), " & _
             "CustomerState varchar(50), " & _
             "CustomerZIPCode varchar(20), " & _
             "CarID int Constraint " & _
             "FK_Cars References Cars(CarID) NOT NULL, " & _
             "CarMake varchar(50), " & _
             "CarModel varchar(50), " & _
             "CarYear smallint, " & _
             "CarCondition varchar(50), " & _
             "TankLevel varchar(40), " & _
             "MileageStart int, " & _
             "MileageEnd int, " & _
             "RentStartDate datetime, " & _
             "RentEndDate datetime, " & _
             "Days int, " & _
             "RateApplied money, " & _
             "SubTotal money, " & _
             "TaxRate decimal(6, 2), " & _
             "TaxAmount money, " & _
             "OrderTotal money, " & _
             "OrderStatus varchar(50), " & _
             "CONSTRAINT PK_RentalOrder " & _
             "PRIMARY KEY (RentalOrderID));"

            Dim Command As SqlCommand = _
		New SqlCommand(strCreateTable, Connect)

            Connect.Open()
            Command.ExecuteNonQuery()
            MsgBox("A table named RentalOrder has been " & _
                "added to the BethesdaCarRental2 database.")
        End Using
    End Sub

    Private Sub Central_Load(ByVal sender As Object, _
                             ByVal e As System.EventArgs) _
                             Handles Me.Load
        CreateDatabase()
    End Sub
End Class
|
- Execute the application to actually create the database and its tables
- Close the form and return to your programming environment
- To create a new form, on the main menu, click Project -> Add Windows
Form...
- Set the name to Employees and click Add
- To create a data source, on the main menu, click Data -> Add New Data
Source...
- In the first page of the wizard, make sure Database is selected and
click Next
- In the combo box
- If you see a BethesdaCarRental2, select it
- If you do not have BethesdaCarRental2:
- Click New
Connection...
- In the Server combo box, select the server or type
(local)
- In the Select Or Enter A Database Name combo box,
select BethesdaCarRental2
- Click Test Connection
- Click OK twice
- In the
Data Source Configuration Wizard, make sure the new connection is
selected and click Next
- Change the Connection String to
cstBethesdaCarRental and click Next
- Expand the Tables node and
expand the Employees node
- Click the check boxes of EmployeeID, EmployeeNumber, FirstName,
LastName, Title, and HourlySalary. Change the DataSet Name to dsBethesdaCarRental
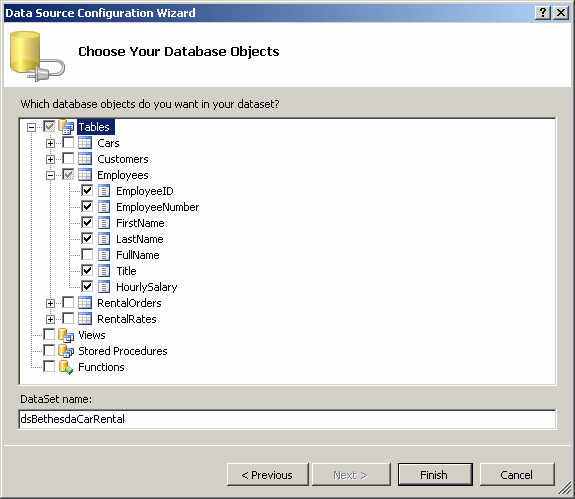
- Click Finish
- In the Data Sources window, click Employees and click the arrow of its
combo box to select DataGridView (it should be selected already as the
default).
Drag the Employees node and drop it on the form
- Under the form, click the objects and, using the Properties window,
change their names as follows:
| Object |
Name |
| employeesBindingSource |
BSEmployees |
| employeesTableAdapter |
TAEmployees |
| employeesBindingNavigator |
BNEmployees |
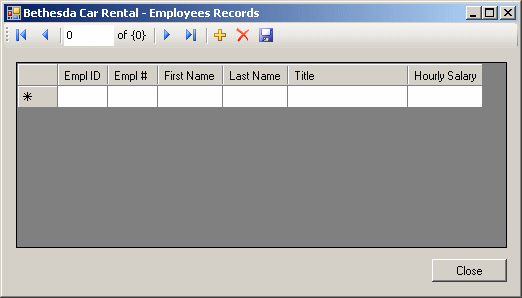
- Under the DataGridView control, add a button and set its properties as
follows:
Text: Close
(Name): BtnClose
Anchor: Bottom, Right
- On the form, click the data grid view control and, in the
Properties window, change the following properties:
(Name): DGVEmployees
ColumnHeadersHeightSizeMode: EnableResizing
Anchor: Top, Bottom, Left, Right
- Click the ellipsis of the Columns field and make the
following changes:
| Selected Columns |
HeaderText |
Width |
| EmployeeID |
Empl ID |
50 |
| EmployeeNumber |
Empl # |
50 |
| FirstName |
First Name |
65 |
| LastName |
Last Name |
65 |
| Title |
|
120 |
| HourlySalary |
Hourly Salary |
75 |
- Click OK
- Double-click the Close button and implement its even as follows:
Private Sub BtnClose_Click(ByVal sender As System.Object, _
                           ByVal e As System.EventArgs) _
                           Handles BtnClose.Click
    Close()
End Sub
|
- Access the Central.vb [Design] tab
- Add a button to it and set its properties as follows:
Text: Employees
(Name): BtnEmployees
- Double-click the Employees button and implement its even as follows:
Private Sub Central_Load(ByVal sender As Object, _
                         ByVal e As System.EventArgs) _
                         Handles Me.Load
    REM CreateDatabase()
End Sub

Private Sub btnEmployees_Click(ByVal sender As System.Object, _
                               ByVal e As System.EventArgs) _
                               Handles btnEmployees.Click
    Dim Clerks As Employees = New Employees
    Clerks.ShowDialog()
End Sub
|
- Execute the application to test it
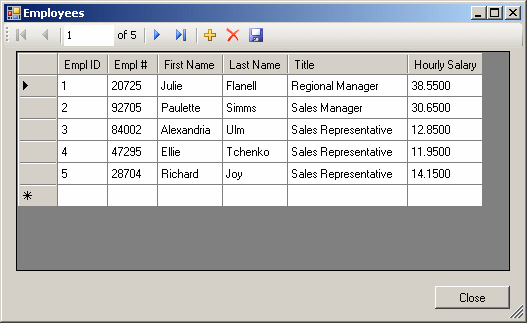
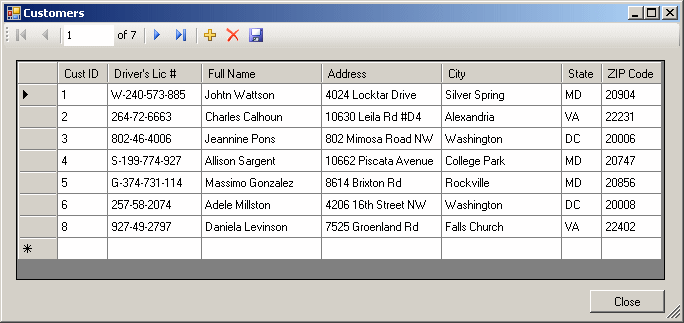
- Click the Employees button and create the following records:
| Empl # |
First Name |
Last Name |
Title |
HourlySalary |
| 20725 |
Julie |
Flanell |
Regional Manager
|
36.55 |
| 92705 |
Paulette |
Simms |
Sales Manager
|
26.65
|
| 84002 |
Alexandra |
Ulm |
Sales Representative
|
12.85
|
| 47295 |
Ellie |
Tchenko |
Sales Representative
|
11.95 |
- Close the forms and return to your programming environment
- To create a new form, on the main menu, click Project -> Add Windows
Form...
- Set the name to Customers and click Add
- In the Data Sources window, right-click dsBethesdaCaRental and click
Configure Dataset with Wizard...
- Expand the Tables node and click the check box of Customers
- Click Finish
- In the Data Sources window, drag Customers and drop it on the form
- Under the form, click the objects and, using the Properties window,
change their names as follows:
| Object |
Name |
| customersBindingSource |
BSCustomers |
| customersTableAdapter |
TACustomers |
| customersBindingNavigator |
BNCustomers |
- Under the DataGridView control, add a button and set its properties as
follows:
Text: Close
(Name): BtnClose
Anchor: Bottom, Right
- On the form, click the data grid view control and, in the
Properties window, change the following properties:
(Name): DGVCustomers
ColumnHeadersHeightSizeMode: EnableResizing
Anchor: Top, Bottom, Left, Right
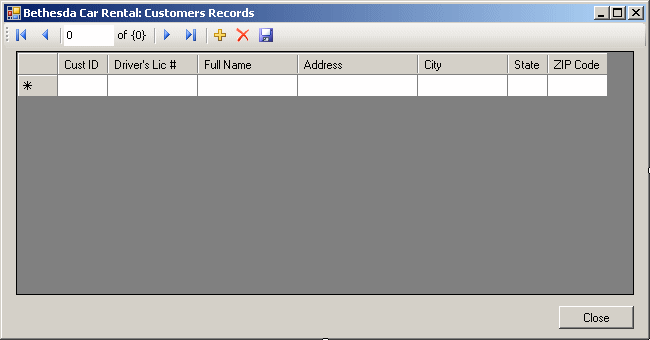
- Click the ellipsis of the Columns field and make the
following changes:
| Selected Columns |
HeaderText |
Width |
| CustomerID |
Cust ID |
50 |
| DrvLicNumber |
Driver's Lic # |
80 |
| FullName |
Full Name |
120 |
| Address |
|
120 |
| City |
|
120 |
| State |
|
40 |
| ZIPCode |
ZIP Code |
60 |
- Click OK
- Set DataGridView's Anchor property to Top, Bottom, Left, Right
- Under the DataGridView control, add a button and set its properties as
follows:
Text: Close
(Name): BtnClose
Anchor: Bottom, Right
- Double-click the Close button and implement its even as follows:
Private Sub BtnClose_Click(ByVal sender As System.Object, _
                               ByVal e As System.EventArgs) _
                               Handles BtnClose.Click
    Close()
End Sub
|
- Access the Central.vb [Design] tab
- Add a button to it and set its properties as follows:
Text: Customers
(Name): BtnCustomers
- Double-click the Employees button and implement its even as follows:
Private Sub btnCustomers_Click(ByVal sender As System.Object, _
                               ByVal e As System.EventArgs) _
                               Handles btnCustomers.Click
    Dim Clients As Customers = New Customers
    Clients.ShowDialog()
End Sub
|
- Execute the application to test it
- Click the Customers button and create
Create a few
records
- Close the forms and return to your programming environment
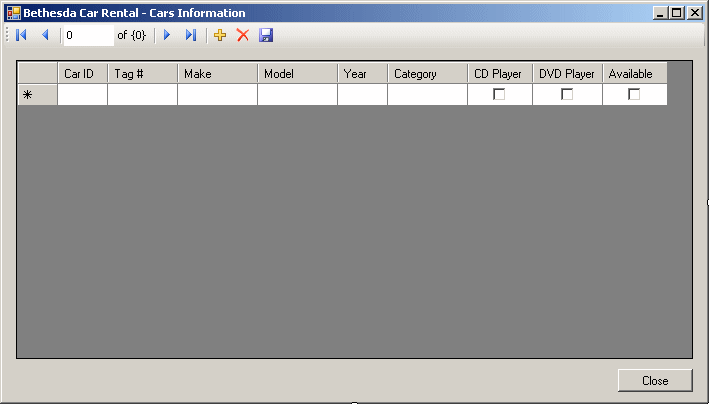
- To create a new form, on the main menu, click Project -> Add Windows
Form...
- Set the name to Cars and click Add
- In the Data Sources window, right-click dsBethesdaCaRental and click
Configure Dataset with Wizard...
- Expand the Tables node and click the check box of Cars
- Click Finish
- In the Data Sources window, drag Cars and drop it on the form
- Under the form, click the objects and, using the Properties window,
change their names as follows:
| Object |
Name |
| carsBindingSource |
BSCars |
| carsTableAdapter |
TACars |
| carsBindingNavigator |
BNCars |
- Under the DataGridView control, add a button and set its properties as
follows:
Text: Close
(Name): BtnClose
Anchor: Bottom, Right
- On the form, click the data grid view control and, in the
Properties window, change the following properties:
(Name): DGVCars
ColumnHeadersHeightSizeMode: EnableResizing
Anchor: Top, Bottom, Left, Right
- Click the ellipsis of the Columns field and make the
following changes:
| Selected Columns |
HeaderText |
Width |
| CarID |
Car ID |
50 |
| TagNumber |
Tag # |
70 |
| Make |
|
80 |
| Model |
|
80 |
| CarYear |
Year |
50 |
| Category |
|
80 |
| CDPlayer |
CD Player |
65 |
| DVDPlayer |
DVD Player |
70 |
| Available |
|
65 |
- Click OK
- Double-click the Close button and implement its even as follows:
Private Sub BtnClose_Click(ByVal sender As System.Object, _
                               ByVal e As System.EventArgs) _
                               Handles BtnClose.Click
    Close()
End Sub
|
- Access the Central.vb [Design] tab
- Add a button to it and set its properties as follows:
Text: Cars
(Name): BtnCars
- Double-click the Employees button and implement its even as follows:
Private Sub btnCars_Click(ByVal sender As Object, _
                          ByVal e As System.EventArgs) _
                          Handles btnCars.Click
    Dim Vehicles As Cars = New Cars
    Vehicles.ShowDialog()
End Sub
|
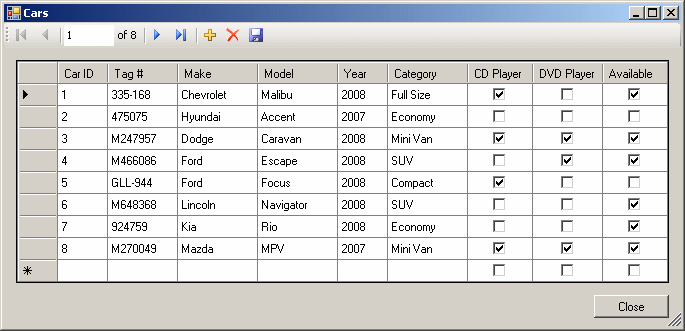
- Execute the application to test it
- Click the Cars button and create Create a few
records
- Close the forms and return to your programming environment
- To add a new form to the project, on the main menu, click
Project -> Add -> Windows Form...
- Set the Name to RentalRates and press Enter
- In the Data Sources window, right-click dsBethesdaCaRental and click
Configure Dataset with Wizard...
- Expand the Tables node and click the check box of RentalRates
- Click Finish
- In the Data Sources window, drag RentalRates and drop it on the form
- Under the form, click the objects and, using the Properties window,
change their names as follows:
| Object |
Name |
| rentalRatesBindingSource |
BSRentalRates |
| rentalRatesTableAdapter |
TARentalRates |
| rentalRatesBindingNavigator |
BNRentalRates |
- Under the DataGridView control, add a button and set its properties as
follows:
Text: Close
(Name): BtnClose
Anchor: Bottom, Right
- On the form, click the data grid view control and, in the
Properties window, change the following properties:
(Name): DGVRentalRates
ColumnHeadersHeightSizeMode: EnableResizing
Anchor: Top, Bottom, Left, Right
- Click the ellipsis of the Columns field and make the
following changes:
| Selected Columns |
HeaderText |
Width |
| RentalRateID |
Rate ID |
50 |
| Category |
|
75 |
| Daily |
|
50 |
| Weekly |
|
50 |
| Monthly |
|
50 |
| Weekend |
|
50 |
- Click OK
- To create a new form, on the main menu, click Project -> Add Windows
Form...
- Set the name to OrderProcessing and click Add
- In the Data Source window, right-click dsBethesdaCarRental and click Configure DataSet
With Wizard...
- Expand the Tables node and click the check box of RentalOrders and click
Finish
- In the Data Sources window, click RentalOrders and click the arrow of
its combo box
- Select Details
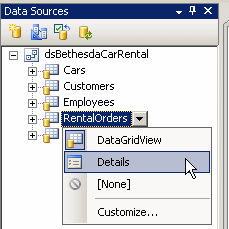
- From the Data Sources window, drag RentalOrders and drop it on the form
- Under the form, click the objects and, using the Properties window,
change their names as follows:
| Object |
Name |
| rentalOrdersBindingSource |
BSRentalOrders |
| rentalOrdersTableAdapter |
TARentalOrders |
| rentalOrdersBindingNavigator |
BNRentalOrders |
- Again, from the Data Sources window, drag Employees and drop it on
the form
- While the DataGridView control is still selected on the form, press Delete
to remove it from the form
- Under the form, click the objects and, using the Properties window,
change their names as follows:
| Object |
Name |
| employeesBindingSource |
BSEmployees |
| employeesTableAdapter |
TAEmployees |
- From the Data Sources window, drag Customers and drop it in an
empty area of the form
- While the DataGridView control is still selected on the form, press Delete
to remove it from the form
- Under the form, click the objects and, using the Properties window,
change their names as follows:
| Object |
Name |
| customersBindingSource |
BSCustomers |
| customersTableAdapter |
TACustomers |
- Once again, from the Data Sources window, drag Cars and drop it on the
form
- While the DataGridView control is still selected on the form, press Delete
to remove it from the form
- Under the form, click the objects and, using the Properties window,
change their names as follows:
| Object |
Name |
| carsBindingSource |
BSCars |
| carsTableAdapter |
TACars |
- On the form, delete the text boxes on the right side of EmployeeID,
CustomerID, CarID, CarCondition, TankLevel,
and OrderStatus
- Design the form as follows (you will add new controls
to replace those that were deleted):
 |
| Control |
Old Name |
Text |
Name |
Additional Properties |
| Label |
New |
Processed By: |
|
BackColor: Gray
BorderStyle: FixedSingle |
| Label |
Old |
Employee #: |
|
|
| ComboBox |
New |
|
cboEmployeeID |
|
| TextBox |
employeeNameTextBox |
|
TxtEmployeeName |
|
| Label |
|
Processing For |
|
BackColor: Gray
BorderStyle: FixedSingle |
| Label |
Old |
Driver's Lic. #: |
|
|
| ComboBox |
New |
|
CbxCustomerID |
|
| Label |
Old |
Customer Name: |
|
|
| TextBox |
customerNameTextBox |
|
TxtCustomerName |
|
| Label
|
Old |
Address: |
|
|
| TextBox |
customerAddressTextBox |
|
TxtCustomerAddress |
|
| Label |
Old |
City: |
|
|
| TextBox |
customerCityTextBox |
|
TxtCustomerCity |
|
| Label |
Old |
State: |
|
|
| TextBox |
customerStateTextBox |
|
TxtCustomerState |
|
| Label |
Old |
ZIP Code: |
|
|
| TextBox |
customerZIPCodeTextBox |
|
TxtCustomerZIPCode |
|
| Label |
New |
Car Selected |
|
BackColor: Gray
BorderStyle: FixedSingle |
| Label |
Old |
Tag Number: |
|
|
| ComboBox |
New |
|
CbxCarID |
|
| Label |
Old |
Car Condition: |
|
|
| ComboBox |
New |
|
CbxCarConditions |
Items:
Needs Repair
Drivable
Excellent |
| Label |
Old |
Make: |
|
|
| TextBox |
carMakeTextBox |
|
TxtCarMake |
|
| Label |
|
Model: |
|
|
| TextBox |
carModelTextBox |
|
TxtCarModel |
|
| Label |
Old |
Year: |
|
|
| TextBox |
Old |
|
TxtCarYear |
|
| Label |
Old |
Tank Level: |
|
|
| ComboBox |
New |
|
CbxTankLevels |
Items:
Empty
1/4 Empty
1/2 Full
3/4 Full
Full |
| Label |
Old |
Mileage Start: |
|
|
| TextBox |
mileageStartTextBox |
|
TxtMileageStart |
TextAlign: Right |
| Label |
|
Mileage End: |
|
|
| TextBox |
mileageEndTextBox |
|
TxtMileageEnd |
TextAlign: Right |
| Label |
|
Order Timing |
|
BackColor: Gray
BorderStyle: FixedSingle |
| Label |
Old |
Date Processed |
|
|
| DateTimePicker |
dateProcessedDateTimePicker |
|
DtpDateProcessed |
|
| Label |
Old |
Rent Start Date: |
|
|
| DateTimePicker |
rentStartDateDateTimePicker |
|
DtpRentStartDate |
|
| Label |
|
Rent End Date: |
|
|
| DateTimePicker |
rentEndDateDateTimePicker |
|
DtpRentEndDate |
|
| Label |
Old |
Total Days: |
|
|
| TextBox |
daysTextBox |
|
TxtTotalDays |
|
| Label |
|
Order Evaluation |
|
BackColor: Gray
BorderStyle: FixedSingle |
| Label |
Old |
Rate Applied |
|
|
| TextBox |
rateAppliedTextBox |
|
TxtRateApplied |
TextAlign: Right |
| Button |
New |
Rental Rates |
BtnRentalRates |
|
| Label |
Old |
Sub Total: |
|
|
| TextBox |
subTotalTextBox |
|
TxtSubTotal |
TextAlign: Right |
| Button |
New |
Calculate |
BtnCalculate |
|
| Label |
Old |
Tax Rate: |
|
|
| TextBox |
taxRateTextBox |
|
TxtTaxRate |
TextAlign: Right |
| Label |
|
% |
|
|
| Label |
|
Tax Amount: |
|
|
| TextBox |
taxAmountTextBox |
|
TxtTaxAmount |
TextAlign: Right |
| Label |
|
Order Total: |
|
|
| TextBox |
orderTotalTextBox |
|
TxtOrderTotal |
TextAlign: Right |
| Label |
Old |
Order Status: |
|
|
| ComboBox |
New |
|
CbxOrderStatus |
Items:
Car On Road
Car Returned
Order Reserved |
| Label |
Old |
Rental Order ID: |
|
|
| TextBox |
rentalOrderIDTextBox |
|
TxtRentalOrderID |
TextAlign: Right |
| Button |
|
Close |
BtnClose |
|
| StatusStrip |
|
|
|
|
|
- Click each control that was added and change
its data bindings
- Right-click the form and click View Code
- In the Class Name combo box, select CbxEmployeeID
- In the Method Name combo box, select SelectedIndexChanged and implement
the event as follows:
Private Sub CbxEmployeeID_SelectedIndexChanged(ByVal sender As Object, _
                                               ByVal e As System.EventArgs) _
                                   Handles CbxEmployeeID.SelectedIndexChanged
    Using Connect As System.Data.SqlClient.SqlConnection = _
        New System.Data.SqlClient.SqlConnection("Data Source=(local);" & _
  	       "Database=BethesdaCarRental2;" & _
      		"Integrated Security=yes")

        Dim strEmployee As String = "SELECT FullName FROM Employees " & _
                                    "WHERE EmployeeNumber = '" & _
                    		    CbxEmployeeID.Text & "';"

        Dim Command As System.Data.SqlClient.SqlCommand = _
             New System.Data.SqlClient.SqlCommand(strEmployee, Connect)
        Connect.Open()

        Dim rdrEmployees As System.Data.SqlClient.SqlDataReader = _
	            Command.ExecuteReader()

        While rdrEmployees.Read()
            txtEmployeeName.Text = rdrEmployees.GetString(0)
        End While
    End Using
End Sub
|
- In the Class Name combo box, select CbxCustomerID
- In the Method Name combo box, select SelectedIndexChanged and implement
the event as follows:
Private Sub cbxCustomerID_SelectedIndexChanged(ByVal sender As Object, _
                                               ByVal e As System.EventArgs) _
                                   Handles cbxCustomerID.SelectedIndexChanged
    Using Connect As System.Data.SqlClient.SqlConnection = _
	 New System.Data.SqlClient.SqlConnection( _
		"Data Source=(local);" & _
     		"Database=BethesdaCarRental2;" & _
      		"Integrated Security=yes")

        Dim strCustomer As String = "SELECT * FROM Customers " & _
        		            "WHERE DrvLicNumber = '" & _
                   		   CbxCustomerID.Text & "';"

        Dim Command As System.Data.SqlClient.SqlCommand = _
                 New System.Data.SqlClient.SqlCommand(strCustomer, Connect)
        Connect.Open()

        Dim rdrCustomers As System.Data.SqlClient.SqlDataReader = _
        	    Command.ExecuteReader()

        While rdrCustomers.Read()
                TxtCustomerName.Text = rdrCustomers.GetString(2)
                TxtCustomerAddress.Text = rdrCustomers.GetString(3)
                TxtCustomerCity.Text = rdrCustomers.GetString(4)
                TxtCustomerState.Text = rdrCustomers.GetString(5)
                TxtCustomerZIPCode.Text = rdrCustomers.GetString(6)
        End While
    End Using
End Sub
|
- In the Class Name combo box, select CbxCarID
- In the Method Name combo box, select SelectedIndexChanged and implement
the event as follows:
Private Sub cbxCarID_SelectedIndexChanged(ByVal sender As Object, _
                                          ByVal e As System.EventArgs) _
                                   Handles cbxCarID.SelectedIndexChanged
    Using Connect As System.Data.SqlClient.SqlConnection = _
	 New System.Data.SqlClient.SqlConnection( _
		 "Data Source=(local);" & _
	         "Database=BethesdaCarRental2;" & _
  		 "Integrated Security=yes")

        Dim strCar As String = "SELECT * FROM Cars " & _
	                       "WHERE TagNumber = '" & _
          		       CbxCarID.Text & "';"

        Dim cmdCars As System.Data.SqlClient.SqlCommand = _
                 New System.Data.SqlClient.SqlCommand(strCar, Connect)
        Connect.Open()

        Dim rdrCars As System.Data.SqlClient.SqlDataReader = _
	                 cmdCars.ExecuteReader()

        While rdrCars.Read()
                TxtCarMake.Text = rdrCars.GetString(2)
                TxtCarModel.Text = rdrCars.GetString(3)
                TxtCarYear.Text = rdrCars.GetSqlInt16(4)
        End While
    End Using
End Sub
|
- In the Class Name combo box, select DtpRentEndDate
- In the Method Name combo box, select ValueChanged and implement the event as follows:
Private Sub DtpRentEndDate_ValueChanged(ByVal sender As Object, _
                                    ByVal e As System.EventArgs) _
                               Handles DtpRentEndDate.ValueChanged
    If DtpRentStartDate.Value > DtpRentEndDate.Value Then
        TxtTotalDays.Text = "0"
    ElseIf DtpRentStartDate.Value = DtpRentEndDate.Value Then
        TxtTotalDays.Text = "1"
    Else
        Dim Days As Integer

        Dim DateStart As Date = DtpRentStartDate.Value
        Dim DateEnd As Date = DtpRentEndDate.Value

        ' Let's calculate the difference in days
        Dim tme As TimeSpan = DateEnd - DateStart
        Days = tme.Days

        ' If the customer returns the car the same day,
        ' we consider that the car was rented for 1 day
        If days = 0 Then
            days = 1
        End If

        TxtTotalDays.Text = days.ToString()
        ' At any case, we will let the clerk
        ' specify the actual number of days
    End If
End Sub
|
- In the Class Name combo box, select BtnRentalRates
- In the Method Name combo box, select Click and implement the event as follows:
Private Sub BtnRentalRates_Click(ByVal sender As Object, _
                                 ByVal e As System.EventArgs) _
                                 Handles BtnRentalRates.Click
    Dim Rates As RentalRates = New RentalRates
    Rates.ShowDialog()
End Sub
|
- In the Class Name combo box, select BtnCalculate
- In the Method Name combo box, select Click and implement the events as follows:
Private Sub BtnCalculate_Click(ByVal sender As Object, _
                               ByVal e As System.EventArgs) _
                               Handles BtnCalculate.Click
    Dim Days As Integer = 0
    Dim RateApplied As Double = 0.0
    Dim TaxRate As Double = 0.0
    Dim SubTotal As Double, TaxAmount As Double
    Dim OrderTotal As Double

    Try
        Days = CInt(TxtTotalDays.Text)
    Catch ex As Exception
        MsgBox("Invalid number of days.")
    End Try

    Try
        RateApplied = CDbl(TxtRateApplied.Text)
    Catch ex As Exception
        MsgBox("Invalid rate applied.")
    End Try

    Try
        TaxRate = CDbl(txtTaxRate.Text)
    Catch ex As Exception
        MsgBox("Invalid tax rate.")
    End Try

    SubTotal = Days * RateApplied
    TaxAmount = SubTotal * TaxRate / 100
    OrderTotal = SubTotal + TaxAmount

    txtSubTotal.Text = FormatCurrency(SubTotal)
    txtTaxAmount.Text = FormatCurrency(TaxAmount)
    txtOrderTotal.Text = FormatCurrency(OrderTotal)
End Sub
|
- In the Class Name combo box, select BtnClose
- In the Method Name combo box, select Click and implement the even as follows:
Private Sub BtnClose_Click(ByVal sender As System.Object, _
                               ByVal e As System.EventArgs) _
                               Handles BtnClose.Click
    Close()
End Sub
|
- Access the Central form
- Add a button to it and set its properties as follows:
Text: OrderProcessing
(Name): BtnOrderProcessing
- Double-click the OrderProcessing button and implement the even as follows:
Private Sub btnRentalOrders_Click(ByVal sender As System.Object, _
                                  ByVal e As System.EventArgs) _
                                  Handles btnRentalOrders.Click
    Dim Orders As OrderProcessing = New OrderProcessing
    Orders.ShowDialog()
End Sub
|
- In the Class Name combo box, select BtnClose
- In the Method Name combo box, select Click and implement the event as follows:
Private Sub BtnClose_Click(ByVal sender As System.Object, _
                           ByVal e As System.EventArgs) _
                           Handles BtnClose.Click
    End
End Sub
|
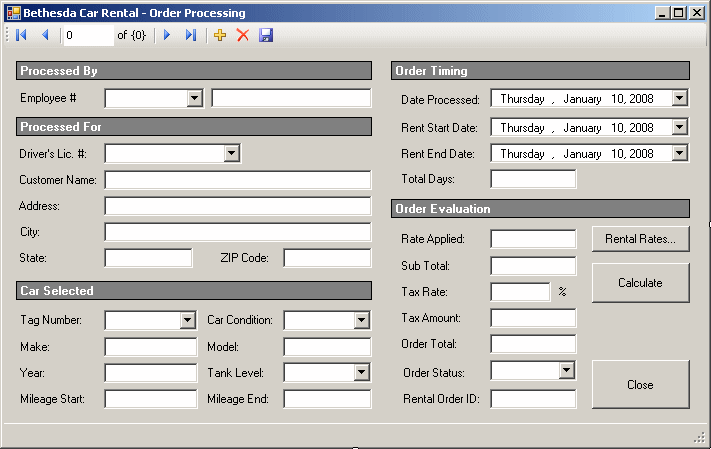
- Execute the application and display the OrderProcessing form
- To create an order, click the + button, complete the form, and click the
Save button. Here are examples:
- Close the forms and return to your programming environment
- Execute the application again and display the Order Processing form
again
- Click the Rental Rates button and create the values as follows:
| Category |
Daily |
Weekly |
Monthly |
Weekend |
| Economy |
35.95 |
32.75 |
28.95 |
24.95 |
| Compact |
39.95 |
35.75 |
32.95 |
28.95 |
| Standard |
45.95 |
39.75 |
35.95 |
32.95 |
| Full Size |
49.95 |
42.75 |
38.95 |
35.95 |
| Mini Van |
55.95 |
50.75 |
45.95 |
42.95 |
| SUV |
55.95 |
50.75 |
45.95 |
42.95 |
| Truck |
42.75 |
38.75 |
35.95 |
32.95 |
| Van |
69.95 |
62.75 |
55.95 |
52.95 |
- Update the orders you previously processed and save them
- Close the forms and return to your programming environment
|
|


