Assistance With Data Entry
|
|
Assistance With Data Entry |
|
The Nullity of a Field |
|
Introduction |
|
During data entry, users of your database face fields that expect data. Sometimes, for one reason or another, data will not be available for a particular field. An example would be an MI (middle initial) field: some people have a middle initial, some others either do not have it or would not (or cannot) provide it. This aspect can occur for any field of your table. Therefore, you should think of a way to deal with it. A field is referred to as null when no data entry has been made to it:
|
|
A field is referred to as null if there is no way of determining the value of its content (in reality, the computer, that is, the operating system, has its own internal mechanism of verifying the value of a field) or its value is simply unknown. As you can imagine, it is not a good idea to have a null field in your table. As a database developer, it is your responsibility to always know with certainty the value held by each field of your table. A field is referred to as required if the user must provide a value for it before moving to another record. In other words, the field cannot be left empty during data entry.
To solve the problem of null and required fields, Microsoft SQL Server proposes one of two options: allow or not allow a null value on a field. For a typical table, there are pieces of information that the user should make sure to enter; otherwise, the data entry would not be validated. To make sure the user always fills out a certain field before moving to the next field, that is, to require the value, if you are visually creating the table, clear the Allow Nulls check box for the field. On the other hand, if the value of a field is not particularly important, for example if you do not intend to involve that value in an algebraic operation, check its Allow Nulls check box.
If you are programmatically creating the table using SQL, to specify that a column can allow null values, type NULL on the right side of the column definition. To specify that the values of the column are required, on the right side, type NOT NULL. If you do not specify NULL or NOT NULL, the column will be created as NULL. Here are examples: Imports System.Data.SqlClient
Public Class Exercise
Private Sub Exercise_Load(ByVal sender As Object, _
ByVal e As System.EventArgs) _
Handles Me.Load
Using Connect As SqlConnection = _
New SqlConnection("Data Source=(local);" & _
"Database='Exercise';" & _
"Integrated Security=yes;")
Dim Command As SqlCommand = _
New SqlCommand("CREATE TABLE Persons( " & _
"FirstName nvarchar(20) NULL, " & _
"LastName nvarchar(20) NOT NULL, " & _
"Gender smallint);", _
Connect)
Connect.Open()
Command.ExecuteNonQuery()
MsgBox("A new table named Persons has been crated.")
End Using
End Sub
End Class
If the table was created already and it holds some values, you cannot change its nullity option.
One of the goals of a good table is to be able to uniquely identity each record. In most cases, the database engine should not confuse two records. Consider the following table:
Imagine that you want to change the value of an item named Long-sleeve jersey dress. Because you must find the item programmatically, you can start looking for an item with that name. This table happens to have two items with that name. You may then decide to look for an item using its category. In the Category column, there are too many items named Women. In the same way, there are too many records that have a Large value in the Size column, same problem in the Unit Price column. This means that you do not have a good criterion you can use to isolate the record whose Item Name is Long-sleeve shirt. To solve the problem of uniquely identifying a record, you can create a particular column whose main purpose is to distinguish one record from another. To assist you with this, the SQL allows you to create a column whose data type is an integer type but the user does not have to enter data for that column. A value would automatically be entered into the field when a new record is created. This type of column is called an identity column. You cannot create an identity column on an existing table, only on a new table.
To create an identity column, if you are visually working in the design view of the table, in the top section, specify the name of the column. By tradition, the name of this column resembles that of the table but is singular. Also, by habit, the name of the column ends with _id, Id, or ID. After specifying the name of the column, set its data type to an integer-based type. Usually, the data type used is int. In the bottom section, click and expand the Identity Specification property. The first action you should take is to set its (Is Identity) property from No to Yes. Once you have set the value of the (Is Identity) property to Yes, the first time the user performs data entry, the value of the first record would be set to 1. This characteristic is controlled by the Identity Seed property. If you want the count to start to a value other than 1, specify it on this property. After the (Is Identity) property has been set to Yes, the SQL interpreter would increment the value of each new record by 1, which is the default. This means that the first record would have a value of 1, the second would have a value of 2, and so on. This aspect is controlled by the Identity Increment property. If you want to increment by more than that, you can change the value of the Identity Increment property.
If you are programmatically creating a column, to indicate that it would be used as an identity column after its name and data type, type identity followed by parentheses. Between the parentheses, enter the seed value, followed by a comma, followed by the increment value. Here is an example: Imports System.Data.SqlClient
Public Class Exercise
Private Sub Exercise_Load(ByVal sender As Object, _
ByVal e As System.EventArgs) _
Handles Me.Load
Using Connect As SqlConnection = _
New SqlConnection("Data Source=(local);" & _
"Database='Exercise';" & _
"Integrated Security=yes;")
Dim Command As SqlCommand = _
New SqlCommand("CREATE TABLE StoreItems( " & _
"StoreItemID int IDENTITY(1, 1) NOT NULL, " & _
"Category nvarchar(50), " & _
"[Item Name] nvarchar(100) NOT NULL, " & _
"Size nvarchar(20), " & _
"[Unit Price] money);", _
Connect)
Connect.Open()
Command.ExecuteNonQuery()
MsgBox("A new table named StoreItems has been crated.")
End Using
End Sub
End Class
Sometimes, most records under a certain column may hold the same value although just a few would be different. For example, if a school is using a database to register its students, all of them are more likely to be from the same state. In such a case, you can assist the user by automatically providing a value for that column. The user would then simply accept the value and change it only in the rare cases where the value happens to be different. To assist the user with this common value, you create what is referred to as a default value.
You can create a default value of a column when creating a table. To specify the default value of a column, in the top section, click the column. In the bottom section, click Default Value or Binding, type the desired value following the rules of the column's data type:
To specify the default value in a SQL statement, when creating the column, before the semi-colon or the closing parenthesis of the last column, type the DEFAULT keyword followed by the value. Here are examples: Imports System.Data.SqlClient
Public Class Exercise
Private Sub Exercise_Load(ByVal sender As Object, _
ByVal e As System.EventArgs) _
Handles Me.Load
Using Connect As SqlConnection = _
New SqlConnection("Data Source=(local);" & _
"Database='Exercise';" & _
"Integrated Security=yes;")
Dim Command As SqlCommand = _
New SqlCommand("CREATE TABLE Employees " & _
"( " & _
"FullName NVARCHAR(50), " & _
"Address NVARCHAR(80), " & _
"City NVARCHAR(40), " & _
"State NVARCHAR(40) DEFAULT 'NSW', " & _
"PostalCode NVARCHAR(4) DEFAULT '2000', " & _
"Country NVARCHAR(20) DEFAULT 'Australia');", _
Connect)
Connect.Open()
Command.ExecuteNonQuery()
MsgBox("A new table named Employees has been created")
End Using
End Sub
End Class
After creating the table, the user does not have to provide a value for a column that has a default value. If the user does not provide the value, the default would be used when the record is saved.
There are various ways you can assist the user with data entry. You can create an expression using one or a combination of arithmetic and/or SQL operators. You can create an expression when creating a table.
To create an expression when visually creating a table, in the top section, specify the column's name (only the column name is important). In the bottom section, expand the Computed Column Specification field and, in its (Formula) field, enter the desired expression.
You can also programmatically create an expression in a SQL expression you are using to create a table. To do this, in the placeholder of the column, enter the name of the column, followed by AS, and followed by the desired expression. Here is an example: Imports System.Data.SqlClient
Public Class Exercise
Private Sub Exercise_Load(ByVal sender As Object, _
ByVal e As System.EventArgs) _
Handles Me.Load
Using Connect As SqlConnection = _
New SqlConnection("Data Source=(local);" & _
"Database='Exercise';" & _
"Integrated Security=yes;")
Dim Command As SqlCommand = _
New SqlCommand("CREATE TABLE Circle( " & _
"CircleID int identity(1,1) NOT NULL, " & _
"Radius decimal(8, 3) NOT NULL, " & _
"Area AS Radius * Radius * PI());", _
Connect)
Connect.Open()
Command.ExecuteNonQuery()
MsgBox("A new table named Circle has been crated.")
End Using
End Sub
End Class
When performing data entry, you must not provide a value for a column that has an expression; the SQL interpreter would provide the value automatically. Here is an example of entering data for the above Circle table: Private Sub Exercise_Load(ByVal sender As Object, _
ByVal e As System.EventArgs) _
Handles Me.Load
Using Connect As SqlConnection = _
New SqlConnection("Data Source=(local);" & _
"Database='Exercise';" & _
"Integrated Security=yes;")
Dim Command As SqlCommand = _
New SqlCommand("INSERT INTO Circle(Radius) VALUES(46.82);" & _
"INSERT INTO Circle(Radius) VALUES(8.15);" & _
"INSERT INTO Circle(Radius) VALUES(122.57);", _
Connect)
Connect.Open()
Command.ExecuteNonQuery()
MsgBox("A few records have been added to the table.")
End Using
End Sub
Some operations are difficult or even impossible to obtain with an expression, or the operation could become too complex to achieve. The alternative is to create a function that would take care of performing the operation and supplying the result to the table. Of course, as you may know already, a function is its own object. This means that, after creating it, to use its result in a table, you must call it. For example, you can create a function that returns a value, then call that function and assign its returned value to a column. You can create your own function and use it, or you can use one of the built-in functions of Transact-SQL.
In order to involve a function with your data entry, you must have one. You can create your own function using the techniques we learned already. To make the function easily accessible, you should create it as part of the database that would use it. Here is an example: -- =============================================
-- Author: FunctionX
-- Create date: Saturday 22 December 2007
-- Description: Used to calculate the greatest common divisor
-- =============================================
CREATE FUNCTION GCD
(
@a int, @b int
)
RETURNS int
AS
BEGIN
DECLARE @Remainder int;
WHILE @b <> 0
BEGIN
SET @Remainder = @a % @b;
SET @a = @b;
SET @b = @Remainder;
END
RETURN @a
END
When calling the function, follow the normal rules. Here are examples: INSERT INTO Calculations VALUES(345, 135, dbo.GCD(345, 135)); GO INSERT INTO Calculations VALUES(40, 6, dbo.GCD(40, 6)); GO INSERT INTO Calculations VALUES(16, 28, dbo.GCD(16, 28)); GO
You can use one of the built-in functions of Transact-SQL. Probably the best way to be familiar with the built-in functions is to check the online documentation to find out if the assignment you want to perform is already created. Using a built-in functions would spare you the trouble of creating your own function. For example, imagine you have a database named AutoRepairShop and imagine it has a table used to create repair orders for customers: CREATE TABLE RepairOrders ( RepairID int Identity(1,1) NOT NULL, CustomerName nvarchar(50), CustomerPhone nvarchar(20), RepairDate DateTime ); GO When performing data entry for this table, you can let the user enter the customer name and phone number. On the other hand, you can assist the user by programmatically entering the current date. To do this, you would call the GETDATE() function. Here are examples: INSERT INTO RepairOrders(CustomerName, CustomerPhone, RepairDate)
VALUES('Annette Berceau', '301-988-4615', GETDATE());
GO
INSERT INTO RepairOrders(CustomerPhone, CustomerName, RepairDate)
VALUES('(240) 601-3795', 'Paulino Santiago', GETDATE());
GO
INSERT INTO RepairOrders(CustomerName, RepairDate, CustomerPhone)
VALUES('Alicia Katts', GETDATE(), '(301) 527-3095');
GO
INSERT INTO RepairOrders(RepairDate, CustomerPhone, CustomerName)
VALUES(GETDATE(), '703-927-4002', 'Bertrand Nguyen');
GO
You can also involve the function in an operation, then use the result as the value to assign to a field. You can also call a function that takes one or more arguments; make sure you respect the rules of passing an argument to a function when calling it. If none of the Transact-SQL built-in functions satisfies your requirements, you can create your own.
When performing data entry, in some columns, even after indicating the types of values you expect the user to provide for a certain column, you may want to restrict a range of values that are allowed. To assist you with checking whether a newly entered value fits the desired range, Transact-SQL provides what is referred to as a check constraint. A check constraint is a Boolean operation performed by the SQL interpreter. The interpreter examines a value that has just been provided for a column. If the value is appropriate:
If the value is not appropriate:
You create a check constraint at the time you are creating a table.
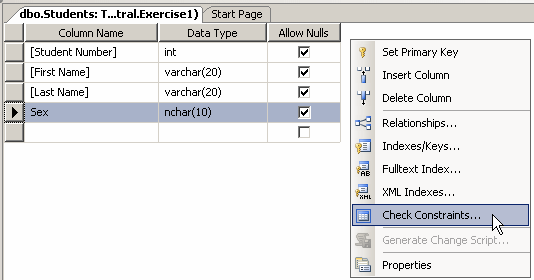
To create a check constraint, when creating a table, right-click anywhere in (even outside) the table and click Check Constraints...
This would open the Check Constraints dialog box. From that window, you can click Add. Because a constraint is an object, you must name it. The most important piece of information that a check constraint should hold is the mechanism it would use to check its values. This is provided as an expression. Therefore, to create a constraint, you can click Expression and click its ellipsis button. This would open the Check Constraint Expression dialog box. To create the expression, first type the name of the column on which the constraint will apply, followed by parentheses. In the parentheses, use the arithmetic and/or SQL operators we studied already. Here is an example that will check that a new value specified for the Student Number is greater than 1000:
After creating the expression, you can click OK. If the expression is invalid, you would receive an error and given the opportunity to correct it. You can create as many check constraints as you judge necessary for your table:
After creating the check constraints, you can click Close.
To create a check constraint in SQL, first create the column on which the constraint will apply. Before the closing parenthesis of the table definition, use the following formula: CONSTRAINT name CHECK (expression) The CONSTRAINT and the CHECK keywords are required. As an object, make sure you provide a name for it. Inside the parentheses that follow the CHECK operator, enter the expression that will be applied. Here is an example that will make sure that the hourly salary specified for an employee is greater than 12.50: Imports System.Data.SqlClient
Public Class Exercise
Private Sub Exercise_Load(ByVal sender As Object, _
ByVal e As System.EventArgs) _
Handles Me.Load
Using Connect As SqlConnection = _
New SqlConnection("Data Source=(local);" & _
"Database='Exercise';" & _
"Integrated Security=yes;")
Dim Command As SqlCommand = _
New SqlCommand("DROP TABLE Employees;" & _
"CREATE TABLE Employees " & _
"( " & _
"[Employee Number] nchar(7), " & _
"[Full Name] nvarchar(80), " & _
"[Hourly Salary] smallmoney, " & _
"CONSTRAINT CK_HourlySalary CHECK ([Hourly Salary] > 12.50) " & _
");", _
Connect)
Connect.Open()
Command.ExecuteNonQuery()
MsgBox("A new table named Employees has been created")
End Using
End Sub
End Class
It is important to understand that a check constraint is neither an expression nor a function. A check constraint contains an expression and may contain a function as part of its definition. After creating the constraint(s) for a table, in the Object Explorer of the Microsoft SQL Server Management Studio, inside the table's node, there is a node named Constraints and, if you expand it, you would see the name of the constraint.
With the constraint(s) in place, during data entry, if the user (or your code) provides an invalid value, an error would display. Here is an example:
Instead of an expression that uses only the regular operators, you can use a function to assist in the checking process. You can create and use your own function or you can use one of the built-in Transact-SQL functions.
This property allows you to specify that a column with the Identity property set to Yes is used as a ROWGUID column.
Another technique used to get data into one or more tables consists of importing already existing data from another database or from any other recognizable data file. Microsoft SQL Server provides various techniques and means of importing data. One of the easiest types of data that can be imported into SQL Server, and which is available on almost all database environments, is the text file. Almost every database environment allows you to import a text file but data from that file must be formatted appropriately. For example, the information stored in the file must define the columns as distinguishable by a character that serves as a separator. This separator can be the single-quote, the double-quote, the comma, or any valid character. Data between the quotes is considered as belonging to a distinct field. The last piece of information the file must provide is to distinguish each record from another. This is easily taken car of by the end of line of a record. This is also recognized as the carriage return.These directives can help you manually create a text file that can be imported into Microsoft SQL Server. In practicality, if you want to import data that resides on another database, you can ask that application to create the source of data. Most applications can do that and format the data. To import data a data file (Students) to Microsoft SQL Server Management Studio:
After importing data, you should verify and possibly format it to customize its fields. To do this, in the Object Explorer, you can expand the database in which you imported the list and expand its Tables nodes. Right-click the new table and click Design. Click each field under Column Name and change its properties appropriately. Here is an example:
After customizing the columns, make sure you save the table. You may receive a dialog box filled with warnings:
After reading the text in the Validation Warnings dialog box, click Yes. |
|
|
||
| Home | Copyright © 2008-2016, FunctionX, Inc. | |
|
|
||