 |
Introduction to Forms and Reports |
Forms Fundamentals
Introduction to Forms
Besides tables, data is presented in friendlier objects named forms. When it comes to data of a database, there are two broad types of forms: forms used to display the records of a table and independent forms that are not tied to any table.
As mentioned in Lesson 6, the most fundamental class for Windows control is named Control. This class lays a foundation for all types of visible objects that allow a user to interact with a database. Such objects include the form. Other classes are created from the Control class. An example of those objects is the form. From now on to the rest of our lessons, the word control will include any object the user uses on the database.
To support forms, the Microsoft Access library provides a class named Form.
 Practical
Learning: Introducing Forms
- Start Microsoft Accecss
- In the list of files, click Exercise3 from the previous lesson
To create a form, on the Ribbon, click Create and, in the Forms section, click one of the buttons:

![]() Practical
Learning: Creating a Form
Practical
Learning: Creating a Form
- On the Ribbon, click Create
- In the Forms section, click Form Design
Programmatically Creating a Form
To help you programmatically create a form, the Application class is equipped with a method named CreateForm. The syntax of this method is:
CreateForm([database[, formtemplate]])
This method takes two arguments and both are optional. The first argument is the name of the database that will receive the form. If the form will be added to the current database, omit this argument. The second argument is the name of an existing form that you want to use as template. If you want to specify this argument, you must provide the name of a form. Otherwise, you can omit it. Here is an example of creating a form:
Private Sub cmdCreateForm_Click()
    Dim frmEmployees As Form

    Set frmEmployees = CreateForm
End Sub
After this method has been called, a form is created but it is minimized.
Unrelated Forms
Although most of the forms you will use in a database are meant to display data from a table, you can create an independent form whose functionality and behavior do not depend on the data from a database. To create a data-unrelated form, on the Ribbon, click Create and, in the Forms section, click Blank Form.
Before creating a form, you must decide where data would come from. If the data of a form will be based on a table, you can specify it. To easily create a form that would display data, in the Navigation Pane, select the table. On the Ribbon, click Create. In the Forms section, click Form.
The Name of a Form
A form must have a name. You can name it when saving or after creating it. To save and name a form:
- Right-click the form's tab or title bar and click Save
- Close the form. You would be prompted to save it
If the form was not saved previously, you would be prompted to give it a name. If a form is based on a table, it may be a good idea to give the same name as the table.
![]() Practical Learning: Introducing
Forms
Practical Learning: Introducing
Forms
- In the top-left section of Microsoft Access, click the Save button

- In the Save As dialog box, replace the suggested name with Employees
- Click OK
The Form Wizard
The Form Wizard provides an easy and fast means of creating a form. To launch the Form Wizard, on the Ribbon, click Create. In the Forms section, click Form Wizard.
Referring to a Form
To refer to a form in your code, if its name is in one word, you can just type it. If the name is in more than one word, you must include it between square brackets, [ and ]. Even if the name is in one word, just to be safe, you can include it between square brackets
Objects in the Navigation Pane
Introduction
The Navigation Pane is the window that displays the list of objects of a database. The top section of the Navigation Pane displays an All Access Objects caption:
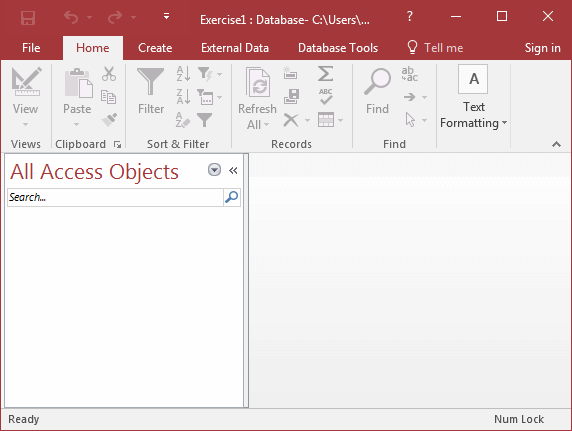
When you create an object such as a table, it gets added to the Navigation Pane.
Managing a Category
When you create the objects, they are added to the Navigation Pane in the order you add them. If you want to display in reverse alphabetical order, right-click the name of a section, position the mouse on Sort By, and decide:
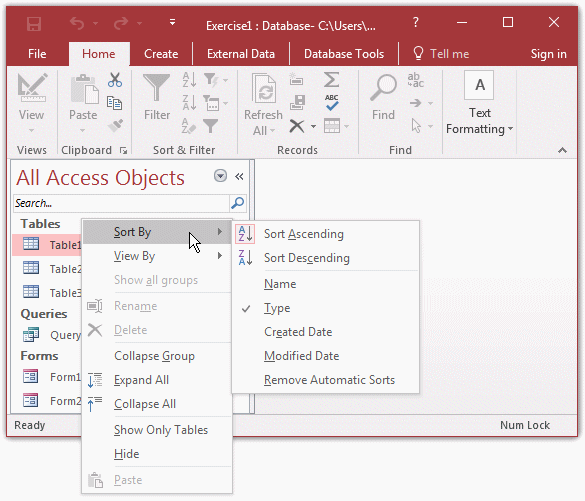
Managing the Categories in the Navigation Pane
If you want to expand all categories at once, right-click any section header and click Expand All. In the same way, if you want to collapse all categories, right-click any section header and click Collapse All.
In the Navigation Pane, you can show the tables only, the forms only, or all objects. One way you can decide is to right-click an empty area of the Navigation Pane and click Navigation Options. This would open the Navigation Options dialog box:

To decide what categories to show or hide, put or remove check marks next to their name in the right list. The dialog box also allows you to create new categories.
Introduction to Form Maintenance
Referring to a Form
To refer to a form in your code, you can use the Me keyword.
The Collection of Forms of the Current Database
After creating a database, or while working on one, all of the forms that belong to the database are stored in a collection named AllForms. The AllForms collection is equipped with the Count property and the methods we reviewed for the Collection class. Each form can be located by its name or its index, using the Item() property.
In Microsoft Access, a form that is opened in a database is a member of the Forms collection. To refer to an open form in your code, type the Forms collection, followed by an exclamation point !, followed by the name of the form. Here is an example that refers to a form named Students:
Forms!Students
You can also include the name of the form between an opening square bracket and a closing square bracket. Here is an example:
Forms![Students]
If the name is in one word, the square brackets are optional. If the name is made of more than one word, the square brackets become required. Here is an example that refers to a form named Potential Applicants:
Forms![Potential Applicants]
If you omit the square brackets in this case, the expression or the code may not work.
A form can also be referred to by an index in the Forms collection. The first form of the collection has an index of 0 and can be accessed with Forms(0). The second form in the collection has an index of 1 and can be referred to by Forms(1), and so on. The name of the form can also be used as index. For example, a form named Students can be referred to as Forms("Students").
Selecting a Form
Some operations to perform on a form require that you select the form first. If a form is opened on the screen, it may not have focus or it may not be activated. To select a form, if the database is configured to display overlapped windows, you can click its title bar or any section of its body. If a form is closed, to visually select it, in the Navigation Pane, click the form to select it. The name of the form would become highlighted, indicating that it is selected.
To let you programmatically select a form, the DoCmd object is equipped with a method named SelectObject. The syntax to use is:
DoCmd.SelectObject acForm, [object-name][, indatabasewindow]
The first argument must be acForm to indicate that you are selecting a form. The second argument is the name of the form to select. If you only want to highlight the form in the Navigation Pane, then pass the third argument as True.
Here is an example that selects a form named Teachers to highlight it in the Navigation Pane:
Private Sub cmdSelect_Click()
    DoCmd.SelectObject acForm, "Teachers", True
End Sub
If the form is already displaying, it may be in the background. If there is no form by the name you specified in the second argument, you would receive a 2544 error:
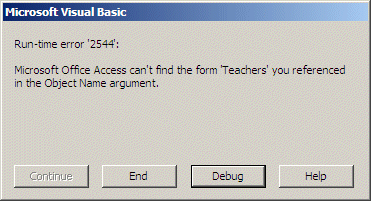
If you omit the third argument or pass it as False, the form would be displayed in the foreground. If the form is not opened and you omit the third argument or pass it as False, you would receive a 2489 error:

If you create a new form, it automatically receives a temporary name but you must save it to have an actual name for the form. Once a form exists, if you want, you can change its name. In order to rename a form, it must be closed. To visually rename a form, in the Navigation Pane, right-click its name and click Rename. Type the desired name and click OK or press Enter.
To let you programmatically rename a form, the DoCmd object is equipped with a method named Rename. The syntax to use is:
DoCmd.Rename(NewName, ObjectType, OldName)
The first argument is the new name the form will have. Normally, only the first argument is required. If you call this method using only the first argument and if you call this argument from a form, the form you are using would be renamed. But, based on the rules of the Microsoft Windows operating system, you cannot rename a form that is currently opened. Consequently, if you call this method from a form and provide only the first argument, you would receive a 2009 error:
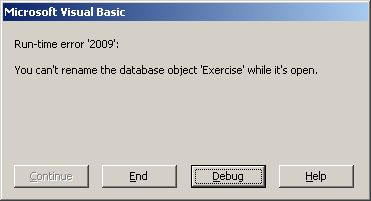
This means that you should always pass the first argument.
The second argument is a member of the AcObjectType enumeration. For a form, this member must be acForm. The third argument is the name of the existing form you want to rename. Here is an example:
Private Sub cmdRename_Click()
    DoCmd.Rename "Children", AcObjectType.acForm, "Pupils"
End Sub
Instead of renaming a form, you can make a copy of it and keep the original. To visually copy an existing form, in the Navigation Pane, right-click the form and click Copy. Then right-click an area of the Navigation Pane and click Paste. This would open the Paste Table As dialog box in which you can enter the new name of the copied object.
To let you programmatically copy a form, the DoCmd object is equipped with a method named CopyObject. Its syntax is:
DoCmd.CopyObject [destinationdatabase][, newname], ObjectType, sourceobjectname]
The destinationdatabase argument is the name or path of the database where the copied form would be sent to. If you are copying the form in the same database, you can omit this argument. The newname argument is the name you want the new form to hold. The third argument must be acForm. The last argument is the name of the existing form.
Opening a Form
The Form View is the view used for normal user-based operations on a database. In Lesson 1, we saw how to open a form in Form View.
To let you programmatically open a form, the DoCmd object provides a method named OpenForm. Its syntax is:
DoCmd.OpenForm FormName As Variant,
               Optional view As AcFormView][,
               Optional FilterName As String,
               Optional WhereCondition As String,
               Optional datamode As AcFormOpenDataMode,
               Optional WindowMode As AcWindowMode,
               Optional OpenArgs As String
The first argument, the only one required, is the name of the form you want to open. Here is an example:
Private Sub cmdOpenForm_Click()
    DoCmd.OpenForm "Employees"
End Sub
If you want to use it, the second argument is a member of the acFormView enumeration. Its value can be one of the following:
| acFormView Member | Value | Result |
| acNormal | 0 | The form will display in Form View |
| acDesign | 1 | The form will display in Design View |
| acPreview | 2 | The form will display in Print Preview |
| acFormDS | 3 | The form will display like a table in Datasheet View |
| acFormPivotTable | 4 | The form will display as a pivot table |
| acFormPivotChart | 5 | The form will display as a pivot chart |
| acLayout | 6 | The form will display in Layout View |
If you omit the second argument, the acNormal option applies. Here is an example:
Private Sub cmdOpenForm_Click()
    DoCmd.OpenForm "Employees", AcFormView.acNormal
End Sub
When this code executes, a form named Employees would be opened in the Form View.
The Opening Argument of a Form
When you open a form using the OpenForm method of the DoCmd object, the form is equipped with an argument named OpenArgs, which is of type Variant. The OpenArgs argument is typically used to carry a string from the object or action that is opening the form, to the form that is being opened.
To visually delete a form, in the Navigation Pane, right-click it and click Delete. To let you programmatically delete a form, the DoCmd object is equipped with a method named DeleteObject. Its syntax is:
DoCmd.DeleteObject ObjectType, [object-name]
The ObjectType argument is a member of the AcObjectType enumeration. For a form, it would be acForm. Since the second argument is optional, you can call this method as follows:
Private Sub cmdDelete_Click()
    DoCmd.DeleteObject AcObjectType.acForm
End Sub
You can omit AcObjectType. When this method is called, the form that is selected in the Navigation Pane would be deleted. As mentioned already, the second argument is optional. If you want to use it, pass the name of the form to be deleted. Here is an example:
Private Sub cmdDelete_Click()
    DoCmd.DeleteObject AcObjectType.acForm, "Customers"
End Sub
When you call this method and pass the second argument, if no form is selected in the Navigation Pane and if you omit the second argument, you would receive a 2493 error stating that the action requires a form name:

If you decide to pass the second argument but provide a name for a form that cannot be found in the Navigation Pane, you would receive a 7874 error:

This means that, either you select a form prior to calling this method, or you pass the name of the form to delete as the second argument.
Form Design Fundamentals
The design of a form is done by displaying the object in Design View. To present a form in Design View:
- If the form is currently closed, in the Navigation Pane, right-click the form and click Design View
- If the form is currently opened:
- In the Navigation Pane, right-click the form and click Design View
- Right-click its title bar or tab and click Design View
- Right-click it (somewhere on its body) and click Design View
- On the Ribbon, click Home. In the Views section, click the arrow
button under
View and click Design View

- On the right side of the status bar, click the Design View button

On the other hand, if the form is currently displaying in Design View and you want to switch it to Form View:
- In the Navigation Pane:
- Double-click the name of the same form
- Right-click the name of the same form and click Open
- On the Ribbon, click either Design or Home, in the Views section:
- Click the View button
- Click the down-pointing button under View and click Form View

Overview of Properties
Since a normal class is equipped with properties that describe and characterize it, a form has properties. Microsoft Access, Microsoft Visual Basic, and the VBA language provide various tools and means to help you manage the forms of a database and their properties.
To assist you in visually configuring a form, that is, to help you visually set or change the characteristics of a form, both Microsoft Access and Microsoft Visual Basic provide a special window you can use to configure the desired behaviors. In Microsoft Access, the window is called the Property Sheet. In Microsoft Visual Basic, the object is the Properties window.
The Property Sheet
In Microsoft Access, to get the Property Sheet of the properties associated with a form or report, first display the form or report in Design View. then:
- Right-click the button in the top-left section under the tab or the title
bar
 and click Properties
 - Double-click the button in the top-left section under the tab or
the title bar

- In the Tools section of the Design tab of the Ribbon, click the Property sheet
button

Any of these actions would display the Property Sheet for the form (or report):

There are various ways you can close or hide the Property Sheet:
- In the Tools section of the Design tab of the Ribbon, when the Property Sheet button is
highlighted
 , this means that
the Property Sheet is currently displaying. To close or hide it, you can
click the same button and it looses its highlighting

- As a regular window, you can click its close button

![]() Practical Learning: Accessing the Properties Window
Practical Learning: Accessing the Properties Window
- Double-click the button at the intersection of the rulers
 and notice the Property Sheet
The Properties Window
In the Microsoft Visual Basic environment, the Properties window displays the characteristics of the form selected in the Project window, that is, the form whose module is opened in the Code Editor. Therefore, to display the properties of a form or report and the controls positioned on it, click it in the Project window.
Since the Project window and the Properties Window usually share the same section of the interface (it is better that way), you can shrink one and heighten the other. To do that, position the mouse on the gray bar between both windows. When the mouse pointer turns into a short line with double arrows, click and drag.
To specify the object whose properties you want to access, click the arrow in the top section of the Properties window and select the control.
![]() Practical Learning: Accessing the Properties Window
Practical Learning: Accessing the Properties Window
- In the Design tab of the Ribon, in the Tools section, click the View Code
button

Characteristics of the Property Sheet and the Properties Windows
Introduction
Both the Microsoft Access Property Sheet and the Microsoft Visual Basic Properties window share some characteristics but also have differences. For example, selections are made the same way. On the other hand, the fields are not displayed the same. Also, a change in the Property Sheet can be seen immediately but to see a change made in the Properties window, you must return to Microsoft Access.
If you are using at least two monitors connected to your computer while you are developing your databases, you can display Microsoft Access in one monitor and Microsoft Visual Basic in the other or another monitor. This also allows you to see both the Property Sheet and the Properties window at the same time and be able to simultaneously see or coordinate the changes on the forms/reports or their controls.
Selecting a Form
To visually select a form whose properties you want to access:
- If you are working in Microsoft Access, click the form or the report
- In both the Property Sheet or the Properties window, click the arrow of the top combo box to display the list of controls and select the form by name
The Property Sheet window is made of five property pages or tabs: Format, Data, Event, Other, and All.
The Properties window is made of two property pages or tabs. The Alphabetic tab displays the properties by word. In the Categories tab, the properties are arranged by groups of roles.
Each window is made of two sections divided by a vertical line. To resize the sections, position the mouse on their dividing line and drag left or right:
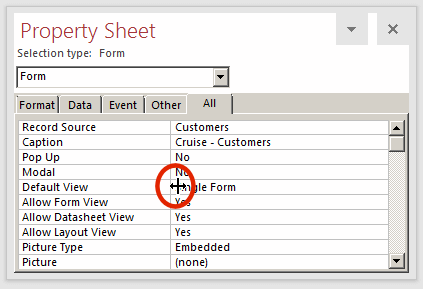
The Name of a Property
The name of a property specifies what it is used for. Each field in the Property Sheet or the Properties window displays its name on the left side:

In the Property Sheet, the names of some properties are made of more than one word. In reality, and behind the scenes, that is, in the classes of the objects, the names of properties are in one word. That is also how the names of properties appear in the Properties window:
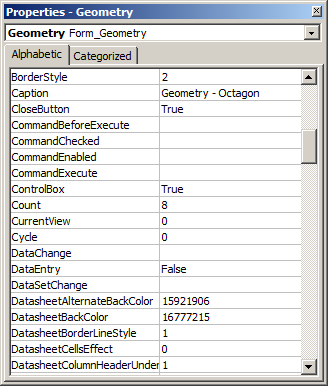
As a result, in your code, use the one-word name of the property in your code.
The Value of a Property
The value of a property defines the role of that property on the object on which it applies. In both the Property Sheet and the Properties window, the value of a property displays on the right side of its name:
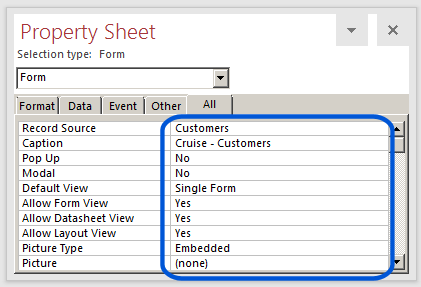
Types of Properties
Text-Based Properties
A text-based property is one for which you can type text as its value. Here is an example:

![]() Practical
Learning: Accessing a Text-Based Property
Practical
Learning: Accessing a Text-Based Property
- Scroll down in the list of properties. Click Caption and type Watts' A Loan - Employees Records
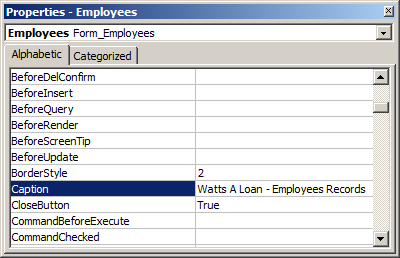
- Return to Microsoft Access and switch the form to Form View. Notice the caption on the tab
- Right-click the tab and click Design View
- Return to Microsoft Visual Basic
Number-Based Properties
A property is numeric if it must hold an integral or decimal value. Here is an example:

If the value is a natural number, you can just type its digits with no special character. If the value is a fractional number, it can include a decimal and a fractional part, both separated by a period. Here are examples:

To specify a numeric value of a property in the Property Sheet or the Properties window, you can type the value as you know it. An example would be 2. Another example would be 4.50. Behind the scenes, Microsoft Access (actually the database engine) uses another technique to determine these types of measure.
A twentieth of an imperial point, abbreviated twip (derived from TWentieth of an Imperial Point) represents the 1/20 of a typographical point. Since you are probably more familiar with the inch system, a twip represents 1/1440 inch. Therefore, in many examples that follow, you may see higher numbers than those specified in the Properties window, simply remember that the Visual Basic language (the compiler in the Microsoft Visual Basic environment used in Microsoft Access) uses the twip system for the measures.
To programmatically specify the value, access the object's property and assign the desired value Here is an example:
Private Sub cmdChangeHeight_Click()
    Detail.Height = 1450
End Sub
![]() Practical Learning: Accessing
Numeric Properties
Practical Learning: Accessing
Numeric Properties
- In the top combo box of the Properties window, select Detail Section
- In the Alphabetic list, click BackColor and type 240858
- Return to Microsoft Access and switch the form to Form View. Notice the color that paints the form
- Right-click the tab and click Design View
- Return to Microsoft Visual Basic and, in the top combo box of the Properties window, select Employees Form_Employees
Expressions-Based Properties
Some text-based properties can use or require a combination of specific characters and digits.
Boolean Properties
A property is referred to as Boolean if it can have only one of two specific values. In the Property Sheet, Boolean fields display a Yes or a No value. Here are examples:

In the Properties window, Boolean fields display their values as True or False. Here are examples:
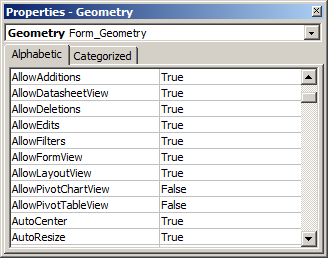
To change the value of a Boolean property:
- Click the property name to display its combo box, then click the arrow of the combo box and select the desired value
- Double-click the property name or its value
- Click the property name, type T of F for the desired value
To programmatically specify or change a Boolean property, access it by its name and assign True or False to it. Here is an example:
Private Sub cmdHideRecordSelector_Click()
    RecordSelectors = False
End Sub
![]() Practical Learning: Accessing Boolean Properties
Practical Learning: Accessing Boolean Properties
- Click AutoCenter, then click the arrow of its combo box and select True
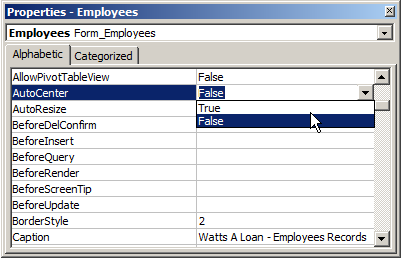
- Return to Microsoft Access and switch the form to Form View
- Right-click the tab and click Design View
Enumerated Properties
A enumerated property presents a list of options as the members of its enumeration. In the Property Sheet, the values of the property appear in one or more words in plain English. In the Properties window, the values of the property appear as the integral values specified in the VBA code used to create the enumeration.
In the Property Sheet, to specify or change the value of an enumerated property:
- Click the property name to reveal its combo box, click the arrow of the combo box and select the desired value from the list

- Double-click either the property name or the property value
In the Properties window, to specify or change the value of an enumerated property, type the integral value of the member of the enumeration.
To programmatically specify or change the value of an enumerated property, assign the appropriate constant integer to the property. Here is an example:
Private Sub cmdAction_Click()
    txtFullName.FontWeight = 600
End Sub
Action-Based Properties
An action-based property requires an expression or a value. If you know the value, in most cases, you can just type it. Otherwise, these fields display an ellipsis button:

When you click the ellipsis button
![]() , a dialog box or a window
may come up.
, a dialog box or a window
may come up.
Programmatically changing the value of an action field depends on the type of property. If the property requires a file, you can assign the name and/path of the file to the property. Here is an example:
Private Sub cmdAction_Click()
    Picture = "C:\My Documents\My Pictures\business.gif"
End Sub
In some other cases, you may have to provide more values than that.
In the Property Sheet and the Properties window, some fields appear empty. The values of most of those properties depend on other characteristics of an object.
Introduction to the Events of a Control
Overview
An event is an action that occurs on a form, a report, or a control. Examples of actions include clicking a control, typing text, or moving the mouse. The forms, the reports, and the Windows controls support various types of events.
Firing an Event
When an action occurs, the control is said to fire the event.
Accessing an Event
To access an event:
- Display the Property Sheet of the object. In the Event or the All tab, you should see the list of events
- In the Properties window, you can see the list of events in the middle-bottom section
You can then locate the event whose behavior you want to implement. You have various options. In the Property Sheet, the names of events are in two or more words. In the Properties window, the names of events are in one word.
In Microsoft Access, if you see the event you want in the Property Sheet:
- Double-click it. It would then display [Event Procedure]
- Click the arrow of the field and select [Event Procedure]
- Click the ellipsis button
 of the field. This would display the Choose Builder dialog box. Either click Code Builder and click OK or double-click Code Builder
In Microsoft Visual Basic, first select the control in the Object combo box. Then, in the Procedure combo box, select the event you want.
![]() Practical Learning:
Ending the Lesson
Practical Learning:
Ending the Lesson
- Close Microsoft Access
- When asked whether you want to save, click No
|
|
||
| Previous | Copyright © 2000-2022, FunctionX, Inc. | Next |
|
|
||