|
The tables, queries, and forms provide a fast means of
printing records without having to do any particular design. Instead of directly
sending a document to a printing, you can choose what records to print. To do
this, you must first open the table, query, or form.
To print a particular record, if you are using a table or a
query, click any cell in that record. To print a record from a table, first
navigate to that record. In both cases, on the main menu, click File ->
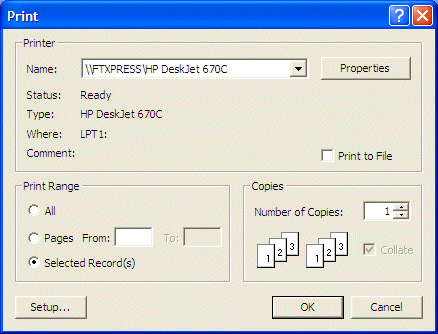
Print... This would display the Print dialog box. From it, you can click the
Selected Record(s) radio button:

To print more than one record, first select them and then
proceed in the same way.
While the table, the query, and the form provide a fast
means of printing, their result may not be particularly appealing. The most convenient object
to print from a database is a report. A report is an object in its own right. It
is created and saved like one of the objects we have saved so far. Like the
other Microsoft Access objects, which excludes views and stored procedures, the reports
have their own section in the Database window, and it is labeled Reports.
Like a table or a form, there are various ways you create a
report. From the main menu, you can click Insert -> Report. From the Reports
section of the Database window, you can click the New button or, on the Database
toolbar, you can click the arrow of the New Object button and click Report. Any
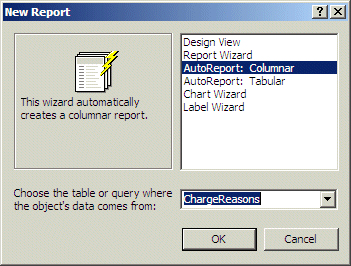
of these actions would display the New Report dialog box:

You can create a report that would be used to print simple
text that is not related to any data source. To create such a report, when in
the New Report dialog box, you can click Design View, make sure the combo box is
empty, and click OK. Otherwise, the New Report displays the same options as the
New Form dialog box.
After creating a report, as we will see in the next few
sections, to keep it in your database, you must save it by giving it a name. The
name of a report follows the rules and suggestions we have applied to tables,
queries, and forms so far.
|
 Practical
Learning: Using Different Options to Create Reports Practical
Learning: Using Different Options to Create Reports
|
|
- Start Microsoft Access.
Create a blank database and name it Yugo
National Bank
- In the Tables section of the Database window, Click the New button
- In the New Table dialog box, double-click Table Wizard
- In the first page of the wizard, click Personal
- In the Sample Fields list, double-click AccountTypeID, AccountType,
and Description
- Click Next
- In the second page of the wizard, change the name of the table to AccountTypes and
click Next
- Click Finish
- Enter a few records as follows:
| Account Type ID |
Account Type |
Description |
| 1 |
Checking |
|
| 2 |
Saving |
|
| 3 |
Certificate of Deposit |
|
- Close the table and, in the Tables section of the Database window,
click AccountTypes to make sure it is selected
- On the Database toolbar, click the arrow of the New Object button and
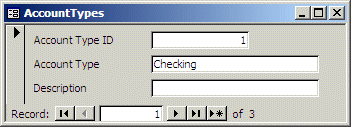
click AutoForm

- Close the new form
- When asked whether you want to save it, click Yes
- Accept the suggested name of the form as AccountTypes and click OK
- In the Database window, click AccountTypes to make sure it is selected.
To create a new report, on the Database toolbar, click the arrow of the New
Object button and click AutoReport
- After viewing it, close the report
- When asked whether you want to save the report, click Yes and click OK to
accept the suggested name of the report
- In the Tables section of the Database window, Click the New button
- In the New Table dialog box, double-click Table Wizard
- In the first page of the wizard, click Personal
- In the Sample Fields list, double-click AccountTypeID, AccountType,
and Notes
- In the Fields In My New Table list, click AccountTypeID and click Rename
Field
- Type DepositTypeID and click OK
- In the Fields In My New Table list, click AccountType and click Rename
Field
- Type DepositType and click OK
- In the Fields In My New Table list, click Notes and click Rename Field
- Type Description and click OK
- Click Next
- In the second page of the wizard, change the name of the table to DepositTypes and
click Finish
- Switch the table to Design View
- Change the captions of the DespositTypeID and DepositType to Deposit Type
ID and Deposit Type respectively
- Close the table and, when asked whether you want to save it, click Yes
- To create a new form, on the main menu, click Insert -> Form
- In the New Table dialog box, click Form Wizard
- In the combo box, select DepositTypes and click OK
- In the first page of the wizard, click the button that selects all records
 and click Next and click Next
- In the second page of the wizard, accept the Columnar option and click
Next
- In the third page of the wizard, accept the Standard option and click Next
- In the fourth page, accept the suggested name of the form as DepositTypes
and click Finish
- Enter a few records as follows:
| Deposit Type ID |
Deposit Type |
Description |
| 1 |
Cash |
|
| 2 |
ATM |
Deposit made at the Automated Teller Machine |
| 3 |
Personal Check |
Check written by the customer or written to the
customer |
| 4 |
Business Check |
Examples include payroll |
| 5 |
Direct Deposit |
From the customer's employer or a customer's customer |
| 6 |
Transfer |
Money transferred to this account from another account |
| 7 |
New Account |
|
- Close the form
- To create a new report, on the main menu, click Insert -> Report
- In the New Report dialog box, click Report Wizard
- In the combo box, select DepositTypes and click OK
- In the first page of the wizard, click the button that selects all records
 and click Next and click Next
- In the second page, make sure no grouping is selected and click Next
- In the third page, click make sure the combo boxes are empty and click
Next
- In the fourth page, click Columnar and click Next
- In the fifth page of the wizard, click Formal and click Next
- Accept the name of the report as AccountTypes and click Finish
- After viewing the report, close it
- While the Tables section of the Database window is displaying,
right-click AccountTypes and click Save As...
-
Set the name of the table to ChargeReasons and click OK
- Right-click ChargeReasons and click Design
View
- Rename the fields as follows:
| Old Name |
New Name |
New Property |
| AccountTypeID |
ChargeReasonID |
Caption: Charge Reason ID |
| AccountType |
ChargeReason |
Caption: Charge Reason |
| Description |
|
Data Type: Memo |
- Close the table
- When asked whether you want to save it, click Yes
- To create a new form, on the main menu, click Insert -> Form
- In the New Form dialog box, click AutoForm: Columnar and, in the
combo box, select ChargeReasons
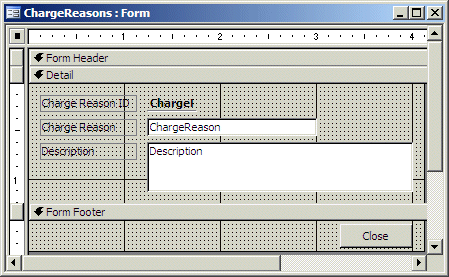
- Click OK and adjust the design of the form as you see fit. Here is an
example:

- On the Form View toolbar, click the Save button
- Accept the suggested name of the form and click OK
- change the values of the records as follows
| Charge Reason ID |
Charge Reason |
Description |
| 1 |
Monthly Charge |
Applied every month to all accounts |
| 2 |
Overdraft |
Applied if a customer's account remains negative
for 72 hours |
| 3 |
Miscellaneous Charge |
This charge could be applied for any reason the management judges necessary. If/When applied, an application should be noted and the customer must be notified. |
- Close the form
- To create a new report, on the main menu, click Insert -> Report
- In the New Report dialog box, click AutoReport: Columnar

- In the combo box, select ChargeReasons and click OK
- Close the Report
- When asked whether you want to save it, click Yes
- Accept the suggested name of the report and click OK
- Close the report
|
Programmatically Creating a Report |
|
To programmatically create a report, you can call the CreateReport()
method of the Application object. The syntax of this method is:
CreateReport([database[, reporttemplate]])
Both arguments of this method are optional. Here is an
example of calling it:
Private Sub cmdReport_Click()
    Dim rptMaintenance As Report

    Set rptMaintenance = CreateReport
End Sub
If you call the method like this, it generates a temporary
report named Report1 but it doesn't save it. After the report has been
generated, it appears in Microsoft Access. If you want to keep it, you can save
it. If fact, if you try closing it, you would be asked whether you want to save
it. If yes, you would be asked to give it a name.
The first argument of this method is the name of the
database that will receive the report. If the report will be added to the current
database, you can omit this argument. The second argument is the name of an
existing report that you want to use as template. If you specify this argument,
you must make sure that you provide the name of a report. Otherwise, you can omit
it.
|
|

